2014 BMW 328I XDRIVE SPORTS WAGON lock
[x] Cancel search: lockPage 146 of 244
Air flow, air distribution, and temperature are
controlled automatically.
Depending on the selected temperature,
AUTO intensity program and outside influen‐
ces, the air is directed to the windshield, side
windows, upper body, and into the footwell.
The cooling function, refer to page 146, is
switched on automatically with the AUTO pro‐
gram.
At the same time, a condensation sensor con‐
trols the program so as to prevent window
condensation as much as possible.
Intensity of the AUTO program
With the AUTO program switched on, auto‐
matic control of the air flow and air distribution
can be adjusted.
Press the left or right side of the but‐
ton: decrease or increase the inten‐
sity.
The selected intensity is shown on the display
of the automatic climate control.
Maximum cooling Press the button.
The system is set to the lowest tem‐
perature, maximum air flow and air circulation
mode.
Air flows out of the vents for the upper body
region. The vents need to be open for this.
The function is available above an external
temperature of approx. 32 ℉/0 ℃ and with the
engine running.
The air flow can be adjusted when the program
is active.
Cooling function
The passenger compartment can only be
cooled with the engine running.
Press the button.The air is cooled and dehumidified and, de‐
pending on the temperature setting, warmed
again.
Depending on the weather, the windshield may
fog up briefly when the engine is started.
The cooling function is switched on automati‐
cally with the AUTO program.
When using the automatic climate control,
condensation water, refer to page 170, devel‐
ops that exits underneath the vehicle.
Automatic recirculated-air control/
recirculated-air mode
You can respond to unpleasant odors or pollu‐
tants in the immediate environment by tempo‐
rarily suspending the supply of outside air. The
system then recirculates the air currently
within the vehicle.
Press the button repeatedly to select
an operating mode:▷LEDs off: outside air flows in continuously.▷Left LED on, automatic recirculated-air
control: a sensor detects pollutants in the
outside air and controls the shutoff auto‐
matically.▷Right LED on, recirculated-air mode: the
supply of outside air into the vehicle is per‐
manently blocked.
Recirculated air mode switches off automati‐
cally at low external temperatures after a cer‐
tain amount of time in order to window fog‐
ging.
If the windows are fogged over, switch off the
recirculated-air mode and press the AUTO
button to utilize the condensation sensor.
Make sure that air can flow onto the wind‐
shield.
Continuous recirculated-air mode
The recirculated-air mode should not be
used for an extended period of time, as the air
quality inside the vehicle deteriorates stead‐
ily.◀
Seite 146ControlsClimate control146
Online Edition for Part no. 01 40 2 925 793 - II/14
Page 156 of 244
Before closing the rear window or tailgate,
push the cargo cover down until it locks into
place.
Removing
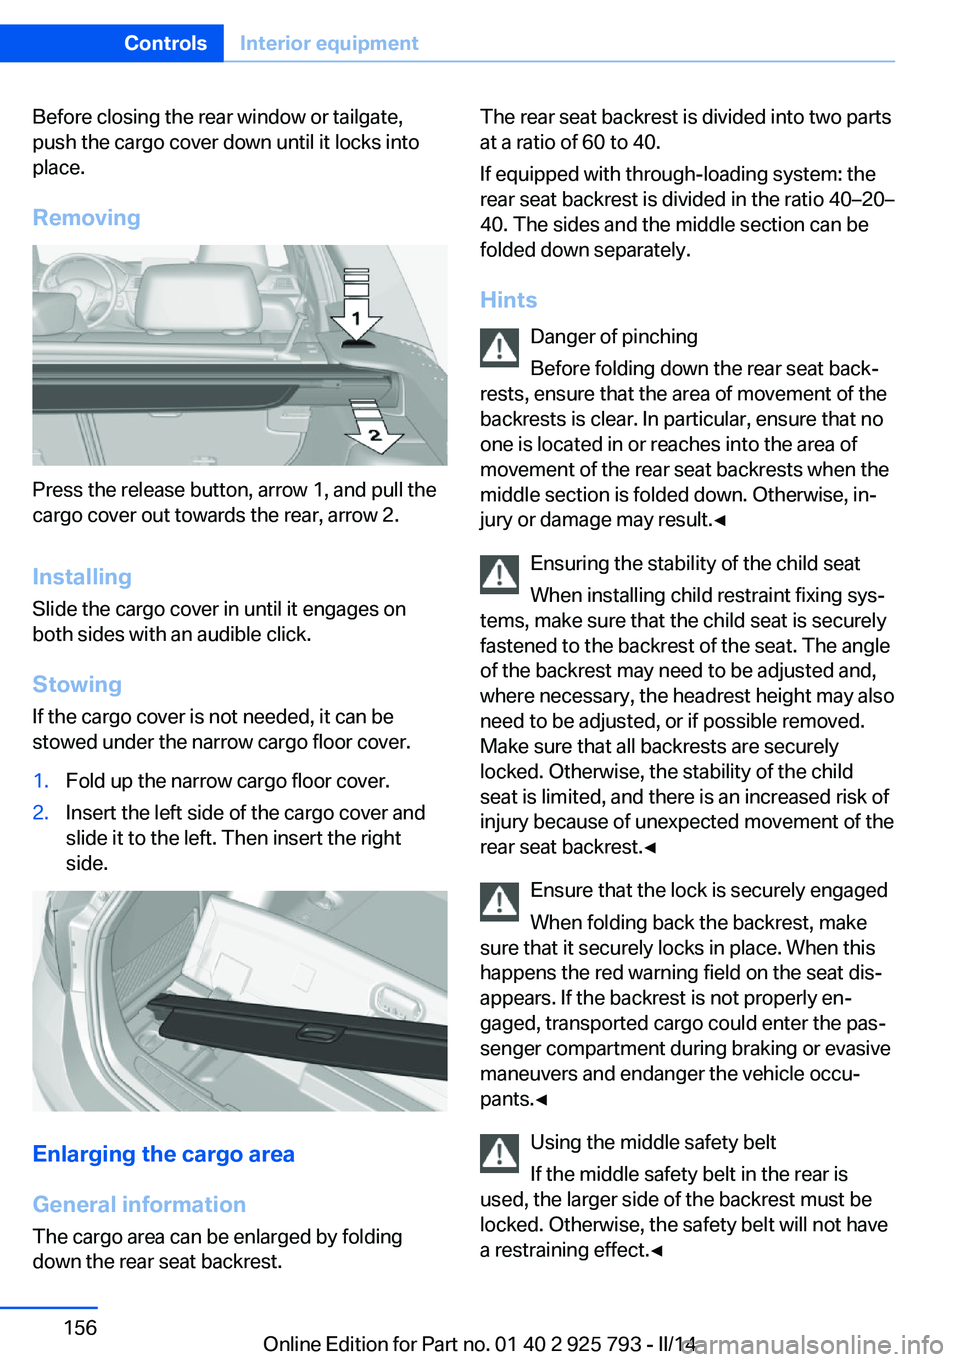
Press the release button, arrow 1, and pull the
cargo cover out towards the rear, arrow 2.
Installing Slide the cargo cover in until it engages on
both sides with an audible click.
Stowing
If the cargo cover is not needed, it can be
stowed under the narrow cargo floor cover.
1.Fold up the narrow cargo floor cover.2.Insert the left side of the cargo cover and
slide it to the left. Then insert the right
side.
Enlarging the cargo area
General information
The cargo area can be enlarged by folding
down the rear seat backrest.
The rear seat backrest is divided into two parts
at a ratio of 60 to 40.
If equipped with through-loading system: the
rear seat backrest is divided in the ratio 40–20–
40. The sides and the middle section can be
folded down separately.
Hints Danger of pinching
Before folding down the rear seat back‐
rests, ensure that the area of movement of the
backrests is clear. In particular, ensure that no
one is located in or reaches into the area of
movement of the rear seat backrests when the
middle section is folded down. Otherwise, in‐
jury or damage may result.◀
Ensuring the stability of the child seat
When installing child restraint fixing sys‐
tems, make sure that the child seat is securely
fastened to the backrest of the seat. The angle
of the backrest may need to be adjusted and,
where necessary, the headrest height may also
need to be adjusted, or if possible removed.
Make sure that all backrests are securely
locked. Otherwise, the stability of the child
seat is limited, and there is an increased risk of
injury because of unexpected movement of the
rear seat backrest.◀
Ensure that the lock is securely engaged
When folding back the backrest, make
sure that it securely locks in place. When this
happens the red warning field on the seat dis‐
appears. If the backrest is not properly en‐
gaged, transported cargo could enter the pas‐
senger compartment during braking or evasive
maneuvers and endanger the vehicle occu‐
pants.◀
Using the middle safety belt
If the middle safety belt in the rear is
used, the larger side of the backrest must be
locked. Otherwise, the safety belt will not have
a restraining effect.◀Seite 156ControlsInterior equipment156
Online Edition for Part no. 01 40 2 925 793 - II/14
Page 157 of 244
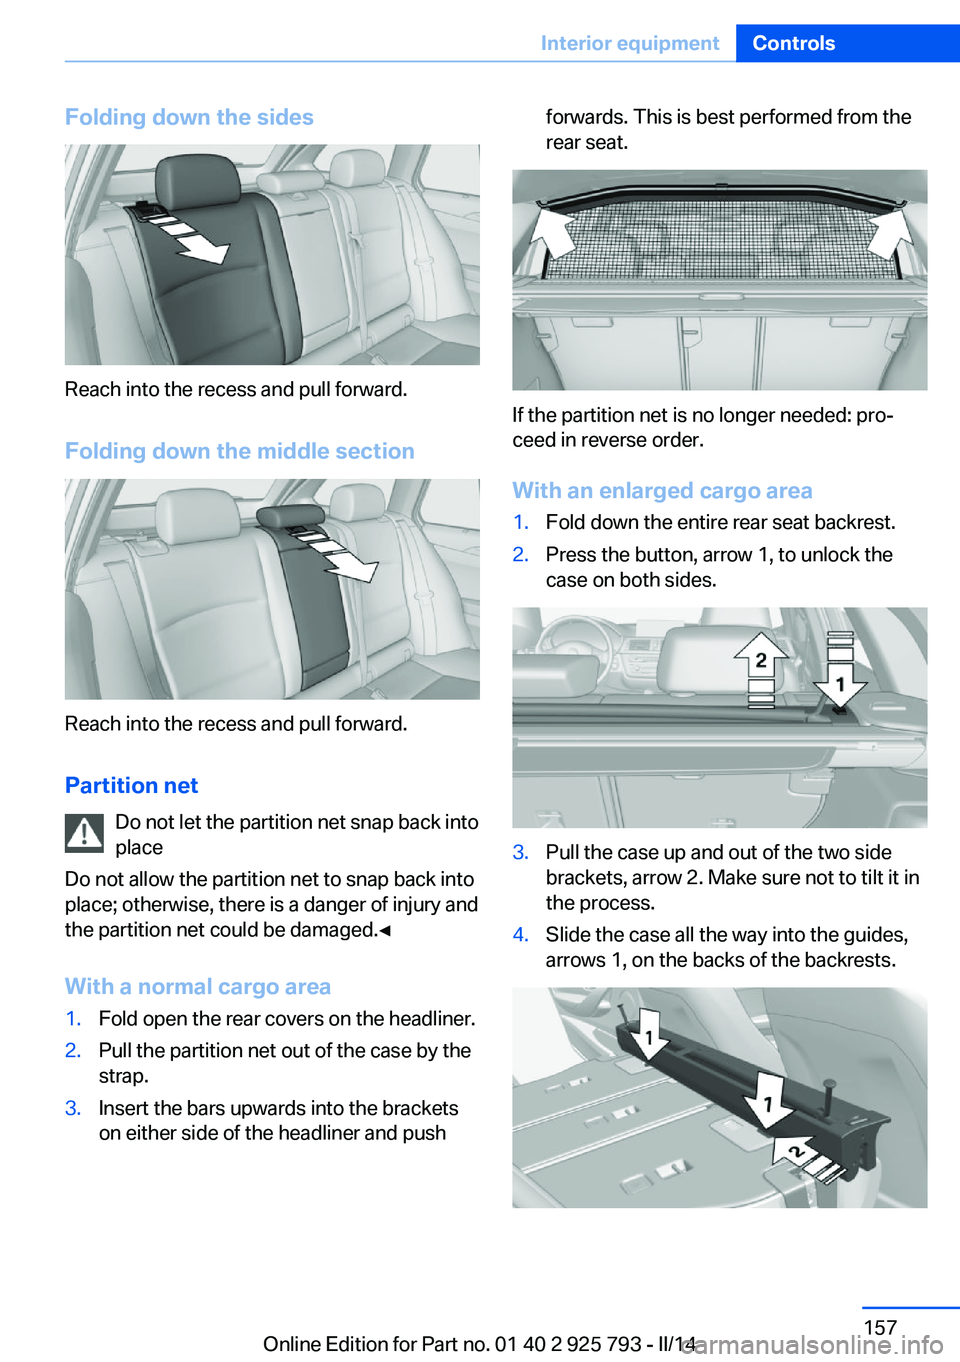
Folding down the sides
Reach into the recess and pull forward.
Folding down the middle section
Reach into the recess and pull forward.
Partition net Do not let the partition net snap back into
place
Do not allow the partition net to snap back into
place; otherwise, there is a danger of injury and
the partition net could be damaged.◀
With a normal cargo area
1.Fold open the rear covers on the headliner.2.Pull the partition net out of the case by the
strap.3.Insert the bars upwards into the brackets
on either side of the headliner and pushforwards. This is best performed from the
rear seat.
If the partition net is no longer needed: pro‐
ceed in reverse order.
With an enlarged cargo area
1.Fold down the entire rear seat backrest.2.Press the button, arrow 1, to unlock the
case on both sides.3.Pull the case up and out of the two side
brackets, arrow 2. Make sure not to tilt it in
the process.4.Slide the case all the way into the guides,
arrows 1, on the backs of the backrests.Seite 157Interior equipmentControls157
Online Edition for Part no. 01 40 2 925 793 - II/14
Page 158 of 244
5.Fold open the front covers on the head‐
liner.6.Quickly pull out the partition net and insert
it into the brackets as for a normal cargo
area, refer to page 157. If the partition net
becomes blocked when it is pulled out, al‐
low it to retract and then pull it out quickly
again.
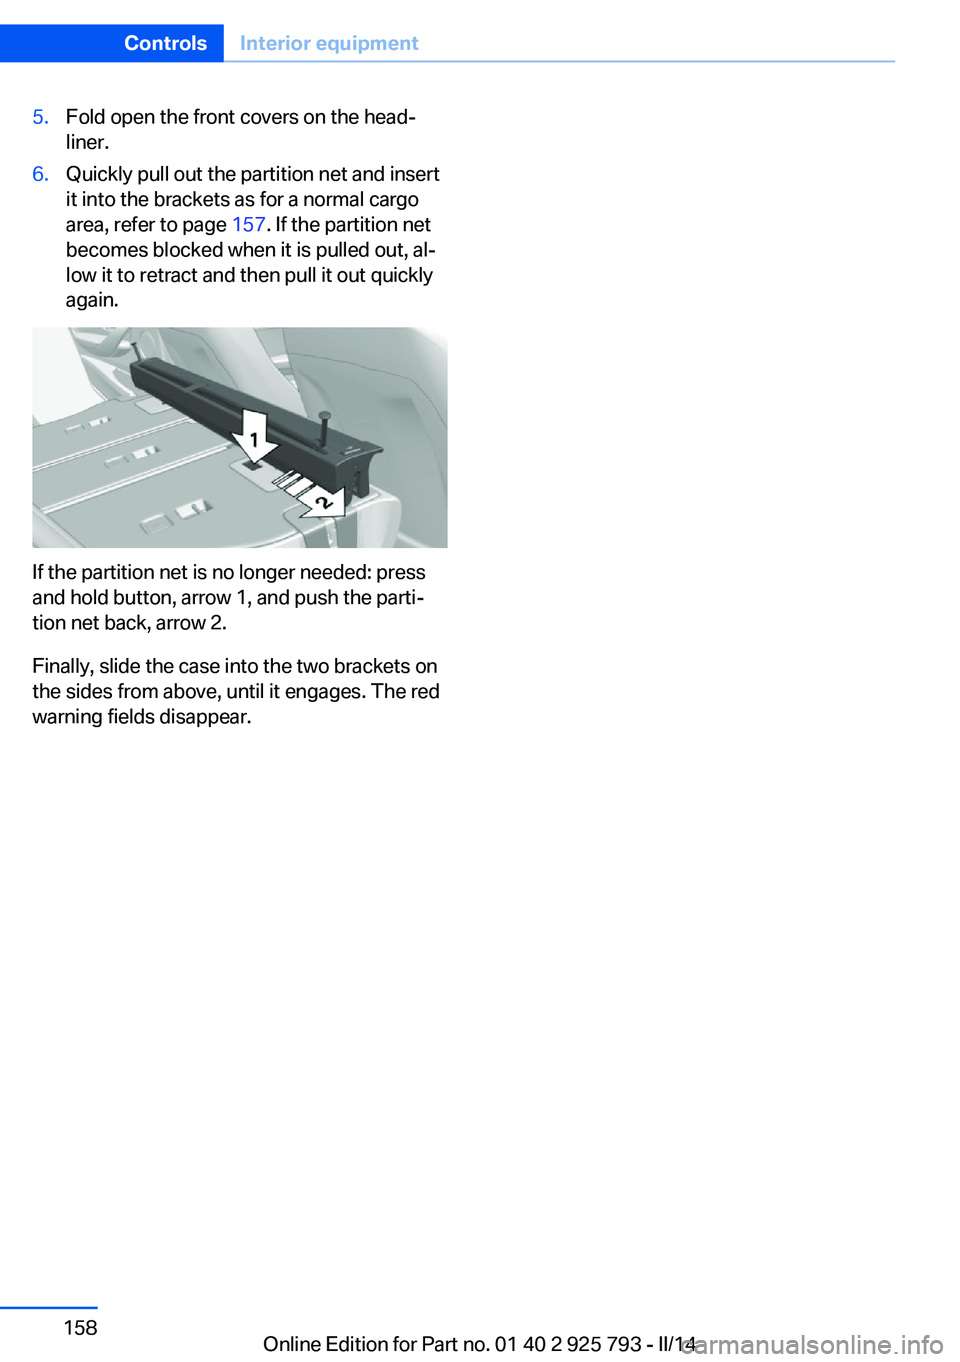
If the partition net is no longer needed: press
and hold button, arrow 1, and push the parti‐
tion net back, arrow 2.
Finally, slide the case into the two brackets on
the sides from above, until it engages. The red
warning fields disappear.
Seite 158ControlsInterior equipment158
Online Edition for Part no. 01 40 2 925 793 - II/14
Page 160 of 244
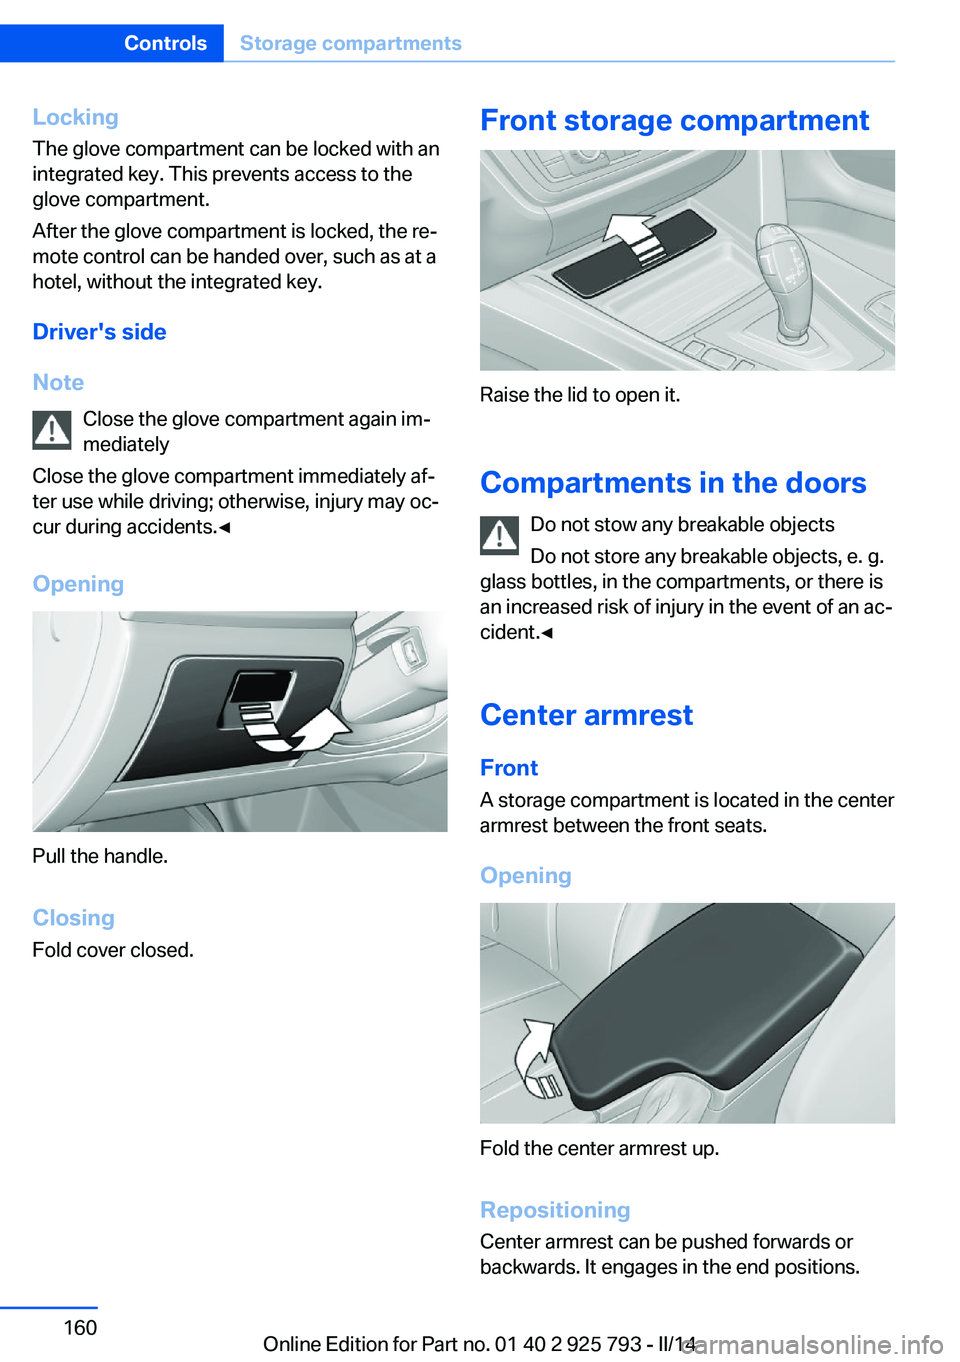
LockingThe glove compartment can be locked with an
integrated key. This prevents access to the
glove compartment.
After the glove compartment is locked, the re‐
mote control can be handed over, such as at a
hotel, without the integrated key.
Driver's side
Note Close the glove compartment again im‐
mediately
Close the glove compartment immediately af‐
ter use while driving; otherwise, injury may oc‐
cur during accidents.◀
Opening
Pull the handle.
ClosingFold cover closed.
Front storage compartment
Raise the lid to open it.
Compartments in the doors Do not stow any breakable objects
Do not store any breakable objects, e. g.
glass bottles, in the compartments, or there is
an increased risk of injury in the event of an ac‐
cident.◀
Center armrest
Front A storage compartment is located in the center
armrest between the front seats.
Opening
Fold the center armrest up.
Repositioning
Center armrest can be pushed forwards or
backwards. It engages in the end positions.
Seite 160ControlsStorage compartments160
Online Edition for Part no. 01 40 2 925 793 - II/14
Page 163 of 244
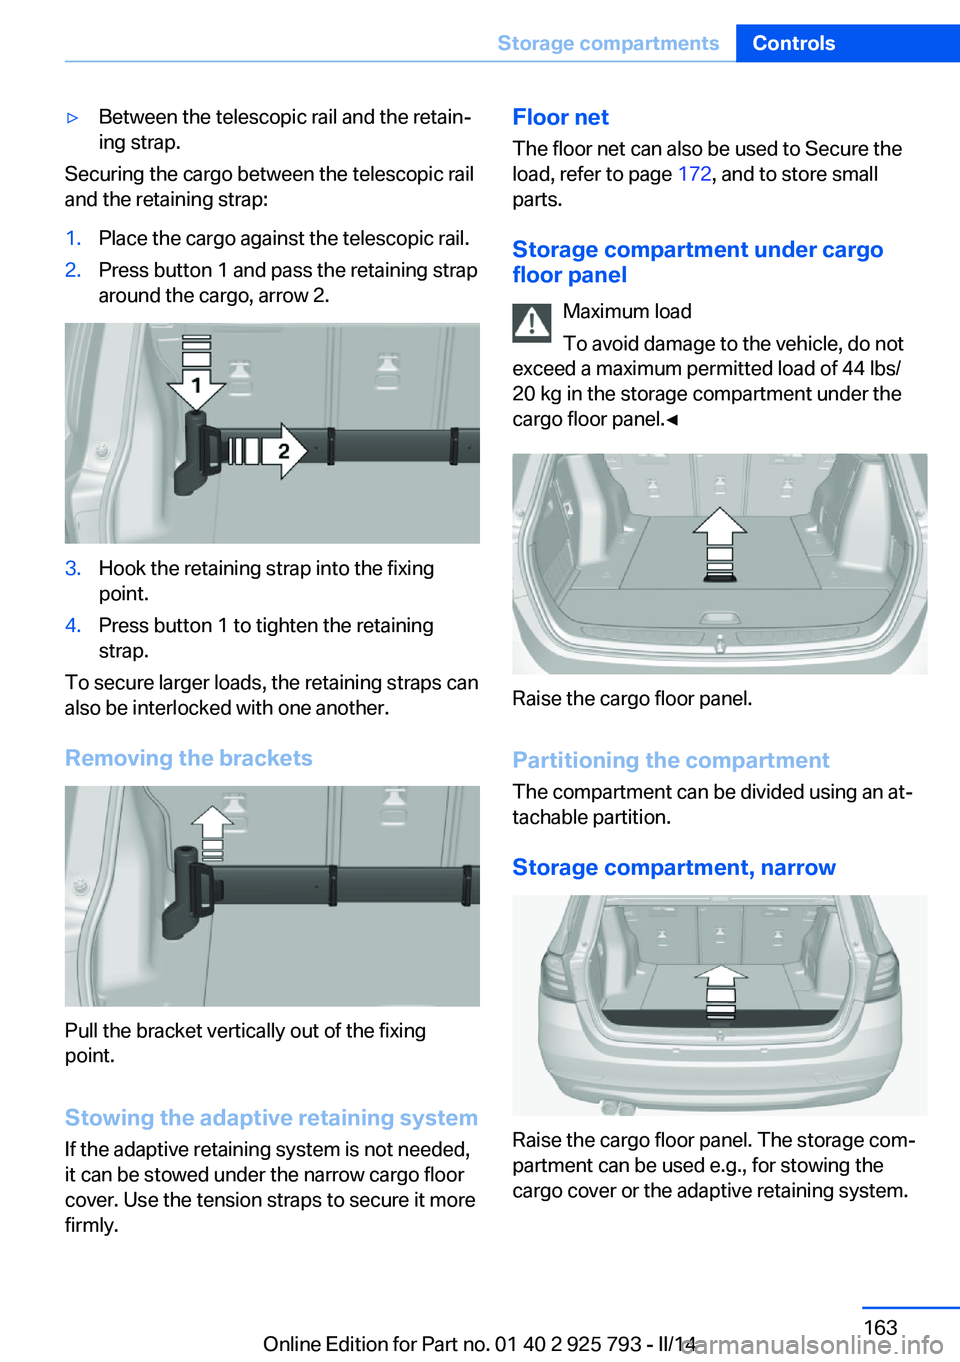
▷Between the telescopic rail and the retain‐
ing strap.
Securing the cargo between the telescopic rail
and the retaining strap:
1.Place the cargo against the telescopic rail.2.Press button 1 and pass the retaining strap
around the cargo, arrow 2.3.Hook the retaining strap into the fixing
point.4.Press button 1 to tighten the retaining
strap.
To secure larger loads, the retaining straps can
also be interlocked with one another.
Removing the brackets
Pull the bracket vertically out of the fixing
point.
Stowing the adaptive retaining system If the adaptive retaining system is not needed,
it can be stowed under the narrow cargo floor
cover. Use the tension straps to secure it more
firmly.
Floor net
The floor net can also be used to Secure the
load, refer to page 172, and to store small
parts.
Storage compartment under cargo
floor panel
Maximum load
To avoid damage to the vehicle, do not
exceed a maximum permitted load of 44 lbs/
20 kg in the storage compartment under the
cargo floor panel.◀
Raise the cargo floor panel.
Partitioning the compartment The compartment can be divided using an at‐
tachable partition.
Storage compartment, narrow
Raise the cargo floor panel. The storage com‐
partment can be used e.g., for stowing the
cargo cover or the adaptive retaining system.
Seite 163Storage compartmentsControls163
Online Edition for Part no. 01 40 2 925 793 - II/14
Page 184 of 244
RefuelingVehicle equipment
All standard, country-specific and optional
equipment that is offered in the model series is
described in this chapter. Therefore, equip‐
ment is also described that is not available in a
vehicle, e. g., because of the selected optional
equipment or country variant. This also applies
for safety-related functions and systems.
Hints Refuel promptly
Refuel no later than at a range of
30 miles/50 km, or operation of the engine is
not ensured and damage may occur.◀
Diesel engines The filler neck is designed for refueling at die‐
sel fuel pumps.
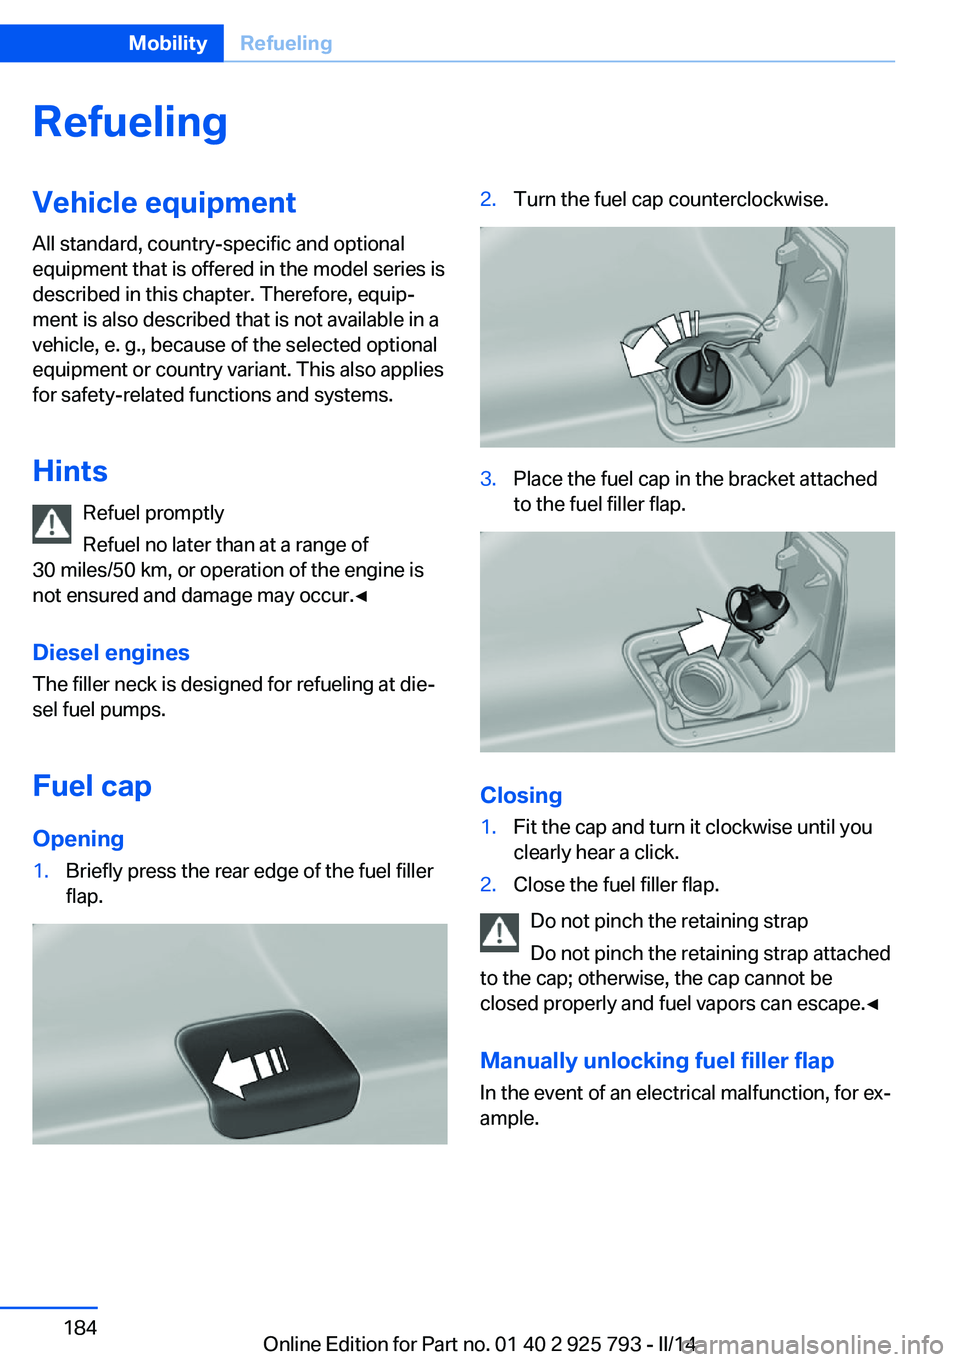
Fuel cap
Opening1.Briefly press the rear edge of the fuel filler
flap.2.Turn the fuel cap counterclockwise.3.Place the fuel cap in the bracket attached
to the fuel filler flap.
Closing
1.Fit the cap and turn it clockwise until you
clearly hear a click.2.Close the fuel filler flap.
Do not pinch the retaining strap
Do not pinch the retaining strap attached
to the cap; otherwise, the cap cannot be
closed properly and fuel vapors can escape.◀
Manually unlocking fuel filler flap In the event of an electrical malfunction, for ex‐
ample.
Seite 184MobilityRefueling184
Online Edition for Part no. 01 40 2 925 793 - II/14
Page 189 of 244
exhaust fluid can be replenished simply
and safely.▷Alternative: NOx reduction agent AUS 32
Diesel exhaust fluid can be purchased at your
Service Center.
Refill quantity
When the Reserve display starts, add at least 2
bottles of reducing agent.
This corresponds to approx. 1 gallon.
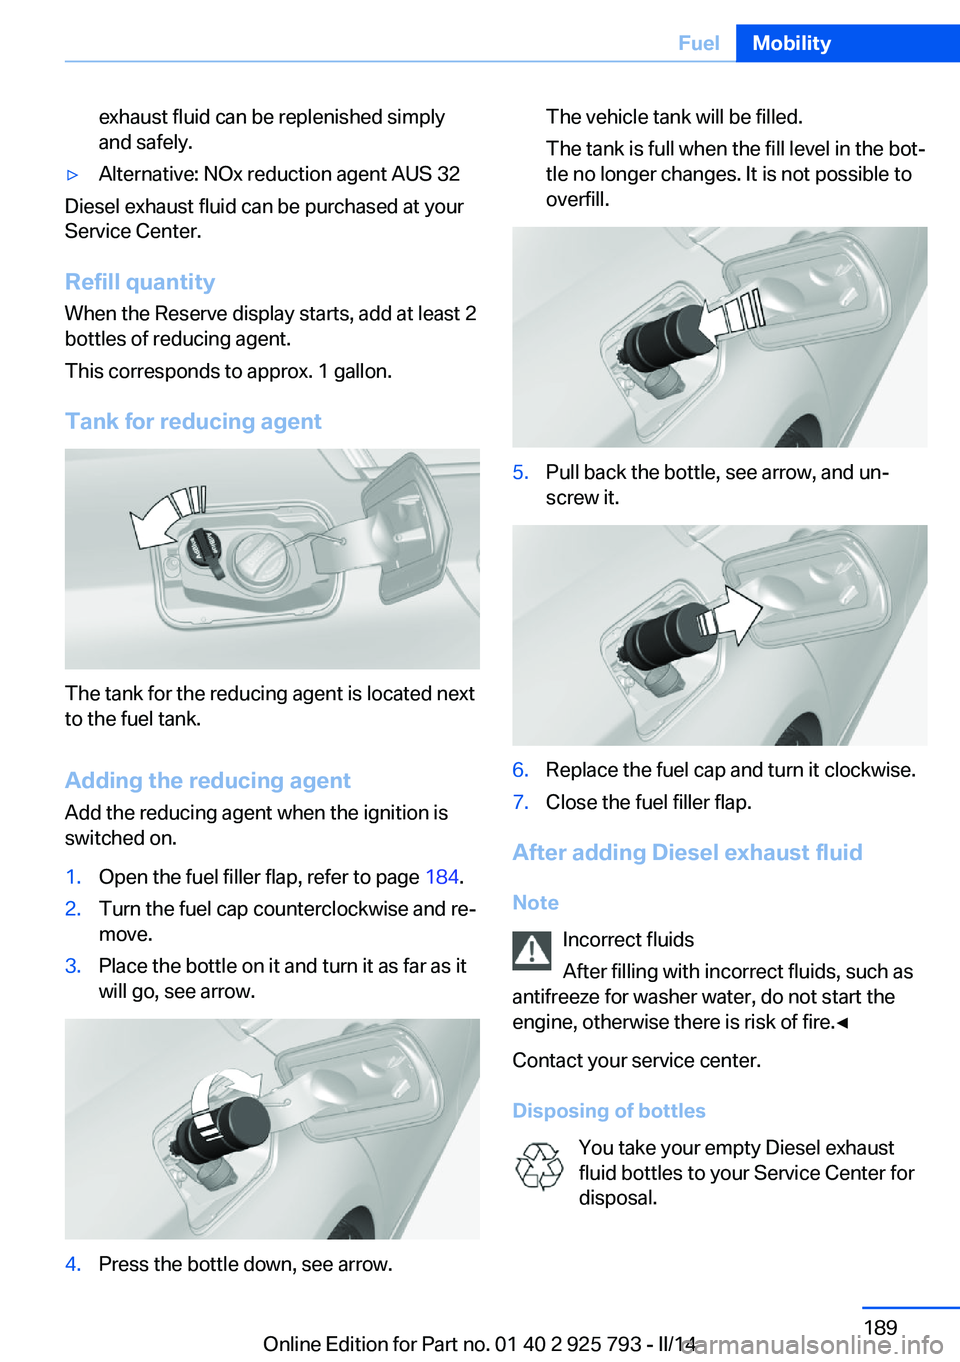
Tank for reducing agent
The tank for the reducing agent is located next
to the fuel tank.
Adding the reducing agent Add the reducing agent when the ignition is
switched on.
1.Open the fuel filler flap, refer to page 184.2.Turn the fuel cap counterclockwise and re‐
move.3.Place the bottle on it and turn it as far as it
will go, see arrow.4.Press the bottle down, see arrow.The vehicle tank will be filled.
The tank is full when the fill level in the bot‐
tle no longer changes. It is not possible to
overfill.5.Pull back the bottle, see arrow, and un‐
screw it.6.Replace the fuel cap and turn it clockwise.7.Close the fuel filler flap.
After adding Diesel exhaust fluid
Note Incorrect fluids
After filling with incorrect fluids, such as
antifreeze for washer water, do not start the
engine, otherwise there is risk of fire.◀
Contact your service center.
Disposing of bottles You take your empty Diesel exhaust
fluid bottles to your Service Center for
disposal.
Seite 189FuelMobility189
Online Edition for Part no. 01 40 2 925 793 - II/14