2014 BMW 328I XDRIVE SPORTS WAGON window
[x] Cancel search: windowPage 156 of 244
Before closing the rear window or tailgate,
push the cargo cover down until it locks into
place.
Removing
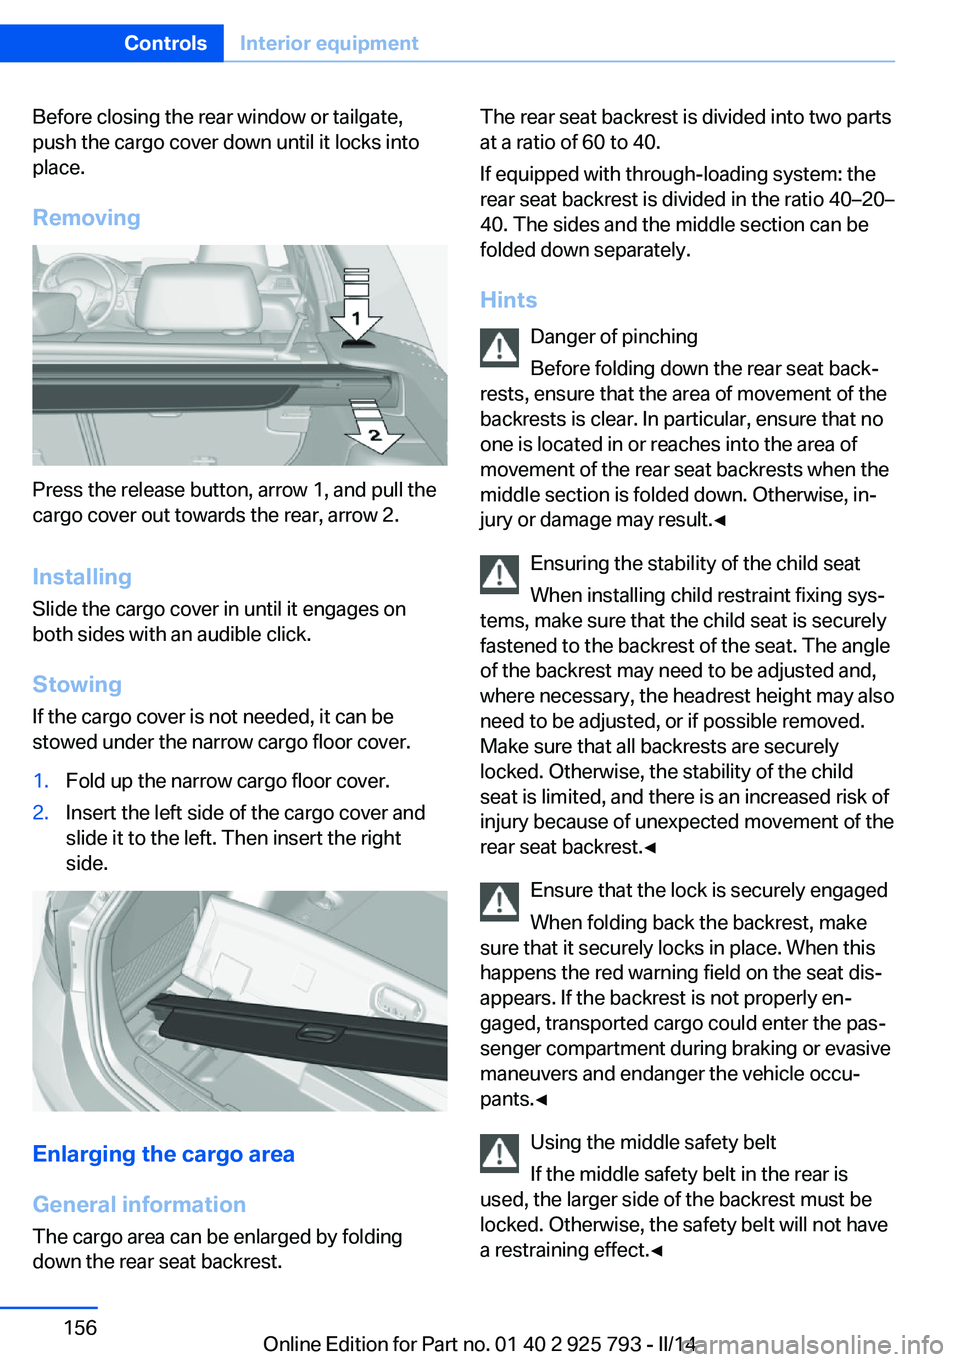
Press the release button, arrow 1, and pull the
cargo cover out towards the rear, arrow 2.
Installing Slide the cargo cover in until it engages on
both sides with an audible click.
Stowing
If the cargo cover is not needed, it can be
stowed under the narrow cargo floor cover.
1.Fold up the narrow cargo floor cover.2.Insert the left side of the cargo cover and
slide it to the left. Then insert the right
side.
Enlarging the cargo area
General information
The cargo area can be enlarged by folding
down the rear seat backrest.
The rear seat backrest is divided into two parts
at a ratio of 60 to 40.
If equipped with through-loading system: the
rear seat backrest is divided in the ratio 40–20–
40. The sides and the middle section can be
folded down separately.
Hints Danger of pinching
Before folding down the rear seat back‐
rests, ensure that the area of movement of the
backrests is clear. In particular, ensure that no
one is located in or reaches into the area of
movement of the rear seat backrests when the
middle section is folded down. Otherwise, in‐
jury or damage may result.◀
Ensuring the stability of the child seat
When installing child restraint fixing sys‐
tems, make sure that the child seat is securely
fastened to the backrest of the seat. The angle
of the backrest may need to be adjusted and,
where necessary, the headrest height may also
need to be adjusted, or if possible removed.
Make sure that all backrests are securely
locked. Otherwise, the stability of the child
seat is limited, and there is an increased risk of
injury because of unexpected movement of the
rear seat backrest.◀
Ensure that the lock is securely engaged
When folding back the backrest, make
sure that it securely locks in place. When this
happens the red warning field on the seat dis‐
appears. If the backrest is not properly en‐
gaged, transported cargo could enter the pas‐
senger compartment during braking or evasive
maneuvers and endanger the vehicle occu‐
pants.◀
Using the middle safety belt
If the middle safety belt in the rear is
used, the larger side of the backrest must be
locked. Otherwise, the safety belt will not have
a restraining effect.◀Seite 156ControlsInterior equipment156
Online Edition for Part no. 01 40 2 925 793 - II/14
Page 168 of 244
Things to remember when drivingVehicle equipment
All standard, country-specific and optional
equipment that is offered in the model series is
described in this chapter. Therefore, equip‐
ment is also described that is not available in a
vehicle, e. g., because of the selected optional
equipment or country variant. This also applies
for safety-related functions and systems.
Breaking-in period General information Moving parts need to be broken in to adjust to
each other.
The following instructions will help achieve a
long vehicle life and good economy.
Engine and differential Always obey the official speed limit.
Up to 1,200 miles/2,000 km
Do not exceed the maximum engine and road
speed:▷For gasoline engine 4,500 rpm and
100 mph/160 km/h.▷For diesel engine 3,500 rpm and
93 mph/150 km/h.
Avoid full load or kickdown under all circum‐
stances.
From 1,200 miles/2,000 km The engine and vehicle speed can gradually be
increased.
Tires
Due to technical factors associated with their
manufacture, tires do not achieve their full
traction potential until after an initial breaking-
in period.
Drive conservatively for the first
200 miles/300 km.
Brake system
Brakes require an initial break-in period of ap‐
prox. 300 miles/500 km to achieve optimized
contact and wear patterns between brake
discs and brake pads. Drive moderately during
this break-in period.
Clutch
The function of the clutch reaches its optimal
level only after a distance driven of approx.
300 miles/500 km. During this break-in period,
engage the clutch gently.
Following part replacement
The same breaking in procedures should be
observed if any of the components mentioned
above have to be renewed in the course of the
vehicle's operating life.
General driving notes
Closing the rear window and tailgate Drive with the rear window and tailgate
closed
Only drive with the tailgate closed; otherwise,
in the event of an accident or braking and eva‐
sive maneuvers, passengers and other road
users may be injured, and the vehicle may be
damaged. In addition, exhaust fumes may en‐
ter the passenger compartment.◀
If driving with the tailgate open cannot be avoided:▷Close all windows and the glass sunroof.▷Greatly increase the blower speed.▷Drive moderately.Seite 168Driving tipsThings to remember when driving168
Online Edition for Part no. 01 40 2 925 793 - II/14
Page 174 of 244
Saving fuelVehicle equipmentAll standard, country-specific and optional
equipment that is offered in the model series is
described in this chapter. Therefore, equip‐
ment is also described that is not available in a
vehicle, e. g., because of the selected optional
equipment or country variant. This also applies
for safety-related functions and systems.
General information Your vehicle contains advanced technology for
the reduction of fuel consumption and emis‐
sions.
Fuel consumption depends on a number of dif‐
ferent factors.
The implementation of certain measures, driv‐
ing style and regular maintenance can have an
influence on fuel consumption and on the envi‐
ronmental impact.
Remove unnecessary cargoAdditional weight increases fuel consumption.
Remove attached parts
following use
Remove auxiliary mirrors, roof or rear luggage
racks which are no longer required following
use.
Attached parts on the vehicle impair the aero‐
dynamics and increase the fuel consumption.Close the windows and glass
sunroof
Driving with the glass sunroof and windows
open results in increased air resistance and
thereby reduces the range.
Tires
General information Tires can affect fuel consumption values in
various ways, for instance fuel consumption
can be influenced by the size of the tires.
Check the tire inflation pressure
regularly
Check and, if necessary, correct the tire infla‐
tion pressure at least twice a month and before
starting on a long trip.
Low tire inflation pressure increases rolling re‐
sistance and thus raises fuel consumption and
tire wear.
Drive away immediately
Do not wait for the engine to warm-up while
the vehicle remains stationary. Start driving
right away, but at moderate engine speeds.
This is the fastest way for the cold engine to
reach its operating temperature.
Look well ahead when
driving
Avoid unnecessary acceleration and braking.
By maintaining a suitable distance to the vehi‐
cle driving ahead of you.
Driving smoothly and looking ahead reduces
fuel consumption.Seite 174Driving tipsSaving fuel174
Online Edition for Part no. 01 40 2 925 793 - II/14
Page 175 of 244
Avoid high engine speeds
Use 1st gear to get the vehicle in motion. Be‐
ginning with 2nd gear, accelerate rapidly.
When accelerating, shift up before reaching
high engine speeds.
When you reach the desired speed, shift into
the highest applicable gear and drive with the
engine speed as low as possible and at a con‐
stant speed.
As a rule: driving at low engine speeds lowers
fuel consumption and reduces wear.
The gear shift indicator of your vehicle indi‐
cates the most fuel efficient gear.
Use coasting When approaching a red light, take your foot
off the accelerator and let the vehicle coast to
a halt.
On a downhill gradient, take your foot off the
accelerator and let the vehicle roll.
The flow of fuel is interrupted while coasting.
Switch off the engine during longer stops
Switch off the engine during longer stops, e.g.,
at traffic lights, railroad crossings or in traffic
congestion.
Auto Start/Stop function The Auto Start/Stop function of your vehicle
automatically switches off the engine during a
stop.
If the engine is switched off and then restarted
rather than leaving the engine running con‐
stantly, fuel consumption and emissions are
reduced. Savings can begin within a few sec‐
onds of switching off the engine.
In addition, fuel consumption is also deter‐
mined by other factors, such as driving style,road conditions, maintenance or environmental
factors.
Switch off any functions that
are not currently needed
Functions such as seat heating and the rear
window defroster require a lot of energy and
reduce the range, especially in city and stop-
and-go traffic.
Therefore, switch off these functions if they
are not actually needed.
The ECO PRO driving program supports the
energy conserving use of comfort functions.
These functions are automatically deactivated
partially or completely.
Have maintenance carried
out
Have vehicles maintained regularly to achieve
optimal vehicle economy and operating life.
The maintenance should be carried out by
your service center.
Also note the BMW Maintenance System, refer
to page 205.
ECO PRO
The concept ECO PRO supports a driving style that saves
on fuel consumption. For this purpose, the en‐
gine control and comfort functions, e. g. the
climate control output, are adjusted.
Under certain conditions the engine is auto‐
matically decoupled from the transmission in
the D selector lever position. The vehicle con‐
tinues traveling with the engine idling to re‐
duce fuel consumption. Selector lever position
D remains engaged.Seite 175Saving fuelDriving tips175
Online Edition for Part no. 01 40 2 925 793 - II/14
Page 226 of 244
2.Engage selector lever position N.3.Switch the engine off.
In this way, the ignition remains switched
on, and a Check-Control message is dis‐
played.
Do not turn off the ignition in the car
wash
Do not turn off the ignition in the car wash;
otherwise, selector lever position P is en‐
gaged and damages can result.◀
To start the engine:
1.Depress the brake pedal.2.Press the Start/Stop button.
Pressing the Start/Stop button without step‐
ping on the brake turns the ignition off.
The vehicle cannot be locked from the outside
when in selector lever position N. A signal is
sounded when an attempt is made to lock the
vehicle.
Selector lever position Selector lever position P is engaged automati‐
cally:
▷When the ignition is switched off.▷After approx. 15 minutes.
Headlamps
▷Do not rub dry and do not use abrasive or
caustic cleansers.▷Soak areas that have been soiled e.g. due
to insects, with shampoo and wash off with
water.▷Thaw ice with deicing spray; do not use an
ice scraper.
After washing the vehicle
After washing the vehicle, apply the brakes
briefly to dry them; otherwise, braking action
can be reduced and corrosion of the brake
discs can occur.
Completely remove all residues on the win‐
dows, to minimize loss of visibility due to
smearing and to reduce wiper noises and
wiper blade wear.
Vehicle care
Car care products BMW recommends using cleaning and care
products from BMW, since these have been
tested and approved.
Car care and cleaning products
Follow the instructions on the container.
When cleaning the interior, open the doors or
windows.
Only use products intended for cleaning vehi‐
cles.
Cleansers can contain substances that are
dangerous and harmful to your health.◀
Vehicle paint
Regular care contributes to driving safety and
value retention. Environmental influences in
areas with elevated air pollution or natural con‐
taminants, such as tree resin or pollen can af‐
fect the vehicle's paintwork. Tailor the fre‐
quency and extent of your car care to these
influences.
Aggressive substances, such as spilled fuel,
oil, grease or bird droppings, must be removed
immediately to prevent the finish from being
altered or discolored.
Leather care
Remove dust from the leather often, using a
cloth or vacuum cleaner.
Otherwise, particles of dust and road grime
chafe in pores and folds, and lead to increased
wear and premature degradation of the leather
surface.Seite 226MobilityCare226
Online Edition for Part no. 01 40 2 925 793 - II/14
Page 236 of 244
Control Display 16
Control Display, settings 87
Controller 16, 17
Control systems, driving sta‐ bility 115
Convenient opening 35
Coolant 204
Coolant temperature 79
Cooling function 143, 146
Cooling, maximum 146
Cooling system 204
Corrosion on brake discs 170
Cruise control 126
Cruise control, active with Stop & Go 120
Cruising range 80
Cupholder 161
Current fuel consumption 81
D
Damage, tires 195
Damping control, dy‐ namic 116
Data, technical 232
Date 80
Daytime running lights 91
Defrosting, refer to defrosting the windows 143
Defrosting, refer to Windows, defrosting 147
Defrosting the windows 143
Dehumidifying, air 143, 146
Destination distance 85
Diesel exhaust fluid, at low temperatures 188
Diesel exhaust fluid, having refilled 188
Diesel exhaust fluid, on mini‐ mum 188
Diesel exhaust fluid, replen‐ ishing yourself 188
Diesel particulate filter 169
Digital clock 80
Digital compass 151
Dimensions 232 Dimmable exterior mirrors 56
Dimmable interior rearview mirror 57
Direction indicator, refer to Turn signals 66
Display, electronic, instru‐ ment cluster 76
Display in windshield 88
Display lighting, refer to In‐ strument lighting 93
Displays 74
Displays, cleaning 228
Disposal, coolant 204
Disposal, vehicle battery 217
Distance control, refer to PDC 129
Distance to destination 85
Divided screen view, split screen 22
Door lock 36
Door lock, refer to Remote control 32
Drive-off assistant 119
Drive-off assistant, refer to DSC 115
Driver assistance, refer to In‐ telligent Safety 103
Driving Assistant, refer to In‐ telligent Safety 103
Driving Dynamics Con‐ trol 117
Driving instructions, breaking in 168
Driving mode 117
Driving notes, general 168
Driving stability control sys‐ tems 115
Driving style analysis 179
Driving tips 168
DSC Dynamic Stability Con‐ trol 115
DTC Dynamic Traction Con‐ trol 116
Dynamic Damping Con‐ trol 116 Dynamic Stability Control
DSC 115
Dynamic Traction Control DTC 116
E
ECO PRO 175
ECO PRO, bonus range 176
ECO PRO display 175
ECO PRO driving mode 175
ECO PRO driving style analy‐ sis 179
ECO PRO mode 175
ECO PRO Tip - driving in‐ struction 177
EfficientDynamics 177
Electronic displays, instru‐ ment cluster 76
Electronic Stability Program ESP, refer to DSC 115
Emergency detection, remote control 33
Emergency release, fuel filler flap 184
Emergency Request 219
Emergency service, refer to Roadside Assistance 220
Emergency start function, en‐ gine start 33
Energy Control 81
Energy recovery 81
Engine, automatic Start/Stop function 64
Engine, automatic switch- off 64
Engine compartment 199
Engine compartment, work‐ ing in 200
Engine coolant 204
Engine idling when driving, coasting 178
Engine oil 201
Engine oil, adding 202
Engine oil additives 202
Engine oil change 203 Seite 236ReferenceEverything from A to Z236
Online Edition for Part no. 01 40 2 925 793 - II/14
Page 237 of 244
Engine oil filler neck 202
Engine oil temperature 79
Engine oil types, alterna‐ tive 203
Engine oil types, ap‐ proved 203
Engine start during malfunc‐ tion 33
Engine start, jump-start‐ ing 220
Engine start, refer to Starting the engine 63
Engine stop 63
Engine temperature 79
Entering a car wash 225
Equipment, interior 149
ESP Electronic Stability Pro‐ gram, refer to DSC 115
Exchanging wheels/tires 196
Exhaust system 169
Exterior mirror, automatic dimming feature 56
Exterior mirrors 55
External start 220
External temperature dis‐ play 80
External temperature warn‐ ing 80
Eyes for securing cargo 172
F
Failure message, refer to Check Control 77
False alarm, refer to Uninten‐ tional alarm 43
Fan, refer to Air flow 143, 147
Fault displays, refer to Check Control 77
Filler neck for engine oil 202
Fine wood, care 227
First aid kit 220
Fitting for towing, refer to Tow fitting 223 Flat tire, changing
wheels 216
Flat Tire Monitor FTM 101
Flat tire, Tire Pressure Moni‐ tor TPM 98
Flat tire, warning lamp 99, 102
Flooding 169
Floor carpet, care 228
Floor mats, care 228
Fogged up windows 143
Fold-out position, windshield wipers 69
Foot brake 169
Front airbags 95
Front fog lamps 93
Front fog lamps, bulb replace‐ ment 212
Front lamps 209
Front passenger airbags, au‐ tomatic deactivation 97
Front passenger airbags, indi‐ cator lamp 97
FTM Flat Tire Monitor 101
Fuel 186
Fuel cap 184
Fuel consumption, current 81
Fuel consumption, refer to Average fuel consump‐
tion 85
Fuel filler flap 184
Fuel gauge 79
Fuel quality 186
Fuel recommendation 186
Fuel, tank capacity 233
Fuse 217
G
Garage door opener, refer to Universal garage door
opener 149
Gasoline 186
Gear change, automatic transmission 71
Gear shift indicator 82 General driving notes 168
Glass sunroof, refer to Panor‐ amic glass sunroof 45
Glove compartment 159
Gross vehicle weight, ap‐ proved 232
H
Handbrake, refer to parking brake 66
Hand-held transmitter, alter‐ nating code 150
Hazard warning flashers 219
Head airbags 95
Headlamp control, auto‐ matic 91
Headlamp courtesy delay fea‐ ture 90
Headlamp flasher 67
Headlamp glass 208
Headlamps 209
Headlamps, care 226
Headlamp washer system 67
Headliner 15
Head restraints 48
Head restraints, front 52
Head restraints, rear 53
Head-up Display 88
Head-up Display, care 228
Heavy cargo, stowing 172
Height, vehicle 232
High-beam Assistant 92
High beams 67
High beams/low beams, refer to High-beam Assistant 92
Hills 170
Hill start assistant, refer to Drive-off assistant 119
Hints 6
Holder for beverages 161
Homepage 6
Hood 200
Horn 12
Hot exhaust system 169
HUD Head-up Display 88 Seite 237Everything from A to ZReference237
Online Edition for Part no. 01 40 2 925 793 - II/14
Page 238 of 244
Hydroplaning 169
I Ice warning, see External temperature warning 80
Icy roads, see External tem‐ perature warning 80
Identification marks, tires 193
Identification number, refer to Important features in the en‐
gine compartment 199
iDrive 16
Ignition key, refer to Remote control 32
Ignition off 62
Ignition on 62
Indication of a flat tire 99, 102
Indicator and warning lamps 77
Individual air distribu‐ tion 143, 147
Individual settings, refer to Personal Profile 33
Inflation pressure, tires 191
Inflation pressure warning FTM, tires 101
Info display, refer to Com‐ puter 84
Initialize, Tire Pressure Moni‐ tor TPM 99
Initializing, Flat Tire Monitor FTM 102
Instrument cluster 74
Instrument cluster, electronic displays 76
Instrument lighting 93
Integrated key 32
Integrated Owner's Manual in the vehicle 27
Intelligent Emergency Re‐ quest 219
Intelligent Safety 103
Intensity, AUTO pro‐ gram 146
Interior equipment 149 Interior lamps 93
Interior lamps via remote con‐ trol 35
Interior motion sensor 43
Interior rearview mirror, auto‐ matic dimming feature 57
Interior rearview mirror, com‐ pass 151
Interior rearview mirror, man‐ ually dimmable 57
Internet page 6
Interval display, service re‐ quirements 81
J Jacking points for the vehicle jack 216
Joystick, automatic transmis‐ sion 71
Jump-starting 220
K
Key/remote control 32
Keyless Go, refer to Comfort Access 39
Key Memory, refer to Per‐ sonal Profile 33
Kickdown, automatic trans‐ mission 71
Knee airbag 95
L
Lamp replacement 208
Lamp replacement, front 209
Lamp replacement, rear 213
Lamps 90
Lamps and bulbs 208
Lane departure warning 111
Lane margin, warning 111
Language on Control Dis‐ play 87
Lashing eyes, securing cargo 172 LATCH child restraint fixing
system 59
Launch Control 73
Leather, care 226
LEDs, light-emitting di‐ odes 208
Length, vehicle 232
Letters and numbers, enter‐ ing 23
Light alloy wheels, care 227
Light control 91
Light-emitting diodes, LEDs 208
Lighter 153
Lighting 90
Lighting via remote con‐ trol 35
Light switch 90
Load 172
Loading 171
Lock, door 36
Locking/unlocking via door lock 36
Locking/unlocking with re‐ mote control 35
Locking, automatic 42
Locking, settings 41
Lock, power window 45
Locks, doors, and win‐ dows 61
Low beams 90
Low beams, automatic, refer to High-beam Assistant 92
Lower back support 50
Low-Sulfur Diesel 187
Luggage rack, refer to Roof- mounted luggage rack 172
Lumbar support 50
M
Maintenance 205
Maintenance require‐ ments 205
Maintenance, service require‐ ments 81 Seite 238ReferenceEverything from A to Z238
Online Edition for Part no. 01 40 2 925 793 - II/14