2014 BMW 328I XDRIVE SPORTS WAGON low beam
[x] Cancel search: low beamPage 93 of 244
The system is not fully functional in situations
such as the following, and driver intervention
may be necessary:▷In very unfavorable weather conditions,
such as fog or heavy precipitation.▷In detecting poorly-lit road users, such as
pedestrians, cyclists, horseback riders and
wagons; when driving close to train or ship
traffic; and at animal crossings.▷In tight curves, on hilltops or in depres‐
sions, in cross traffic or half-obscured on‐
coming traffic on freeways.▷In poorly-lit towns and cities and in the
presence of highly reflective signs.▷At low speeds.▷When the windshield behind the interior
rearview mirror is fogged over, dirty or cov‐
ered with stickers, etc.
Camera
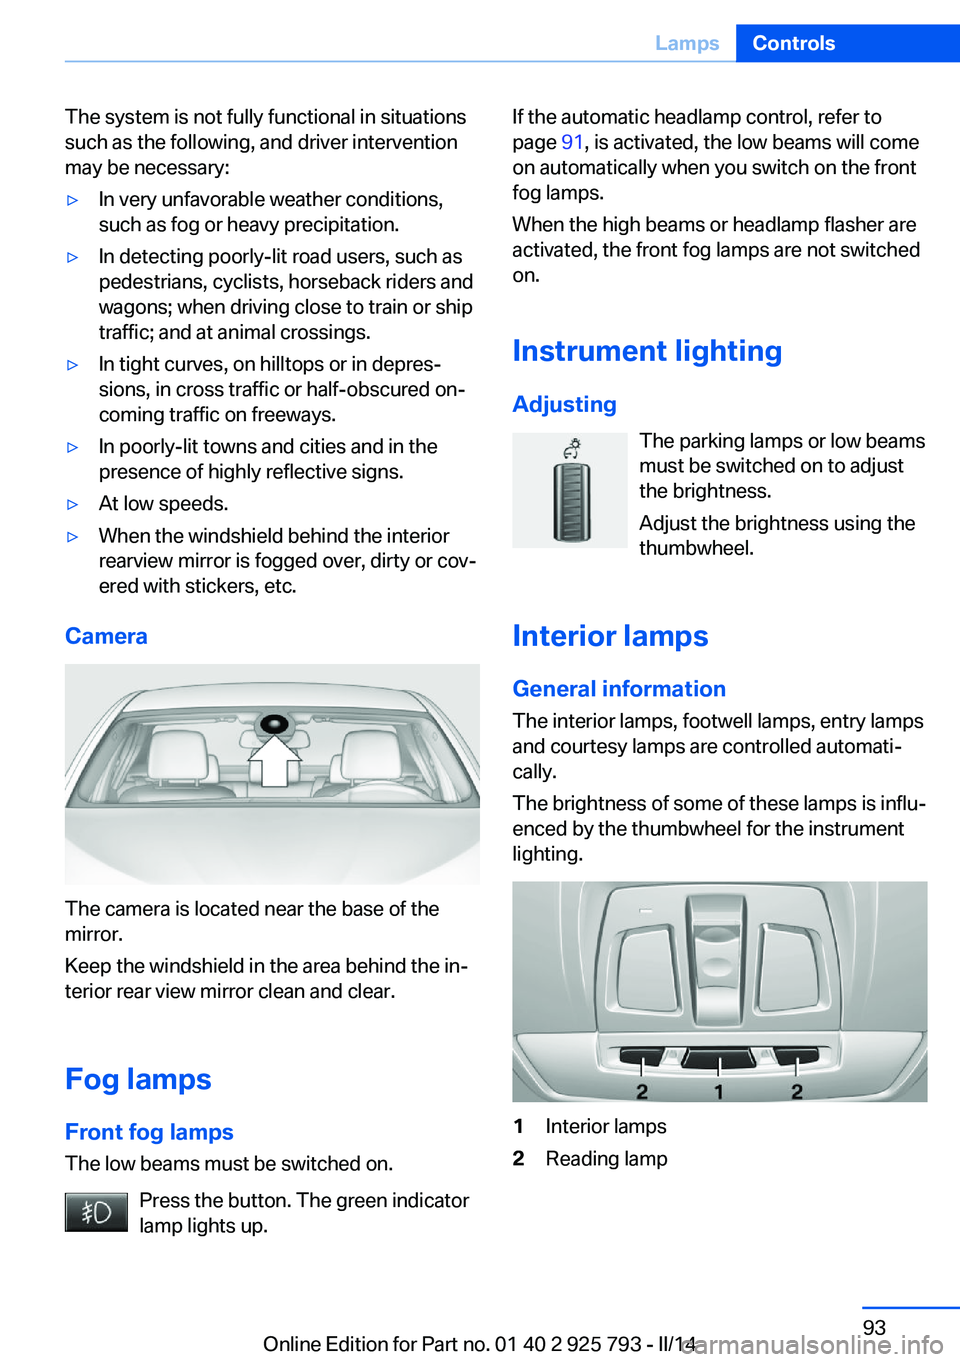
The camera is located near the base of the
mirror.
Keep the windshield in the area behind the in‐
terior rear view mirror clean and clear.
Fog lamps
Front fog lamps The low beams must be switched on.
Press the button. The green indicator
lamp lights up.
If the automatic headlamp control, refer to
page 91, is activated, the low beams will come
on automatically when you switch on the front
fog lamps.
When the high beams or headlamp flasher are
activated, the front fog lamps are not switched
on.
Instrument lighting Adjusting The parking lamps or low beams
must be switched on to adjust
the brightness.
Adjust the brightness using the
thumbwheel.
Interior lamps
General information
The interior lamps, footwell lamps, entry lamps
and courtesy lamps are controlled automati‐
cally.
The brightness of some of these lamps is influ‐
enced by the thumbwheel for the instrument
lighting.1Interior lamps2Reading lampSeite 93LampsControls93
Online Edition for Part no. 01 40 2 925 793 - II/14
Page 209 of 244
Front lamps, bulb replacement
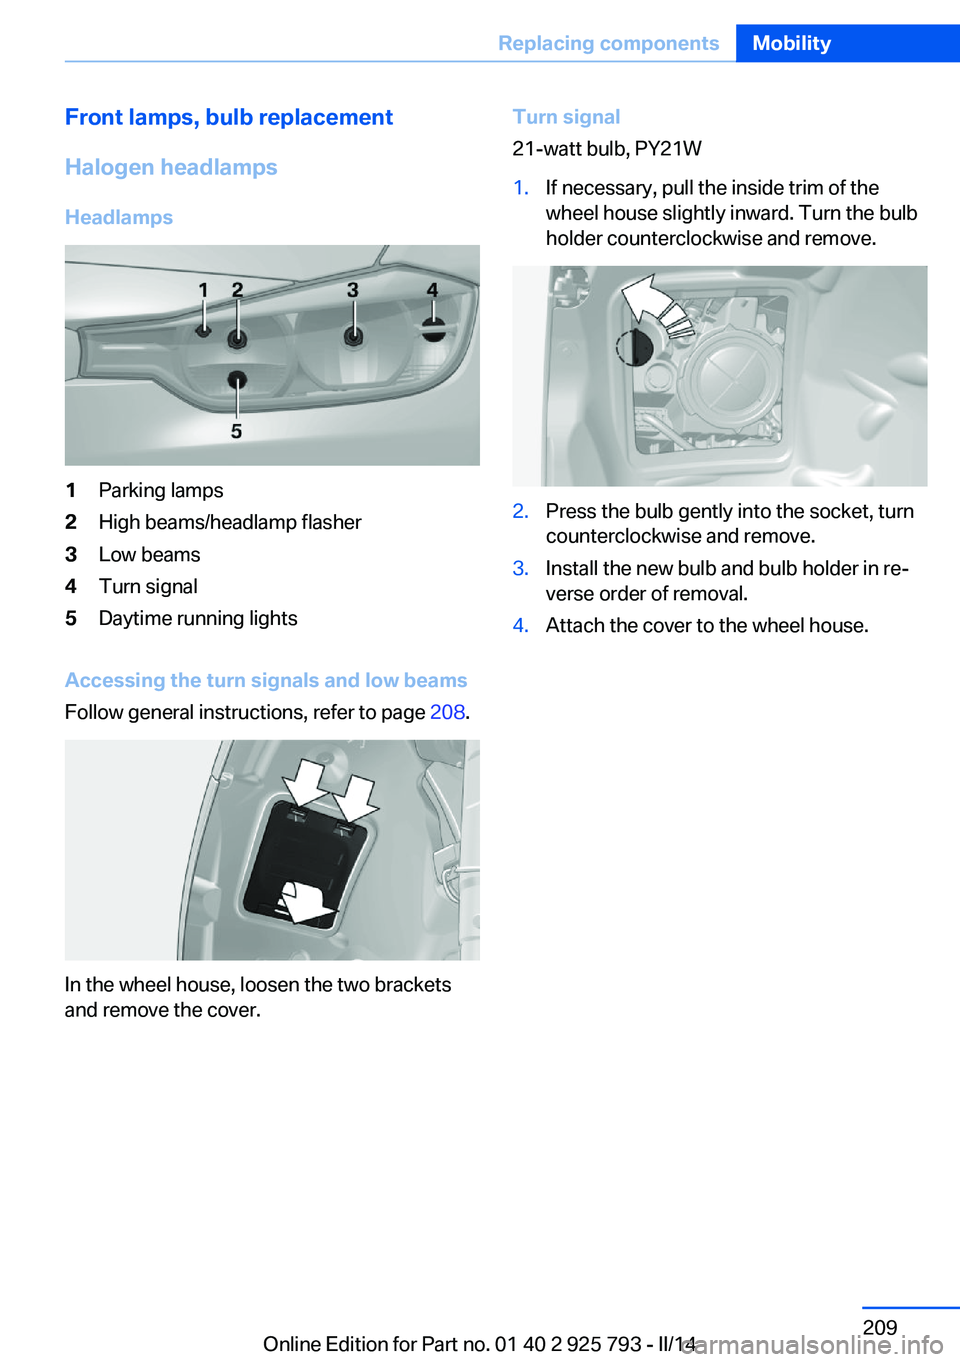
Halogen headlamps Headlamps1Parking lamps2High beams/headlamp flasher3Low beams4Turn signal5Daytime running lights
Accessing the turn signals and low beams
Follow general instructions, refer to page 208.
In the wheel house, loosen the two brackets
and remove the cover.
Turn signal
21-watt bulb, PY21W1.If necessary, pull the inside trim of the
wheel house slightly inward. Turn the bulb
holder counterclockwise and remove.2.Press the bulb gently into the socket, turn
counterclockwise and remove.3.Install the new bulb and bulb holder in re‐
verse order of removal.4.Attach the cover to the wheel house.Seite 209Replacing componentsMobility209
Online Edition for Part no. 01 40 2 925 793 - II/14
Page 210 of 244
Low beams
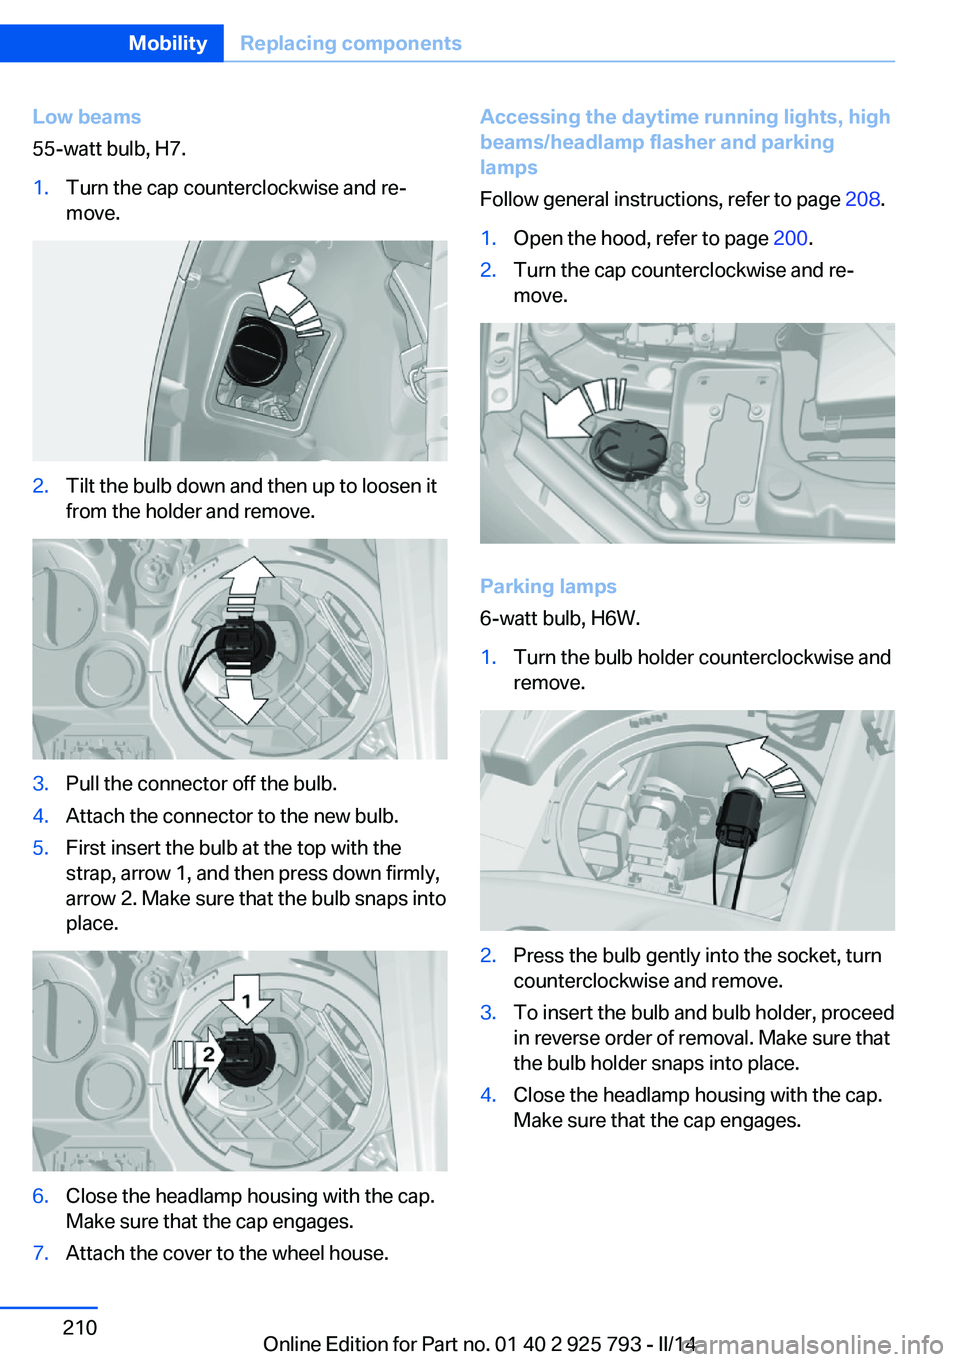
55-watt bulb, H7.1.Turn the cap counterclockwise and re‐
move.2.Tilt the bulb down and then up to loosen it
from the holder and remove.3.Pull the connector off the bulb.4.Attach the connector to the new bulb.5.First insert the bulb at the top with the
strap, arrow 1, and then press down firmly,
arrow 2. Make sure that the bulb snaps into
place.6.Close the headlamp housing with the cap.
Make sure that the cap engages.7.Attach the cover to the wheel house.Accessing the daytime running lights, high
beams/headlamp flasher and parking
lamps
Follow general instructions, refer to page 208.1.Open the hood, refer to page 200.2.Turn the cap counterclockwise and re‐
move.
Parking lamps
6-watt bulb, H6W.
1.Turn the bulb holder counterclockwise and
remove.2.Press the bulb gently into the socket, turn
counterclockwise and remove.3.To insert the bulb and bulb holder, proceed
in reverse order of removal. Make sure that
the bulb holder snaps into place.4.Close the headlamp housing with the cap.
Make sure that the cap engages.Seite 210MobilityReplacing components210
Online Edition for Part no. 01 40 2 925 793 - II/14
Page 211 of 244
High beams/headlamp flasher
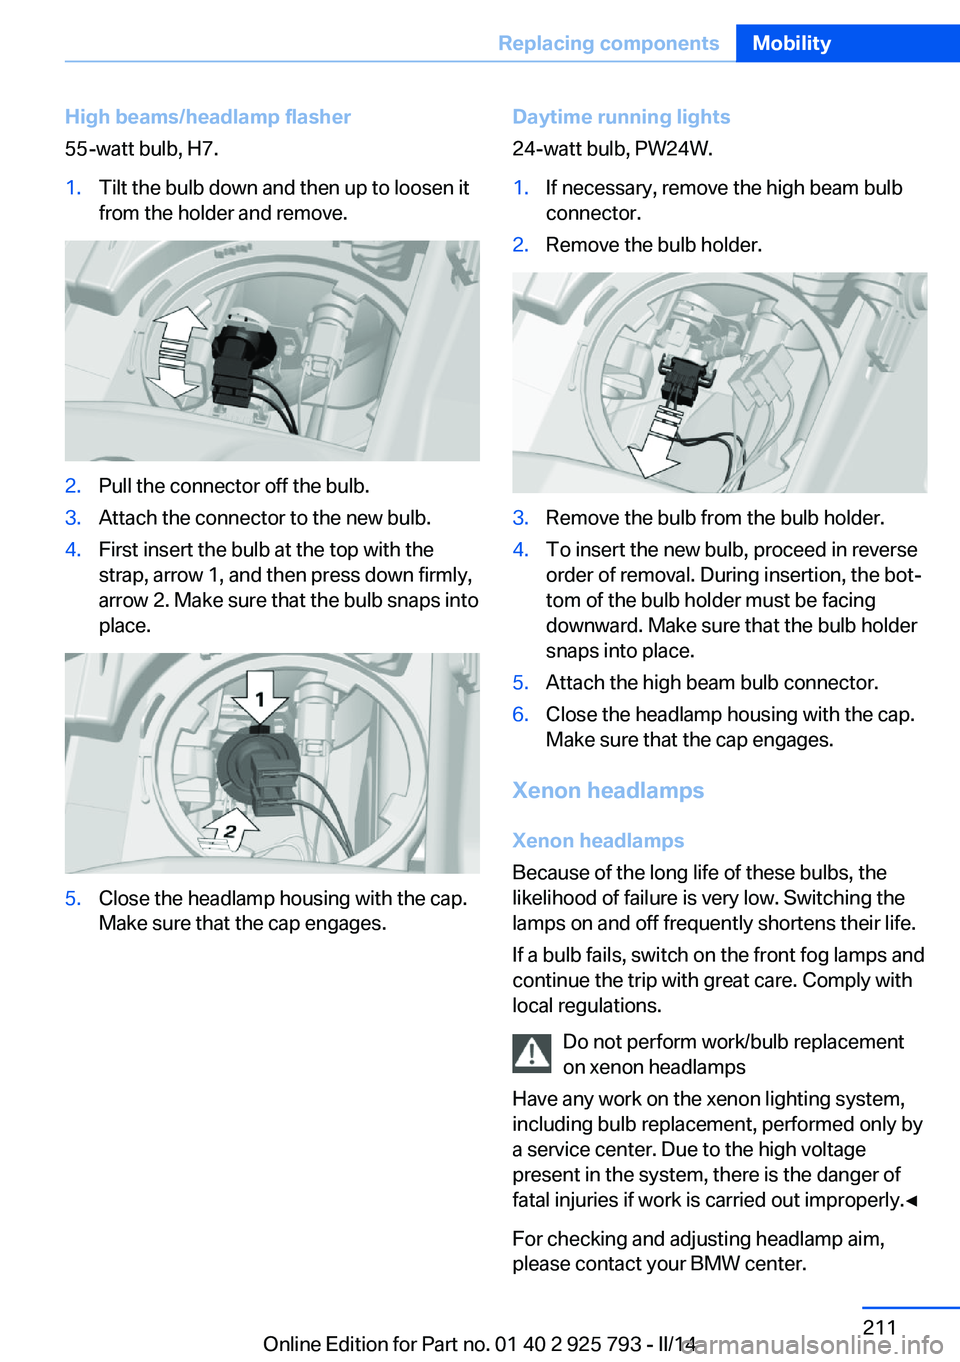
55-watt bulb, H7.1.Tilt the bulb down and then up to loosen it
from the holder and remove.2.Pull the connector off the bulb.3.Attach the connector to the new bulb.4.First insert the bulb at the top with the
strap, arrow 1, and then press down firmly,
arrow 2. Make sure that the bulb snaps into
place.5.Close the headlamp housing with the cap.
Make sure that the cap engages.Daytime running lights
24-watt bulb, PW24W.1.If necessary, remove the high beam bulb
connector.2.Remove the bulb holder.3.Remove the bulb from the bulb holder.4.To insert the new bulb, proceed in reverse
order of removal. During insertion, the bot‐
tom of the bulb holder must be facing
downward. Make sure that the bulb holder
snaps into place.5.Attach the high beam bulb connector.6.Close the headlamp housing with the cap.
Make sure that the cap engages.
Xenon headlamps
Xenon headlamps
Because of the long life of these bulbs, the
likelihood of failure is very low. Switching the
lamps on and off frequently shortens their life.
If a bulb fails, switch on the front fog lamps and
continue the trip with great care. Comply with
local regulations.
Do not perform work/bulb replacement
on xenon headlamps
Have any work on the xenon lighting system,
including bulb replacement, performed only by
a service center. Due to the high voltage
present in the system, there is the danger of
fatal injuries if work is carried out improperly.◀
For checking and adjusting headlamp aim,
please contact your BMW center.
Seite 211Replacing componentsMobility211
Online Edition for Part no. 01 40 2 925 793 - II/14
Page 212 of 244
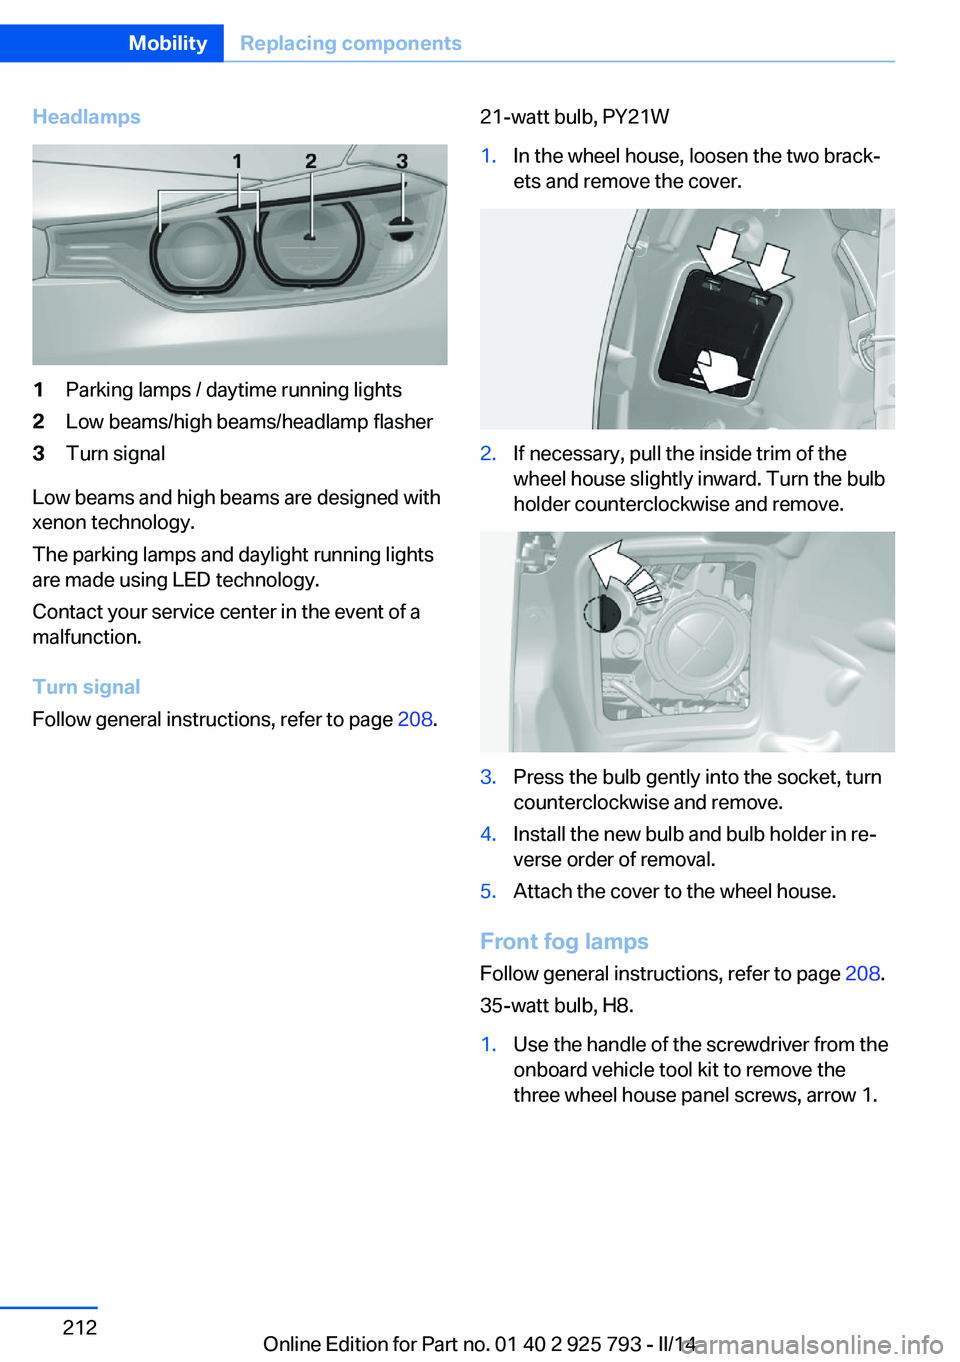
Headlamps1Parking lamps / daytime running lights2Low beams/high beams/headlamp flasher3Turn signal
Low beams and high beams are designed with
xenon technology.
The parking lamps and daylight running lights
are made using LED technology.
Contact your service center in the event of a
malfunction.
Turn signal
Follow general instructions, refer to page 208.
21-watt bulb, PY21W1.In the wheel house, loosen the two brack‐
ets and remove the cover.2.If necessary, pull the inside trim of the
wheel house slightly inward. Turn the bulb
holder counterclockwise and remove.3.Press the bulb gently into the socket, turn
counterclockwise and remove.4.Install the new bulb and bulb holder in re‐
verse order of removal.5.Attach the cover to the wheel house.
Front fog lamps
Follow general instructions, refer to page 208.
35-watt bulb, H8.
1.Use the handle of the screwdriver from the
onboard vehicle tool kit to remove the
three wheel house panel screws, arrow 1.Seite 212MobilityReplacing components212
Online Edition for Part no. 01 40 2 925 793 - II/14
Page 222 of 244
If the first starting attempt is not success‐
ful, wait a few minutes before making an‐
other attempt in order to allow the dis‐
charged battery to recharge.3.Let both engines run for several minutes.4.Disconnect the jumper cables in the re‐
verse order.
Check the battery and recharge if necessary.
Tow-starting and towing Note Tow-starting and towing
When tow-starting and towing the vehi‐
cle, switch off the Intelligent Safety systems;
otherwise, improper behavior of the braking
function of individual systems could result in
an accident.◀
Switching off Intelligent Safety systems, refer
to page 103.
Manual transmission Gearshift lever in neutral position.
Towing Follow the towing instructions
Follow all towing instructions; otherwise,
vehicle damage or accidents may occur.◀
▷Make sure that the ignition is switched on;
otherwise, the low beams, tail lamps, turn
signals, and windshield wipers may be un‐
available.▷Do not tow the vehicle with the rear axle
tilted, as the front wheels could turn.▷When the engine is stopped, there is no
power assist. Consequently, more force
needs to be applied when braking and
steering.▷Larger steering wheel movements are re‐
quired.▷The towing vehicle must not be lighter
than the vehicle being towed; otherwise,
it will not be possible to control the vehicle
response.
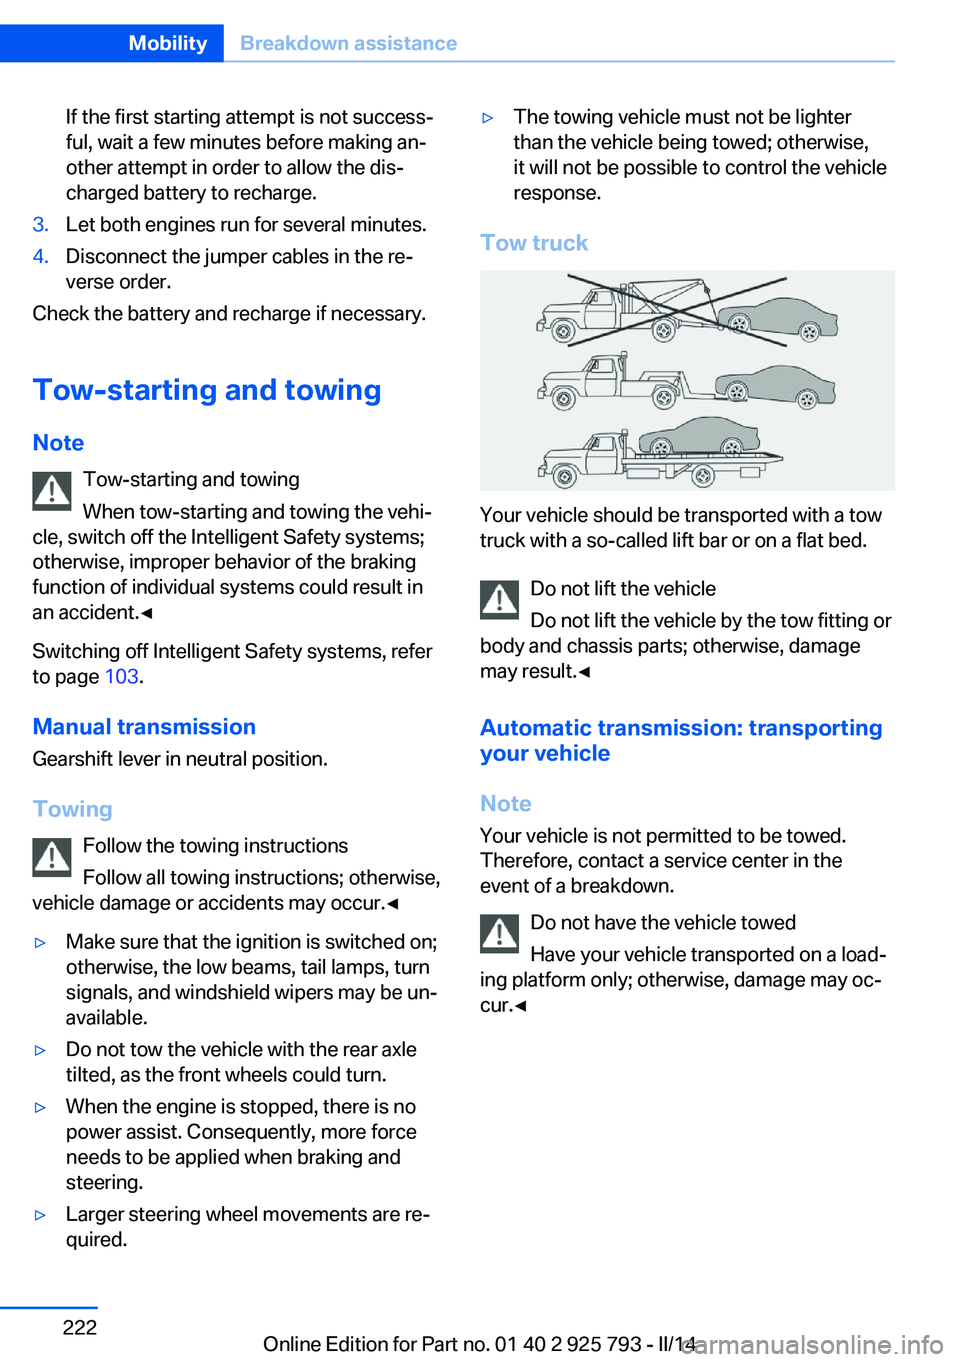
Tow truck
Your vehicle should be transported with a tow
truck with a so-called lift bar or on a flat bed.
Do not lift the vehicle
Do not lift the vehicle by the tow fitting or
body and chassis parts; otherwise, damage
may result.◀
Automatic transmission: transporting
your vehicle
Note Your vehicle is not permitted to be towed.
Therefore, contact a service center in the
event of a breakdown.
Do not have the vehicle towed
Have your vehicle transported on a load‐
ing platform only; otherwise, damage may oc‐
cur.◀
Seite 222MobilityBreakdown assistance222
Online Edition for Part no. 01 40 2 925 793 - II/14
Page 237 of 244
Engine oil filler neck 202
Engine oil temperature 79
Engine oil types, alterna‐ tive 203
Engine oil types, ap‐ proved 203
Engine start during malfunc‐ tion 33
Engine start, jump-start‐ ing 220
Engine start, refer to Starting the engine 63
Engine stop 63
Engine temperature 79
Entering a car wash 225
Equipment, interior 149
ESP Electronic Stability Pro‐ gram, refer to DSC 115
Exchanging wheels/tires 196
Exhaust system 169
Exterior mirror, automatic dimming feature 56
Exterior mirrors 55
External start 220
External temperature dis‐ play 80
External temperature warn‐ ing 80
Eyes for securing cargo 172
F
Failure message, refer to Check Control 77
False alarm, refer to Uninten‐ tional alarm 43
Fan, refer to Air flow 143, 147
Fault displays, refer to Check Control 77
Filler neck for engine oil 202
Fine wood, care 227
First aid kit 220
Fitting for towing, refer to Tow fitting 223 Flat tire, changing
wheels 216
Flat Tire Monitor FTM 101
Flat tire, Tire Pressure Moni‐ tor TPM 98
Flat tire, warning lamp 99, 102
Flooding 169
Floor carpet, care 228
Floor mats, care 228
Fogged up windows 143
Fold-out position, windshield wipers 69
Foot brake 169
Front airbags 95
Front fog lamps 93
Front fog lamps, bulb replace‐ ment 212
Front lamps 209
Front passenger airbags, au‐ tomatic deactivation 97
Front passenger airbags, indi‐ cator lamp 97
FTM Flat Tire Monitor 101
Fuel 186
Fuel cap 184
Fuel consumption, current 81
Fuel consumption, refer to Average fuel consump‐
tion 85
Fuel filler flap 184
Fuel gauge 79
Fuel quality 186
Fuel recommendation 186
Fuel, tank capacity 233
Fuse 217
G
Garage door opener, refer to Universal garage door
opener 149
Gasoline 186
Gear change, automatic transmission 71
Gear shift indicator 82 General driving notes 168
Glass sunroof, refer to Panor‐ amic glass sunroof 45
Glove compartment 159
Gross vehicle weight, ap‐ proved 232
H
Handbrake, refer to parking brake 66
Hand-held transmitter, alter‐ nating code 150
Hazard warning flashers 219
Head airbags 95
Headlamp control, auto‐ matic 91
Headlamp courtesy delay fea‐ ture 90
Headlamp flasher 67
Headlamp glass 208
Headlamps 209
Headlamps, care 226
Headlamp washer system 67
Headliner 15
Head restraints 48
Head restraints, front 52
Head restraints, rear 53
Head-up Display 88
Head-up Display, care 228
Heavy cargo, stowing 172
Height, vehicle 232
High-beam Assistant 92
High beams 67
High beams/low beams, refer to High-beam Assistant 92
Hills 170
Hill start assistant, refer to Drive-off assistant 119
Hints 6
Holder for beverages 161
Homepage 6
Hood 200
Horn 12
Hot exhaust system 169
HUD Head-up Display 88 Seite 237Everything from A to ZReference237
Online Edition for Part no. 01 40 2 925 793 - II/14
Page 238 of 244
Hydroplaning 169
I Ice warning, see External temperature warning 80
Icy roads, see External tem‐ perature warning 80
Identification marks, tires 193
Identification number, refer to Important features in the en‐
gine compartment 199
iDrive 16
Ignition key, refer to Remote control 32
Ignition off 62
Ignition on 62
Indication of a flat tire 99, 102
Indicator and warning lamps 77
Individual air distribu‐ tion 143, 147
Individual settings, refer to Personal Profile 33
Inflation pressure, tires 191
Inflation pressure warning FTM, tires 101
Info display, refer to Com‐ puter 84
Initialize, Tire Pressure Moni‐ tor TPM 99
Initializing, Flat Tire Monitor FTM 102
Instrument cluster 74
Instrument cluster, electronic displays 76
Instrument lighting 93
Integrated key 32
Integrated Owner's Manual in the vehicle 27
Intelligent Emergency Re‐ quest 219
Intelligent Safety 103
Intensity, AUTO pro‐ gram 146
Interior equipment 149 Interior lamps 93
Interior lamps via remote con‐ trol 35
Interior motion sensor 43
Interior rearview mirror, auto‐ matic dimming feature 57
Interior rearview mirror, com‐ pass 151
Interior rearview mirror, man‐ ually dimmable 57
Internet page 6
Interval display, service re‐ quirements 81
J Jacking points for the vehicle jack 216
Joystick, automatic transmis‐ sion 71
Jump-starting 220
K
Key/remote control 32
Keyless Go, refer to Comfort Access 39
Key Memory, refer to Per‐ sonal Profile 33
Kickdown, automatic trans‐ mission 71
Knee airbag 95
L
Lamp replacement 208
Lamp replacement, front 209
Lamp replacement, rear 213
Lamps 90
Lamps and bulbs 208
Lane departure warning 111
Lane margin, warning 111
Language on Control Dis‐ play 87
Lashing eyes, securing cargo 172 LATCH child restraint fixing
system 59
Launch Control 73
Leather, care 226
LEDs, light-emitting di‐ odes 208
Length, vehicle 232
Letters and numbers, enter‐ ing 23
Light alloy wheels, care 227
Light control 91
Light-emitting diodes, LEDs 208
Lighter 153
Lighting 90
Lighting via remote con‐ trol 35
Light switch 90
Load 172
Loading 171
Lock, door 36
Locking/unlocking via door lock 36
Locking/unlocking with re‐ mote control 35
Locking, automatic 42
Locking, settings 41
Lock, power window 45
Locks, doors, and win‐ dows 61
Low beams 90
Low beams, automatic, refer to High-beam Assistant 92
Lower back support 50
Low-Sulfur Diesel 187
Luggage rack, refer to Roof- mounted luggage rack 172
Lumbar support 50
M
Maintenance 205
Maintenance require‐ ments 205
Maintenance, service require‐ ments 81 Seite 238ReferenceEverything from A to Z238
Online Edition for Part no. 01 40 2 925 793 - II/14