2014 BMW 328I XDRIVE SEDAN climate settings
[x] Cancel search: climate settingsPage 34 of 242
▷During unlocking, the profile stored for the
remote control is activated.▷Your personal settings will be recognized
and called up again even if the vehicle has
been operated in the meantime with an‐
other remote control.
Adjusting
The following settings are stored in a profile.
▷Radio: stored stations, station listened to
last.▷Assignment of the programmable memory
buttons.▷Tone settings.▷Audio source listened to last.▷Unlocking the vehicle: driver door or entire
vehicle.▷Locking the vehicle: if no door is open or
after starting off.▷Welcome lamps: on/off.▷Triple turn signal activation: on/off.▷Headlamp courtesy delay feature: time set‐
ting.▷Language on the Control Display.▷Daytime running lights: on/off.▷Automatic climate control/Automatic cli‐
mate control with enhanced features: set‐
tings.▷Navigation: map views, route criteria, voice
output on/off.▷Park Distance Control PDC: adjusting the
signal tone volume.▷Rearview camera: selection of functions
and type of display.▷Side view: display type.▷Head-up Display: selection, brightness,
position and rotation of the display.▷Driving Dynamics Control: sport program.▷Exterior mirror position.▷Driver's seat position: automatically re‐
trieved after unlocking.▷Collision warning: warning time.▷Lane departure warning: last setting, on/
off.▷Active Blind Spot Detection: last setting,
on/off.
Profile management
Opening the profiles A different profile can be called up than the
one associated with the remote control cur‐
rently in use.
1."Settings"2."Profiles"3.Select a profile.
Called up profile is assigned to the remote
control being used at the time.
Renaming profiles
1."Settings"2."Profiles"3.Open "Options".4."Rename current profile"
Resetting profiles The settings of the active profile are reset to
their default values.
1."Settings"2."Profiles"3.Open "Options".4."Reset current profile"
Exporting profiles
Most settings of the active profile and the
saved contacts can be exported.
This can be helpful for securing and retrieving
personal settings, before delivering the vehicle
to a workshop for example. The saved profiles
Seite 34ControlsOpening and closing34
Online Edition for Part no. 01 40 2 925 743 - II/14
Page 141 of 242
Climate controlVehicle equipment
All standard, country-specific and optional
equipment that is offered in the model series is
described in this chapter. Therefore, equip‐ment is also described that is not available in a
vehicle, e. g., because of the selected optional
equipment or country variant. This also applies
for safety-related functions and systems.
Automatic climate control
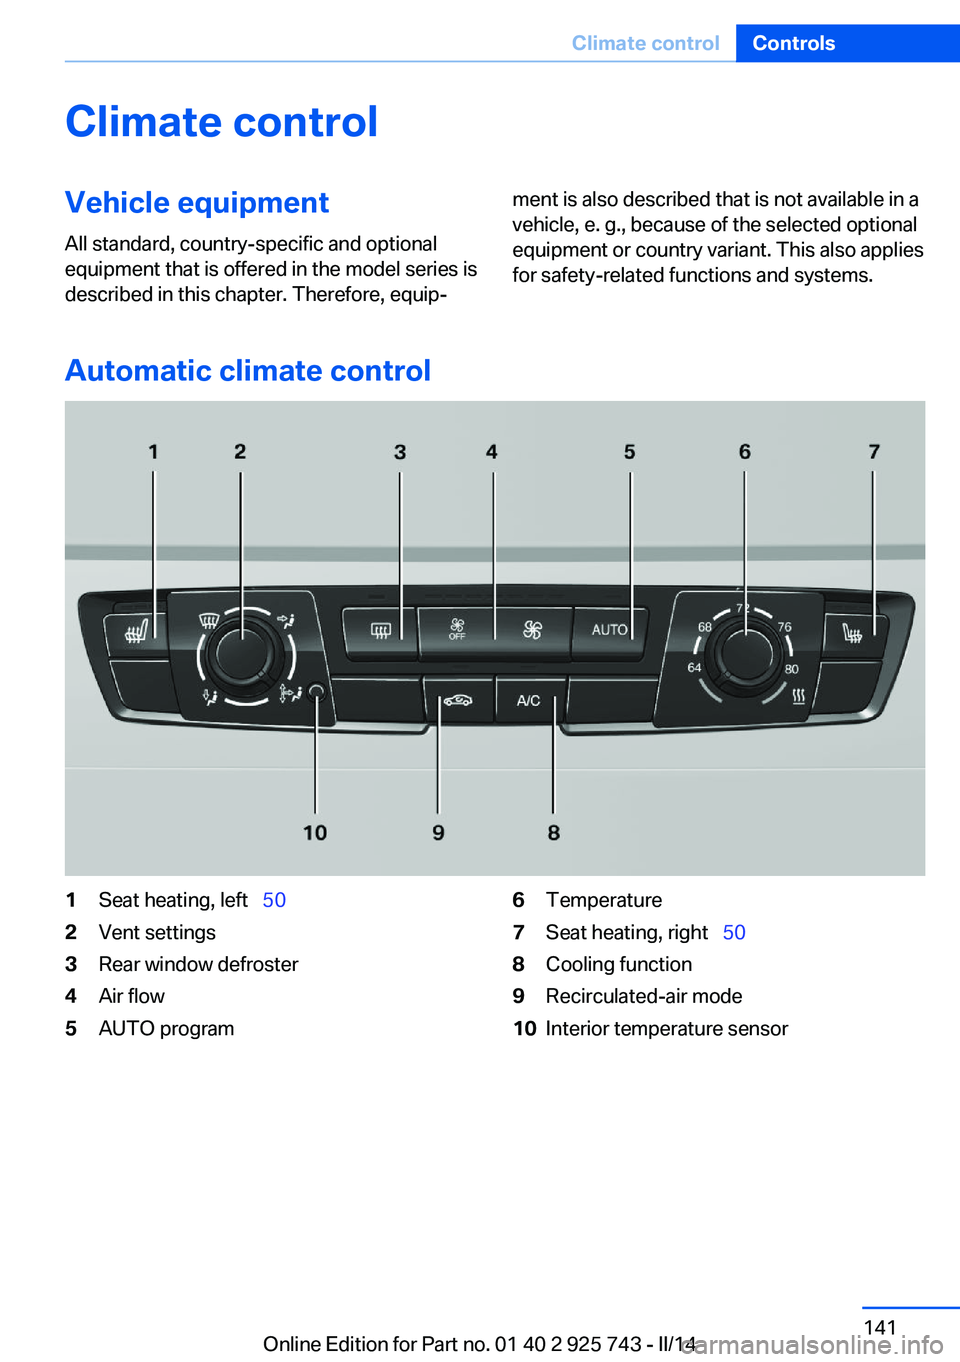
1Seat heating, left 502Vent settings3Rear window defroster4Air flow5AUTO program6Temperature7Seat heating, right 508Cooling function9Recirculated-air mode10Interior temperature sensorSeite 141Climate controlControls141
Online Edition for Part no. 01 40 2 925 743 - II/14
Page 142 of 242
Climate control functions in detail
Manual air distribution Turn the wheel to select the de‐
sired program or the desired in‐
termediate setting.▷ Windows.▷ Upper body region.▷ Windows, upper body region, and foot‐
well.▷ Footwell.
Defrosting windows and removing
condensation
Direct the air distribution toward windows, in‐
crease the air flow and temperature, and, if
necessary, use the cooling function.
Rear window defroster Press the button.
The rear window defroster switches
off automatically after a certain period of time.
Air flow, manual Press the left or right side of the but‐
ton: decrease or increase air flow.
The air flow of the air conditioner may be re‐
duced automatically to save battery power.
AUTO program Press the button.
Air flow, air distribution, and tempera‐
ture are controlled automatically.
Depending on the selected temperature and
outside influences, the air is directed to the
windshield, side windows, upper body, and
into the footwell.
The cooling function, refer to page 142, is
switched on automatically with the AUTO pro‐
gram.
Temperature Turn the wheel to set the de‐sired temperature.
The automatic climate control reaches this
temperature as quickly as possible, if neces‐
sary by increasing the cooling or heating out‐
put, and then keeps it constant.
Avoid rapidly switching between different tem‐
perature settings. Otherwise, the automatic cli‐
mate control will not have sufficient time to ad‐
just the set temperature.
Cooling function The passenger compartment can only be
cooled with the engine running.
Press the button.
The air is cooled and dehumidified
and, depending on the temperature setting,
warmed again.
Depending on the weather, the windshield may
fog up briefly when the engine is started.
The cooling function is switched on automati‐
cally with the AUTO program.
When using the automatic climate control,
condensation water, refer to page 164, devel‐
ops that exits underneath the vehicle.
Recirculated-air mode You can respond to unpleasant odors or pollu‐
tants in the immediate environment by tempo‐
rarily suspending the supply of outside air. The
system then recirculates the air currently within the vehicle.
Press the button repeatedly to select
an operating mode:Seite 142ControlsClimate control142
Online Edition for Part no. 01 40 2 925 743 - II/14
Page 144 of 242
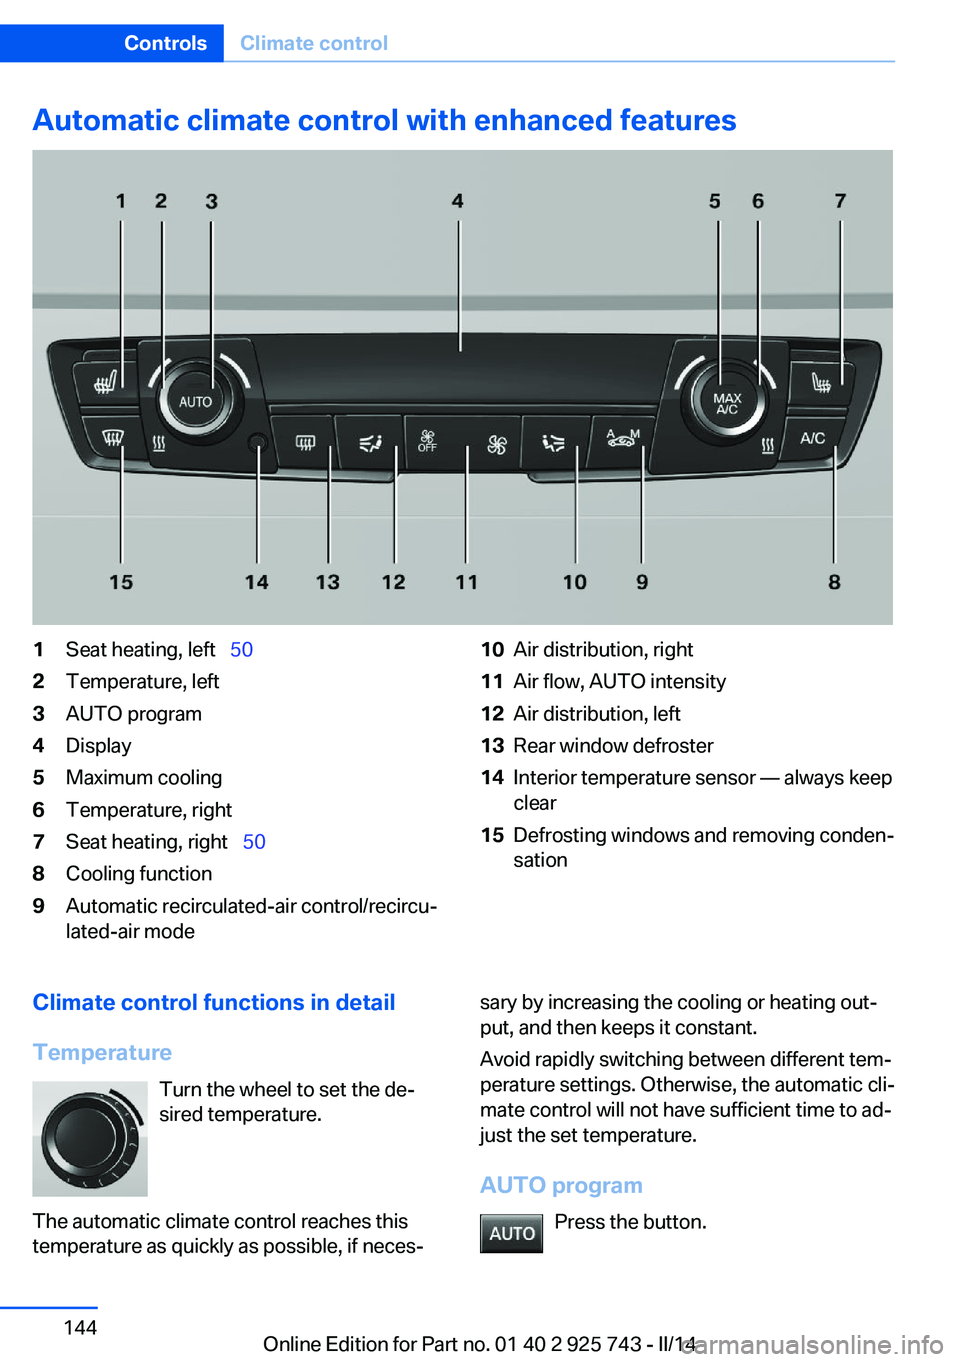
Automatic climate control with enhanced features1Seat heating, left 502Temperature, left3AUTO program4Display5Maximum cooling6Temperature, right7Seat heating, right 508Cooling function9Automatic recirculated-air control/recircu‐
lated-air mode10Air distribution, right11Air flow, AUTO intensity12Air distribution, left13Rear window defroster14Interior temperature sensor — always keep
clear15Defrosting windows and removing conden‐
sationClimate control functions in detail
Temperature Turn the wheel to set the de‐
sired temperature.
The automatic climate control reaches this
temperature as quickly as possible, if neces‐sary by increasing the cooling or heating out‐
put, and then keeps it constant.
Avoid rapidly switching between different tem‐
perature settings. Otherwise, the automatic cli‐
mate control will not have sufficient time to ad‐
just the set temperature.
AUTO program Press the button.Seite 144ControlsClimate control144
Online Edition for Part no. 01 40 2 925 743 - II/14
Page 147 of 242
Toward red: warmer.
Adjusting the ventilation
▷Ventilation for cooling:
Adjust the vent to direct the air in your di‐
rection, such as if the vehicle interior is hot
from the sun.▷Draft-free ventilation:
Adjust the vent to let the air flow past you.
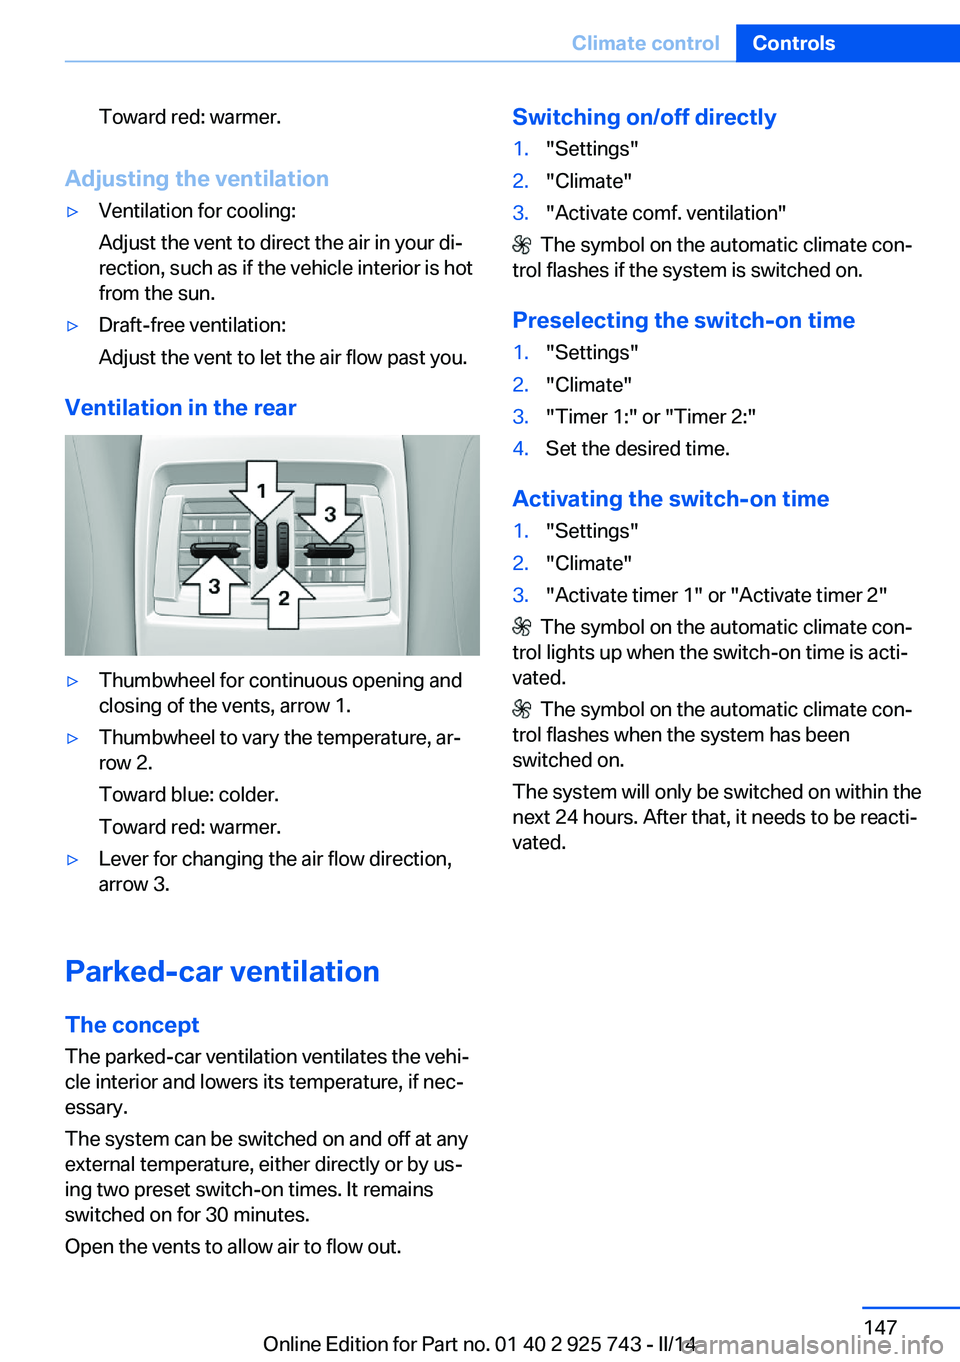
Ventilation in the rear
▷Thumbwheel for continuous opening and
closing of the vents, arrow 1.▷Thumbwheel to vary the temperature, ar‐
row 2.
Toward blue: colder.
Toward red: warmer.▷Lever for changing the air flow direction,
arrow 3.
Parked-car ventilation
The concept The parked-car ventilation ventilates the vehi‐
cle interior and lowers its temperature, if nec‐
essary.
The system can be switched on and off at any
external temperature, either directly or by us‐
ing two preset switch-on times. It remains
switched on for 30 minutes.
Open the vents to allow air to flow out.
Switching on/off directly1."Settings"2."Climate"3."Activate comf. ventilation"
The symbol on the automatic climate con‐
trol flashes if the system is switched on.
Preselecting the switch-on time
1."Settings"2."Climate"3."Timer 1:" or "Timer 2:"4.Set the desired time.
Activating the switch-on time
1."Settings"2."Climate"3."Activate timer 1" or "Activate timer 2"
The symbol on the automatic climate con‐
trol lights up when the switch-on time is acti‐
vated.
The symbol on the automatic climate con‐
trol flashes when the system has been
switched on.
The system will only be switched on within the
next 24 hours. After that, it needs to be reacti‐
vated.
Seite 147Climate controlControls147
Online Edition for Part no. 01 40 2 925 743 - II/14
Page 170 of 242
In addition, context-sensitive instructions can
be displayed that assist in driving in a manner
that optimizes fuel consumption.
In the instrument display, the extension of the
range achieved by this can be displayed as a
bonus range.
At a glance The system includes the following
EfficientDynamics functions and displays:▷ECO PRO bonus range, refer to page 170.▷ECO PRO tips driving instruction, refer to
page 171▷ECO PRO climate control, refer to
page 170.▷ECO PRO coasting driving status, refer to
page 172.▷ECO PRO driving style analysis, refer to
page 173.
Activate ECO PRO
Press button repeatedly until ECO
PRO is displayed in the instrument
cluster.
Configuring ECO PRO
Via the Driving Dynamics Control
1.Activate ECO PRO.2."Configure ECO PRO"3.Configure the program.
Via the iDrive
1."Settings"2."ECO PRO mode"
Or
1."Settings"2."Driving mode"3."Configure ECO PRO"
Configure the program.
ECO PRO Tip▷"Tip at:":
Set ECO Pro speed at which an ECO PRO
Tip is to be displayed.▷"ECO PRO speed warning":
A reminder is displayed if the set ECO PRO
speed is exceeded.
Coasting
Fuel-efficiency can be optimized by disengag‐
ing the engine and Coasting, refer to
page 172, with the engine idling.
This function is only available in ECO PRO
mode.
ECO PRO climate control
"ECO PRO climate control"
The climate control is adjusted to be fuel-effi‐
cient.
By making a slight change to the set tempera‐
ture, or slowly adjusting the rate of heating or
cooling of the passenger compartment, fuel
consumption can be economized.
The outputs of the seat heater and the exterior
mirror heating are also reduced.
The exterior mirror heating is made available
when outside temperatures are very cold.
ECO PRO potential
The percentage of potential savings that can
be achieved with the current configuration is
displayed.
Display in the instrument cluster
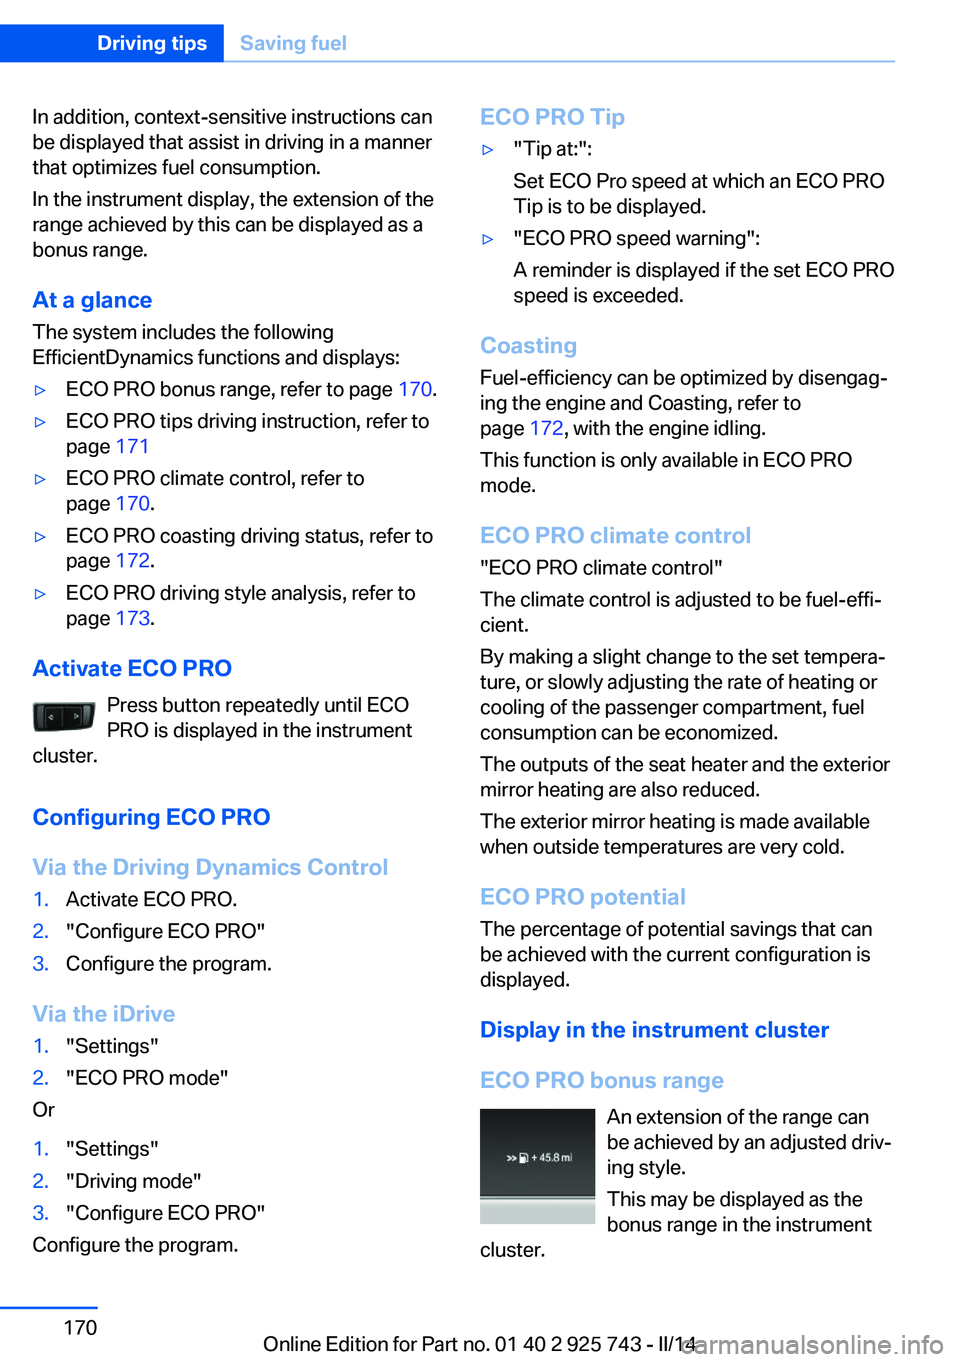
ECO PRO bonus range An extension of the range can
be achieved by an adjusted driv‐
ing style.
This may be displayed as the
bonus range in the instrument
cluster.
Seite 170Driving tipsSaving fuel170
Online Edition for Part no. 01 40 2 925 743 - II/14
Page 233 of 242
Brake discs, breaking in 162
Brake force display 113
Brake lamps, brake force dis‐ play 113
Brake lights, adaptive 113
Brake pads, breaking in 162
Braking, hints 163
Breakdown assis‐ tance 215, 216
Breaking in 162
Brightness of Control Dis‐ play 87
Bulb replacement 204
Bulb replacement, front 205
Bulb replacement, halogen headlamps 205
Bulb replacement, rear 210
Bulb replacement, xenon headlamps 208
Bulbs and lamps 204
Button, RES 122
Button, Start/Stop 61
Bypassing, refer to Jump- starting 216
C
California Proposition 65 Warning 7
Camera, care 224
Camera, rearview cam‐ era 131
Camera, Side View 133
Camera, Top View 135
Can holder, refer to Cu‐ pholder 158
Car battery 212
Car care products 222
Care, displays 224
Care, vehicle 222
Cargo 165
Cargo area, enlarging 154
Cargo area, storage compart‐ ments 159
Cargo, securing 166 Cargo straps, securing
cargo 166
Car key, refer to Remote con‐ trol 32
Carpet, care 224
Car wash 221
Catalytic converter, refer to Hot exhaust system 163
CBS Condition Based Serv‐ ice 202
CD/Multimedia, see user's manual for Navigation, En‐
tertainment and Communi‐
cation
Center armrest 157
Center console 14
Central locking system 37
Central screen, refer to Con‐ trol Display 16
Changes, technical, refer to Safety 7
Changing parts 204
Changing wheels 212
Changing wheels/tires 193
Check Control 76
Checking the oil level elec‐ tronically 198
Children, seating position 57
Children, transporting safely 57
Child restraint fixing sys‐ tem 57
Child restraint fixing system LATCH 58
Child restraint fixing systems, mounting 57
Child safety locks 60
Child seat, mounting 57
Child seats 57
Chrome parts, care 223
Cigarette lighter 152
Cleaning, displays 224
Climate control 141, 144
Clock 79
Closing/opening via door lock 37 Closing/opening with remote
control 35
Clothes hooks 158
Coasting 172
Coasting with engine decou‐ pled, coasting 172
Coasting with idling en‐ gine 172
Cockpit 12
Cold starting, refer to Starting the engine 62
Collision warning with braking function 106
Collision warning with City Braking function 103
Combination switch, refer to Turn signals 65
Combination switch, refer to Wiper system 66
Comfort Access 39
COMFORT program, Dy‐ namic Driving Control 117
Compartments in the doors 157
Compass 150
Computer 83
Condensation on win‐ dows 146
Condensation under the vehi‐ cle 164
Condition Based Service CBS 202
Configuring drive pro‐ gram 117
Confirmation signal 41
ConnectedDrive, see user's manual for Navigation, En‐
tertainment and Communi‐
cation
ConnectedDrive Services
Connecting electrical devi‐ ces 152
Control Display 16
Control Display, settings 86
Controller 16, 17 Seite 233Everything from A to ZReference233
Online Edition for Part no. 01 40 2 925 743 - II/14