2014 BMW 328I XDRIVE GRAN TURISMO power steering
[x] Cancel search: power steeringPage 12 of 240
CockpitVehicle equipment
All standard, country-specific and optional
equipment that is offered in the model series is
described in this chapter. Therefore, equip‐ment is also described that is not available in a
vehicle, e. g., because of the selected optional
equipment or country variant. This also applies
for safety-related functions and systems.
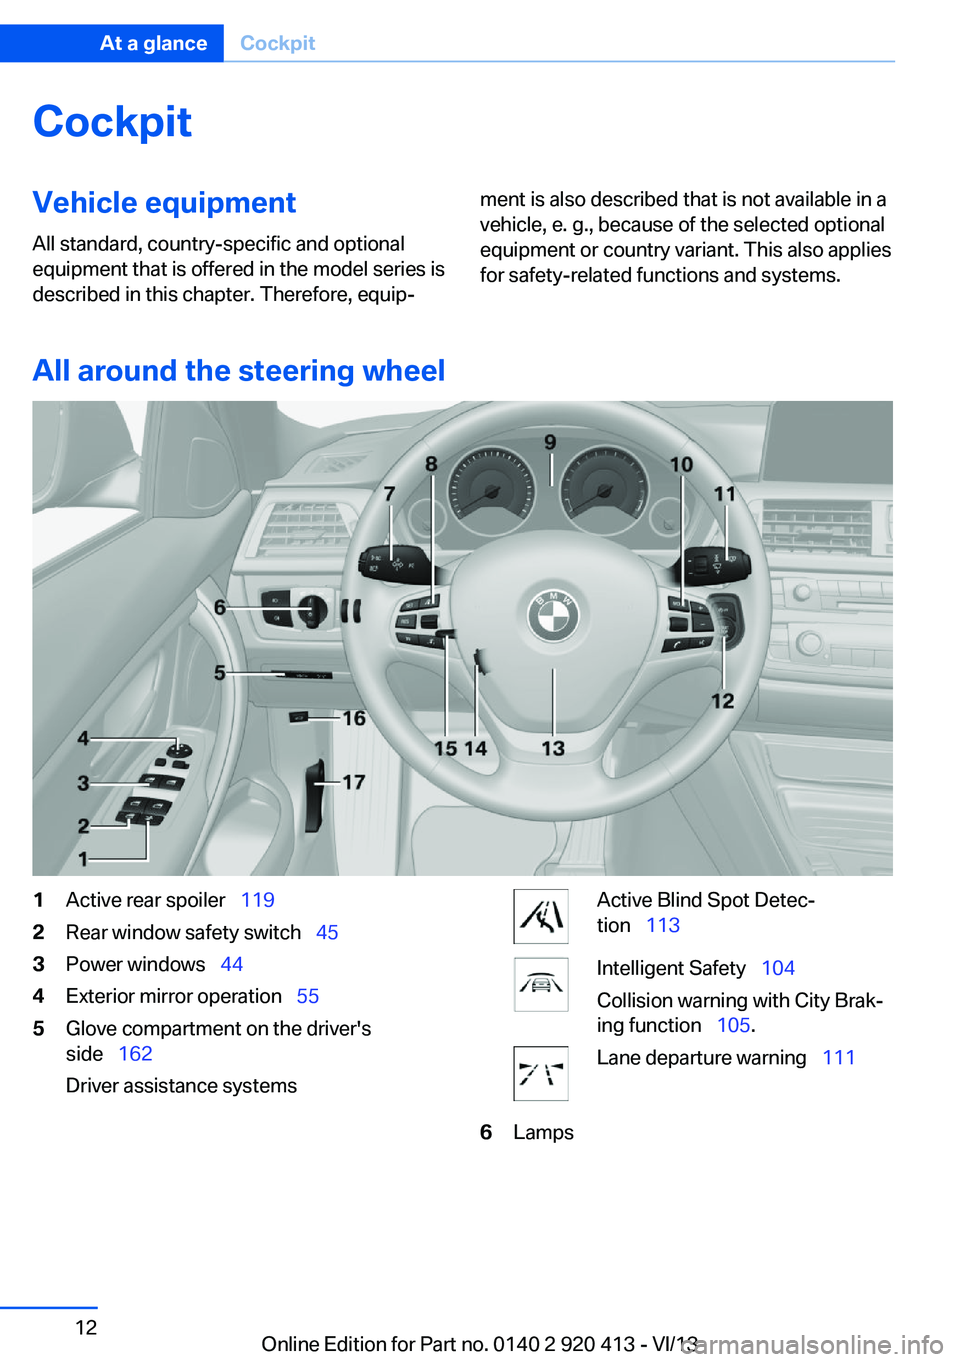
All around the steering wheel
1Active rear spoiler 1192Rear window safety switch 453Power windows 444Exterior mirror operation 555Glove compartment on the driver's
side 162
Driver assistance systemsActive Blind Spot Detec‐
tion 113Intelligent Safety 104
Collision warning with City Brak‐
ing function 105.Lane departure warning 1116LampsSeite 12At a glanceCockpit12
Online Edition for Part no. 0140 2 920 413 - VI/13
Page 54 of 240
RemovingOnly remove the head restraint if no one will be
sitting in the seat in question.
Fold the seat down, refer to page 160, before
removing the head restraint, otherwise the
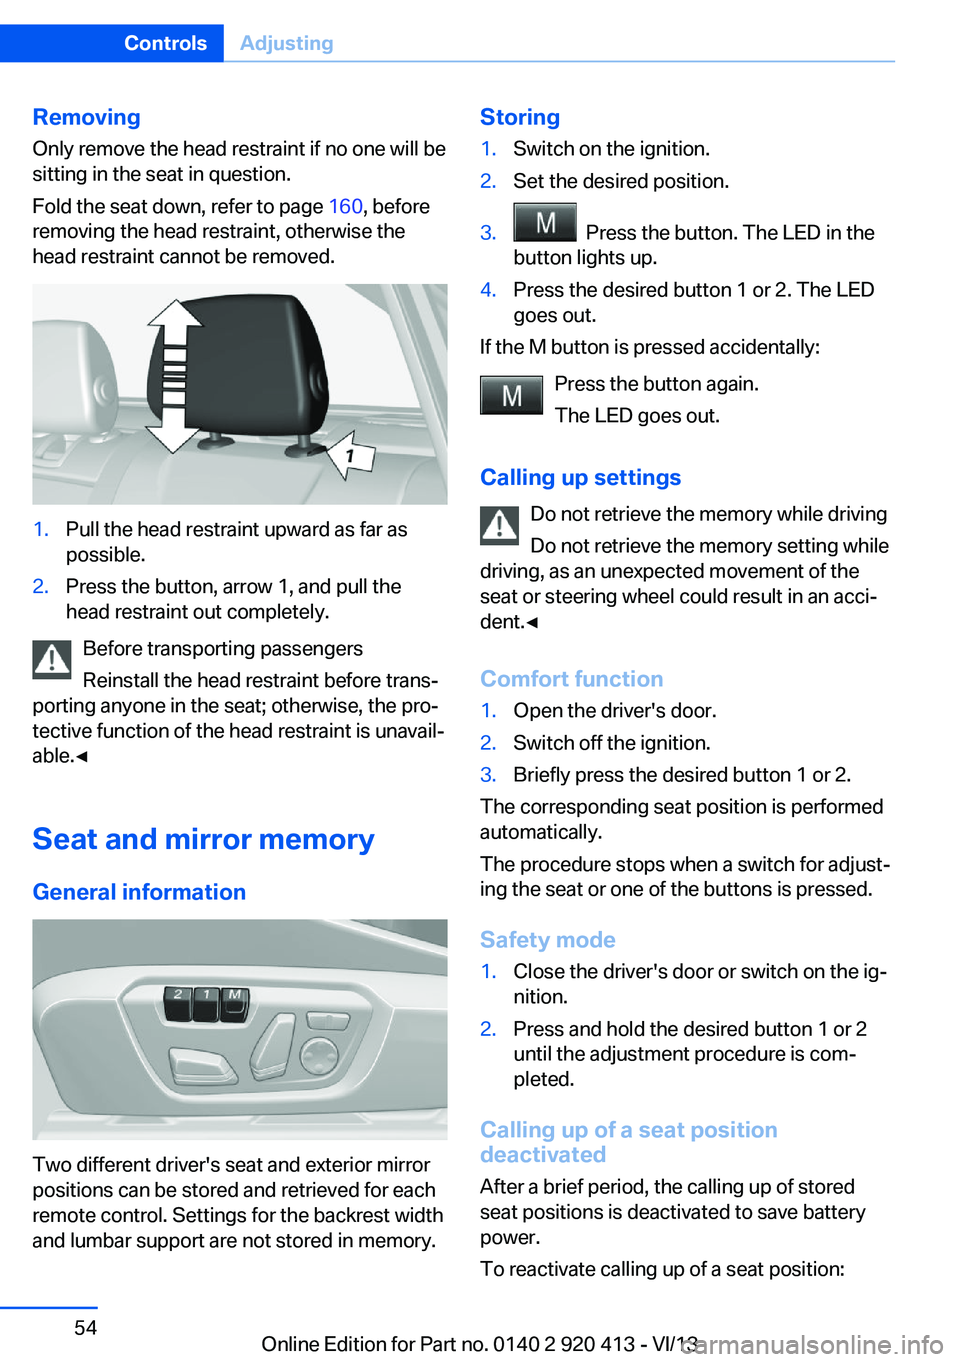
head restraint cannot be removed.1.Pull the head restraint upward as far as
possible.2.Press the button, arrow 1, and pull the
head restraint out completely.
Before transporting passengers
Reinstall the head restraint before trans‐
porting anyone in the seat; otherwise, the pro‐
tective function of the head restraint is unavail‐
able.◀
Seat and mirror memory
General information
Two different driver's seat and exterior mirror
positions can be stored and retrieved for each
remote control. Settings for the backrest width
and lumbar support are not stored in memory.
Storing1.Switch on the ignition.2.Set the desired position.3. Press the button. The LED in the
button lights up.4.Press the desired button 1 or 2. The LED
goes out.
If the M button is pressed accidentally:
Press the button again.
The LED goes out.
Calling up settings Do not retrieve the memory while driving
Do not retrieve the memory setting while
driving, as an unexpected movement of the
seat or steering wheel could result in an acci‐
dent.◀
Comfort function
1.Open the driver's door.2.Switch off the ignition.3.Briefly press the desired button 1 or 2.
The corresponding seat position is performed
automatically.
The procedure stops when a switch for adjust‐
ing the seat or one of the buttons is pressed.
Safety mode
1.Close the driver's door or switch on the ig‐
nition.2.Press and hold the desired button 1 or 2
until the adjustment procedure is com‐
pleted.
Calling up of a seat position
deactivated
After a brief period, the calling up of stored
seat positions is deactivated to save battery
power.
To reactivate calling up of a seat position:
Seite 54ControlsAdjusting54
Online Edition for Part no. 0140 2 920 413 - VI/13
Page 123 of 240
Driving comfortVehicle equipment
All standard, country-specific and optional
equipment that is offered in the model series is
described in this chapter. Therefore, equip‐
ment is also described that is not available in a
vehicle, e. g., because of the selected optional
equipment or country variant. This also applies
for safety-related functions and systems.
Active Cruise Control with Stop & Go function, ACC
The conceptThis system can be used to select a desired
speed that the vehicle will maintain automati‐
cally on clear roads.
To the extent possible, the system automati‐
cally adjusts the speed to a slower vehicle
ahead of you.
The distance that the vehicle maintains to the
vehicle ahead of you can be varied.
For safety reasons, it depends on the speed.
To maintain a certain distance, the system au‐
tomatically decelerates, applies the brakes
lightly, or accelerates again if the vehicle ahead
begins moving faster.
If the vehicle ahead of you brakes to a halt, the
system is able to detect this within the given
system limits. If the vehicle ahead of your
drives away again from a halt, your vehicle is
able to accelerate if operated accordingly.
Even if some time passes before the vehicle
drives away again, the BMW can still be accel‐
erated automatically and simply.
As soon as the road is clear, it accelerates to
the desired speed.
The speed is also maintained on downhill gra‐
dients, but may not be maintained on uphill
slopes if engine power is insufficient.General information
When ECO PRO is activated, cruise control is
also set to a driving style that saves on fuel
consumption.
Notes Personal responsibility
The system does not relieve the driver of
the responsibility to adapt his or her speed,
distance and driving style to the traffic condi‐
tions. Drive attentively, and react to the current
traffic events. Intervene actively when neces‐
sary, e.g., by braking, steering or making an
evasive maneuver, otherwise, there is danger
of an accident.◀
At a glance
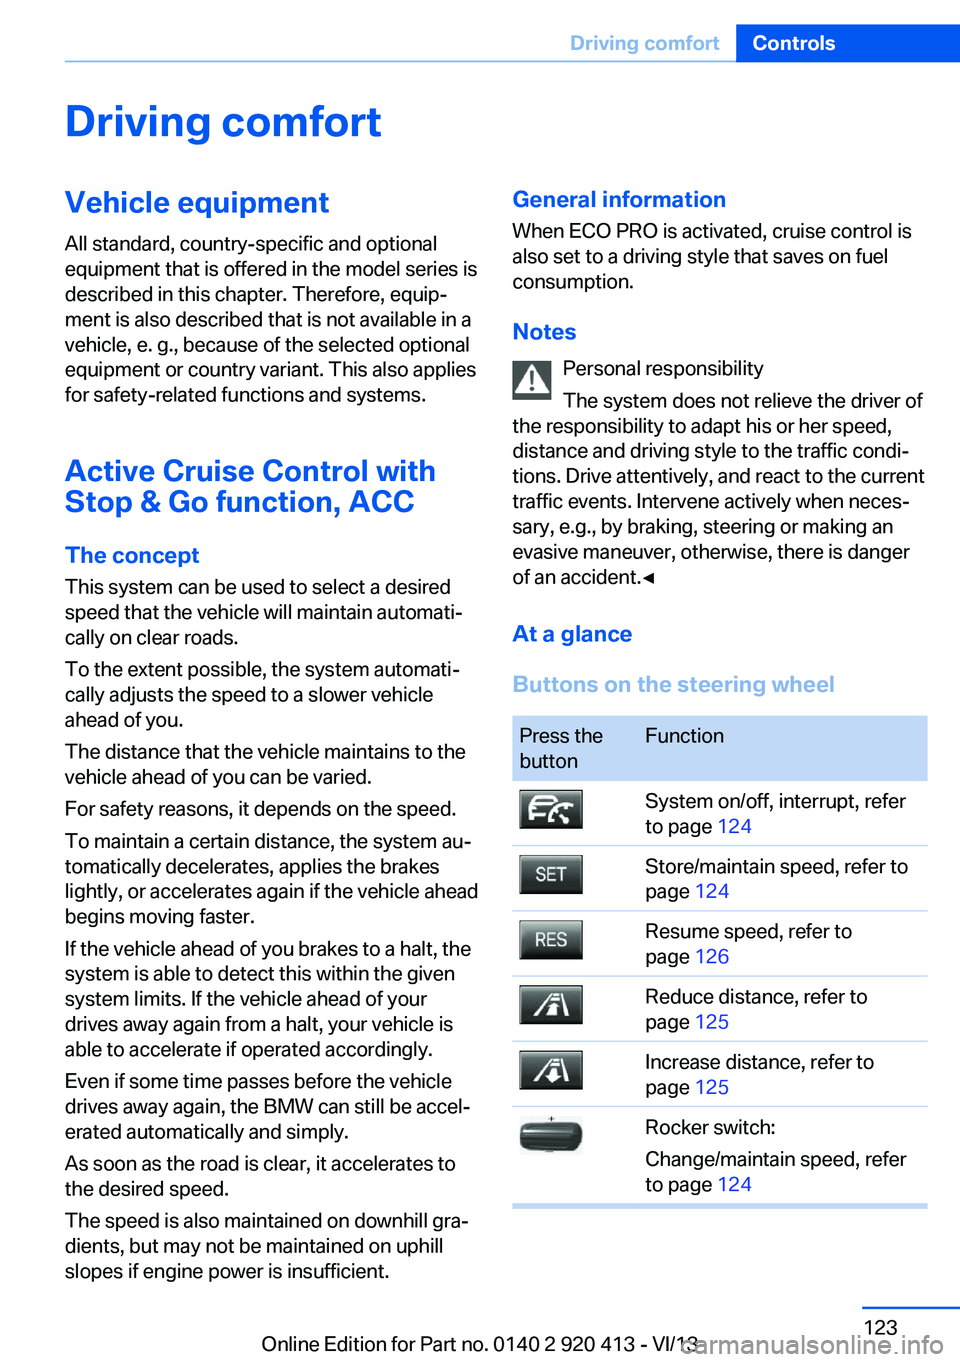
Buttons on the steering wheelPress the
buttonFunctionSystem on/off, interrupt, refer
to page 124Store/maintain speed, refer to
page 124Resume speed, refer to
page 126Reduce distance, refer to
page 125Increase distance, refer to
page 125Rocker switch:
Change/maintain speed, refer
to page 124Seite 123Driving comfortControls123
Online Edition for Part no. 0140 2 920 413 - VI/13
Page 156 of 240
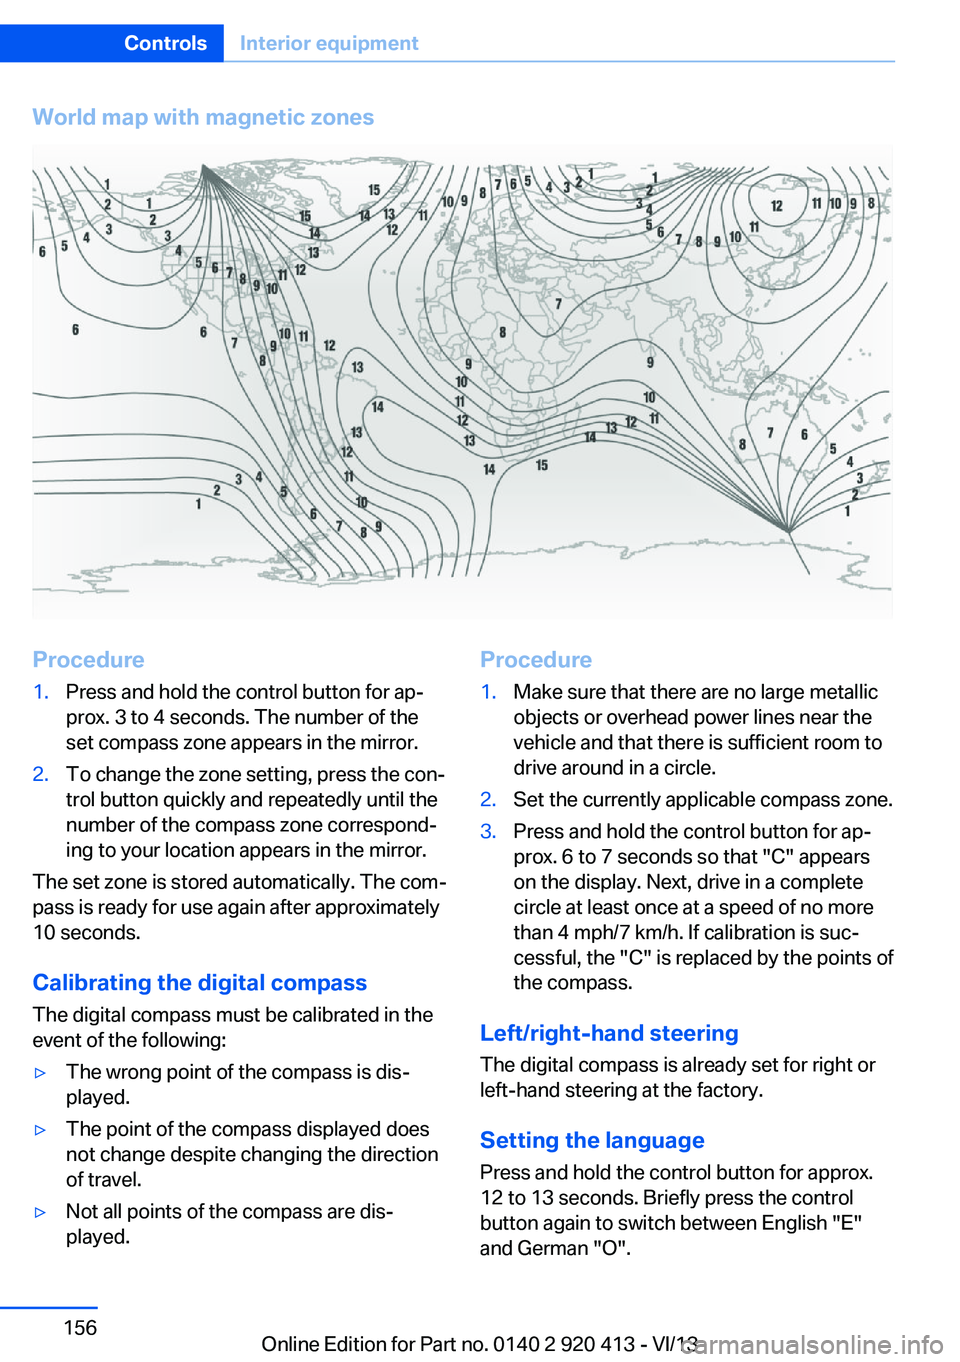
World map with magnetic zonesProcedure1.Press and hold the control button for ap‐
prox. 3 to 4 seconds. The number of the
set compass zone appears in the mirror.2.To change the zone setting, press the con‐
trol button quickly and repeatedly until the
number of the compass zone correspond‐
ing to your location appears in the mirror.
The set zone is stored automatically. The com‐
pass is ready for use again after approximately
10 seconds.
Calibrating the digital compass
The digital compass must be calibrated in the
event of the following:
▷The wrong point of the compass is dis‐
played.▷The point of the compass displayed does
not change despite changing the direction
of travel.▷Not all points of the compass are dis‐
played.Procedure1.Make sure that there are no large metallic
objects or overhead power lines near the
vehicle and that there is sufficient room to
drive around in a circle.2.Set the currently applicable compass zone.3.Press and hold the control button for ap‐
prox. 6 to 7 seconds so that "C" appears
on the display. Next, drive in a complete
circle at least once at a speed of no more
than 4 mph/7 km/h. If calibration is suc‐
cessful, the "C" is replaced by the points of
the compass.
Left/right-hand steering
The digital compass is already set for right or
left-hand steering at the factory.
Setting the language
Press and hold the control button for approx.
12 to 13 seconds. Briefly press the control
button again to switch between English "E"
and German "O".
Seite 156ControlsInterior equipment156
Online Edition for Part no. 0140 2 920 413 - VI/13
Page 217 of 240
other attempt in order to allow the dis‐
charged battery to recharge.3.Let both engines run for several minutes.4.Disconnect the jumper cables in the re‐
verse order.
Check the battery and recharge if necessary.
Tow-starting and towing Automatic transmission: transporting
your vehicle
Note
Your vehicle is not permitted to be towed.
Therefore, contact a service center in the
event of a breakdown.
Do not have the vehicle towed
Have your vehicle transported on a load‐
ing platform only; otherwise, damage may oc‐
cur.◀
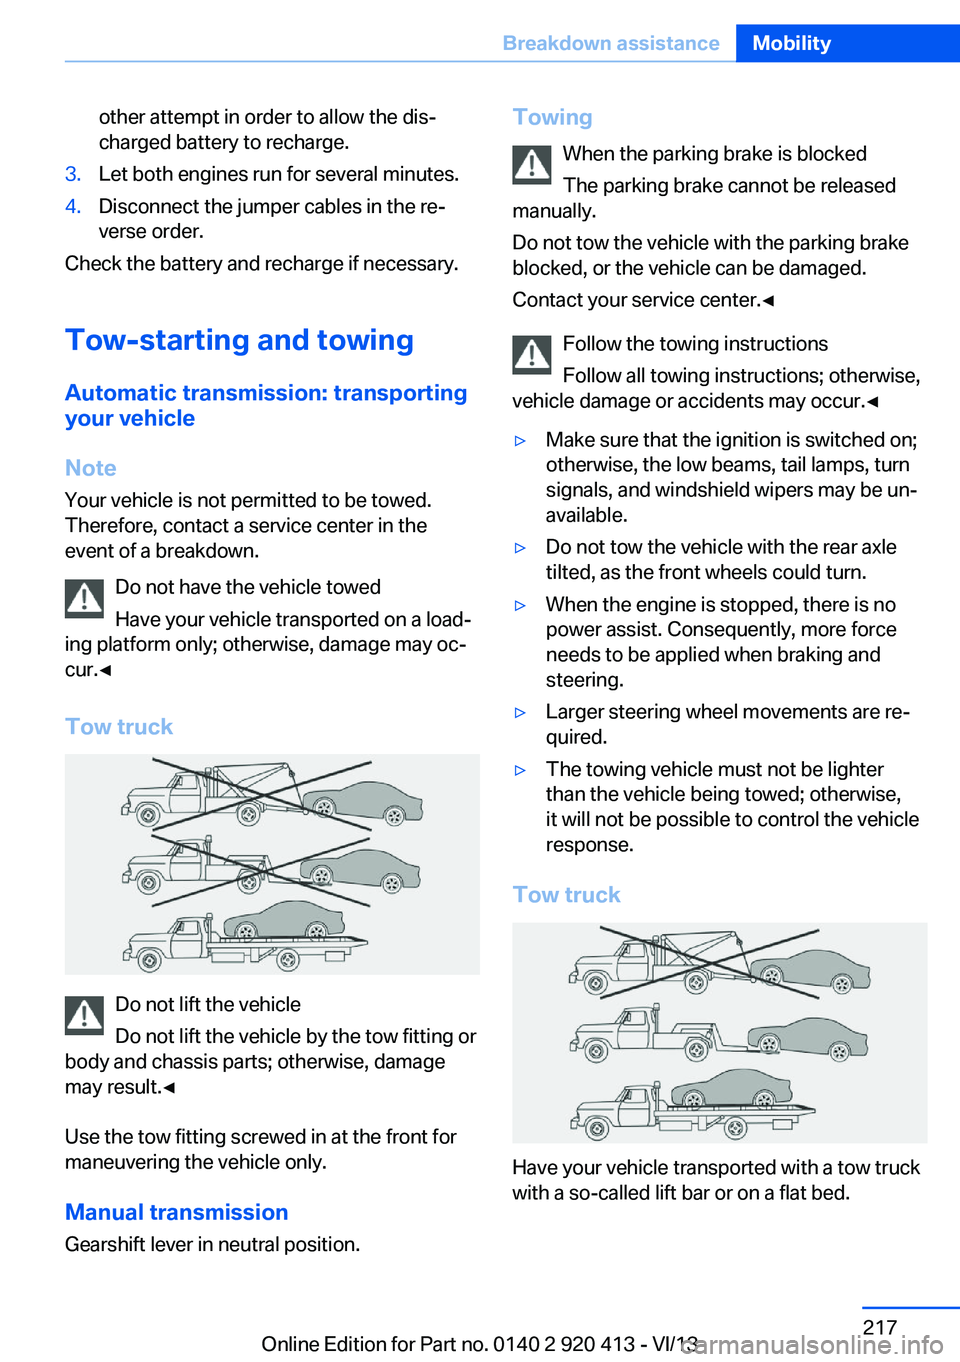
Tow truck
Do not lift the vehicle
Do not lift the vehicle by the tow fitting or
body and chassis parts; otherwise, damage
may result.◀
Use the tow fitting screwed in at the front for
maneuvering the vehicle only.
Manual transmission
Gearshift lever in neutral position.
Towing
When the parking brake is blocked
The parking brake cannot be released
manually.
Do not tow the vehicle with the parking brake
blocked, or the vehicle can be damaged.
Contact your service center.◀
Follow the towing instructions
Follow all towing instructions; otherwise,
vehicle damage or accidents may occur.◀▷Make sure that the ignition is switched on;
otherwise, the low beams, tail lamps, turn
signals, and windshield wipers may be un‐
available.▷Do not tow the vehicle with the rear axle
tilted, as the front wheels could turn.▷When the engine is stopped, there is no
power assist. Consequently, more force
needs to be applied when braking and
steering.▷Larger steering wheel movements are re‐
quired.▷The towing vehicle must not be lighter
than the vehicle being towed; otherwise,
it will not be possible to control the vehicle
response.
Tow truck
Have your vehicle transported with a tow truck
with a so-called lift bar or on a flat bed.
Seite 217Breakdown assistanceMobility217
Online Edition for Part no. 0140 2 920 413 - VI/13
Page 238 of 240
TRACTION program, Dy‐namic Driving Control 118
Transmission, automatic 70
Transmission, manual 70
Transporting children safely 58
Tread, tires 191
Trip computer 87
Triple turn signal activa‐ tion 67
Trip odometer 80
Truck for tow-starting/ towing 217
Trunk lid 38
Trunk lid, emergency unlock‐ ing 40
Trunk lid opening with no- touch activation 41
Turning circle 227
Turning circle lines, rearview camera 135
Turn signals, operation 67
Turn signals, rear, bulb re‐ placement 209
U
Unintentional alarm 44
Units of measure 88
Universal remote control 153
Unlock button, automatic transmission 71
Unlocking/locking from in‐ side 38
Unlocking/locking via door lock 37
Unlocking/locking with re‐ mote control 36
Unlocking, settings 42
Updates made after the edito‐ rial deadline 7
Upholstery care 222
USB interface 158 V
Variable sport steering 119
Vehicle battery 211
Vehicle battery, replac‐ ing 211
Vehicle, breaking in 168
Vehicle care 221
Vehicle equipment 6
Vehicle identification number, refer to Identification num‐
ber in the engine compart‐
ment 195
Vehicle jack 211
Vehicle paint 221
Vehicle storage 223
Vehicle wash 220
Ventilation 151
Ventilation, refer to Parked- car ventilation 151
Voice activation system 24
W Warning indicators 77
Warning lamps 77
Warning messages, refer to Check Control 77
Warning triangle 215
Washer fluid 69
Washer fluid reservoir, ca‐ pacity 229
Washer nozzles, wind‐ shield 69
Washer system 67
Washing, vehicle 220
Water on roads 169
Weights 227
Welcome lamps 90
Wheel base, vehicle 227
Wheel cleaner 222
Wheels, changing 192
Wheels, everything on wheels and tires 185
Wheels, Flat Tire Monitor FTM 102 Wheels, Tire Pressure Moni‐
tor TPM 99
Width, vehicle 226
Window defroster, rear 147, 150
Windows, powered 44
Windshield washer fluid 69
Windshield washer noz‐ zles 69
Windshield washer sys‐ tem 67
Windshield wiper 67
Windshield wipers, fold-out position 69
Winter storage, care 223
Winter tires, suitable tires 193
Winter tires, tread 191
Wiper blades, replacing 203
Wiper fluid 69
Wiper system 67
Wood, care 222
Word match concept, naviga‐ tion 23
Wrench 203
X
xDrive 118
Xenon headlamps, bulb re‐ placement 207 Seite 238ReferenceEverything from A to Z238
Online Edition for Part no. 0140 2 920 413 - VI/13