2014 BMW 328D XDRIVE trunk
[x] Cancel search: trunkPage 167 of 242
Securing cargo
Stow and secure the cargo as described
above; otherwise it may present a danger to
the occupants, e.g., during braking and avoid‐
ance maneuvers.◀
Roof-mounted luggage rack
Note Roof racks are available as special accessories.
Securing
Follow the installation instructions of the roof
rack.
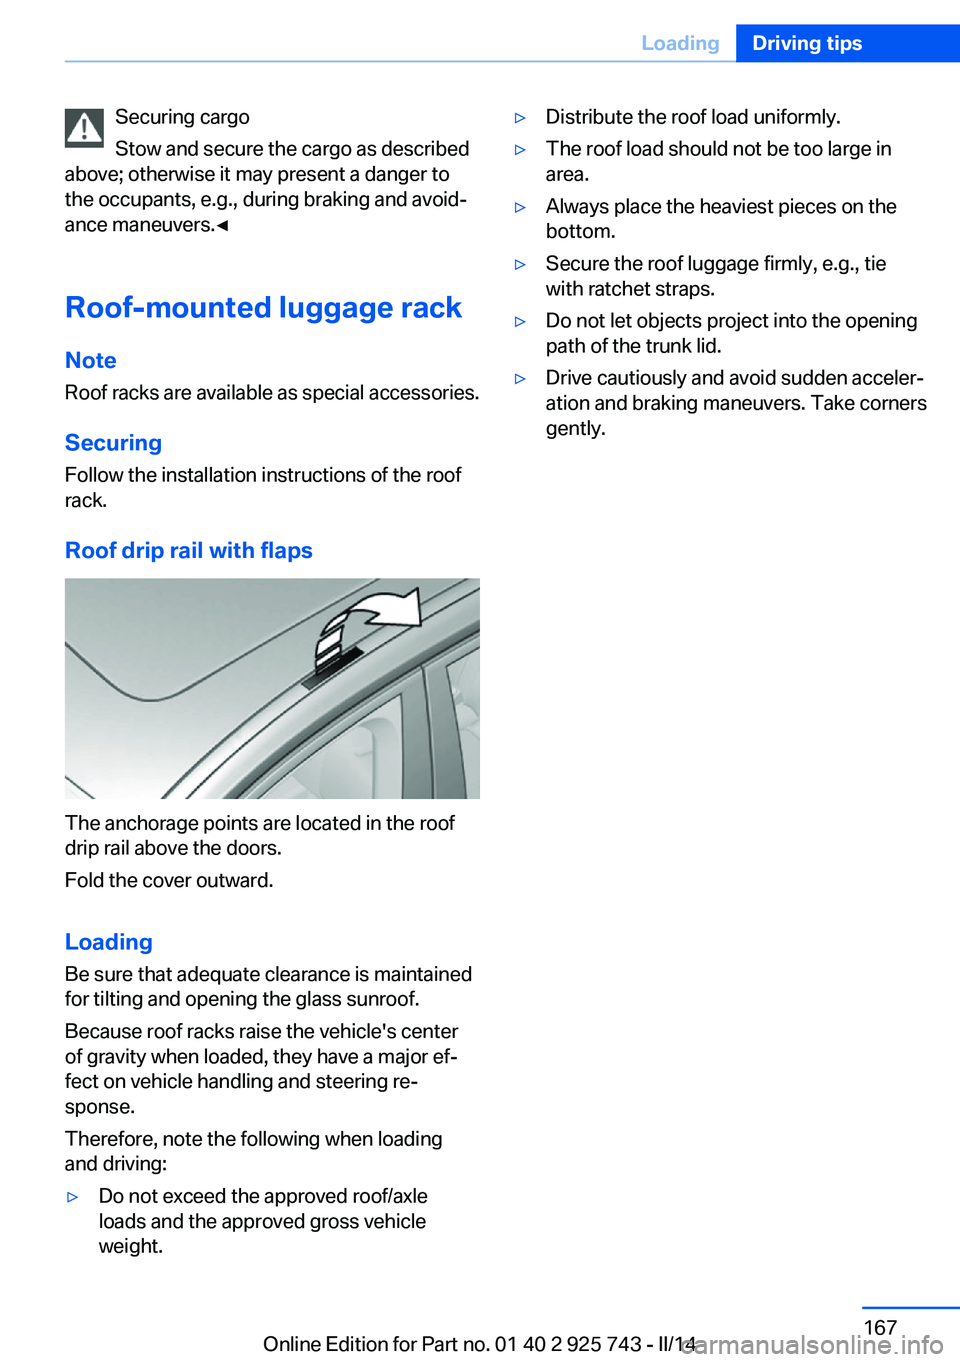
Roof drip rail with flaps
The anchorage points are located in the roof
drip rail above the doors.
Fold the cover outward.
Loading Be sure that adequate clearance is maintained
for tilting and opening the glass sunroof.
Because roof racks raise the vehicle's center
of gravity when loaded, they have a major ef‐
fect on vehicle handling and steering re‐
sponse.
Therefore, note the following when loading
and driving:
▷Do not exceed the approved roof/axle
loads and the approved gross vehicle
weight.▷Distribute the roof load uniformly.▷The roof load should not be too large in
area.▷Always place the heaviest pieces on the
bottom.▷Secure the roof luggage firmly, e.g., tie
with ratchet straps.▷Do not let objects project into the opening
path of the trunk lid.▷Drive cautiously and avoid sudden acceler‐
ation and braking maneuvers. Take corners
gently.Seite 167LoadingDriving tips167
Online Edition for Part no. 01 40 2 925 743 - II/14
Page 210 of 242
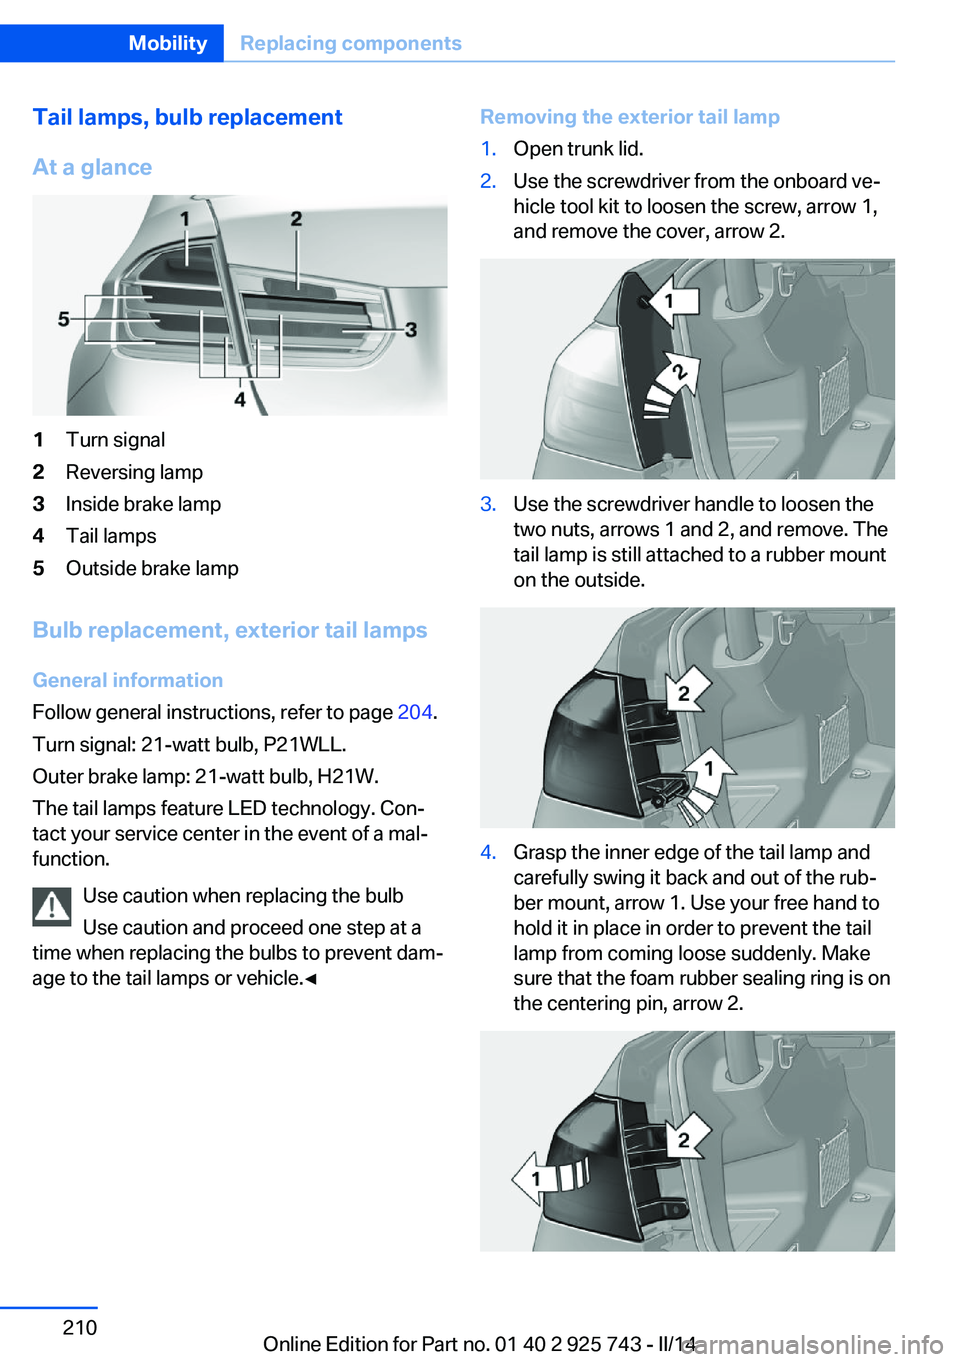
Tail lamps, bulb replacement
At a glance1Turn signal2Reversing lamp3Inside brake lamp4Tail lamps5Outside brake lamp
Bulb replacement, exterior tail lamps General information
Follow general instructions, refer to page 204.
Turn signal: 21-watt bulb, P21WLL.
Outer brake lamp: 21-watt bulb, H21W. The tail lamps feature LED technology. Con‐
tact your service center in the event of a mal‐
function.
Use caution when replacing the bulb
Use caution and proceed one step at a
time when replacing the bulbs to prevent dam‐
age to the tail lamps or vehicle.◀
Removing the exterior tail lamp1.Open trunk lid.2.Use the screwdriver from the onboard ve‐
hicle tool kit to loosen the screw, arrow 1,
and remove the cover, arrow 2.3.Use the screwdriver handle to loosen the
two nuts, arrows 1 and 2, and remove. The
tail lamp is still attached to a rubber mount
on the outside.4.Grasp the inner edge of the tail lamp and
carefully swing it back and out of the rub‐
ber mount, arrow 1. Use your free hand to
hold it in place in order to prevent the tail
lamp from coming loose suddenly. Make
sure that the foam rubber sealing ring is on
the centering pin, arrow 2.Seite 210MobilityReplacing components210
Online Edition for Part no. 01 40 2 925 743 - II/14
Page 211 of 242
5.Remove the connecting line from the clip
on the bulb holder.6.Release the catch at the top on the con‐
nector of the connecting line and remove
the connector from the bulb holder.
Replacing the bulbs
1.Loosen the four fasteners, arrow 1, on the
bulb holder and remove the bulb holder
from the tail lamp, arrow 2.2.Press the defective bulb gently into the
socket, turn counterclockwise and remove.3.Proceed in the reverse order to insert the
new bulb and attach the bulb holder. Make
sure that the bulb holder engages in all fas‐
teners.
Installing the tail lamp
1.Connect the connecting line to the tail
lamp and secure the bulb holder in the clip.2.Make sure that the foam rubber sealing
ring is on the centering pin, arrow 2, and is
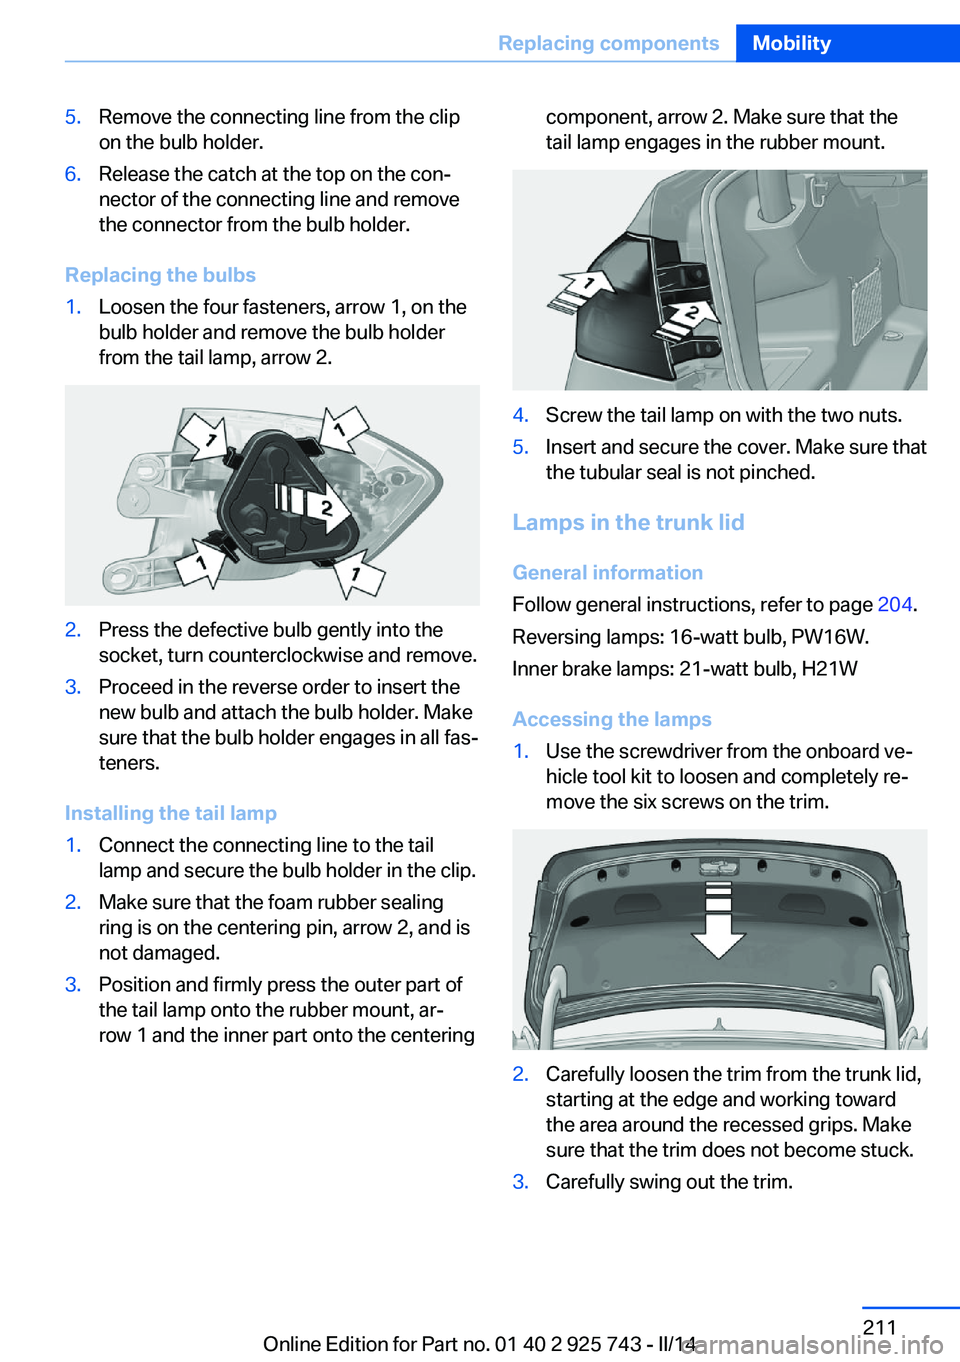
not damaged.3.Position and firmly press the outer part of
the tail lamp onto the rubber mount, ar‐
row 1 and the inner part onto the centeringcomponent, arrow 2. Make sure that the
tail lamp engages in the rubber mount.4.Screw the tail lamp on with the two nuts.5.Insert and secure the cover. Make sure that
the tubular seal is not pinched.
Lamps in the trunk lid
General information
Follow general instructions, refer to page 204.
Reversing lamps: 16-watt bulb, PW16W.
Inner brake lamps: 21-watt bulb, H21W
Accessing the lamps
1.Use the screwdriver from the onboard ve‐
hicle tool kit to loosen and completely re‐
move the six screws on the trim.2.Carefully loosen the trim from the trunk lid,
starting at the edge and working toward
the area around the recessed grips. Make
sure that the trim does not become stuck.3.Carefully swing out the trim.Seite 211Replacing componentsMobility211
Online Edition for Part no. 01 40 2 925 743 - II/14
Page 212 of 242
Replacing the reversing lamp and inner
brake lamp1.Loosen the two holders, arrow 1 and pull
down on the lamp holder to remove, ar‐
row 2.2.Unscrew the defective bulb of the revers‐
ing or brake lamp from its socket counter‐
clockwise.3.Insert the new bulb.
Installing the bulb holder
1.Slide the bulb holder onto the two guide
pins, arrow 1. Insert the two contacts, ar‐
row 2, into the connections, arrow 3.2.Press on the bulb holder. Make sure that
the two exterior holders latch into place.3.Swing the trim back onto the trunk lid and
secure.
Tail lamp, license plate lamp and
central brake lamp
Follow general instructions, refer to page 204.
These lamps are made using LED technology.
Contact your service center in the event of a
malfunction.
Changing wheels
Hints
The vehicle equipment does not include a
spare tire.
When using run-flat tires or tire sealants, a tire
does not need to be changed immediately in
the event of pressure loss due to a flat tire.
The tools for changing wheels are available as
accessories from your service center.
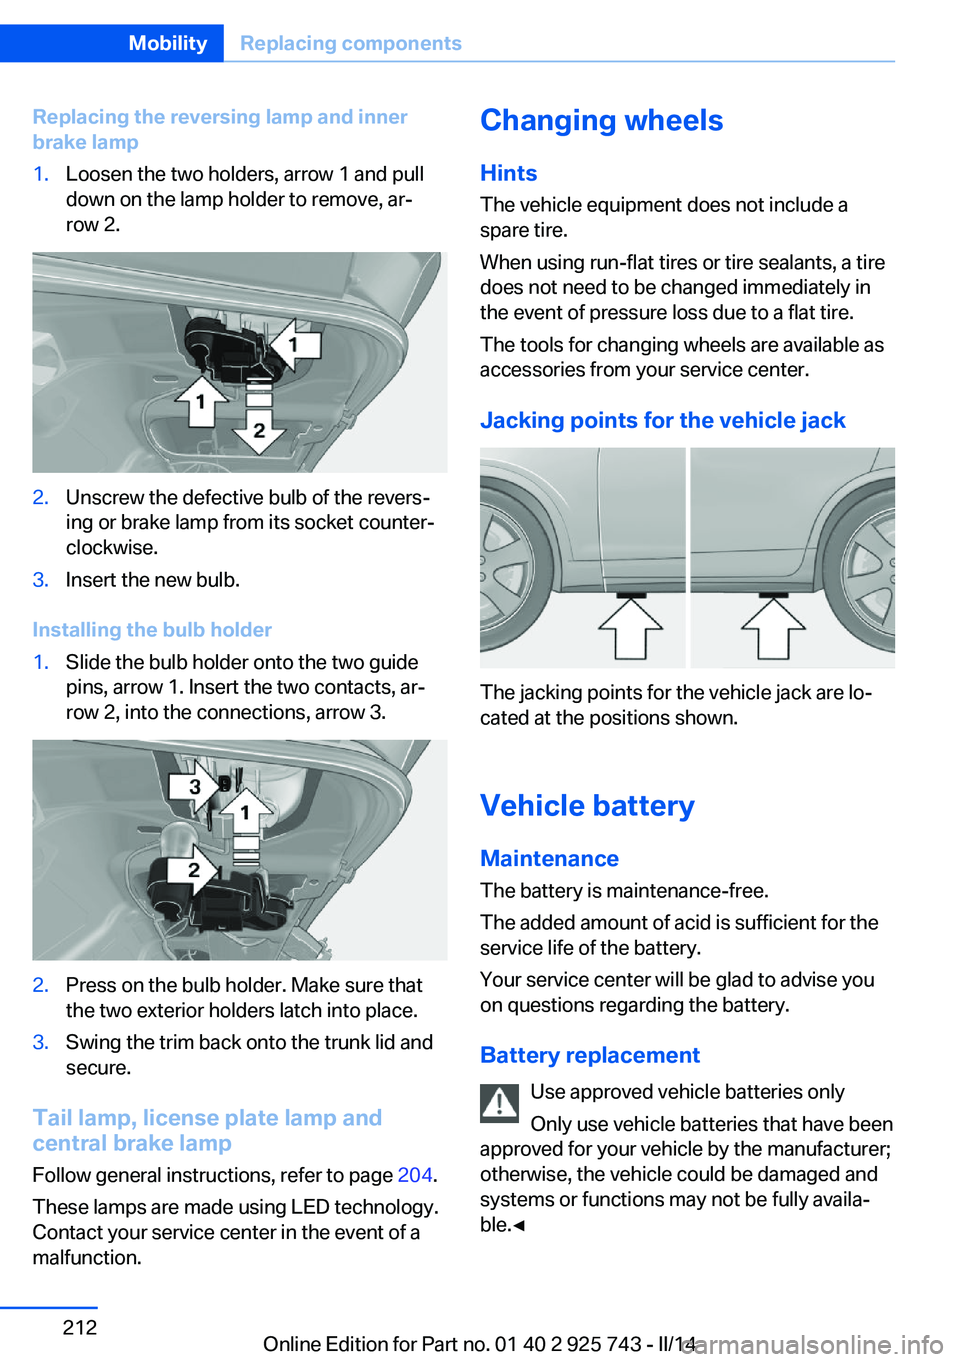
Jacking points for the vehicle jack
The jacking points for the vehicle jack are lo‐
cated at the positions shown.
Vehicle battery Maintenance
The battery is maintenance-free.
The added amount of acid is sufficient for the
service life of the battery.
Your service center will be glad to advise you
on questions regarding the battery.
Battery replacement Use approved vehicle batteries only
Only use vehicle batteries that have been
approved for your vehicle by the manufacturer;
otherwise, the vehicle could be damaged and
systems or functions may not be fully availa‐
ble.◀
Seite 212MobilityReplacing components212
Online Edition for Part no. 01 40 2 925 743 - II/14
Page 216 of 242
if it can be established, are transmitted to
the BMW Response Center.▷If the LED is flashing, but the BMW Re‐
sponse Center can no longer be heard via
the speaker, you can nevertheless still be
heard for the BMW Response Center.
Initiating an Emergency Request
automatically
Under certain conditions, an Emergency Re‐
quest is automatically initiated immediately af‐
ter a severe accident. Automatic Collision Noti‐
fication is not affected by pressing the SOS
button.
Warning triangle
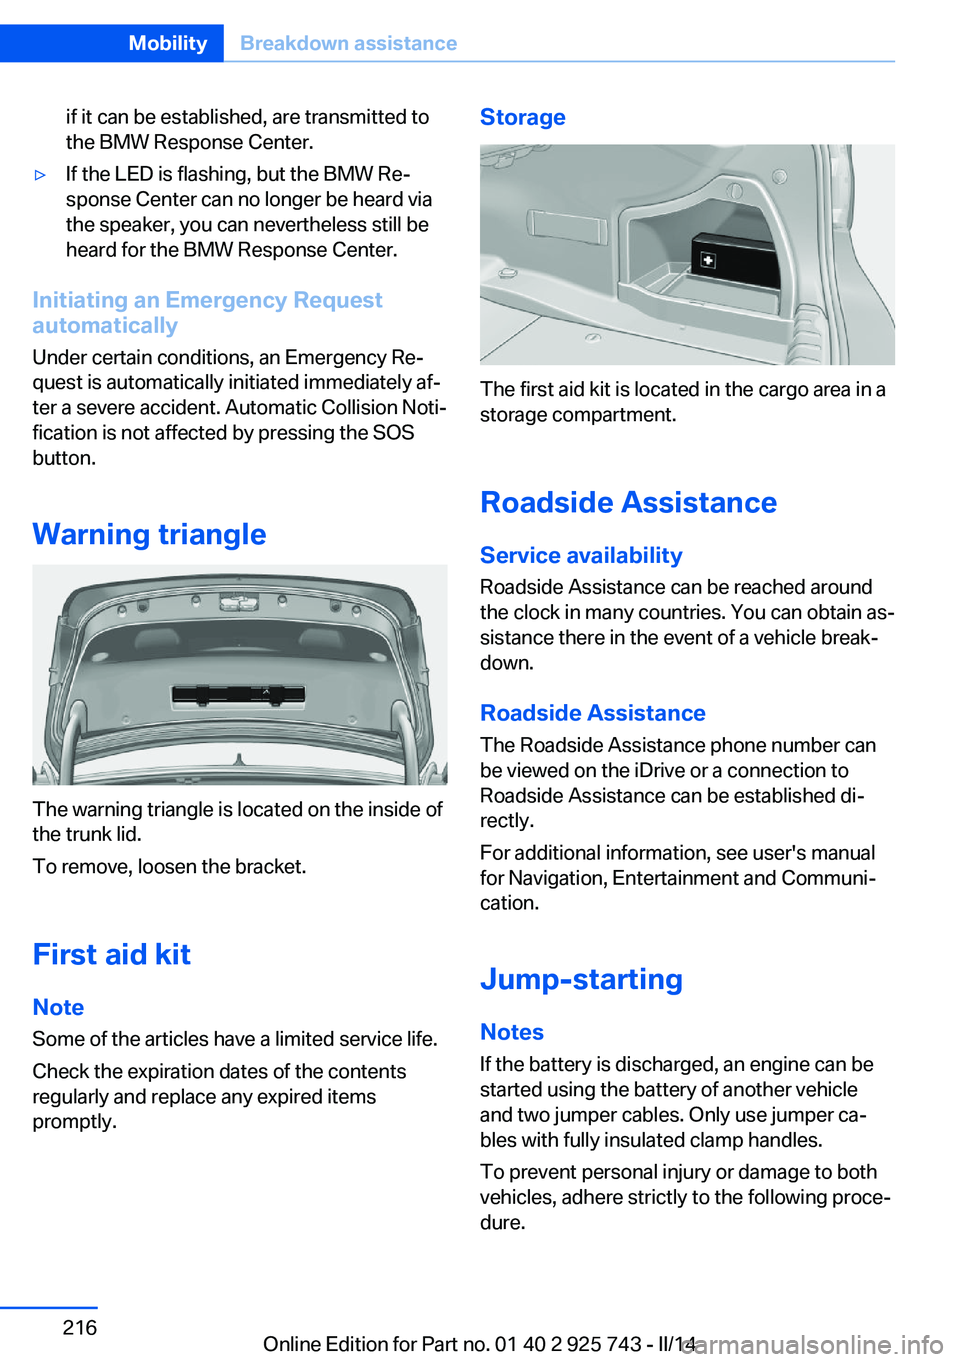
The warning triangle is located on the inside of
the trunk lid.
To remove, loosen the bracket.
First aid kit NoteSome of the articles have a limited service life.
Check the expiration dates of the contents
regularly and replace any expired items
promptly.
Storage
The first aid kit is located in the cargo area in a
storage compartment.
Roadside Assistance
Service availability
Roadside Assistance can be reached around
the clock in many countries. You can obtain as‐
sistance there in the event of a vehicle break‐
down.
Roadside Assistance The Roadside Assistance phone number can
be viewed on the iDrive or a connection to
Roadside Assistance can be established di‐
rectly.
For additional information, see user's manual
for Navigation, Entertainment and Communi‐
cation.
Jump-starting
Notes
If the battery is discharged, an engine can be
started using the battery of another vehicle
and two jumper cables. Only use jumper ca‐
bles with fully insulated clamp handles.
To prevent personal injury or damage to both
vehicles, adhere strictly to the following proce‐
dure.
Seite 216MobilityBreakdown assistance216
Online Edition for Part no. 01 40 2 925 743 - II/14
Page 234 of 242

Control systems, driving sta‐bility 114
Convenient opening 35
Coolant 201
Coolant temperature 78
Cooling function 142, 145
Cooling, maximum 145
Cooling system 201
Corrosion on brake discs 164
Cruise control 125
Cruise control, active with Stop & Go 119
Cruising range 79
Cupholder 158
Current fuel consumption 80
D
Damage, tires 193
Damping control, dy‐ namic 115
Data, technical 228
Date 79
Daytime running lights 90
Defrosting, refer to defrosting the windows 142
Defrosting, refer to Windows, defrosting 146
Defrosting the windows 142
Dehumidifying, air 142, 145
Destination distance 84
Diesel exhaust fluid, at low temperatures 182
Diesel exhaust fluid, having refilled 182
Diesel exhaust fluid, on mini‐ mum 182
Diesel exhaust fluid, replen‐ ishing yourself 182
Diesel particulate filter 163
Digital clock 79
Digital compass 150
Dimensions 228
Dimmable exterior mirrors 55
Dimmable interior rearview mirror 56 Direction indicator, refer to
Turn signals 65
Display, electronic, instru‐ ment cluster 75
Display in windshield 87
Display lighting, refer to In‐ strument lighting 92
Displays 73
Displays, cleaning 224
Disposal, coolant 201
Disposal, vehicle battery 213
Distance control, refer to PDC 128
Distance to destination 84
Divided screen view, split screen 22
Door lock 37
Door lock, refer to Remote control 32
Drive-off assistant 118
Drive-off assistant, refer to DSC 114
Driver assistance, refer to In‐ telligent Safety 102
Driving Assistant, refer to In‐ telligent Safety 102
Driving Dynamics Con‐ trol 116
Driving instructions, breaking in 162
Driving mode 116
Driving notes, general 162
Driving stability control sys‐ tems 114
Driving style analysis 173
Driving tips 162
DSC Dynamic Stability Con‐ trol 114
DTC Dynamic Traction Con‐ trol 115
Dynamic Damping Con‐ trol 115
Dynamic Stability Control DSC 114
Dynamic Traction Control DTC 115 E
ECO PRO 169
ECO PRO, bonus range 170
ECO PRO display 169
ECO PRO driving mode 169
ECO PRO driving style analy‐ sis 173
ECO PRO mode 169
ECO PRO Tip - driving in‐ struction 171
EfficientDynamics 171
Electronic displays, instru‐ ment cluster 75
Electronic Stability Program ESP, refer to DSC 114
Emergency detection, remote control 33
Emergency release, fuel filler flap 178
Emergency Request 215
Emergency service, refer to Roadside Assistance 216
Emergency start function, en‐ gine start 33
Emergency unlocking, trunk lid 38
Energy Control 80
Energy recovery 80
Engine, automatic Start/Stop function 63
Engine, automatic switch- off 63
Engine compartment 196
Engine compartment, work‐ ing in 197
Engine coolant 201
Engine idling when driving, coasting 172
Engine oil 198
Engine oil, adding 199
Engine oil additives 199
Engine oil change 200
Engine oil filler neck 199
Engine oil temperature 78 Seite 234ReferenceEverything from A to Z234
Online Edition for Part no. 01 40 2 925 743 - II/14
Page 235 of 242

Engine oil types, alterna‐tive 200
Engine oil types, ap‐ proved 200
Engine start during malfunc‐ tion 33
Engine start, jump-start‐ ing 216
Engine start, refer to Starting the engine 62
Engine stop 62
Engine temperature 78
Entering a car wash 221
Equipment, interior 148
ESP Electronic Stability Pro‐ gram, refer to DSC 114
Exchanging wheels/tires 193
Exhaust system 163
Exterior mirror, automatic dimming feature 55
Exterior mirrors 54
External start 216
External temperature dis‐ play 79
External temperature warn‐ ing 79
Eyes for securing cargo 166
F
Failure message, refer to Check Control 76
False alarm, refer to Uninten‐ tional alarm 43
Fan, refer to Air flow 142, 146
Fault displays, refer to Check Control 76
Filler neck for engine oil 199
Fine wood, care 223
First aid kit 216
Fitting for towing, refer to Tow fitting 219
Flat tire, changing wheels 212
Flat Tire Monitor FTM 100 Flat tire, Tire Pressure Moni‐
tor TPM 97
Flat tire, warning lamp 98, 101
Flooding 163
Floor carpet, care 224
Floor mats, care 224
Fogged up windows 142
Fold down the rear seat back‐ rest, see Though-loading
system 154
Fold-out position, windshield wipers 68
Foot brake 163
Front airbags 94
Front fog lamps 92
Front fog lamps, bulb replace‐ ment 209
Front lamps 205
Front passenger airbags, au‐ tomatic deactivation 96
Front passenger airbags, indi‐ cator lamp 96
FTM Flat Tire Monitor 100
Fuel 180
Fuel cap 178
Fuel consumption, current 80
Fuel consumption, refer to Average fuel consump‐
tion 84
Fuel filler flap 178
Fuel gauge 78
Fuel quality 180
Fuel recommendation 180
Fuel, tank capacity 231
Fuse 213
G
Garage door opener, refer to Universal garage door
opener 148
Gasoline 180
Gear change, automatic transmission 70
Gear shift indicator 81 General driving notes 162
Glass sunroof, powered 45
Glove compartment 156
Gross vehicle weight, ap‐ proved 228
H
Handbrake, refer to parking brake 65
Hand-held transmitter, alter‐ nating code 149
Hazard warning flashers 215
Head airbags 94
Headlamp control, auto‐ matic 90
Headlamp courtesy delay fea‐ ture 89
Headlamp flasher 66
Headlamp glass 205
Headlamps 205
Headlamps, care 222
Headlamp washer system 66
Headliner 15
Head restraints 47
Head restraints, front 51
Head restraints, rear 52
Head-up Display 87
Head-up Display, care 224
Heavy cargo, stowing 166
Height, vehicle 228
High-beam Assistant 91
High beams 66
High beams/low beams, refer to High-beam Assistant 91
Hills 164
Hill start assistant, refer to Drive-off assistant 118
Hints 6
Holder for beverages 158
Homepage 6
Hood 197
Horn 12
Hotel function, trunk lid 38
Hot exhaust system 163
HUD Head-up Display 87 Seite 235Everything from A to ZReference235
Online Edition for Part no. 01 40 2 925 743 - II/14
Page 240 of 242

Triple turn signal activa‐tion 66
Trip odometer 79
Truck for tow-starting/ towing 218
Trunk lid closing 38
Trunk lid, emergency unlock‐ ing 38
Trunk lid, hotel function 38
Trunk lid opening 38
Trunk lid via remote con‐ trol 36
Turning circle 228
Turning circle lines, rearview camera 132
Turn signals, operation 65
U Unintentional alarm 43
Units of measure 87
Universal remote control 148
Unlock button, automatic transmission 70
Unlocking/locking via door lock 37
Unlocking/locking with re‐ mote control 35
Unlocking, settings 41
Updates made after the edito‐ rial deadline 6
Upholstery care 223
USB interface 153
V Variable sport steering 116
Vehicle battery 212
Vehicle battery, replac‐ ing 212
Vehicle, breaking in 162
Vehicle care 222
Vehicle equipment 6
Vehicle identification number, refer to Identification num‐ber in the engine compart‐
ment 196
Vehicle jack 212
Vehicle paint 222
Vehicle storage 224
Vehicle wash 221
Ventilation 146
Ventilation, refer to Parked- car ventilation 147
Voice activation system 24
W Warning indicators 76
Warning lamps 76
Warning messages, refer to Check Control 76
Warning triangle 216
Washer fluid 68
Washer nozzles, wind‐ shield 68
Washer system 66
Washing, vehicle 221
Water on roads 163
Weights 228
Welcome lamps 89
Wheel base, vehicle 228
Wheel cleaner 223
Wheels, changing 193
Wheels, everything on wheels and tires 185
Wheels, Flat Tire Monitor FTM 100
Wheels, Tire Pressure Moni‐ tor TPM 97
Width, vehicle 228
Window defroster, rear 142, 146
Windows, powered 43
Windshield washer fluid 68
Windshield washer noz‐ zles 68
Windshield washer sys‐ tem 66
Windshield wiper 66 Windshield wipers, fold-out
position 68
Winter diesel 181
Winter storage, care 224
Winter tires, suitable tires 194
Winter tires, tread 193
Wiper blades, replacing 204
Wiper fluid 68
Wiper system 66
Wood, care 223
Word match concept, naviga‐ tion 23
Wrench, see Onboard vehicle tool kit 204
X
xDrive 115
Xenon headlamps, bulb re‐ placement 208 Seite 240ReferenceEverything from A to Z240
Online Edition for Part no. 01 40 2 925 743 - II/14