2014 BMW 228ICOUPE height
[x] Cancel search: heightPage 48 of 218

AdjustingVehicle equipment
All standard, country-specific and optional
equipment that is offered in the model series is
described in this chapter. Therefore, equip‐
ment is also described that is not available in a
vehicle, e. g., because of the selected optional
equipment or country variant. This also applies
for safety-related functions and systems.
Sitting safely The ideal seating position can make a vital
contribution to relaxed, fatigue-free driving.
The seating position plays an important role in
an accident in combination with:▷Safety belts, refer to page 52.▷Head restraints, refer to page 53.▷Airbags, refer to page 95.
Seats
General information Do not adjust the seat while driving
Do not adjust the driver's seat while driv‐
ing, or the seat could respond with unexpected
movement and the ensuing loss of vehicle
control could lead to an accident.◀
Do not incline the backrest too far to the
rear
Also on the front passenger side, do not incline
the backrest on the front passenger side too
far to the rear during driving, or there is a risk of
slipping under the safety belt in the event of an
accident. This would eliminate the protection
normally provided by the belt.◀
Manually adjustable seats
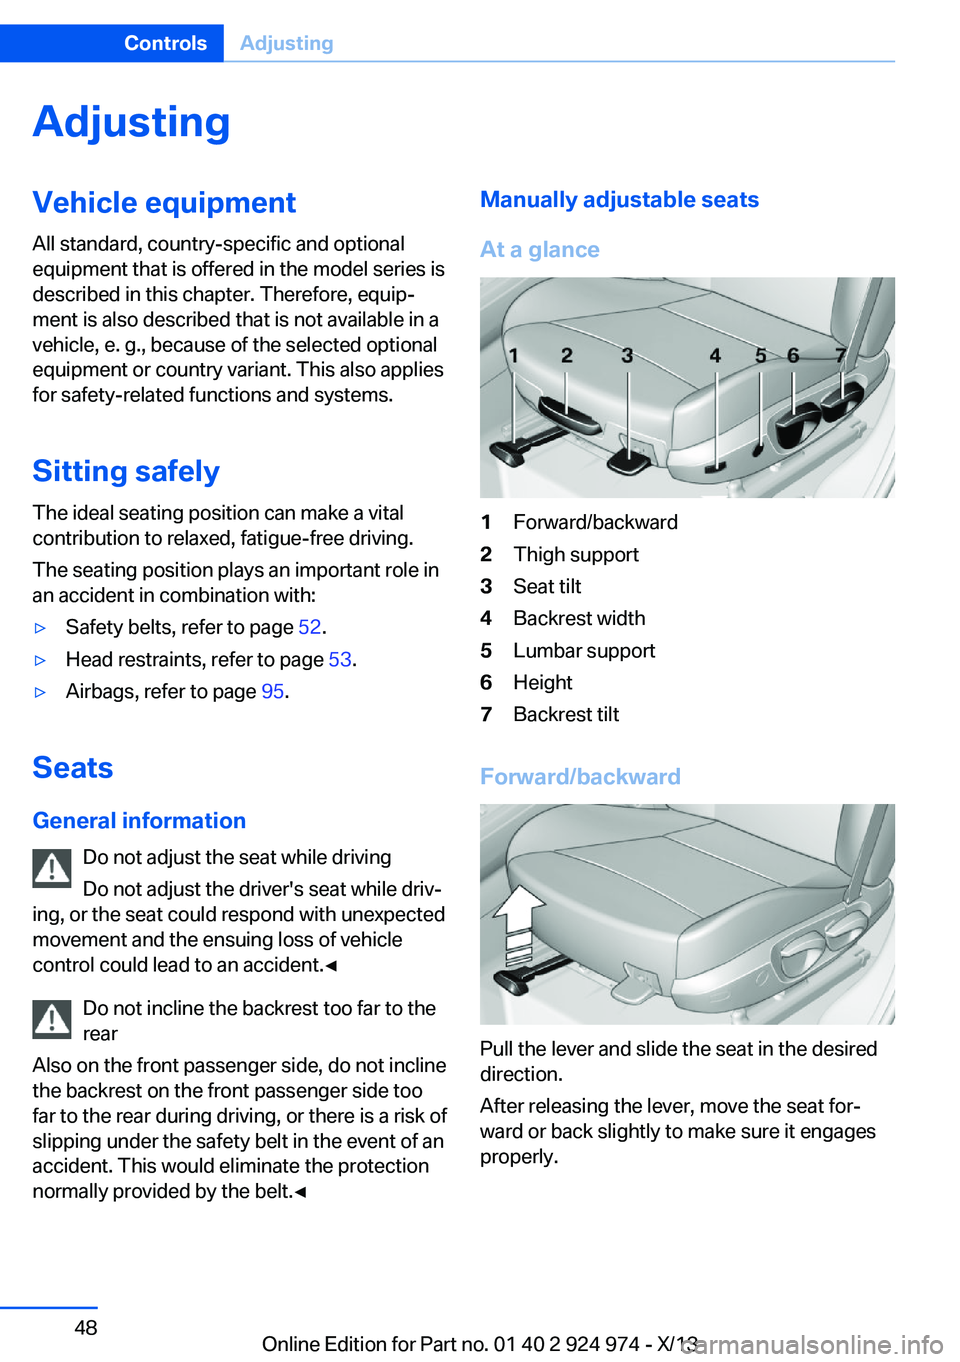
At a glance1Forward/backward2Thigh support3Seat tilt4Backrest width5Lumbar support6Height7Backrest tilt
Forward/backward
Pull the lever and slide the seat in the desired
direction.
After releasing the lever, move the seat for‐
ward or back slightly to make sure it engages
properly.
Seite 48ControlsAdjusting48
Online Edition for Part no. 01 40 2 924 974 - X/13
Page 49 of 218

Height
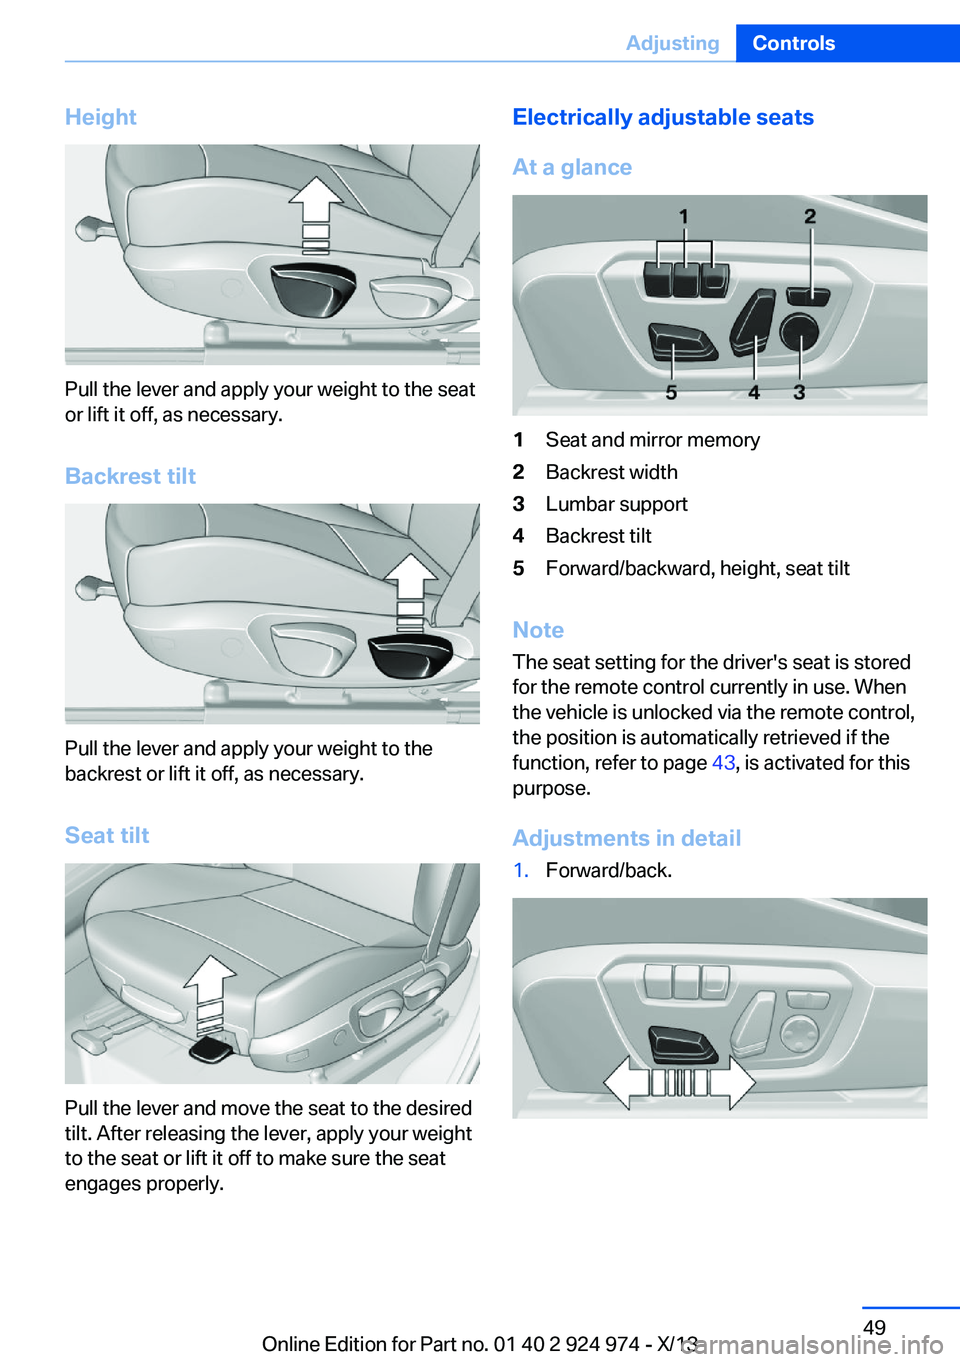
Pull the lever and apply your weight to the seat
or lift it off, as necessary.
Backrest tilt
Pull the lever and apply your weight to the
backrest or lift it off, as necessary.
Seat tilt
Pull the lever and move the seat to the desired
tilt. After releasing the lever, apply your weight
to the seat or lift it off to make sure the seat
engages properly.
Electrically adjustable seats
At a glance1Seat and mirror memory2Backrest width3Lumbar support4Backrest tilt5Forward/backward, height, seat tilt
Note The seat setting for the driver's seat is stored
for the remote control currently in use. When
the vehicle is unlocked via the remote control,
the position is automatically retrieved if the
function, refer to page 43, is activated for this
purpose.
Adjustments in detail
1.Forward/back.Seite 49AdjustingControls49
Online Edition for Part no. 01 40 2 924 974 - X/13
Page 50 of 218

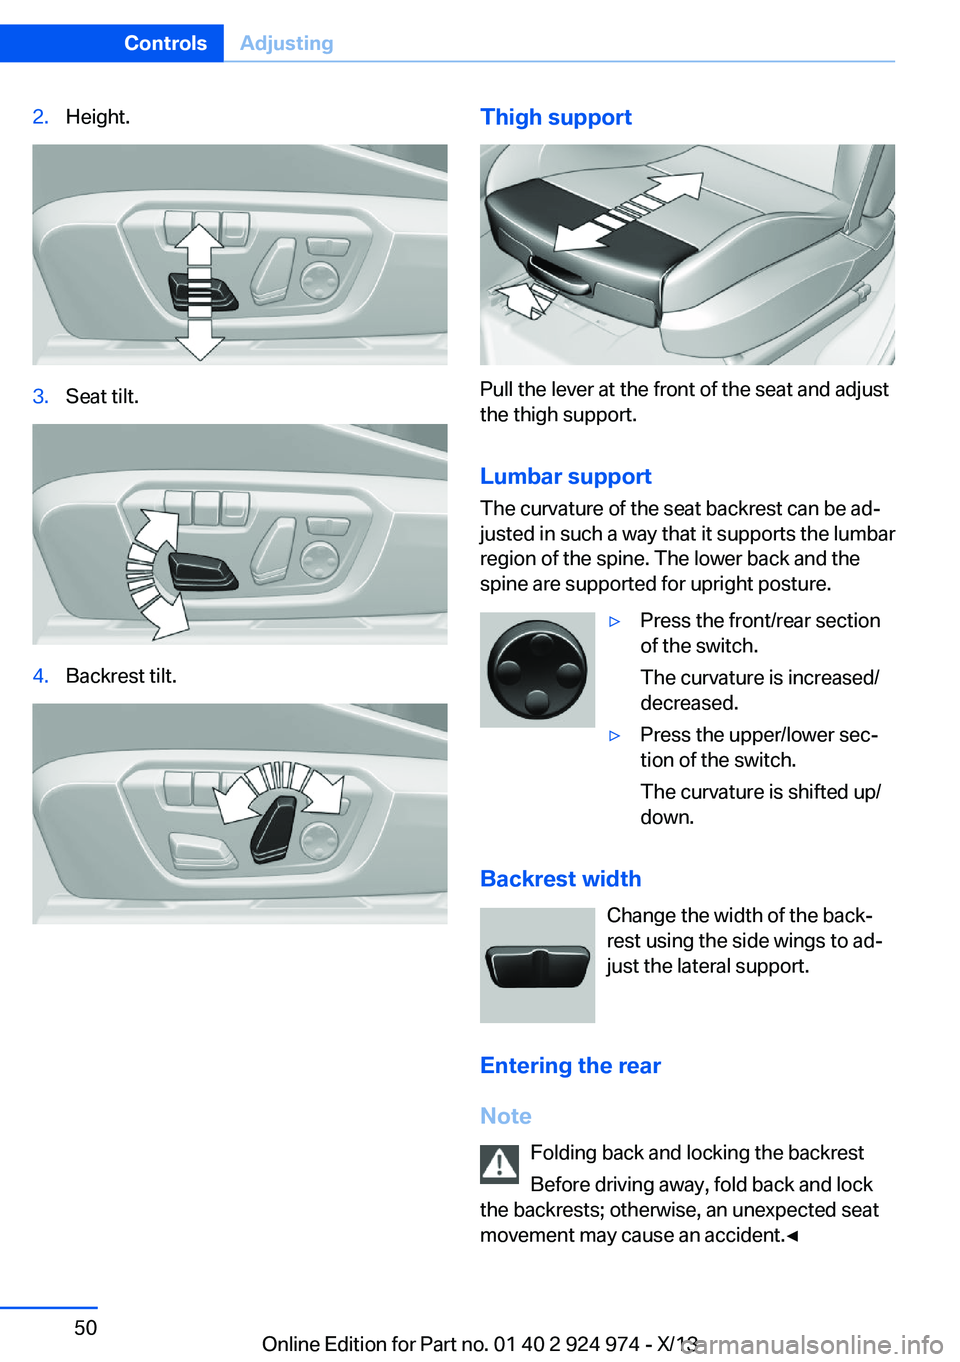
2.Height.3.Seat tilt.4.Backrest tilt.Thigh support
Pull the lever at the front of the seat and adjust
the thigh support.
Lumbar support The curvature of the seat backrest can be ad‐
justed in such a way that it supports the lumbar
region of the spine. The lower back and the
spine are supported for upright posture.
▷Press the front/rear section
of the switch.
The curvature is increased/
decreased.▷Press the upper/lower sec‐
tion of the switch.
The curvature is shifted up/
down.
Backrest width
Change the width of the back‐
rest using the side wings to ad‐
just the lateral support.
Entering the rear
Note Folding back and locking the backrest
Before driving away, fold back and lock
the backrests; otherwise, an unexpected seat
movement may cause an accident.◀
Seite 50ControlsAdjusting50
Online Edition for Part no. 01 40 2 924 974 - X/13
Page 53 of 218

Unbuckling the belt1.Hold the belt firmly.2.Press the red button in the belt buckle.3.Guide the belt back into its reel.
Safety belt reminder for driver's and
passenger's seat
The indicator lamp lights up and a sig‐
nal sounds. Make sure that the safety
belts are positioned correctly. The
safety belt reminder is active at speeds above
approx. 6 mph/10 km/h. It can also be activated
if objects are placed on the front passenger
seat.
Damage to safety belts In the case of strain caused by accidents or
damage:
Have the safety belts, including the safety belt
tensioners, replaced and have the belt anchors
checked.
Checking and replacing safety belts
Have the work performed only by your
service center; otherwise, it cannot be ensured
that this safety feature will function properly.◀
Head restraints in the front
Correctly adjusted head restraint A correctly adjusted head restraint reduces the
risk of injury to cervical vertebrae in the event
of an accident.
Adjusting the head restraint
Correctly adjust the head restraints of all
occupied seats; otherwise, there is an in‐
creased risk of injury in an accident.◀
Height
Adjust the head restraint so that its center is
approximately at ear level.
Distance
Adjust the distance so that the head restraint is as close as possible to the back of the head.
If necessary, adjust the distance by adjusting
the tilt of the backrest.
Adjusting the height▷To raise: pull.▷To lower: press the button, arrow 1, and
push the head restraint down.
Removing
Only remove the head restraint if no one will be
sitting in the seat in question.
1.Pull the head restraint upward as far as
possible.2.Press the button, arrow 1, and pull the
head restraint out completely.
Before transporting passengers
Reinstall the head restraint before trans‐
porting anyone in the seat; otherwise, the pro‐
tective function of the head restraint is unavail‐
able.◀
Seite 53AdjustingControls53
Online Edition for Part no. 01 40 2 924 974 - X/13
Page 54 of 218

Rear head restraints
Correctly adjusted head restraint A correctly adjusted head restraint reduces the
risk of injury to cervical vertebrae in the event
of an accident.
Adjusting the head restraint
Correctly adjust the head restraints of all
occupied seats; otherwise, there is an in‐ creased risk of injury in an accident.◀
Height
Adjust the head restraint so that its center is
approximately at ear level.
Adjusting the height▷To raise: pull.▷To lower: press the button, arrow 1, and
push the head restraint down.
The center head restraint cannot be adjusted
in elevation.
Folding down head restraints Extending/retracting head restraint
Only fold down head restraint if no pas‐
sengers are in the rear. Fold out retracted
headrests again if passengers are being car‐
ried in the rear; otherwise, there is increased
risk of injury in the event of an accident.◀
▷To lower flaps: press the button, arrow 1,
and press down the head restraint, arrow 2.▷Fold back up: pull up head restraints.
Removing
Only remove the head restraint if no one will be
sitting in the seat in question.
1.Pull the head restraint upward as far as
possible.2.Press the button, arrow 1, and pull the
head restraint out completely.
Before transporting passengers
Reinstall the head restraint before trans‐
porting anyone in the seat; otherwise, the pro‐
tective function of the head restraint is unavail‐
able.◀
Seite 54ControlsAdjusting54
Online Edition for Part no. 01 40 2 924 974 - X/13
Page 58 of 218

Adjusting1.Fold the lever down.2.Move the steering wheel to the preferred
height and angle to suit your seating posi‐
tion.3.Fold the lever back.
Steering wheel heating
Switching on/off
Press the button.
▷On: the LED lights up.▷Off: the LED goes out.Seite 58ControlsAdjusting58
Online Edition for Part no. 01 40 2 924 974 - X/13
Page 60 of 218

On the front passenger seat
Deactivating airbags
After installing a child restraint fixing system in
the front passenger seat, make sure that the
front, knee and side airbags on the front pas‐
senger side are deactivated.
Deactivate the front passenger airbags auto‐
matically, refer to page 97.
Deactivating the front passenger airbags
If a child restraint fixing system is used in
the front passenger seat, the front passenger
airbags must be deactivated; otherwise, there
is an increased risk of injury to the child when
the airbags are triggered, even with a child re‐
straint fixing system.◀
Seat position and height
Before installing a child restraint fixing system,
move the front passenger seat as far back as
possible and adjust its height to the highest
position to obtain the best possible position for
the belt and to offer optimal protection in the
event of an accident.
Do not change the seat position and height af‐
ter this.
Backrest width Adjustable backrest width: before installing a
child restraint fixing system in the front pas‐
senger seat, open the backrest width com‐
pletely. Do not change the backrest width
again and do not call up a memory position.
Backrest width for the child seat
Before installing a child restraint fixing
system in the front passenger seat, the back‐
rest width must be opened completely. Do not
change the adjustment after this; otherwise,
the stability of the child seat will be reduced.◀Child seat security
The rear safety belts and the front passenger
safety belt can be locked against pulling out for
mounting the child restraint fixing systems.
Locking the safety belt
1.Pull out the belt webbing completely.2.Secure the child restraint fixing system
with the belt.3.Allow the belt webbing to be pulled in and
pull it taut against the child restraint fixing
system. The safety belt is locked.
Unlocking the safety belt
1.Unbuckle the belt buckle.2.Remove the child restraint fixing system.3.Allow the belt webbing to be pulled in com‐
pletely.
LATCH child restraint fixing
system
LATCH: Lower Anchors and Tether for Chil‐
dren.
Note Manufacturer's information for LATCH
child restraint fixing systems
To mount and use the LATCH child restraint
fixing systems, observe the operating and
safety information from the system manufac‐
turer; otherwise, the level of protection may be
reduced.◀
Seite 60ControlsTransporting children safely60
Online Edition for Part no. 01 40 2 924 974 - X/13
Page 149 of 218

Hot exhaust systemHot exhaust system
High temperatures are generated in the
exhaust system.
Do not remove the heat shields installed and
never apply undercoating to them. Make sure
that flammable materials, e. g. hay, leaves,
grass, etc. do not come in contact with the hot
exhaust system during driving, while in idle po‐
sition mode, or when parked. Such contact
could lead to a fire, and with it the risk of seri‐
ous personal injury as well as property dam‐
age.
Do not touch hot exhaust pipes; otherwise,
there is the danger of getting burned.◀
Mobile communication devices in the
vehicle
Mobile communication devices in the ve‐
hicle
It is advised that you do not use mobile com‐
munication devices, e.g., mobile phones, in‐
side the vehicle without connecting them di‐
rectly to the external antenna. Otherwise, the
vehicle electronics and mobile communication
devices can interfere with each other. In addi‐
tion, there is no assurance that the radiation
generated during transmission will be dis‐
charged from the vehicle interior.◀
Hydroplaning
On wet or slushy roads, a wedge of water can
form between the tires and road surface.
This phenomenon is referred to as hydroplan‐
ing. It is characterized by a partial or complete loss of contact between the tires and the road
surface, ultimately undermining your ability to
steer and brake the vehicle.
Hydroplaning
When driving on wet or slushy roads, re‐
duce your speed to prevent hydroplaning.◀Driving through water
Drive through calm water only and only if it is
not deeper than. 9.8 inches/25 cm and at this
height, no faster than walking speed, up to
6 mph/10 km/h.
Adhere to water depth and speed limita‐
tions
Do not exceed this water depth and walking speed; otherwise, the vehicle's engine, the
electrical systems and the transmission may
be damaged.◀
Braking safely
Your vehicle is equipped with ABS as a stand‐
ard feature.
Applying the brakes fully is the most effective
way of braking in situations when this is neces‐
sary.
The vehicle maintains steering responsive‐
ness. You can still avoid any obstacles with a
minimum of steering effort.
Pulsation of the brake pedal and sounds from
the hydraulic circuits indicate that ABS is in its
active mode.
Objects within the range of movement
of the pedals
No objects in the area around the pedals
Keep floor mats, carpets, and any other
objects out of the area of motion of the pedals;
otherwise, the function of the pedals could be
impeded while driving and create the risk of an
accident.
Do not place additional floor mats over existing
mats or other objects.
Only use floor mats that have been approved
for the vehicle and can be properly fixed in
place.
Ensure that the floor mats are securely fas‐
tened again after they were removed for clean‐
ing, for example.◀Seite 149Things to remember when drivingDriving tips149
Online Edition for Part no. 01 40 2 924 974 - X/13