2014 BMW 228I park assist
[x] Cancel search: park assistPage 14 of 218
CockpitVehicle equipment
All standard, country-specific and optional
equipment that is offered in the model series is
described in this chapter. Therefore, equip‐ment is also described that is not available in a
vehicle, e. g., because of the selected optional
equipment or country variant. This also applies
for safety-related functions and systems.
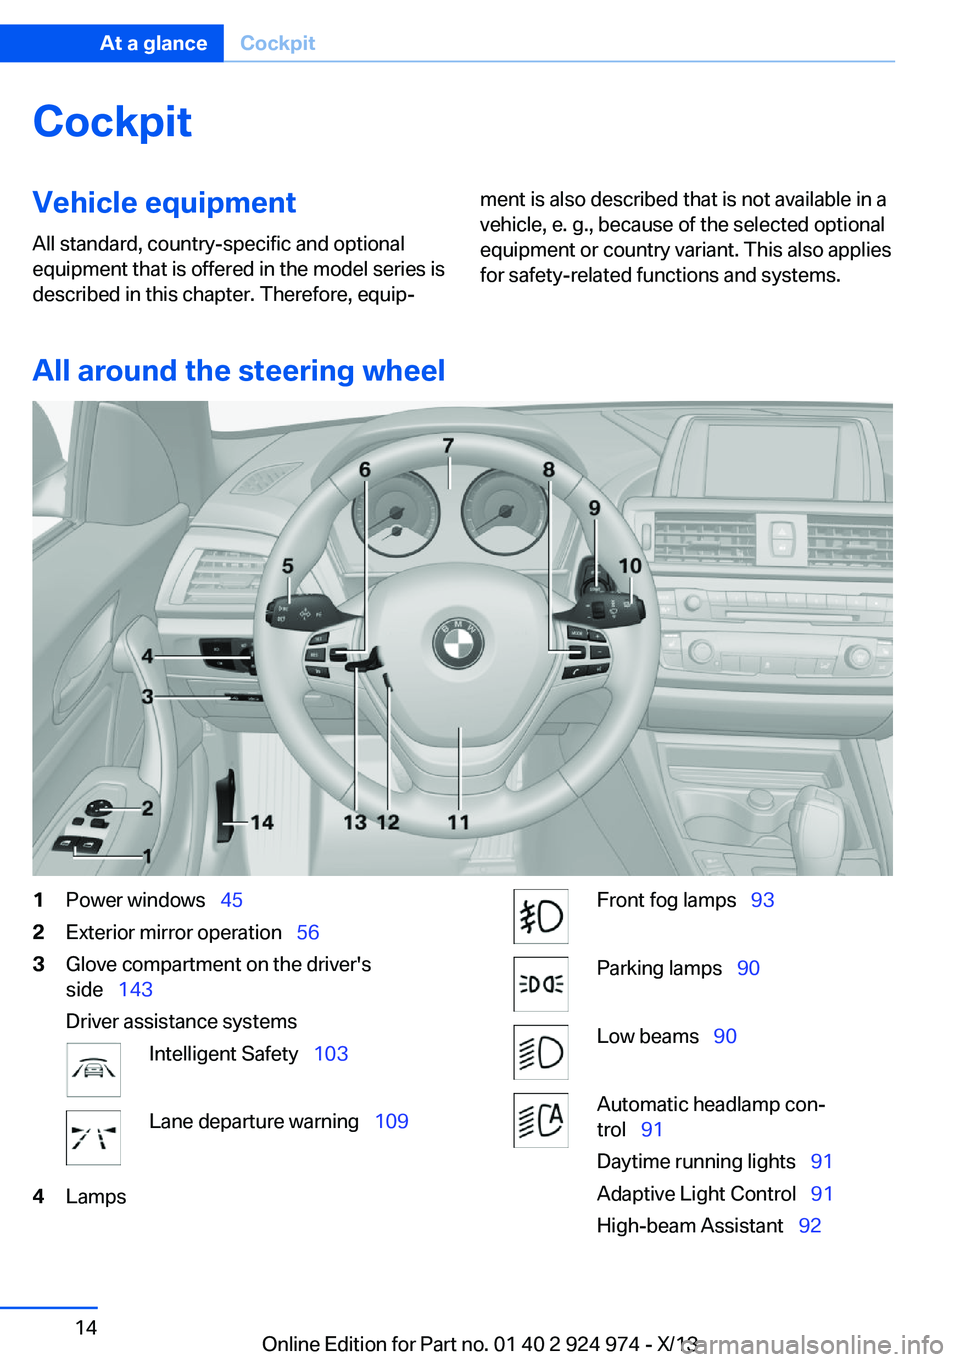
All around the steering wheel
1Power windows 452Exterior mirror operation 563Glove compartment on the driver's
side 143
Driver assistance systemsIntelligent Safety 103Lane departure warning 1094LampsFront fog lamps 93Parking lamps 90Low beams 90Automatic headlamp con‐
trol 91
Daytime running lights 91
Adaptive Light Control 91
High-beam Assistant 92Seite 14At a glanceCockpit14
Online Edition for Part no. 01 40 2 924 974 - X/13
Page 15 of 218

Instrument lighting 93Headlamp range control 925Steering column stalk, leftTurn signal 68High beams, head‐
lamp flasher 68High-beam Assistant 92Roadside parking lamps 91Computer 856Steering wheel buttons, leftStore speed 115Resume speed 117Cruise control on/off, interrupt‐
ing 115Cruise control rocker switch 1167Instrument cluster 758Steering wheel buttons, rightEntertainment sourceVolumeVoice activation 26Telephone, see user's manual for
Navigation, Entertainment and
CommunicationThumbwheel for selection lists 849Start/stop the engine and switch
the ignition on/off 64Auto Start/Stop function 6510Steering column stalk, rightWindshield wipers 68Rain sensor 69Clean the windshields and head‐
lamps 7011Horn12Steering wheel heating 5813Adjust steering wheel 5714Unlock hood 175Seite 15CockpitAt a glance15
Online Edition for Part no. 01 40 2 924 974 - X/13
Page 16 of 218
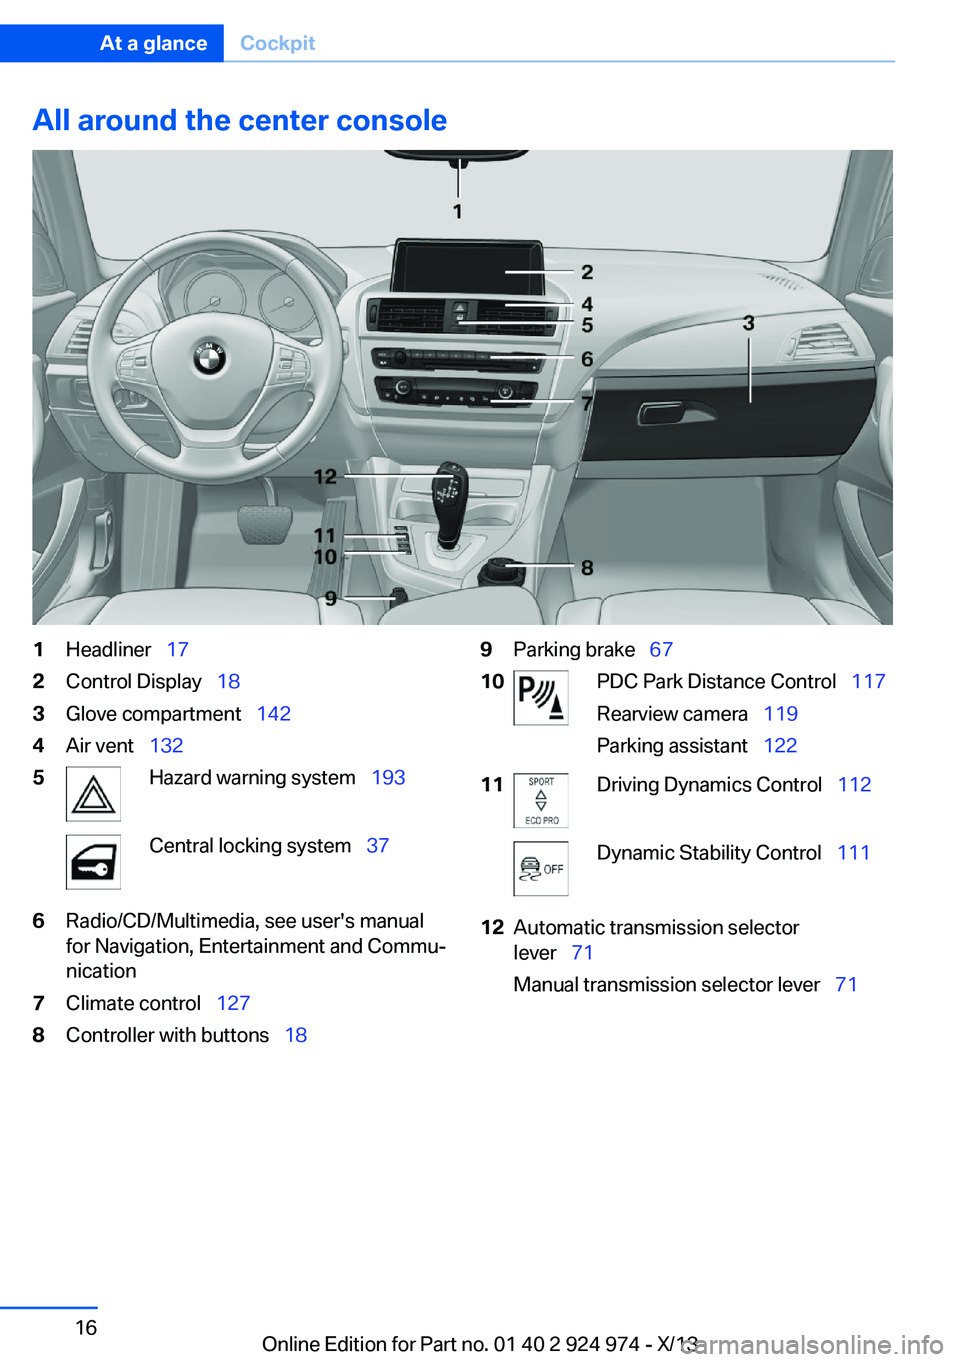
All around the center console1Headliner 172Control Display 183Glove compartment 1424Air vent 1325Hazard warning system 193Central locking system 376Radio/CD/Multimedia, see user's manual
for Navigation, Entertainment and Commu‐
nication7Climate control 1278Controller with buttons 189Parking brake 6710PDC Park Distance Control 117
Rearview camera 119
Parking assistant 12211Driving Dynamics Control 112Dynamic Stability Control 11112Automatic transmission selector
lever 71
Manual transmission selector lever 71Seite 16At a glanceCockpit16
Online Edition for Part no. 01 40 2 924 974 - X/13
Page 66 of 218
▷External temperature too low.▷The external temperature is high and auto‐
matic climate control is running.▷The passenger compartment has not yet
been heated or cooled to the required
level.▷The engine is not yet at operating temper‐
ature.▷The wheels are at a sharp angle or the
steering wheel is being turned.▷After driving in reverse.▷Fogging of the windows when the auto‐
matic climate control is switched on.▷Vehicle battery is heavily discharged.▷The engine compartment lid is unlocked.▷The parking assistant is activated.▷Stop-and-go traffic.▷The transmission selector lever is in posi‐
tion N or M/S.▷Use of fuel with high ethanol content.
Starting the engine
The engine starts automatically under the fol‐
lowing conditions:
▷Manual transmission:
The clutch pedal is pressed.▷Automatic transmission:
By releasing the brake pedal.
After the engine starts, accelerate as usual.
Safety mode
After the engine switches off automatically, it
will not start again automatically if any one of
the following conditions are met.
▷The driver's safety belt is unbuckled and
the driver's door is open.▷The hood was unlocked.
Some indicator lamps light up for varying
lengths of time.
The engine can only be started via the Start/
Stop button.
Note Even if driving away was not intended, the de‐
activated engine starts up automatically in the
following situations:▷Excessive warming of the passenger com‐
partment when the cooling function is
switched on.▷The steering wheel is turned.▷Automatic transmission: the transmission
position is changed from D to N, R, or M/S.▷Automatic transmission: the transmission
position is changed from P to N, D, R or
M/S.▷The vehicle begins rolling.▷Fogging of the windows when the auto‐
matic climate control is switched on.▷Vehicle battery is heavily discharged.▷Excessive cooling of the passenger com‐
partment when the heating is switched on.▷Low brake vacuum pressure; this can oc‐
cur, for example, if the brake pedal is de‐
pressed a number of times in succession.
Activating/deactivating the system
manually
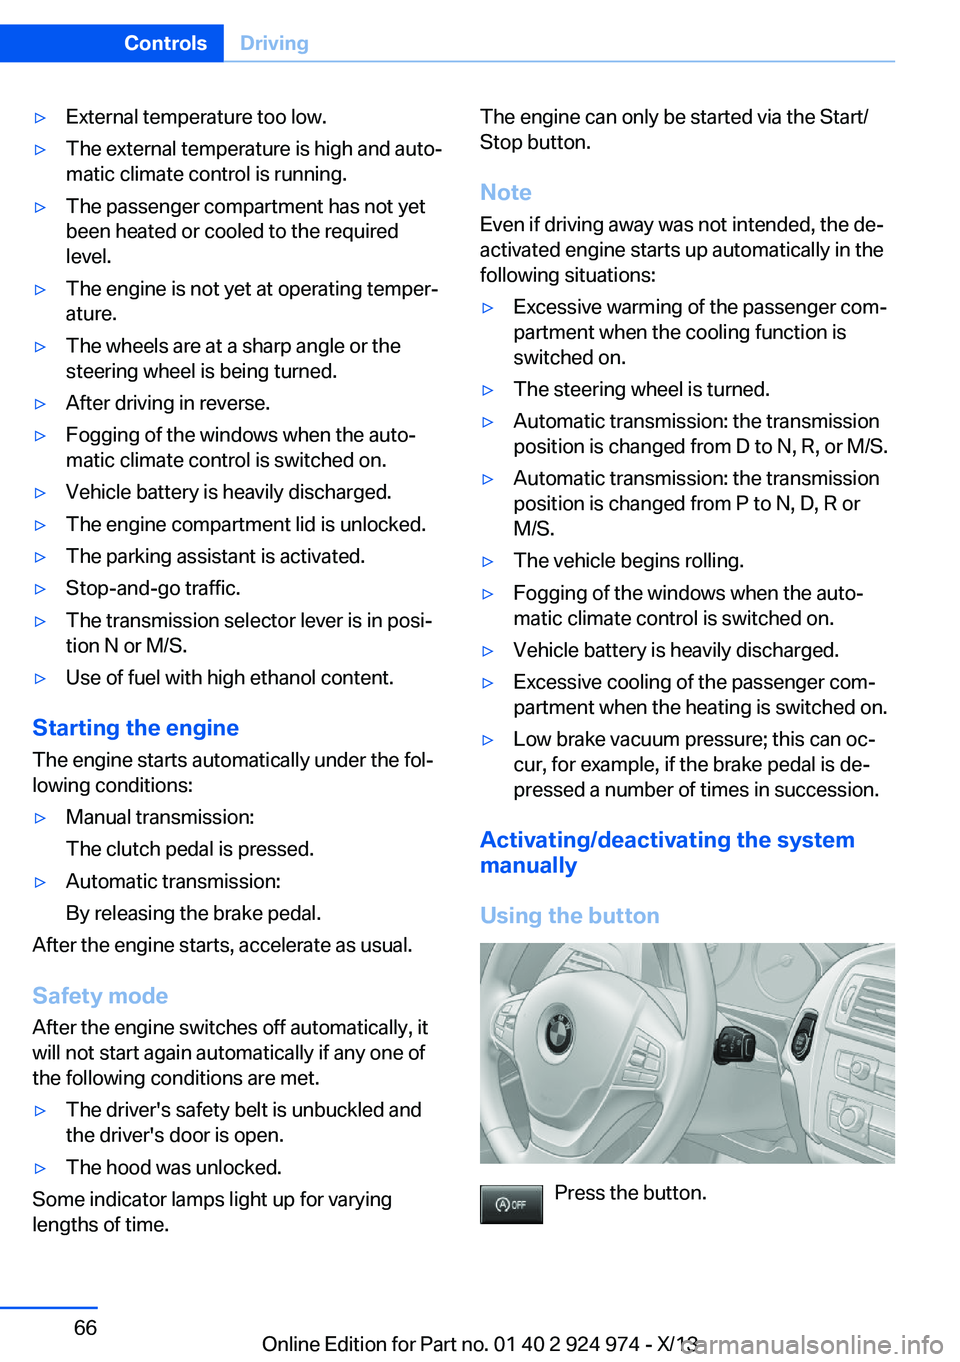
Using the button
Press the button.
Seite 66ControlsDriving66
Online Edition for Part no. 01 40 2 924 974 - X/13
Page 79 of 218
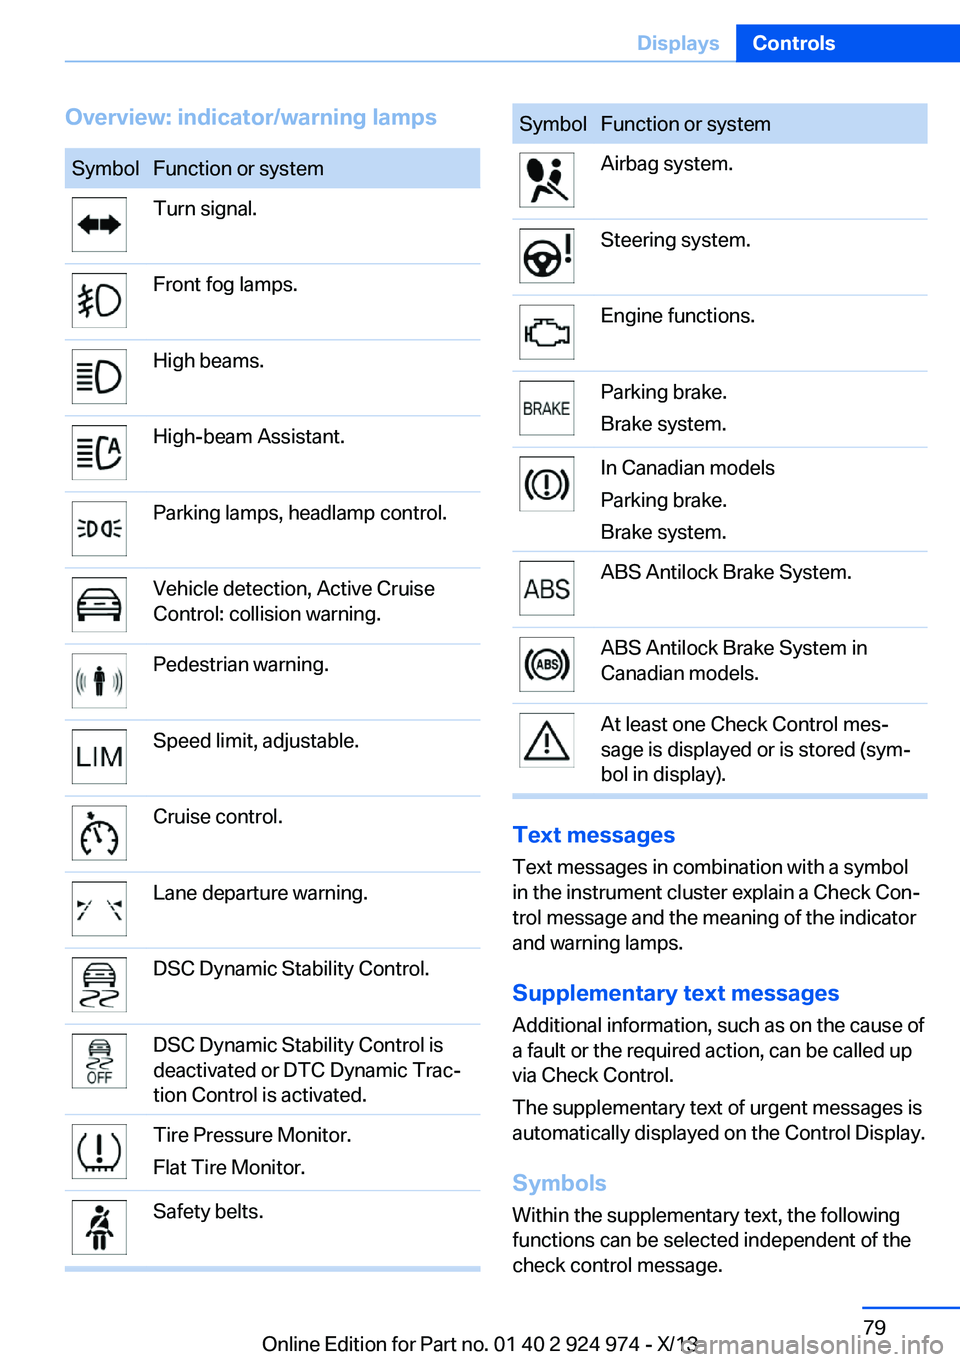
Overview: indicator/warning lampsSymbolFunction or systemTurn signal.Front fog lamps.High beams.High-beam Assistant.Parking lamps, headlamp control.Vehicle detection, Active Cruise
Control: collision warning.Pedestrian warning.Speed limit, adjustable.Cruise control.Lane departure warning.DSC Dynamic Stability Control.DSC Dynamic Stability Control is
deactivated or DTC Dynamic Trac‐
tion Control is activated.Tire Pressure Monitor.
Flat Tire Monitor.Safety belts.SymbolFunction or systemAirbag system.Steering system.Engine functions.Parking brake.
Brake system.In Canadian models
Parking brake.
Brake system.ABS Antilock Brake System.ABS Antilock Brake System in
Canadian models.At least one Check Control mes‐
sage is displayed or is stored (sym‐
bol in display).
Text messages
Text messages in combination with a symbol
in the instrument cluster explain a Check Con‐ trol message and the meaning of the indicator
and warning lamps.
Supplementary text messages
Additional information, such as on the cause of
a fault or the required action, can be called up
via Check Control.
The supplementary text of urgent messages is
automatically displayed on the Control Display.
Symbols
Within the supplementary text, the following
functions can be selected independent of the
check control message.
Seite 79DisplaysControls79
Online Edition for Part no. 01 40 2 924 974 - X/13
Page 90 of 218
LampsVehicle equipment
All standard, country-specific and optional
equipment that is offered in the model series is
described in this chapter. Therefore, equip‐
ment is also described that is not available in a
vehicle, e. g., because of the selected optional
equipment or country variant. This also applies
for safety-related functions and systems.
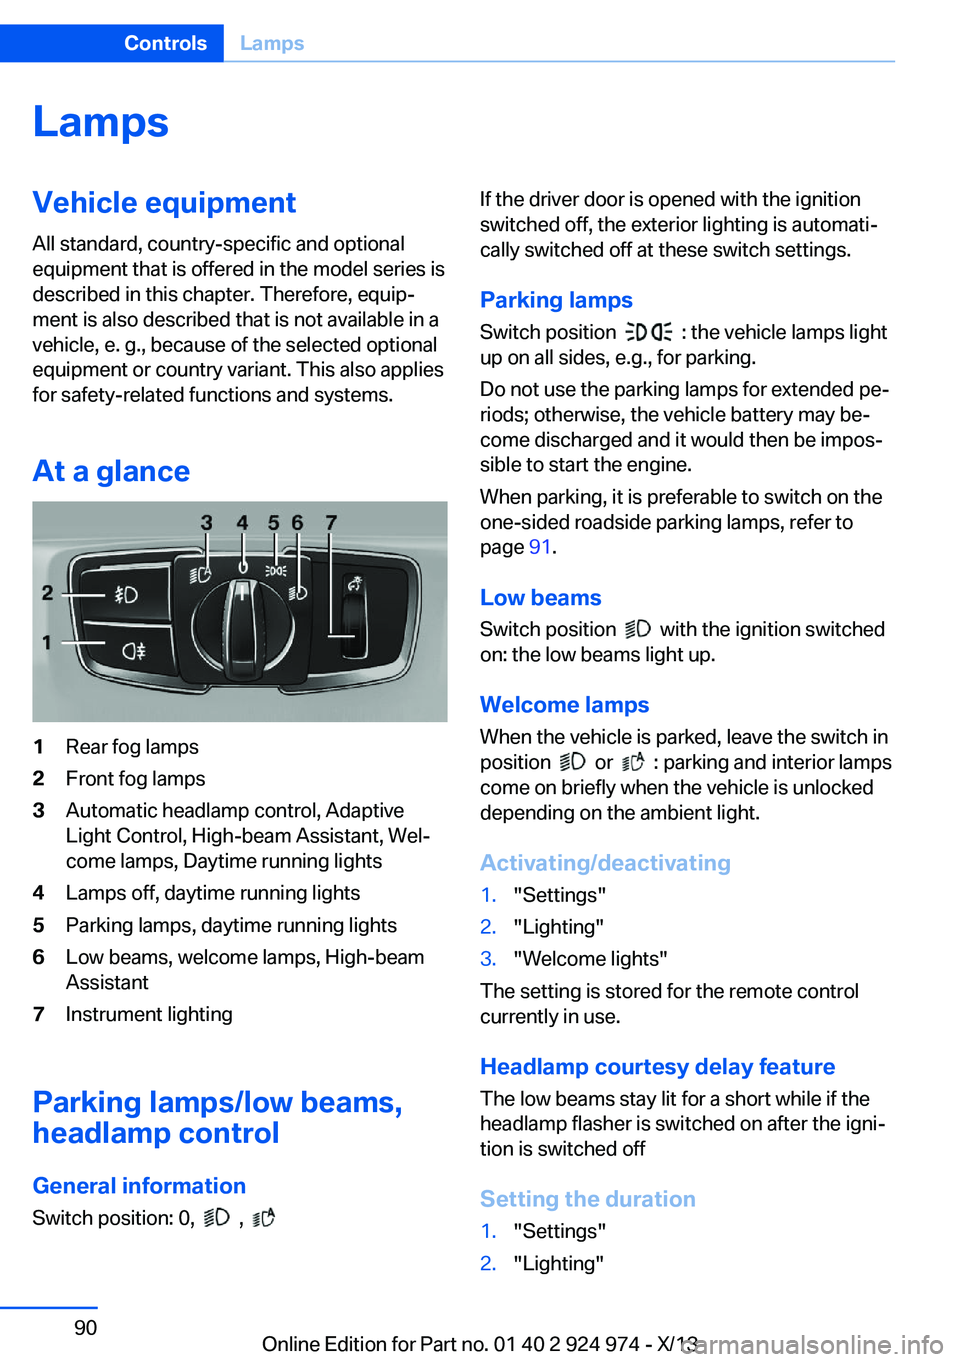
At a glance1Rear fog lamps2Front fog lamps3Automatic headlamp control, Adaptive
Light Control, High-beam Assistant, Wel‐
come lamps, Daytime running lights4Lamps off, daytime running lights5Parking lamps, daytime running lights6Low beams, welcome lamps, High-beam
Assistant7Instrument lighting
Parking lamps/low beams,
headlamp control
General information Switch position: 0,
,
If the driver door is opened with the ignition
switched off, the exterior lighting is automati‐
cally switched off at these switch settings.
Parking lamps
Switch position
: the vehicle lamps light
up on all sides, e.g., for parking.
Do not use the parking lamps for extended pe‐
riods; otherwise, the vehicle battery may be‐
come discharged and it would then be impos‐
sible to start the engine.
When parking, it is preferable to switch on the
one-sided roadside parking lamps, refer to
page 91.
Low beams Switch position
with the ignition switched
on: the low beams light up.
Welcome lamps When the vehicle is parked, leave the switch in
position
or : parking and interior lamps
come on briefly when the vehicle is unlocked
depending on the ambient light.
Activating/deactivating
1."Settings"2."Lighting"3."Welcome lights"
The setting is stored for the remote control
currently in use.
Headlamp courtesy delay feature
The low beams stay lit for a short while if the
headlamp flasher is switched on after the igni‐
tion is switched off
Setting the duration
1."Settings"2."Lighting"Seite 90ControlsLamps90
Online Edition for Part no. 01 40 2 924 974 - X/13
Page 93 of 218
Switching the high beams on and off
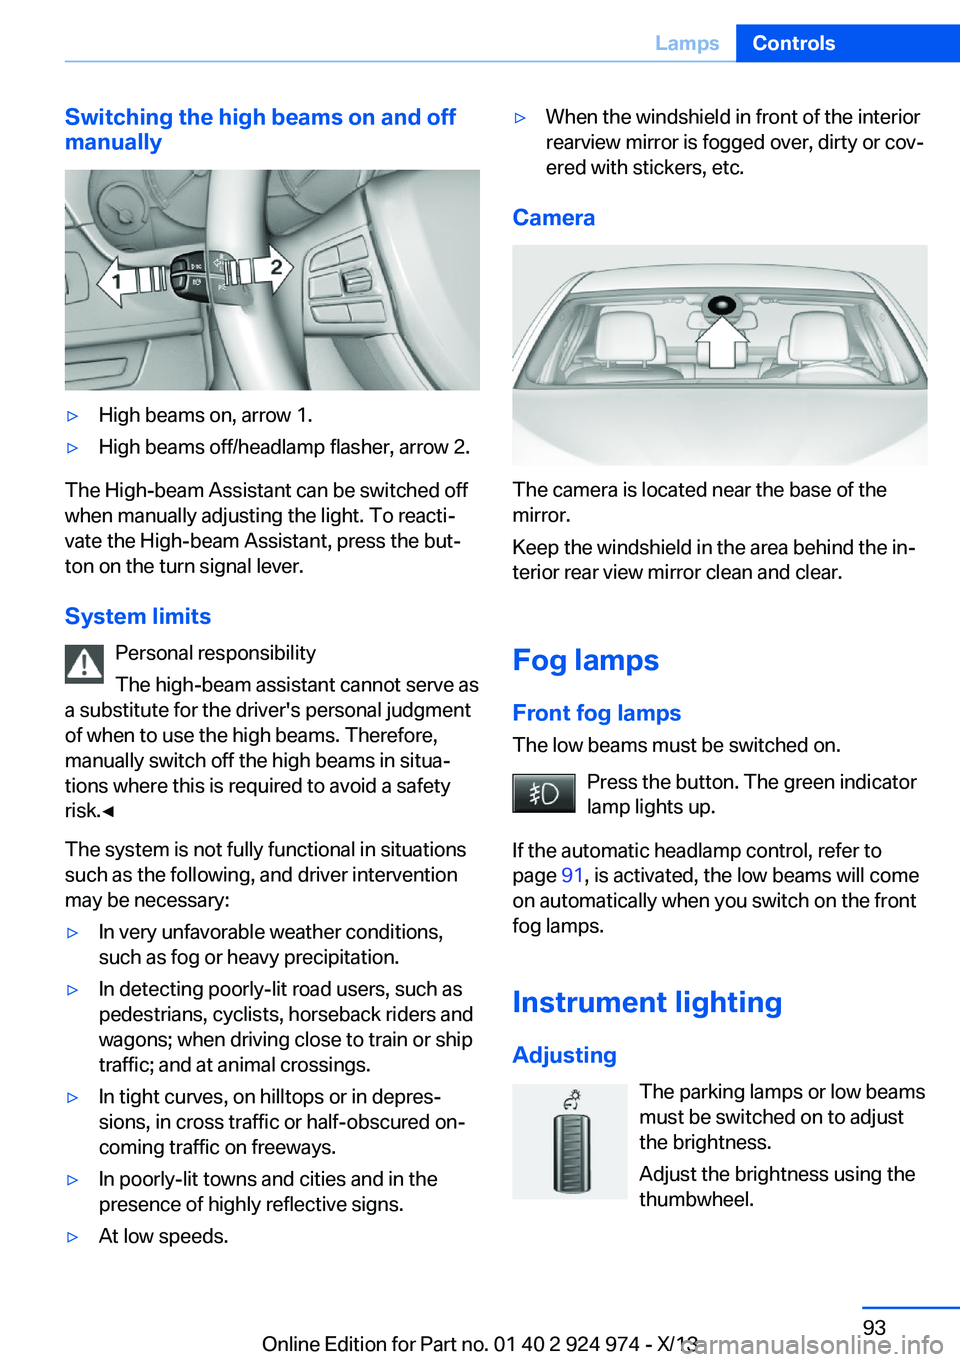
manually▷High beams on, arrow 1.▷High beams off/headlamp flasher, arrow 2.
The High-beam Assistant can be switched off
when manually adjusting the light. To reacti‐
vate the High-beam Assistant, press the but‐
ton on the turn signal lever.
System limits Personal responsibility
The high-beam assistant cannot serve as
a substitute for the driver's personal judgment
of when to use the high beams. Therefore,
manually switch off the high beams in situa‐
tions where this is required to avoid a safety
risk.◀
The system is not fully functional in situations
such as the following, and driver intervention
may be necessary:
▷In very unfavorable weather conditions,
such as fog or heavy precipitation.▷In detecting poorly-lit road users, such as
pedestrians, cyclists, horseback riders and
wagons; when driving close to train or ship
traffic; and at animal crossings.▷In tight curves, on hilltops or in depres‐
sions, in cross traffic or half-obscured on‐
coming traffic on freeways.▷In poorly-lit towns and cities and in the
presence of highly reflective signs.▷At low speeds.▷When the windshield in front of the interior
rearview mirror is fogged over, dirty or cov‐
ered with stickers, etc.
Camera
The camera is located near the base of the
mirror.
Keep the windshield in the area behind the in‐
terior rear view mirror clean and clear.
Fog lamps
Front fog lamps The low beams must be switched on.
Press the button. The green indicator
lamp lights up.
If the automatic headlamp control, refer to
page 91, is activated, the low beams will come
on automatically when you switch on the front
fog lamps.
Instrument lighting Adjusting The parking lamps or low beams
must be switched on to adjust
the brightness.
Adjust the brightness using the
thumbwheel.
Seite 93LampsControls93
Online Edition for Part no. 01 40 2 924 974 - X/13
Page 114 of 218
In certain situations, the system automatically
changes to the NORMAL program, automatic
program change, refer to page 113.
ECO PRO ECO PRO, refer to page 155, provides consis‐
tent tuning to minimize fuel consumption for
maximum range with maximum driving stabili‐
zation.
Comfort functions and the engine controller
are adjusted.
The program can be configured to individual
specifications.
Activating ECO PRO Press button repeatedly until ECO
PRO is displayed in the instrument
cluster.
Configuring ECO PRO1.Activate ECO PRO.2."Configure ECO PRO"
Make the desired settings.
Configuring drive program
Settings can be made for the following driving
programs in Driving mode:
▷SPORT, refer to page 113.▷ECO PRO, refer to page 156.
Displays
Program selection Pressing the button displays a
list of the selectable programs.
Selected program
The selected program is dis‐
played in the instrument cluster.
Display on the Control Display Program changes can be displayed on the
Control Display.1."Settings"2."Driving mode"3."Driving mode info"
Drive-off assistant
This system supports driving away on gradi‐
ents. The parking brake is not required.
1.Hold the vehicle in place with the foot
brake.2.Release the foot brake and drive away
without delay.
After the foot brake is released, the vehicle is
held in place for approx. 2 seconds.
Depending on the vehicle load or when a trailer
is being used, the vehicle may roll back
slightly.
Driving off without delay
After releasing the foot brake, start driv‐
ing without delay, since the drive-off assistant
will not hold the vehicle in place for more than
approx. 2 seconds and the vehicle will begin
rolling back.◀
Seite 114ControlsDriving stability control systems114
Online Edition for Part no. 01 40 2 924 974 - X/13