2014 BMW 2 SERIES turn signal bulb
[x] Cancel search: turn signal bulbPage 72 of 228

Using turn signals
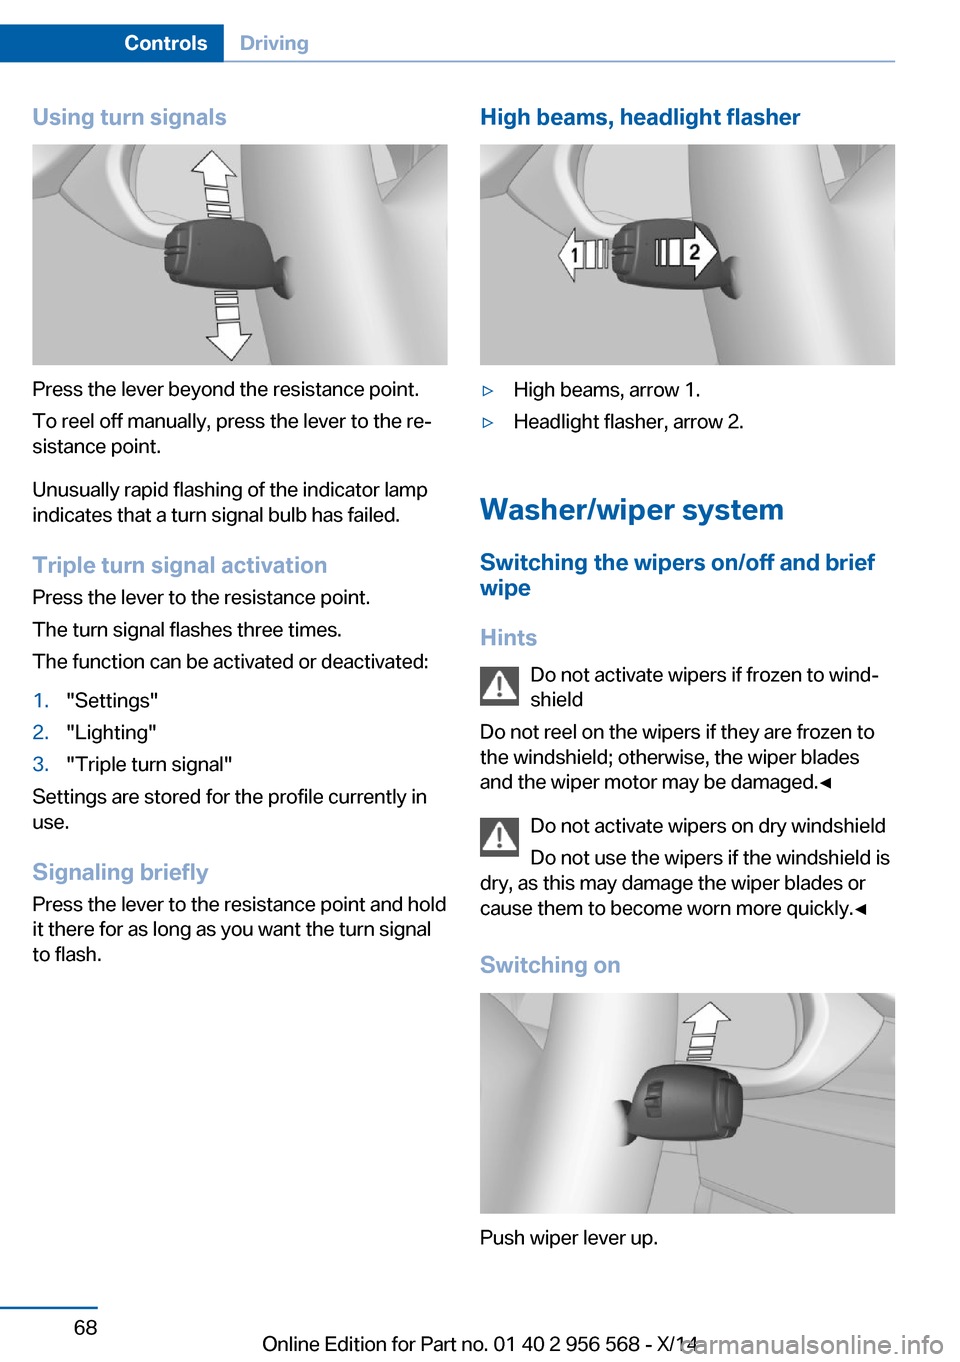
Press the lever beyond the resistance point.
To reel off manually, press the lever to the re‐
sistance point.
Unusually rapid flashing of the indicator lamp
indicates that a turn signal bulb has failed.
Triple turn signal activation Press the lever to the resistance point.
The turn signal flashes three times.
The function can be activated or deactivated:
1."Settings"2."Lighting"3."Triple turn signal"
Settings are stored for the profile currently in
use.
Signaling briefly
Press the lever to the resistance point and hold
it there for as long as you want the turn signal
to flash.
High beams, headlight flasher▷High beams, arrow 1.▷Headlight flasher, arrow 2.
Washer/wiper system
Switching the wipers on/off and brief
wipe
Hints Do not activate wipers if frozen to wind‐
shield
Do not reel on the wipers if they are frozen to
the windshield; otherwise, the wiper blades
and the wiper motor may be damaged.◀
Do not activate wipers on dry windshield
Do not use the wipers if the windshield is
dry, as this may damage the wiper blades or
cause them to become worn more quickly.◀
Switching on
Push wiper lever up.
Seite 68ControlsDriving68
Online Edition for Part no. 01 40 2 956 568 - X/14
Page 83 of 228

Green lights
Turn signal Turn signal on.
Unusually rapid flashing of the indicator
lamp indicates that a turn signal bulb
has failed.
For additional information, refer to Turn signal, refer to page 67.
Parking lights, headlight control Parking lights or headlights are acti‐
vated.
Front fog lights Front fog lights are activated.
For additional information, refer to
Front fog lights, refer to page 92.
High-beam Assistant High-beam Assistant is switched on.
High beams are activated and off auto‐
matically as a function of the traffic sit‐
uation.
For additional information, refer to High-beam
Assistant, refer to page 91.
Cruise control The system is switched on. It maintains
the speed that was set using the con‐
trol elements on the steering wheel.
Blue lights
High beams High beams are activated.
For additional information, refer to High
beams, refer to page 68.General lamps
Check Control At least one Check Control message is
displayed or is stored (symbol in dis‐
play).
Text messages
Text messages in combination with a symbol
in the instrument cluster explain a Check Con‐ trol message and the meaning of the indicator
and warning lights.
Supplementary text messages
Additional information, such as on the cause of
an error or the required action, can be called up
via Check Control.
With urgent messages the added text will be
automatically displayed on the Control Display.
Symbols
Within the supplementary text, the following
functions can be selected independent of the
check control message.▷ Display additional information about
the Check Control message in the
Integrated Owner's Manual.▷ "Service request"
Contact your service center.▷ "Roadside Assistance"
Contact Roadside Assistance.Seite 79DisplaysControls79
Online Edition for Part no. 01 40 2 956 568 - X/14
Page 192 of 228

Danger of burns
Only change bulbs when they are cool;
otherwise, there is a danger of getting
burned.◀
Working on the lighting system
When working on the lighting system,
you should always reel off the lights affected to
prevent short circuits.
To avoid possible injury or equipment damage
when replacing bulbs, observe any instructions
provided by the bulb manufacturer.◀
Do not perform work/bulb replacement
on xenon headlights
Have any work on the xenon lighting system,
including bulb replacement, performed only by
a service center. Due to the high voltage
present in the system, there is a danger of fatal
injuries if work is carried out improperly.◀
Do not touch the bulbs
Do not touch the glass of new bulbs with
your bare hands, as even minute amounts of
contamination will burn into the bulb's surface
and reduce its service life.
Use a clean tissue, cloth or something similar,
or hold the bulb by its base.◀
Light-emitting diodes (LEDs)
Some items of equipment use light-emitting
diodes installed behind a cover as a light
source.
These light-emitting diodes, which are related
to conventional lasers, are officially designated as Class 1 light-emitting diodes.
Do not remove the covers
Do not remove the covers, and never
stare into the unfiltered light for several hours;
otherwise, irritation of the retina could result.◀Headlight glass
Condensation can form on the inside of the ex‐
ternal lights in cool or humid weather. When
driving with the light switched on, the conden‐
sation evaporates after a short time. The head‐
light glass does not need to be changed.
If the headlights do not dim despite driving
with the light switched on, increasing humidity
forms, e. g. water droplets in the light, have the service center check this.
Headlight setting The headlight adjustments can be affected by
changing lights and bulbs. Have the head‐
lights' settings checked and corrected by serv‐
ice after a replacement.
Front lights, bulb replacement
Halogen headlights
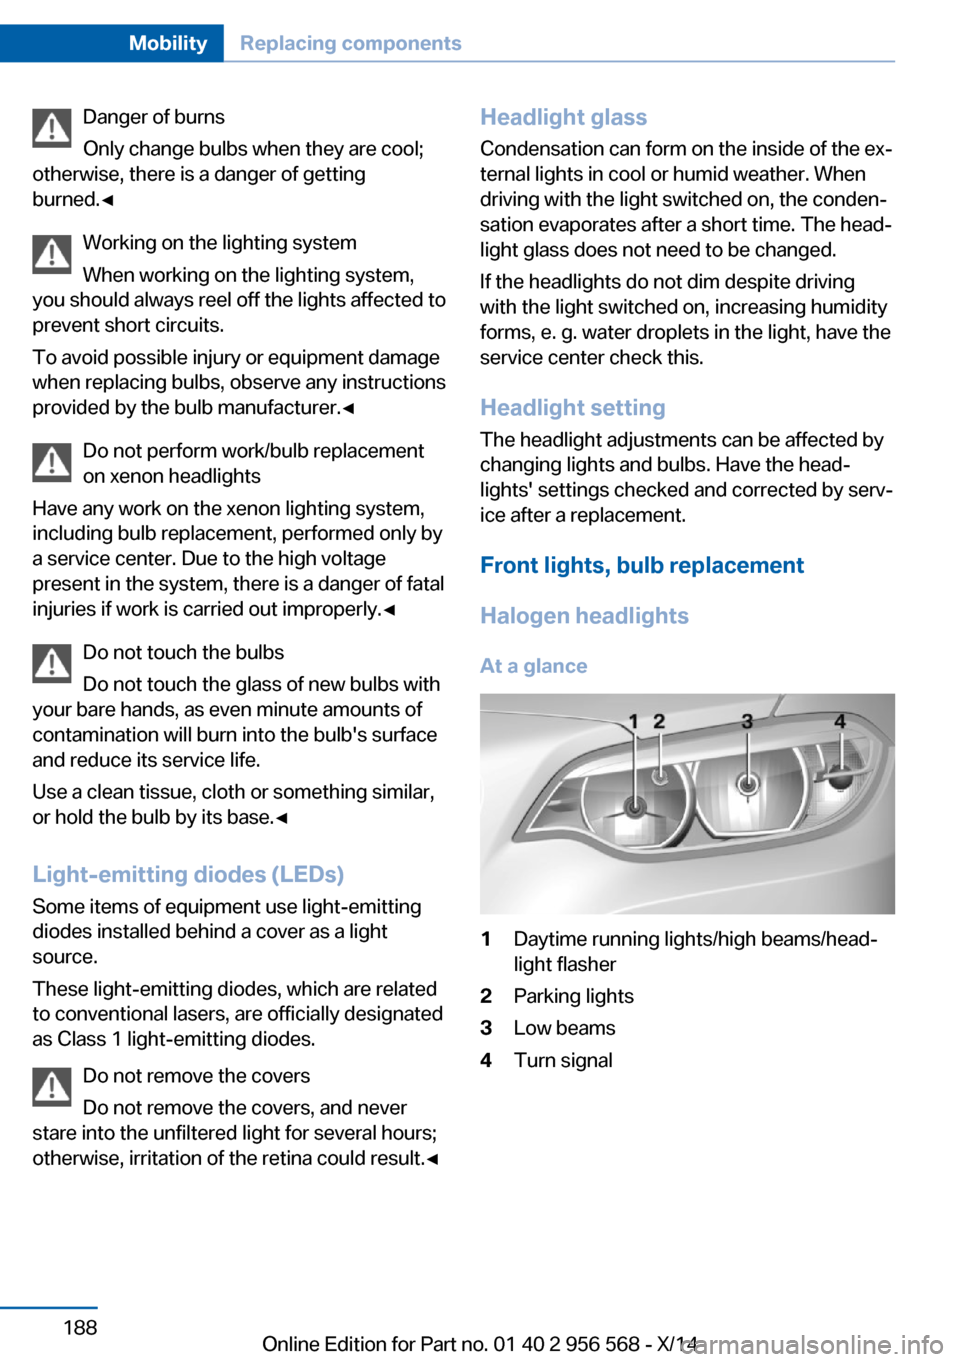
At a glance1Daytime running lights/high beams/head‐
light flasher2Parking lights3Low beams4Turn signalSeite 188MobilityReplacing components188
Online Edition for Part no. 01 40 2 956 568 - X/14
Page 193 of 228

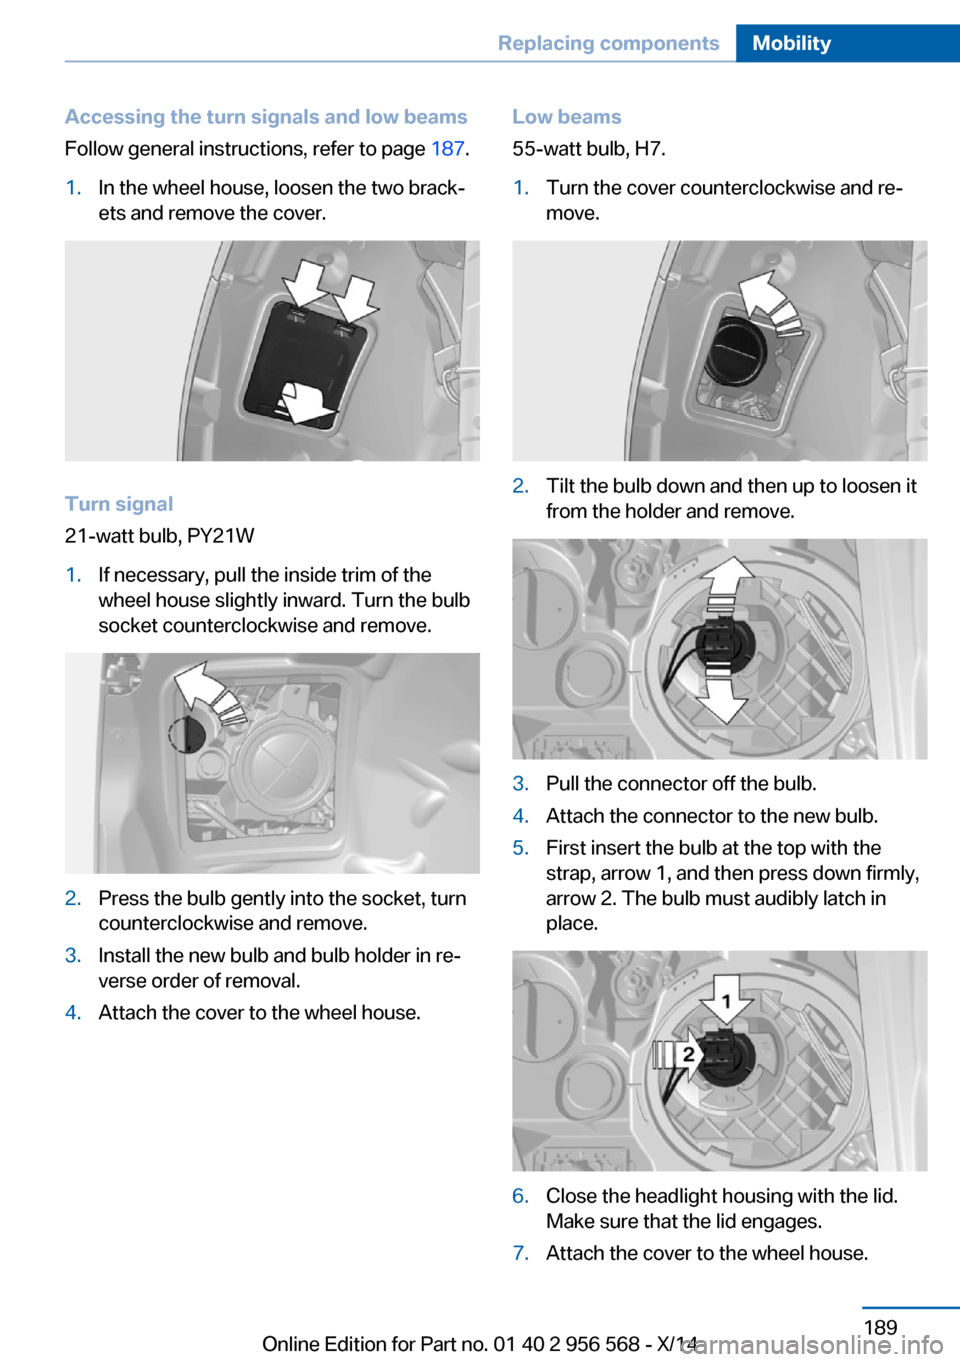
Accessing the turn signals and low beams
Follow general instructions, refer to page 187.1.In the wheel house, loosen the two brack‐
ets and remove the cover.
Turn signal
21-watt bulb, PY21W
1.If necessary, pull the inside trim of the
wheel house slightly inward. Turn the bulb
socket counterclockwise and remove.2.Press the bulb gently into the socket, turn
counterclockwise and remove.3.Install the new bulb and bulb holder in re‐
verse order of removal.4.Attach the cover to the wheel house.Low beams
55-watt bulb, H7.1.Turn the cover counterclockwise and re‐
move.2.Tilt the bulb down and then up to loosen it
from the holder and remove.3.Pull the connector off the bulb.4.Attach the connector to the new bulb.5.First insert the bulb at the top with the
strap, arrow 1, and then press down firmly,
arrow 2. The bulb must audibly latch in
place.6.Close the headlight housing with the lid.
Make sure that the lid engages.7.Attach the cover to the wheel house.Seite 189Replacing componentsMobility189
Online Edition for Part no. 01 40 2 956 568 - X/14
Page 195 of 228

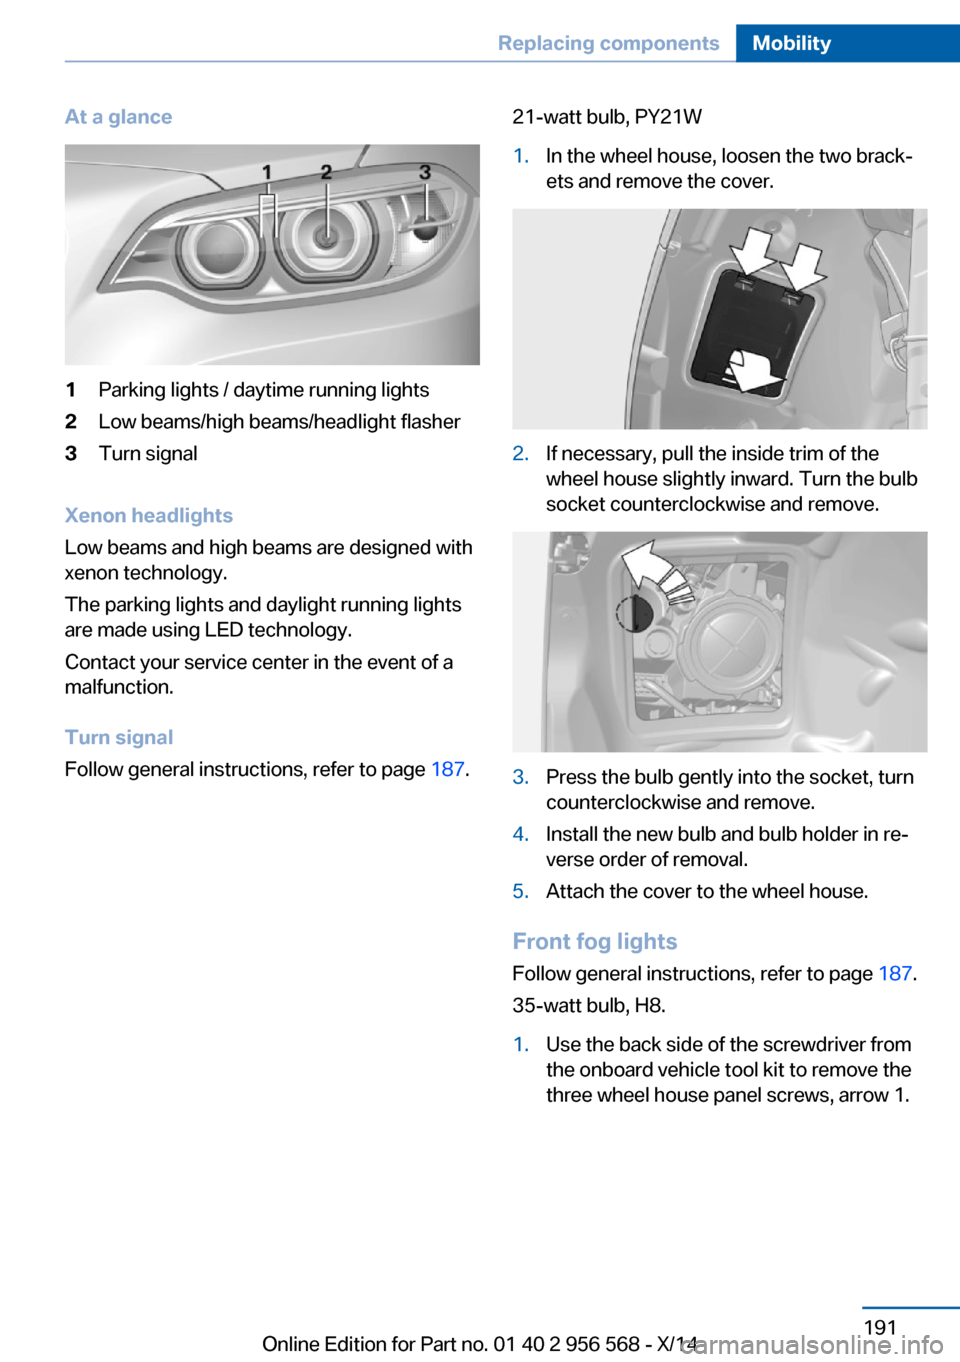
At a glance1Parking lights / daytime running lights2Low beams/high beams/headlight flasher3Turn signal
Xenon headlights
Low beams and high beams are designed with
xenon technology.
The parking lights and daylight running lights
are made using LED technology.
Contact your service center in the event of a
malfunction.
Turn signal
Follow general instructions, refer to page 187.
21-watt bulb, PY21W1.In the wheel house, loosen the two brack‐
ets and remove the cover.2.If necessary, pull the inside trim of the
wheel house slightly inward. Turn the bulb
socket counterclockwise and remove.3.Press the bulb gently into the socket, turn
counterclockwise and remove.4.Install the new bulb and bulb holder in re‐
verse order of removal.5.Attach the cover to the wheel house.
Front fog lights
Follow general instructions, refer to page 187.
35-watt bulb, H8.
1.Use the back side of the screwdriver from
the onboard vehicle tool kit to remove the
three wheel house panel screws, arrow 1.Seite 191Replacing componentsMobility191
Online Edition for Part no. 01 40 2 956 568 - X/14
Page 196 of 228

Carefully raise the wheel house panel, ar‐
row 2.2.Pull off the bulb connector, arrow 1.
Turn the bulb, arrow 2.
Left side of vehicle: turn clockwise.
Right side of vehicle: turn counterclock‐
wise.
Remove the bulb.3.Insert the new bulb, connect the connector
and screw on the wheel house panel.
Turn signal in exterior mirror
The turn signals in the exterior mirrors feature
LED technology. Contact your service center
in the event of a malfunction.
Tail lights, bulb replacement
At a glance1Turn signal2Top brake lamp3Reversing lamp4Rear lamp5Bottom brake lights
Bulb replacement Follow general instructions, refer to page 187.
Turn signal, brake, tail, rear or reversing lamp:
21-watt bulb, P21W
Rear fog lamp: 6-watt bulb, H6W.
Removing the tail lamp
1.Open trunk lid.2.Open the two covers on the tail lamp.3.With the handle of the screwdriver from the
onboard vehicle tool kit, loosen and re‐
move the nuts on the two fasteners. Make
sure that the nuts do not drop into theSeite 192MobilityReplacing components192
Online Edition for Part no. 01 40 2 956 568 - X/14
Page 219 of 228

Bulb replacement, rear 192
Bulbs and lights 187
Button, Start/Stop 63
Bypassing, refer to Jump- starting 198
C
California Proposition 65 Warning 7
Camera, care 206
Camera, rearview cam‐ era 122
Can holder, refer to Cu‐ pholder 145
Car battery 194
Car care products 204
Care, displays 206
Care, vehicle 204
Cargo 153
Cargo area, enlarging 141
Cargo area, storage compart‐ ments 145
Cargo, securing 154
Cargo straps, securing cargo 154
Car key, refer to Remote con‐ trol 34
Carpet, care 206
Car wash 203
Catalytic converter, refer to Hot exhaust system 151
CBS Condition Based Serv‐ ice 185
CD/Multimedia, see user's manual for Navigation, En‐
tertainment and Communi‐
cation
Center armrest 144
Center console 16
Central locking system 39
Central screen, refer to Con‐ trol Display 18
Changes, technical, refer to Safety 7
Changing parts 187 Changing wheels 193
Changing wheels/tires 176
Chassis number, see vehicle identification number 9
Check Control 77
Checking the oil level elec‐ tronically 181
Children, seating position 59
Children, transporting safely 59
Child restraint fixing sys‐ tem 59
Child restraint fixing system LATCH 60
Child restraint fixing systems, mounting 59
Child seat, mounting 59
Child seats 59
Chrome parts, care 205
Cigarette lighter 139
Cleaning displays 206
Climate control 128, 130
Clock 81
Closing/opening via door lock 38
Closing/opening with remote control 37
Clothes hooks 145
Coasting 160
Coasting with engine decou‐ pled, coasting 160
Coasting with idling en‐ gine 160
Cockpit 14
Combination reel, refer to Turn signals 67
Combination reel, refer to Wiper system 68
Comfort Access 41
COMFORT program, Dy‐ namic Driving Control 115
Compartments in the doors 144
Compass 137
Computer 85 Condensation on win‐
dows 132
Condensation under the vehi‐ cle 152
Condition Based Service CBS 185
Configuring driving pro‐ gram 115
Confirmation signal 43
ConnectedDrive, see user's manual for Navigation, En‐
tertainment and Communi‐
cation
ConnectedDrive Services
Connecting electrical devi‐ ces 139
Continued driving with a flat tire 99, 102
Control Display 18
Control Display, settings 87
Controller 18, 19
Control systems, driving sta‐ bility 111
Convenient opening with the remote control 37
Coolant 184
Coolant level 184
Coolant temperature 80
Cooling function 129, 131
Cooling, maximum 131
Cooling system 184
Corrosion on brake discs 152
Cosmetic mirror 139
Cruise control 117
Cruising range 81
Cupholder 145
Current fuel consumption 81
D
Damage, tires 176
Damping control, dy‐ namic 113
Data, technical 210
Date 81
Daytime running lights 90 Seite 215Everything from A to ZReference215
Online Edition for Part no. 01 40 2 956 568 - X/14
Page 220 of 228

Daytime running lights, bulbreplacement 190
Defrosting, refer to defrosting the windows 129
Defrosting, refer to Windows, defrosting 132
Defrosting the windows 129
Dehumidifying, air 129, 131
Deleting personal data 24
Deletion of personal data 24
Destination distance 86
Digital clock 81
Digital compass 137
Dimensions 210
Dimmable exterior mirrors 57
Dimmable interior rearview mirror 57
Direction indicator, refer to Turn signals 67
Display, electronic, instru‐ ment cluster 76
Display lighting, refer to In‐ strument lighting 92
Displays, cleaning 206
Disposal, coolant 184
Disposal, vehicle battery 194
Distance control, refer to PDC 119
Distance to destination 86
Divided screen view, split screen 23
Door lock 38
Door lock, refer to Remote control 34
Drive-off assistant 115
Drive-off assistant, refer to DSC 111
Driver assistance, refer to In‐ telligent Safety 102
Driving Assistant, refer to In‐ telligent Safety 102
Driving Dynamics Con‐ trol 113
Driving instructions, break- in 150
Driving mode 113 Driving notes, general 150
Driving stability control sys‐ tems 111
Driving style analysis 161
Driving tips 150
DSC Dynamic Stability Con‐ trol 111
DTC Dynamic Traction Con‐ trol 112
Dynamic Damping Con‐ trol 113
Dynamic Stability Control DSC 111
Dynamic Traction Control DTC 112
E
ECO PRO 157
ECO PRO, bonus range 158
ECO PRO display 157
ECO PRO driving mode 157
ECO PRO driving style analy‐ sis 161
ECO PRO mode 157
ECO PRO Tip - driving in‐ struction 159
EfficientDynamics 160
Electronic displays, instru‐ ment cluster 76
Electronic oil measure‐ ment 181
Electronic Stability Program ESP, refer to DSC 111
Emergency detection, remote control 35
Emergency release, fuel filler flap 166
Emergency Request 197
Emergency service, refer to Roadside Assistance 198
Emergency start function, en‐ gine start 35
Emergency unlocking, trans‐ mission lock 74 Emergency unlocking, trunk
lid 41
Energy Control 81
Energy recovery 81
Engine, automatic reel-off 65
Engine, automatic Start/Stop function 65
Engine compartment 179
Engine compartment, work‐ ing in 180
Engine coolant 184
Engine idling when driving, coasting 160
Engine oil 181
Engine oil, adding 182
Engine oil additives 182
Engine oil change 183
Engine oil filler neck 182
Engine oil types, alterna‐ tive 183
Engine oil types, ap‐ proved 183
Engine start during malfunc‐ tion 35
Engine start, jump-start‐ ing 198
Engine start, refer to Starting the engine 64
Engine stop 64
Entering a car wash 203
Equipment, interior 135
Error displays, see Check Control 77
ESP Electronic Stability Pro‐ gram, refer to DSC 111
Exchanging wheels/tires 176
Exhaust system 151
Exterior mirror, automatic dimming feature 57
Exterior mirrors 55
External start 198
External temperature dis‐ play 81
External temperature warn‐ ing 81
Eyes for securing cargo 154 Seite 216ReferenceEverything from A to Z216
Online Edition for Part no. 01 40 2 956 568 - X/14