2014 AUDI RS7 SPORTBACK sport mode
[x] Cancel search: sport modePage 173 of 292
WARNINGS. Make certain that the child and
chi ld restraint are correct ly recognized by the
capacitive passenger detect ion system in the
front passenger seat, that the front passenger
airbag is turned
off, and that the airbag status
is always correct ly signaled by the
PASS EN
GER AIR BAG OFF
light .
Many types and models of child restra ints
have been available over the years, new mod
e ls are introduced regular ly incorporating new
and improved designs a nd older models are
taken out of production. Child restraints are not standardized. Ch ild restra ints of the same
type typically h ave different we ights and s izes
and d ifferen t "footprints", the size and shape
of the bottom of the child restraint that sits
on the seat, when they are installed on a vehi
cle seat. These differences make it virtually
imposs ible to certify compliance with the re
qu irements for advanced airbags w ith each
and every child restraint that has ever been
sold in the past or will be sold ove r the course
of the useful life of yo ur vehicle.
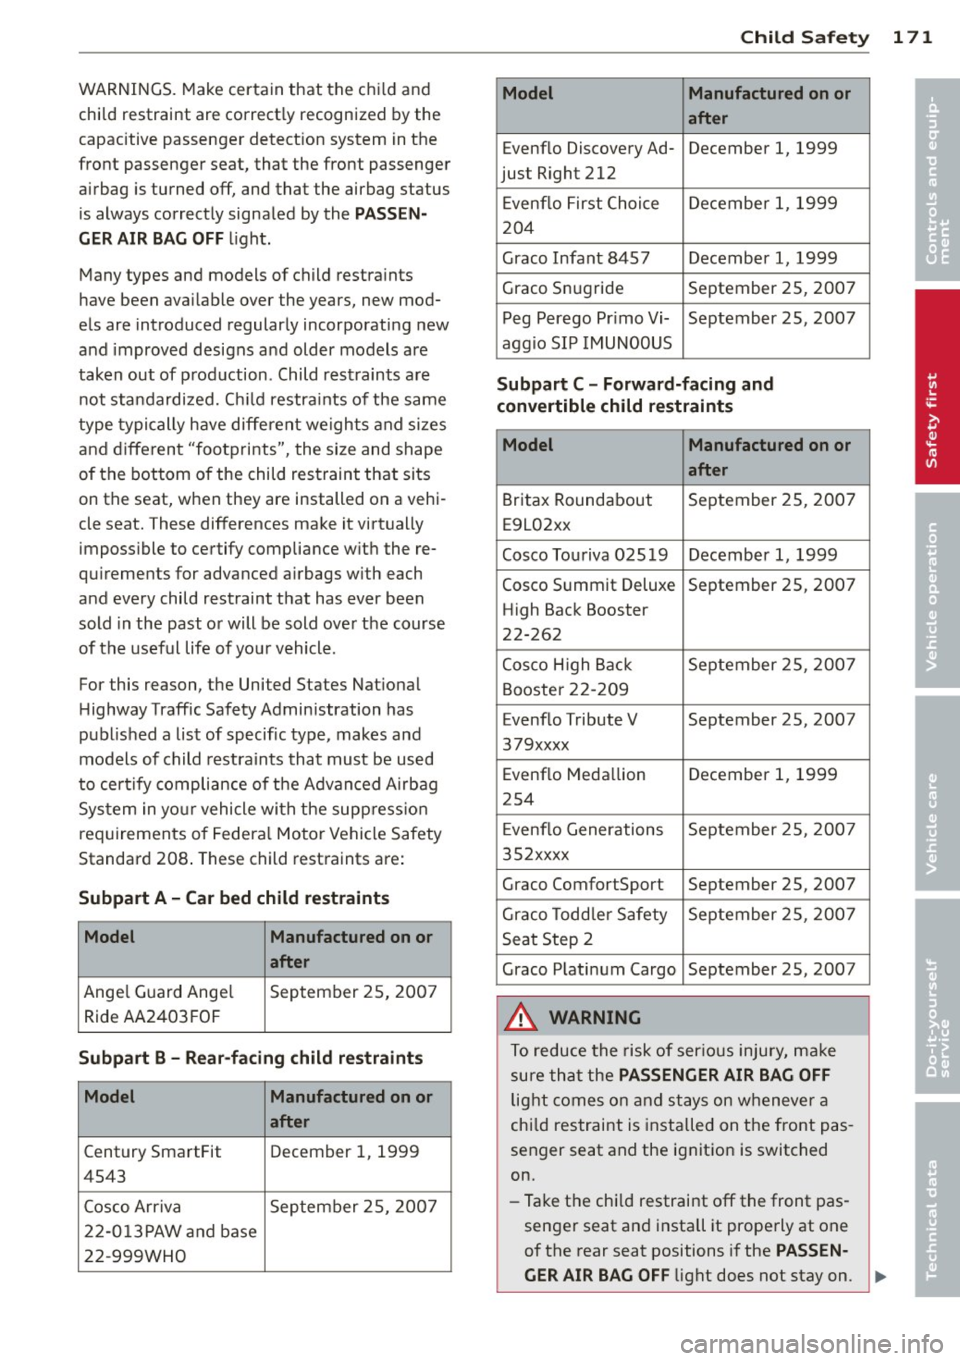
For this reason, the United States Nat ional
H ighway Traffic Safety Administration has
published a list of specific type, makes and
models of child restraints that must be used
to ce rtify compliance of t he Advanced A irbag
System in yo ur vehicle with the supp ress io n
requirements of Federa l Motor Vehicle Safety
Standard 208 . These child restraints are:
Subpart A -Car bed child restraints
Model Manufactured on or
after
Ange
l Guard Ange l September 25, 200 7
Ride AA2403 FOF
Subpart B -Rear -facing child restra ints
Model Manufactured on or
after
Century SmartFit December 1, 1999
4543
Cosco Arriva September 25, 200 7
2 2-0 13 PAW an d base
22-999WHO
Child Sa fet y 1 71
Model Manufactured on or
after
Evenflo Discovery Ad- December 1, 1999
just Right 212
E venflo First Choice December 1, 1999
204
Graco Infant 8457 December 1, 1999
Graco Snug ride September 25, 2007 Peg Perego Pr imo Vi- September 25, 2007
aggio SI P IMUNOOUS
Subpart C -Forw ard-facing and
convertible child restraints
Model Manufactured on or
after
Britax Roundabout September 25, 2007
E9L02xx
Cosco Touriva 025 19 December 1, 1999
Cosco Summit Deluxe September 25, 2007
High Back Booster
22-262
Cosco H igh Back September 2 5, 2007
Booster 22- 209
Evenflo Tribute V September 25, 2007
379xxxx
Evenf lo Meda llion December 1, 1999
254
E venflo Generations September 2 5, 200 7
35 2xxxx
Graco ComfortSport September 25, 2007
Gr aco Todd ler Safety September 25, 2007
Seat Step 2
Graco P lati num Cargo September 25, 2007
A WARNING
To reduce the risk of ser ious injury, ma ke
sure th at the
PASSENGER AIR BAG OFF
light comes on and st ays on wheneve r a
chi ld restraint is installed on the front pas
senger seat and the ignition is switched
on.
- Ta ke the chi ld restraint
off the front pas
senger seat and install it properly at one
of the rear seat positions if the
PASSEN-
GER AIR BAG OFF
light does not stay on. ~
•
•
Page 190 of 292
188 Audi pre sense
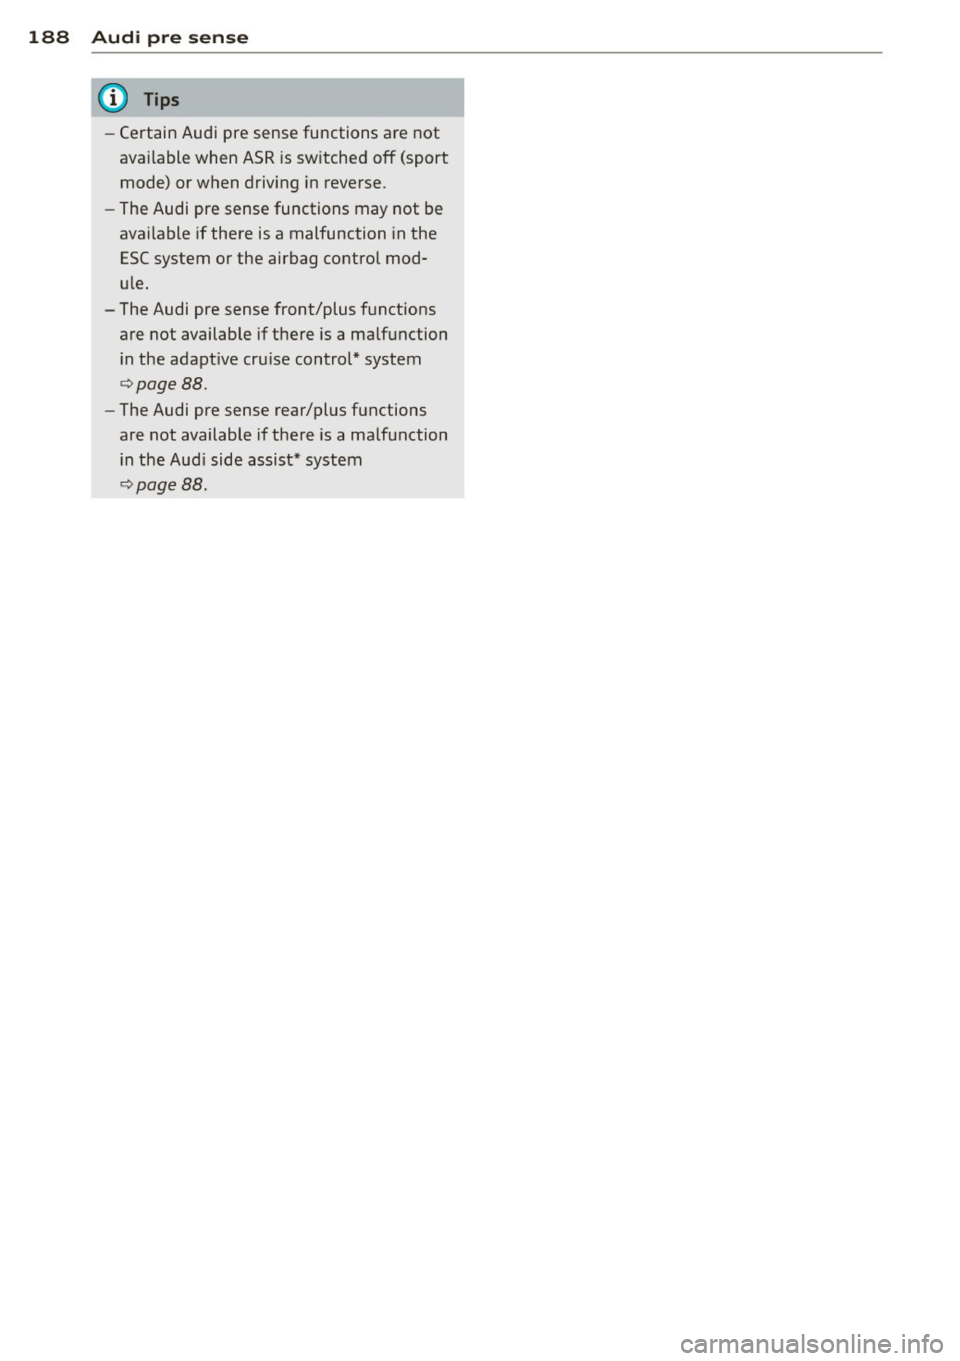
- Certain Audi pre sense functions a re not
available when ASR is sw itched off (sport
mode) or when driving in reverse.
- The Audi pre sense functions may not be
available if there is a malfunction in the
ESC system or the airbag control mod
u le.
- The Audi pre sense front/plus f unctions
are not available if there is a ma lfunction
i n the adapt ive cru ise control* system
Q page 88.
-The Audi pre sense rear/plus functions
are not available if there is a ma lfunction
i n the Aud i side assist* system
Qpage88.
Page 193 of 292
-You may hear noises when the systems
described are working.
- If the indicator ligh t
DJ or flB (USA
models) @ (Canada models) appears,
Switching on and off
Intelligen t technolog y 191
there may be a malfunc tion c> page 19,
c> page 18 .
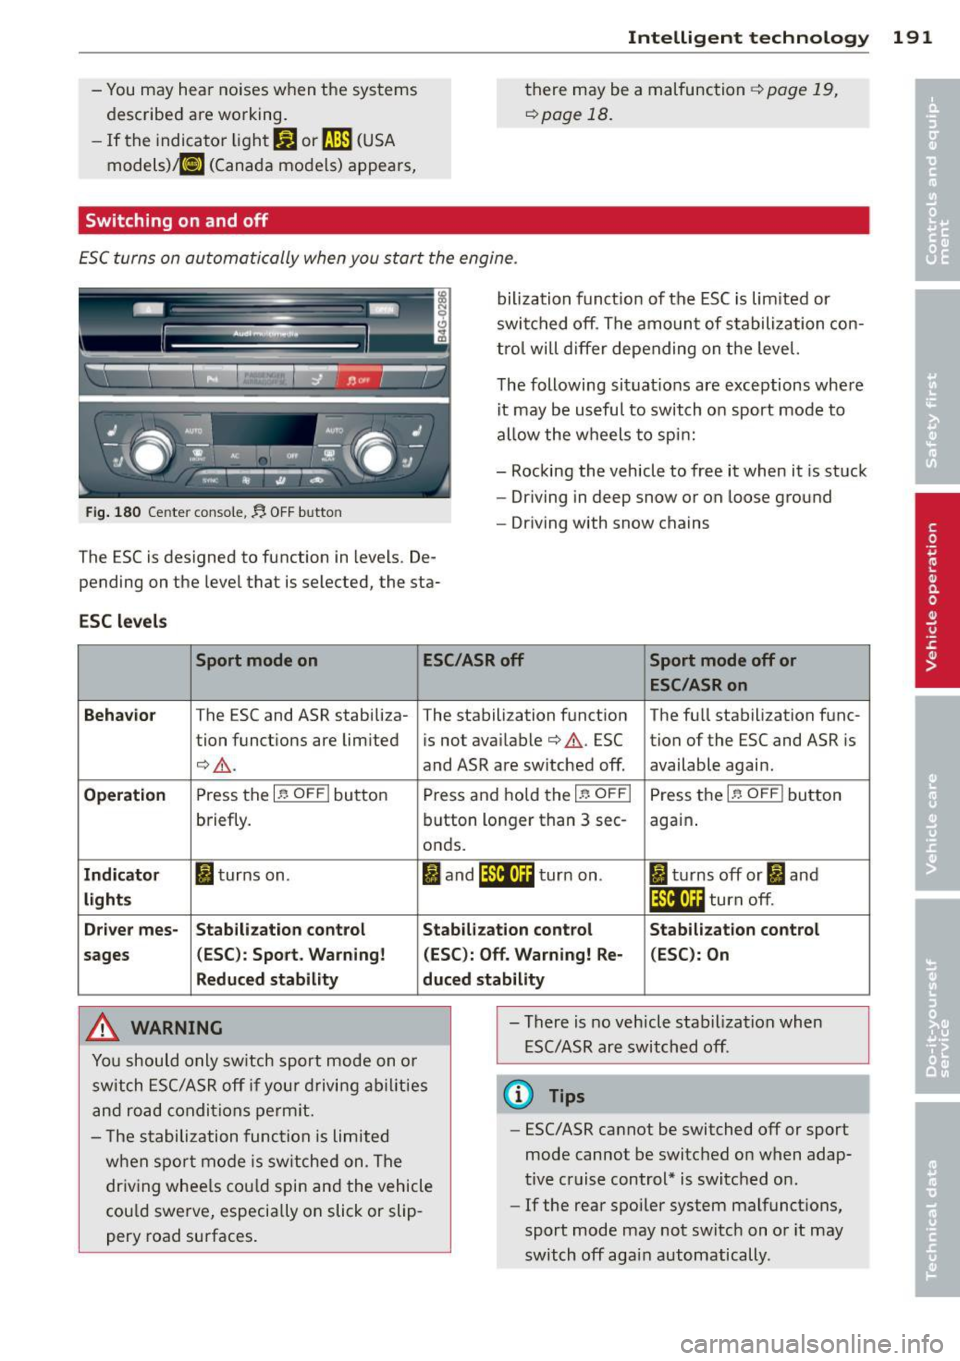
ESC turns on automatically when you s tart the engine .
Fig. 180 Cente r con sole,.$ OFF b utto n
The ESC is des igned to function in levels . De
pend ing on the leve l that is selected, the sta-
ESC l evels
bilization funct ion of the ESC is lim ited or
swi tched off . The amoun t of s tabilization con
tro l will d iffer depending on the level.
T he following situat ions are exceptions where
it may be usefu l to switch on sport mode to
allow the w heels to spi n:
- Rocking the vehicle to free it when it is stuck
- Dr iving in deep snow or on loose ground
- Driving with snow chains
Sport mode on ESC/ASR off Sport mode off or
ESC/ASRon
Behavior
T he ESC and ASR stabili za- The stabili zation function The fu ll stabili zation f unc -
tion funct ions are lim ited is not ava ilable
c> & . ESC tion of the ESC and ASR is
¢ & . and ASR are sw itched off. available agai n.
Operati on Press the I~ O FF I button Press and hold the 1-~ O FFI Press the 1-~ O FF I button
briefly. button longer than 3 sec-again .
o nds.
Ind ic a to r I turns on . I and ifil•)H turn on . II turns off or II and
light s If i4•)ii turn off.
Dr iver mes- Stab ilization control Stabilization control Stabilization control
s ages (
ESC ): Spo rt. Warning! (ESC ): Off. Warning! Re· (ESC) : On
Reduced stabil ity duc ed stab ility
A WARNING
.
You should only sw itch sport mode on o r
switch ESC/ASR off if your drivi ng ab il ities
and road condi tions perm it. -
There is no vehicle stabilization when
ESC/ASR are switched off .
@ Tips
-The s tabilization func tion is limited
w he n spor t mode is sw itched on . The
dr iv ing whee ls cou ld spin and the vehicle
cou ld swe rve, especially on slick or slip
pery road surfaces. -
ESC/ASR cannot be switched off or sport
mode cannot be switched on when adap·
tive cruise control* is switched on .
-If the rear spoiler system malfunctions,
sport mode may not switch on o r it may
switch off again automatically .
Page 203 of 292
@ Tips
The consumption estimates as published by ENVIRONMENTAL PROTECTION AGENCY (EPA) and Transport Canada may not corre
spond to your actual consumption on the
road, wh ich will vary depend ing upon vehi
cle load and speed, road and weather con
ditions, tr ip length, etc.
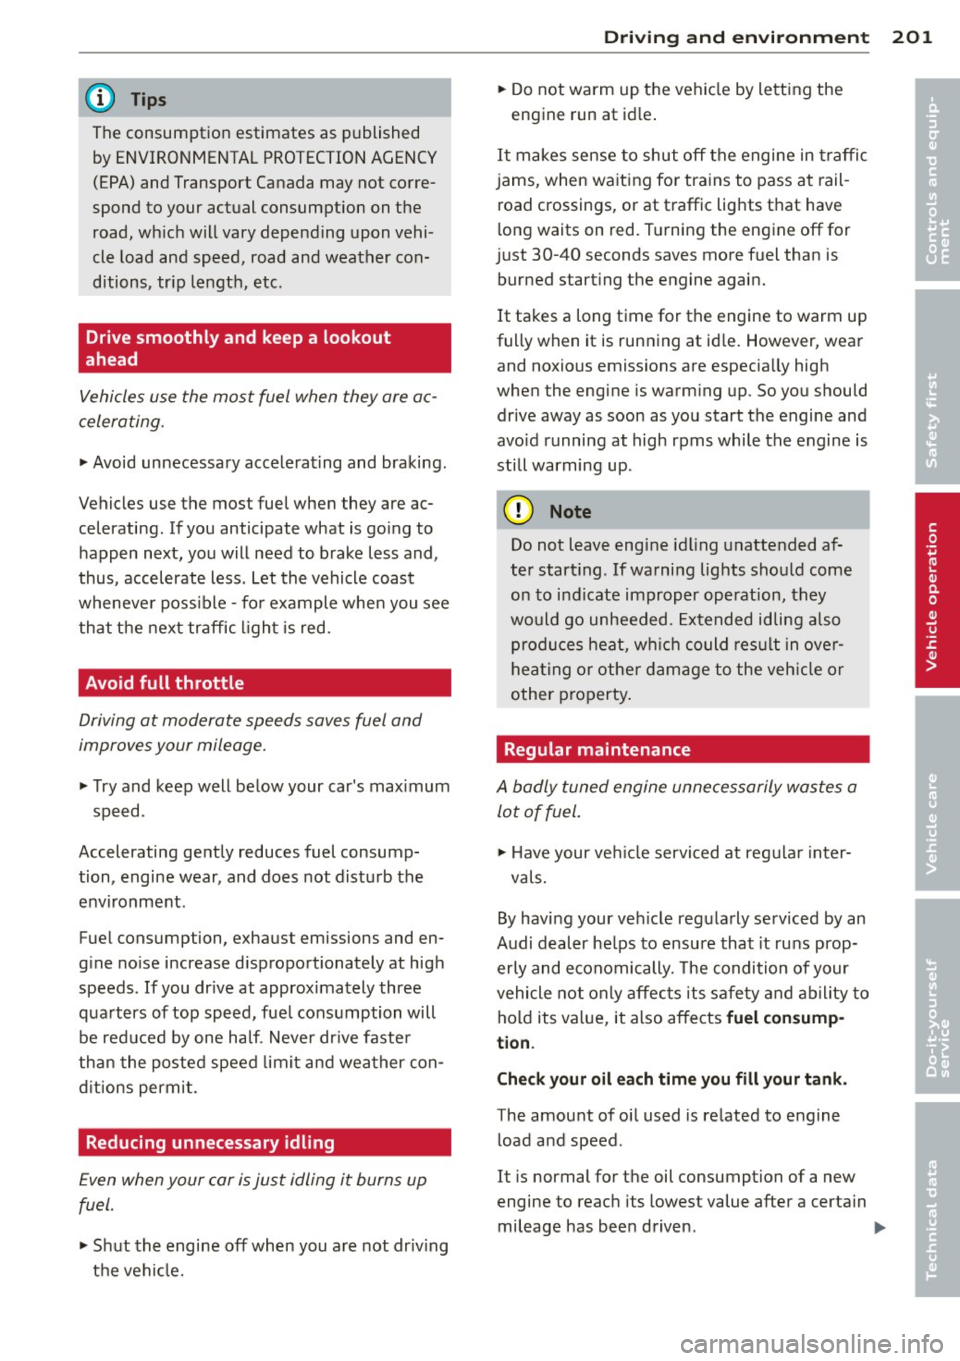
Drive smoothly and keep a lookout
ahead
Vehicles use the most fuel when they are ac
celerating.
~ Avoid unnecessary accelerating and braking.
Vehicles use the most fuel when they are ac
celerating . If you anticipate what is go ing to
h appen next, you will need to b rake less and,
thus, accelerate less. Let the vehicle coast
wheneve r poss ible -fo r example when you see
that the nex t tr affic light is red.
Avoid full throttle
Driving at moderate speeds saves fuel and
improves your mileage.
~ T ry and keep well below your car's max imum
speed.
Accelerating gent ly reduces fuel consump
tion, engine wear, and does not disturb the
environment.
Fuel consumption, exhaust emissions and en
g ine no ise increase d ispropo rtionately at high
speeds. If you dr ive at approxima tely three
q uarters of top speed, fue l consumption will
be red uced by one ha lf. Never dr ive faste r
than the posted speed limit and wea ther con
d itions permit.
Reducing unnecessary idling
E ven when your car is just idling it burns up
fuel.
~ S hu t the engine off when you a re not dr iv ing
t h e vehi cle.
Dri vin g and en vironm ent 201
~ Do not warm up the vehicle by lett ing the
engine run at id le .
It makes sense to shut off the engine in traffi c
jams, when wa it ing fo r tra ins to pass at rail
road crossings, or at traffic lig hts that have
long waits on red. T urning the engine off for
just 30-40 seconds saves more fuel than is burned start ing the e ngine again.
It takes a long time for the engine to warm up
fully when it is runn ing at id le. However, wear
and noxious emissions are especia lly high
when the engine is warm ing up. So you should
drive away as soon as you start the engine and
avo id running at high rpms while the engine is
still warming up .
(D Note
Do not leave engi ne idling unattended a f
ter start ing . If warning lights sho uld come
on to i ndicate improper operat ion, they
would go unheeded. Extended idling a lso
p rodu ces hea t, w hich could re sul t in ove r
hea ting or othe r dam age to the veh icle or
other p roperty .
Regular maintenance
A badly tuned engine unnecessarily wastes a
lot of fuel .
~ Have your ve hicle serviced at reg ula r i nter-
vals.
By having your veh icle regula rly serviced by an
Audi deal er he lps to ensure that it runs prop
erly and economically. The condition of your
vehicle not only affec ts its sa fe ty and ability to
hold its value, it also affects
fuel con sump
tion .
Check your oil each time you fill your tank.
The amou nt of oi l used is re lated to eng ine
load and speed.
It is normal fo r th e oil consumption of a new
engine to reac h its lowest value after a certa in
mileage has bee n driven .
IIJ,,
•
•
Page 235 of 292
Tires an d wheel s 233
you have stored. The system does not recog
nize the load condition of your vehicle.
The effectiveness of the ti re pressu re monitor
ing sys tem w ill be impaired if you store no r
mal load pressures but then operate the vehi
cle at its maximum load¢,& .
See the illustration ¢
fig. 195 for the location
of the label on dr iver's side B-pillar (color of
the actual labe l and exact location on the ve
hicle wi ll vary slig htly) .
Note that the fo llowing tab le is accurate at
the t ime o f go ing to press and is subject to
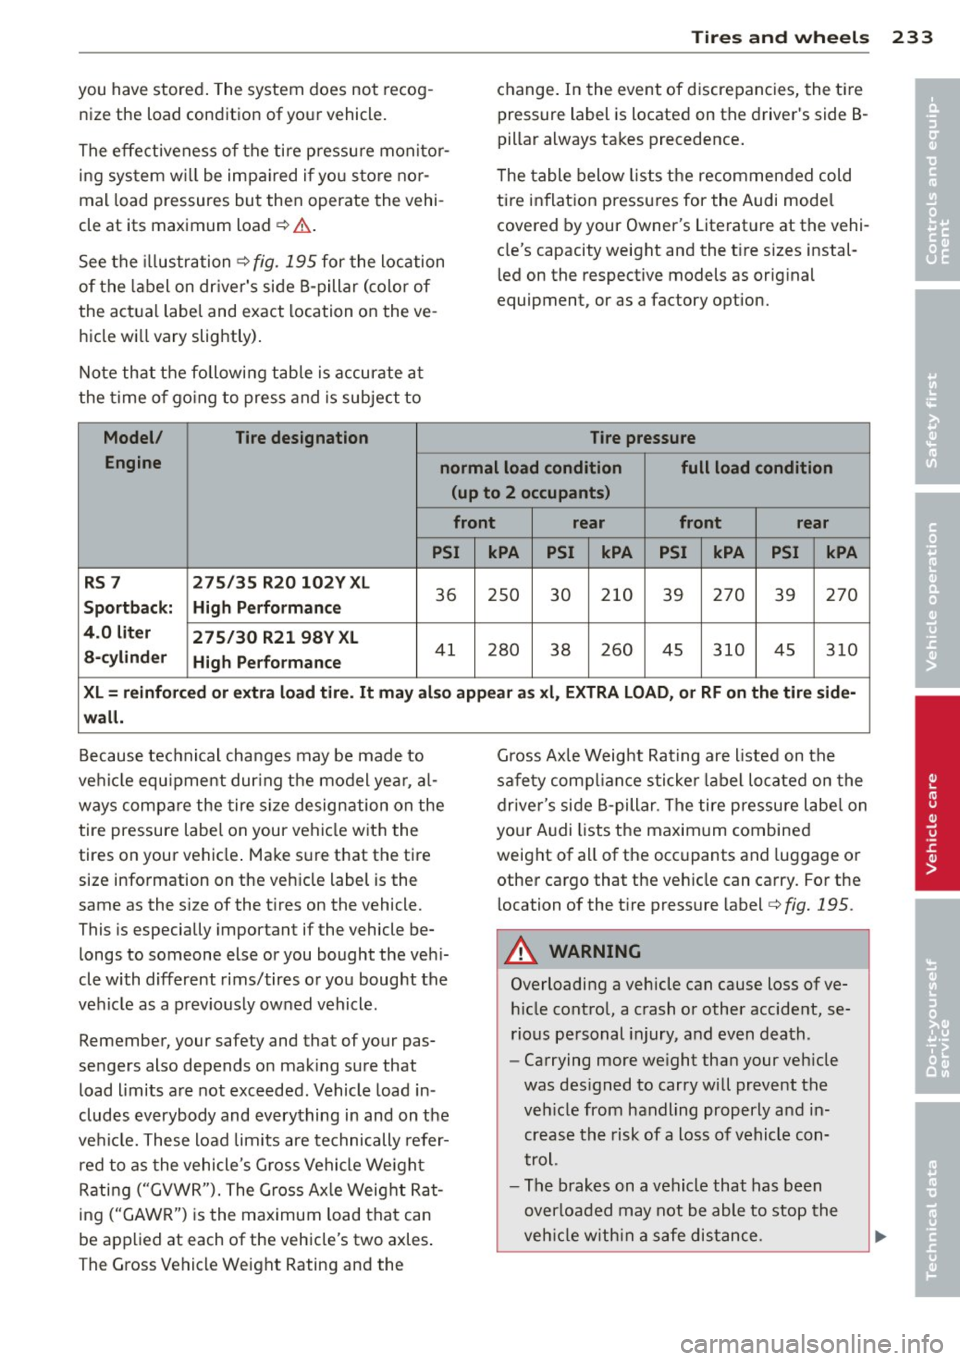
Model/ Tire de
signation
c h ange. In the event of discrepancies, the ti re
pressure label is located on the driver's side B
pillar always takes precedence .
T he table below lists the recommended cold
ti re inflat ion pressures for the Audi mode l
covered by your Owner's Literat ure at the vehi
cle's capacity weight and the t ire sizes instal
l ed on the respective models as orig inal
equipment, or as a factory option.
Tire pressure
Engine normal load condition full load condition
(up to 2 occupants )
front r ear front rear
PSI kPA PSI kPA PSI kPA PSI kPA
RS 7 275/35 R20 102V XL
36 2S0 30 210 39 270 39 270 Sportback: High P erformanc e
4.0 lit er
275 /30 R21 98V XL
a -cy linder
High Performance
41 280 38 260 45 310 4S 3 10
X L = r einfor ced or extra load tir e. It ma y al so appear a s xl , EXTRA LOAD, or RF on th e tire side -
w all.
Because tec hnical changes may be made to
ve hicl e equ ipment dur ing the model yea r, a l
ways compare the tire s ize designation on the
tire pressure label on your vehicle with the
tires on your vehicle . Make s ure that the tire
size information on the vehicle label is the
same as the s ize of the t ires on the vehicle.
This is especially important if the vehicle be
longs to someone else or you bought the veh i
cle with different rims/tires or you bought the
veh icle as a previously owned vehicle.
Remember, your safety and that of your pas
sengers also depends on mak ing sure that
load limits are not exceeded . Vehicle load in
cludes everybody and everything in and on the
ve hicl e. These load limits are technically refer
r ed to as the vehicle's G ross Vehicle We ight
Rating ("GVWR"). The Gross Ax le Weight Rat
ing ("GAWR") is the maximum load that can
be applied at each of the vehicle's two axles .
The Gross Vehicle We ight Rating and the G
ross Ax le Weig ht Rating are listed on the
sa fety comp liance sticke r label lo cated on the
driver's side B-pillar . The tire pressu re labe l on
your A udi lists the maximum combined
weight of all of the occ upants and luggage o r
other cargo that the veh icle can carry. For the
location of the t ire pressure label ¢
fig. 195.
A WARNING
-Overloading a vehicle can cause loss of ve-
h icle contro l, a crash or other accide nt, se
rious personal injury, and even death.
- Carrying more we ight than your veh icle
was des igned to carry will prevent the
veh icle from handling properly a nd in
crease the risk of a loss of vehicle con
trol.
- The brakes on a vehicle that has been
overloaded may not be able to stop the
veh icle w ith in a safe distance.
•
•
Page 270 of 292
268 Emergency situations
@ Tips
Check carefully to make sure the hook-up
is secure before moving the car up the flat
bed truck ramp.
Vehicle transport
Whenever you have your vehicle transported,
be sure to note the following:
(D Note
Mount the tie-down chains/cables over the
running surface (circumference) of the
tires. Never secure the vehicle by the axle,
the suspension struts or the front or rear
towline eye. For technical reasons, the
pressure in the suspension struts may
change during the transport and this will
adversely affect vehicle handling.
Lifting vehicle
Lifting with workshop hoist and with
floor jack
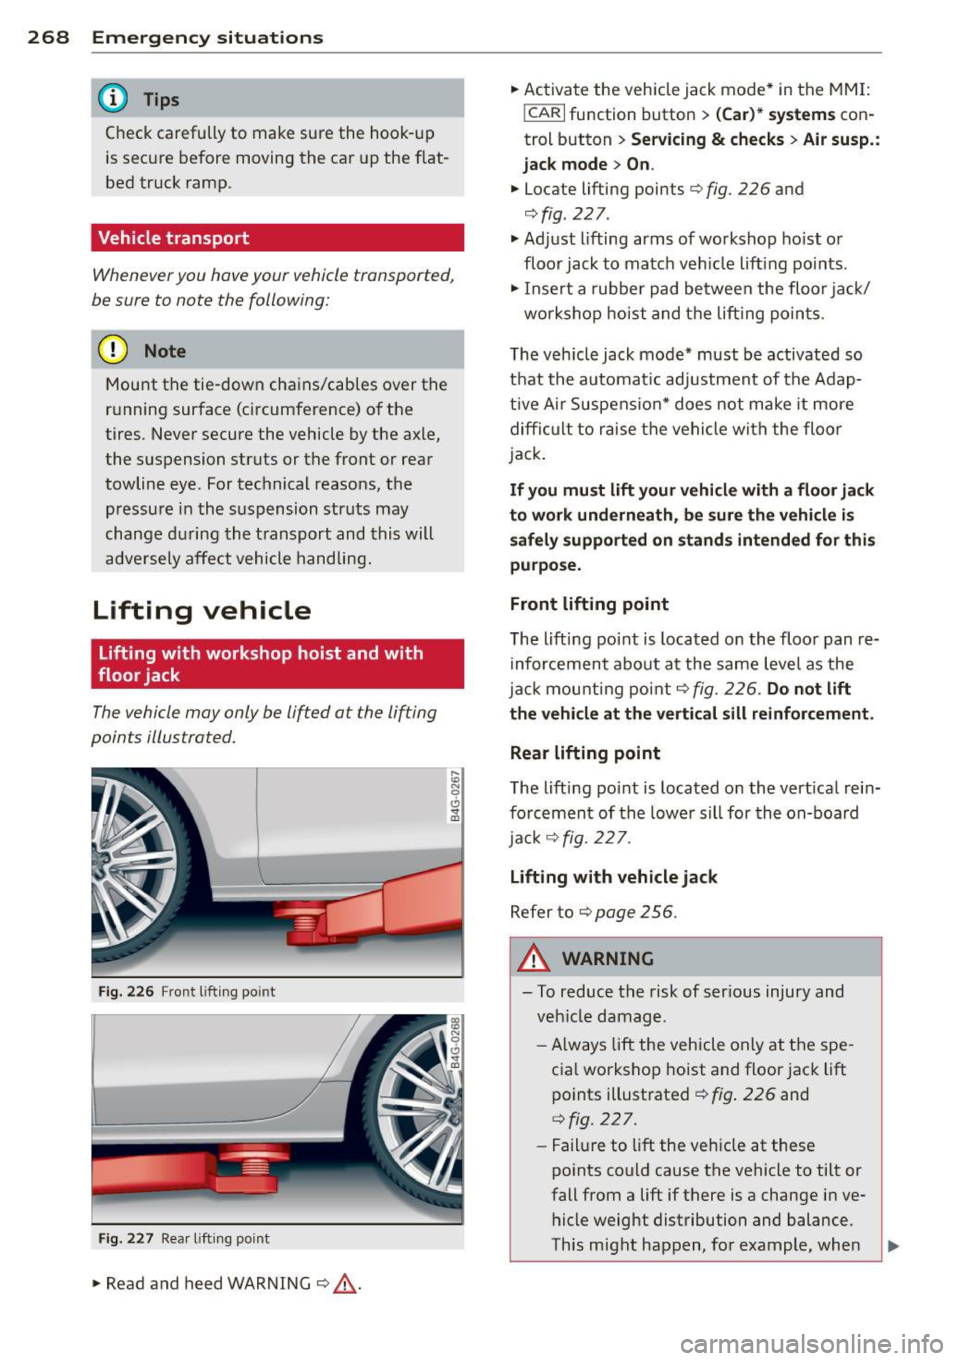
The vehicle may only be lifted at the lifting
points illustrated.
Fig. 226 Front lift in g po int
Fig. 227 Rear lifti ng point
.,. Read and heed WARNING¢&, .
~ N 0 6 .., (0
... Activate the vehicle jack mode* in the MMI:
!CARI function button > (Car)* systems con
trol button>
Servicing & checks> Air susp.:
jack mode > On.
... Locate lifting points ¢ fig . 226 and
¢fig . 227 .
.,. Adjust lifting arms of workshop hoist or
floor jack to match veh icle lifting points .
.,. Insert a rubber pad between the floor jack/
workshop hoist and the lifting points .
The vehicle jack mode* must be activated so
that the automat ic adjustment of the Adap
tive Ai r Suspens ion* does not make it more
difficult to raise the vehicle with the floor
jack .
If you must lift your vehicle with a floor jack
to work underneath, be sure the vehicle is
safely supported on stands intended for this
purpose.
Front lifting point
The lifting point is located on the floor pan re
inforcement about at the same level as the
jack mounting point
¢fig. 226. Do not lift
the vehicle at the vertical sill reinforcement .
Rear lifting point
The lifting point is located on the vert ical rein
forcement of the lower sill for the on-board
jack
c!;> fig. 2 2 7.
Lifting with vehicle jack
Refer to¢ page 256 .
A WARNING
-To reduce the risk of ser ious injury and
veh icle damage.
- Always lift the vehicle only at the spe
cial workshop hoist and floor jack lift
points illustrated¢
fig. 226 and
¢ fig. 227.
-Failure to lift the veh icle at these
points could cause the vehicle to tilt or
fall from a lift if there is a change in ve
hicle weight distribution and balance.
This might happen, for example, when
-
Page 280 of 292

278 Index
Setup . . . . . . . . . . . . . . . . . . . . . . . . . . . . 72
synchronizing ............. ... .... .. 71
Automatic Shift Lock (ASL) .......... . 105
Automatic transmission . . . . . . . . . . . . . . 104
Automatic Shift Lock (ASL) . .. .. .. .. . 105
Driving .... .. ........ .... ... .. .. . 106
Emergency mode ........... .. .. ... 108
E mergency release ........ .. .. .. .. . 109
Kick -down ............... .... .... . 108
Manual shift program ......... .. .. . 108
Selector lever ............. ... .... . 104
Automatic wipers . .. ........ ... .. .. .. 48
Auto Safety Hotline . . . . . . . . . . . . . . . . . 131
Average consumption ....... .. .. .. .. . . 24
Average speed . . . . . . . . . . . . . . . . . . . . . . . 24
Avoid damaging the vehicle ........ .. . 199
B
Bag hooks . . . . . . . . . . . . . . . . . . . . . . . . . . 67
Battery ... .. .. .. ............ ... .. . 223
Charging ... .. .. .. .......... ... .. . 226
I mportant warnings ...... .. .. .. .. . 224
Jump starting .. ........ .. .. .. .. .. . 264
L ocat ion ..... ........... ........ . 224
l ow ... .... ................ ..... . 195
Rep lacing the battery ...... ... .. .. . 227
State of charge ............ ... .. .. . 195
Winter operation ......... .... .... . 223
Working on the battery .... .. .. .. .. . 224
Before driving . . . . . . . . . . . . . . . . . . . . . . 123
Blended gasoline .... ...... .. .. .. .. . 208
Blower (automatic climate control) . . . . . . 71
Boost display . . . . . . . . . . . . . . . . . . . . . . . . 28
Booster seats ... .... ...... .. .. .. .. . 177
Boost pressure indicator .......... .. .. 28
Brake fluid Changing the brake fl uid ... .... .. .. . 223
Check ing the brake fluid level . .. .. .. . 222
What is the correct brake fluid leve l? .. 222
What should I do if the brake fluid warn-
ing light comes on? ........ .... ... . 222
Brake system Anti-lock braking system ..... .. ...... 19
Brake assist system ........ ... .. .. . 189
Brake booster ............. ... .... . 193
Brake fluid ............... ... .... . 222 Brake fluid specifications for refill and re
placement
. . . . . . . . . . . . . . . . . . . . . . . 223
Brake light defective . . . . . . . . . . . . . . . . 21
Brake pads ...... ............. .... 198
Electromechanical parking brake . .... . 77
Fluid reservoir . .. ................ . 222
How does moisture or road salt affect the
brakes? ....... .. .. ........ ... ... . 193
Warning/ind icator lights ...... .. .. .. . 14
Worn b rake pads symbo l ........ .. .. . 20
braking guard
Settings . . . . . . . . . . . . . . . . . . . . . . . . . . 88
Braking guard ..... ............. ... .. 81
Messages . .. .. .. .. ........... .... . 88
Break-in per iod .... ............. .... 198
Brake pads .... .. ................ . 198
Tires .... ..... .. .. .............. . 198
Bu lbs .. .. .. .. .. .. .. .. ...... ... .. .. 263
C
California Proposition 65 Warn ing .... . 214
Battery specific .. ..... ......... ... 225
Capacities .. .... .. ................. 271
Engine oil ....... ............. .... 215
Carbon parts Cleaning . . . . . . . . . . . . . . . . . . . . 205, 206
Car carrier Transporting your vehicle ....... .. .. 268
Care ... .. .. .. .. .. ............. .. .. 203
Cargo area . ..... .. ............. ... . 129
Cargo net . . . . . . . . . . . . . . . . . . . . . . . . . . . 66
Catalytic converter .............. .. .. 199
Center armrest Cockpit . . . . . . . . . . . . . . . . . . . . . . . . . . . 56
Central locking .. .. .......... ...... .. 34
Emergency locking ... ....... ...... .. 38
Certification ..................... .. 276
Changi ng a wheel .. ... .......... .. .. 254
Changing engine oil .......... ...... . 219
Checking Engine coolant level ............ .... 220
Tire pressure ... .. ... .......... .. .. 234