2014 AUDI RS7 SPORTBACK park assist
[x] Cancel search: park assistPage 80 of 292
78 On the road
regular intervals . Any associated noises
are norma l.
Parking
• Press the brake peda l to stop the vehicle .
• Pull the switch(®) to set the parking brake .
• Move the selector lever to P.
• Turn the eng ine off ¢.&_ .
• When on incl ines or declines, turn the steer
i ng wheel so that your vehicle will roll into
the curb if it begins to move.
_& WARNING
- When you leave your veh icle - even if on
ly briefly - always take the ignition key
with you . This applies particu la rly when
children remain in the veh icle. Otherw ise
the ch ildren could start the engine, re
lease the parking brake or operate e lec
trical equipment (e.g . power windows) .
The re is the risk of an accident .
- When the vehicle is locked, no one - par
t icu la rly not children should remain in
the vehicle . Locked doo rs make it more
difficult for emergency wor kers to get in
to the vehicle - putt ing lives at risk.
Starting from rest
The starting assist function ensures that the
parking brake is released automatically upon
starting .
Stopping and applying park ing brake
• Pull the switch© to apply the park ing
brake .
Starting and automat ically releasing the
parking brake
• When you start to drive as usua l, the park
ing brake is automatically re leased and your
vehicle begins to move .
When stopp ing at a traff ic signa l or stopp ing
i n city traffic, the parking brake can be ap
plied . The veh icle does not have to be held
with the footbrake. The par king brake e limi
n ates the te ndency to creep with a drive ra nge engaged. As soon as yo
u drive off as usu a l,
the parking brake is re leased automatically
and the vehicle starts to move .
Starting on slopes
When starting on inclines, the starting assist
prevents the vehi cle from u nintent ionally roll
ing back . The braking force of the parking
brake is not re leased unti l sufficient driving
f orce has been built up at the wheels.
(D Tips
F o r safety reasons, the parking brake is re
l eased a utomatically on ly when t he d riv
er's safety belt is engaged in the buckle.
Emergency braking
In the event that the conventional brake sys
tem fails or locks.
• In an emergency, pu ll the switc h C®> and
continue to pull it to s low your vehicle down
with the parking b rake .
• As soon as you re lease the switch «:El) or ac -
celerate, the brak ing process stops.
If you pu ll the switch «:El) and hold it above a
speed of abo ut 5 mph (8 km/h), the eme rgen
cy brak ing f unct ion is initiated . The vehicle is
braked at all four whee ls by activating the hy
draulic brake system . The brake performa nce
i s sim ila r to making an emergency stop
c::> .&. .
In order not to act ivate the eme rgency brak
ing by mistake, an audib le warning tone (bu z
zer) sounds whe n the switch(®) is pulled . As
soon as the sw itch
®) is released, or the accel
erato r peda l is depressed, eme rgency b raking
stops.
_& WARNING
E mergency br aking should only be u sed in
a n emergency, when the norma l foot bra ke
has fai led or the brake pedal is obstruc ted.
Using the parking brake to pe rform eme r
gency b raking will s low your veh icle down
as if you had made a full brake application.
The laws of physics cannot be suspended
~
Page 104 of 292
102 Night vision assistant
-they are not in an upright position, for
example if they are s itting, crouching
or lying down and/or
- if the o utline in the display is inc om
plete or interrupted, fo r example be
cause the person is partially hidden by
a parked vehicle.
{D) Tips
- Pedestrian detection and the pedestrian
warming are lim ited to objects that are
detected as pedestrians. The system
does not detect animals. Even though
the shape and warmth radiated by each
object detected is evaluated, the system
does have limitat ions and it can give in
correct warnings.
- For techn ical reasons, the image pauses
in split second intervals .
Switching on and off
Applies to vehicles: with night visio n ass istant
Fig. 113 Area a round the light switch: night vision as ·
sistant button
• Switch the ignition on and turn the light
switch to the
AUTO position or ~D.
• To switch night vision assistant on, press the
~ button c:> fig. 113. The image from the
night vision camera appears in the instru
ment cluster d isplay.
• Press the button~ again to switch night vi
s ion assistant off .
Settings in the MMI
Applies to vehicles: wit h night vision assistant
Fig. 114 Display : example of pedestrian detection and
warning to ne switc hed off
• Select: !CAR I function button > (Car)* sys
tems
control button > Driver assist > Night
vision assist.
Highlight pedestrians -
You can switch pedes
trian detect ion
on and off. If you switch pe
destria n detection off, the pedestrian warning
tone also switches off. The symbols
Bl and ~
appear in the uppe r right area of the instru
ment cluster disp lay
c:> fig. 114.
Warning tone -You can switch the tone for
the pedestrian warning
on and off. When the
warning tone is sw itched off, a yellow symbol
for the deactivated warning tone with a line
through it appears in the upper right of the in
strument cluster display
c:> fig. 114 .
Contrast -When the nig ht vision ass istant is
switched on and the image is visib le in the in
strument cluster display, you can adj ust the
contrast in the image from
Min to Max .
Driver messages
Applies to vehicles: wit h night vision assista nt
Night vision assistant: system malfunction!
The system cannot work properly and is
switched off. See your authorized Audi dealer
for assistance.
Night vision assistant: not available
T he system cannot detect properly under cur
rent conditions and is switched off tempora ri-
~-~
Page 109 of 292
activate the parking brake and move the
selector lever to P.
- Power is sti ll transmitted to the wheels
when the engine is running at idle. To
prevent the vehicle from "creeping", you
must keep your foot on the brake when
the engine is running and the selector
lever is in D/S or R or "tiptronic" mode is
selected.
- Do not press the accelerator pedal when changing the selector lever pos ition
wh ile the vehicle is stat ionary and the
engine is running .
- Never shift into
R or P wh ile driving .
- Before driv ing down a steep slope, re -
duce your speed and shift into a lower
gear with "tiptronic".
- Do not ride the brakes or press the brake
peda l too often or too long when dr iv ing
down a hill. Constant braking causes the brakes to ove rheat and substant ially re
duces braking performance, increases
braking distance or ca uses comp lete fail
vre of the brake system .
- To prevent the vehicle from rolling back
when stopping on inclines, always hold it in place with the brake pedal or parking
brake.
- Never hold the vehic le on an incline with
a slipping clutch . The clutch opens auto
matically when it becomes too hot from
the overload. An indicator lamp
[O] illu
minates and a dr iver message appears
~ page 108 when the clutch is overload
ed .
- If the engine must remain running, never have any driv ing position engaged when
check ing under the hood.
M ake sure the
selector lever has secure ly engaged and
is locked in P with the parking bra ke set
¢ page 213 . Otherwise, any increase in
engine speed may set the vehicle in mo
t ion, even with the park ing brake ap
plied.
(D Note
- When stopping on an incline, do not try to hold the vehicle in place by pressing
Aut omat ic Tr ans missio n 107
the acce lerator pedal while a d riving gea r
is se lected. This can cause the transmis
sion to ove rheat and can damage it. Acti
vate the parking brake or press the brake peda l to prevent the vehicle from rolling .
- Allowing the vehicle to roll when the en gine is stopped and the selector lever is
in N will damage the transmission be
cause
i t is not lubricated under those cir
cumstances.
(D Tips
For safety reasons, the parking brake is re
leased automatically o nly when the driv
e r's safety belt is engaged in the buckle .
, Hill descent control
The hill descent control system assists the
driver when driving down declines .
Hill descent contro l is activa ted when these
lector lever is in D/S and you press the brake
pedal. The transmission automatically selects
a gear that is suitable for the incline . H ill de
scent cont ro l t ries to ma inta in the speed ach
ieved a t the t ime of braking, with in phys ica l
and tec hni cal lim itations. If may st ill be nec
essary to adj ust the speed with the brakes .
Hill descent contro l sw itches off once the de
cl in e leve ls out or yo u press the acce le rato r
pedal.
On vehicles with the cruise cont ro l system*
¢ page 79 , hill descent control is also activat
ed whe n the speed is set.
&_ WARNING
-
Hill descent co nt rol cannot overcome
physical lim itations, so it may not be ab le
to maintain a constant speed under a ll
conditions. A lways be ready to apply the
brakes .
Page 112 of 292
110 Parking system s
Parking systems
General information
A ppl ies to vehicles: with parkin g system plus/rear view
camera/peripheral cameras
Depending on your vehicle's equ ipment, vari
ous parking a ids wi ll help you when pa rk ing
and maneuvering.
The
p ar king sy st e m plu s assists you when
pa rking by audib ly and visually indicat ing ob
jects detected
in front of and behind the vehi
cle
~ page 111.
The rear view ca m era shows the area behind
the vehicle in the Infotainment d isp lay. This
d isplay assists you when you are c ross o r par
allel parking
q page 112. In addit ion, you are
assisted by the functions from the parking
system plus
~ page 111 .
The peripher al cam era s ass ist you with park
ing and maneuvering. You are aided by var ious
cameras depending on the vehicle equipment leve l
¢page 115. In addition, you are assist
ed by the functions from the parking system
plus ¢ page 111.
A WARNING
- Always look for traff ic and check the area
around your vehicle by looking at it di
rectly as well . The parking system cannot
rep lace the d river's attent ion. The dr iver
is always respons ible for safety during
p arki ng and for all other maneuvers.
- Please note that some surfaces, such as
clothing, a re not detected by the system.
- Senso rs and cameras have blind spots in
wh ich peop le and objects ca nnot be de
te cted. Be especially cau tious of children
and animals.
- T he sensors can be displaced by impacts
or damage to the radia to r grille, bumpe r,
wheel housing and the unde rbody. The
par king systems may become impaired
as a resu lt . Have your authorized Audi
dealer or qualified workshop check their
function. -
Make s ure the sensors are not covered by
stickers, deposits or any other obstruc
tions as it may impair the sensor func
tion . For information on cleaning, refer
to
~ page 203 .
(D Note
- Some objects are not detected by the
system under certain c ircumstances:
- Obje cts su ch as ba rrie r chains, trailer
draw bars, vertical po les or fences
- Objects above t he senso rs such as wall
extensions
- Objects w ith specific surfaces or struc
tures su ch as chain link fences or pow
der snow.
- If you conti nue d riving closer to a low- ly
ing object, it may disappea r from the
sensor range. Note th at yo u w ill no lon
ger be warned abo ut this obstacle.
(j) Tips
- T he system may provide a wa rni ng even
t ho ugh the re are no obs ta cl es in the cov
erage a rea in some situa tions, such as:
- certain road surfaces or for long grass.
- externa l ultrasonic sources e.g. from
clean ing vehicles.
- heavy rain, snow or thick vehicle ex
ha ust.
- We recommend that you practice park
ing in a traff ic-free location or park ing
lot to become familiar w ith the system.
When doing this, there should be good light and weather cond itions .
- You can change the volume and pitch of
the s ignals as we ll as the disp lay
¢page 120.
- What appears in the infotainment dis
play is somewhat time-delayed .
Page 115 of 292
example, after a collision, do not contin
ue to use the system for safety reasons.
Have it checked by your authorized Audi
dealership or authorized repa ir facility .
- Only use the rear v iew camera to assist
you if it shows a good, clear picture. For
example, the image may be affected by
the sun shin ing into the lens, dirt on the
lens or if there is a system fau lt.
- Use the rear view camera only if the lug
gage compartment lid is comp letely
closed. Ma ke su re any objects you may
h ave mounted on the luggage compart
ment lid do not block the rear view cam
era.
- The camera lens en la rges and dis torts
the field of vision. The ob ject appears
both a ltered and inaccurate on the
screen .
- In certain s ituations, peop le or objects in
the display appear closer or f urther
away:
- For objects that do not touch the
ground , such as the bumper of a
pa rked vehicle, a t railer hitch or the
rea r of a truck. Do not use the help
lines in this case.
- If driven from a leve l su rface onto a n
incline, or a downward slope.
- If driven towa rd p rotruding objects.
- If the veh icle is ca rrying too much load
in the rear.
(D Note
- Always read and follow the applicable
warnings
¢ (D in General information on
page 110.
- The orange colored orientat ion lines in
the Infotainment d isplay show the vehi
cle path depending on the steering
whee l ang le. The front of the vehicle
front sw ings out more than the rear of
the veh icle. Mainta in p lenty of distan ce
so that your outside mirro r o r a corne r of
you r vehicle does not collide with any ob
stacles.
Par king sys tem s 113
Switching on/off
App lies to vehicles: wit h parking system plus w ith rear
v iew camera
Switching on
.. Shift in to reverse or
.. press the
PwA bu tton in the center console
¢ page 111, fig . 122 . A short confirmation
tone sounds and the LED in the button turns
on .
Swi tching between the re ar view camera
and optical display
.,. Press the Graphi c control button®
¢ page 114, fig. 128 to see the optical d is
play .
.. Press the
Rearview control b utton to see the
rear view camera image.
Switching off
.,. Dr ive forward faster than 6 mph (10 km/h),
or
.. Press the
p,,1A button, or
.,. Switch the ignit ion off.
(D Tips
The visual d isplay in the left part of the
display should help you detec t the critical
vehicle areas .
Page 119 of 292

@-Rear* ¢ page 118
© - Corner view (rear)* ¢ page 117
Top view
Applies to vehicles: with parking system plus and top view
mode
Fig . 135 Infotainment: top view mode
This view is ideal for maneuve ring. The vehicle
surro undings are shown using the camera im
ages. The vehicle image is shown by the sys
tem.
Selecting top view
~ Select the @symbol with the control knob.
Switching between optical view and
camera image
1
)
~ To display the camera image, press the cam
era
contro l button @ .
~ Press the Graphic control button to see the
opt ica l display.
Corner view (front /rear )
Applies to vehicles: with parki ng system plus and corner
view (front/rear ) mode
Fig. 136 Infotainment: corner view (front} mode
1 1
Th e ca mera image is not s hown for all ve rsio ns.
Parking systems 117
Fig. 137 Infotainment: corne r view (rear) mode
This view can assist you for example, when
you are exit ing from an area with poor visibili
ty. The area at the front or rear sides of the
vehicles is displayed .
~ To see the corner view (front), select the @
symbol with the control knob¢
fig. 136.
~ To see the co rner v iew ( rear), select the©
symbo l with the control knob¢
fig. 137.
, Front
Applies to vehicles: with parking system plus and front
mo de
Fig. 138 ln fotainment: front mode
This view assists you for example, in using the
full maneuvering range in front of the vehicle.
The area in front of the vehicle is displayed.
The vehicle s urround ings are shown in the left
area of the display. You can switch between
optical display and camera image*
qpag e 117.
~ Select the © symbo l with the control knob .
The orange colored orientation line* de
notes the expected direction of travel. Stop
the vehicle at the latest when the red
Iii>-
Page 121 of 292
Parallel parking
Applies to vehicles: with parking system plus and rear
mode
This view may be used when parallel parking
along the side of a street.
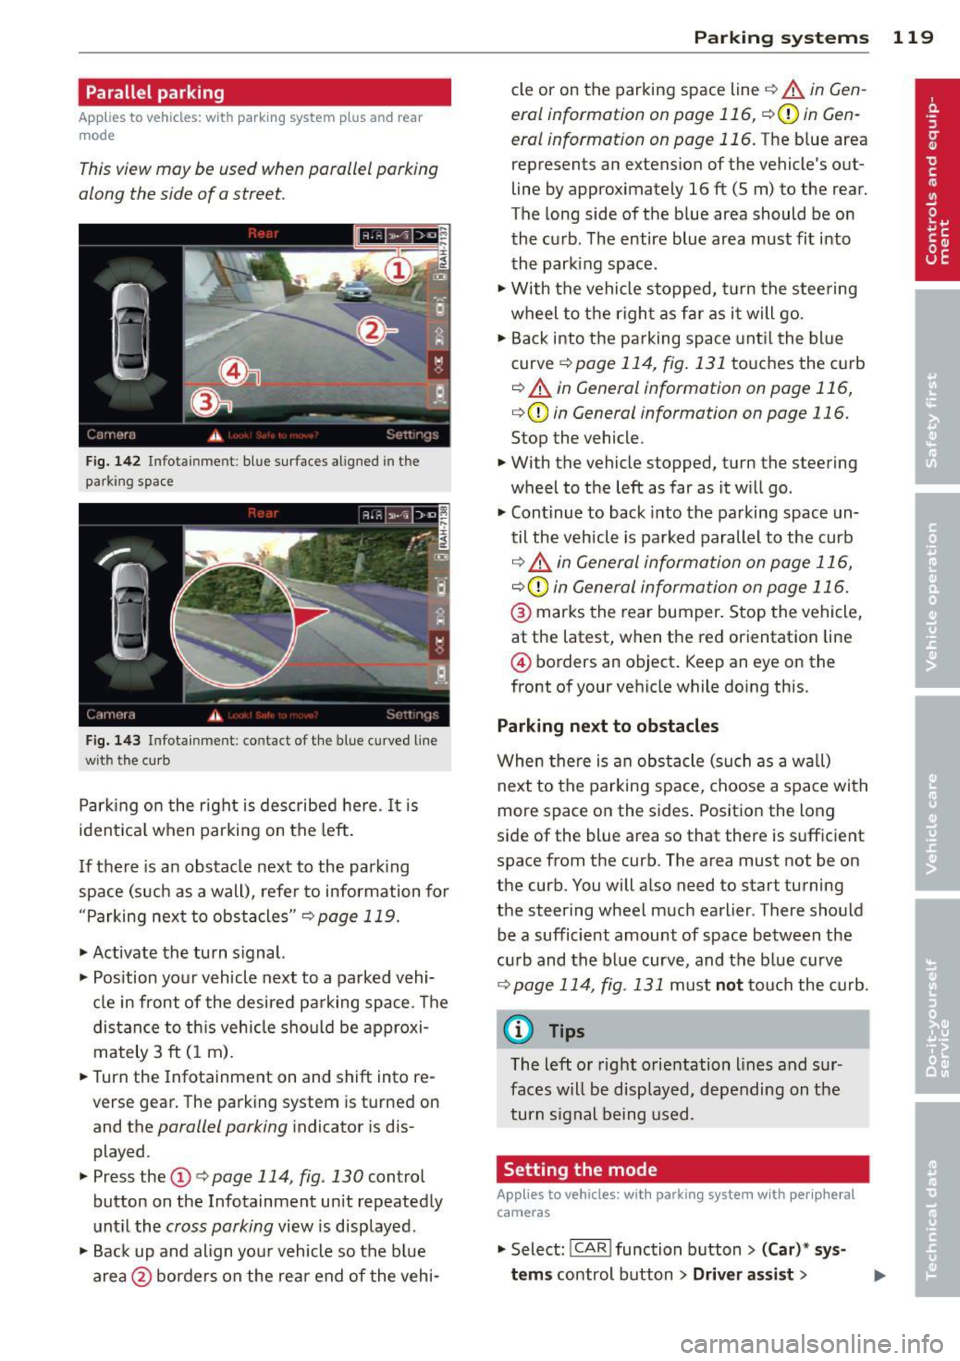
Fig. 1 42 Infotainment: blue su rfaces aligned in the
parking space
F ig. 1 43 Infota inmen t: contact of the blue curved line
wi th th e curb
Park ing on the right is described he re. It is
ident ical when parking on the left .
I f there is an obstacle next to the park ing
space (such as a wall), refer to information for
"Parking next to obstacles"
c::> page 119.
~ Activate the turn s ignal.
~ Position your vehicle next to a parked vehi
cle in front of the desired parking space . T he
distance to th is vehicle should be approxi
mately 3 ft (1 m).
~ Turn the Infotainment on and shift into re
verse gear. The parking system is turned on
and the
parallel parking indicator is dis
played .
~ Press the@¢ page 114 , fig. 130 control
button on the Infotainment un it repeatedly
unt il the
cross parking view is displayed.
~ Backup and align yo ur vehicle so the blue
area @ borders on the rear end of the vehi-
Parking systems 119
cle or on the parking space line c::> A in Gen
eral information on page 116, c::>(I)in Gen
eral information on page 116.
The blue area
represents an extension of the vehicle 's out
line by approximately 16 ft (5 m) to the rear.
The long side of the blue area should be on
the curb . The entire blue area must fit into
th e parking space .
~ With the vehicle stopped, turn the stee ring
wheel to t he righ t as fa r as it will go.
~ Back into the parking space unt il the blue
curve
c::> page 114, fig. 131 to uches the curb
c::> A in General information on page 116,
c::>(D in General information on page 116.
Stop the vehicle.
~ With the vehicle stopped, turn the steering
wheel to the left as far as it w ill go.
~ Continue to back into the parking space un
til the vehicle is parked parallel to the curb
c::> ..&. in General information on page 116,
c::> (Din General information on page 116.
@ marks the rear bumper. Stop the vehicle,
at the latest, when the red orientation line
@ borders an object . Keep an eye on the
front of your vehicle while do ing this .
Parking next to obstacles
When there is an obstacle (such as a w all)
next to the parking space, choose a space with
more space on the sides . Positio n the long
side of the blue area so that there is sufficient
space from the curb. The area must not be on
the curb. You will also need to start turning
the steering wheel much earlier . T here should
be a sufficient amount of space between the
c ur b and the bl ue curve, and the b lue curve
c::> page 114, fig . 131 m ust no t touch the curb.
@ Tips
The left o r right orientation lines and sur
faces w ill be disp layed, depending on the
turn s ignal being used .
Setting the mode
Applies to vehicles: with parking system with peripheral
cameras
~ Select: ! CAR ! function button> (Car) * sy s
tems
control button > Driver assist >
Page 122 of 292
120 Parking systems
Parking aid > Change to front/rear > Auto
or Manual.
Auto -
This view behind the vehicle (Rear
mode) is displayed automatically when you
shift into reverse . This view in front of the ve
hicle
( Front mode) is disp layed automatically
when you shift into the forward gears.
Manual -This view behind the vehicle (Rear
mode) is a lways disp layed when you turn on
the system.
Adjusting the display and the warning tones
Applies to vehicles: with parking system plus/rear view
camera/peripheral cameras
The display and warning tones can be adjust
ed in the Infotainment.
.. Se lect: I CAR ! function button > (Car)* sys
tems
control button > Driver assist > Park
ing aid.
Display
On* -
optical display is shown for the parking
system plus, rear view came ra image is shown
for parking system plus with rear view cam
era*.
Off -when the parking system is switched off,
on ly audib le signals are given.
Warning tones
Front volume -
Volume for the front area
Rear volume -Volume for the rear area
Front frequency -Frequency for the front area
Rear frequency -Frequency for the rear area
Music volume while parking -When the park
ing system is tu rned on, the volume of the au
dio/video source is lowered.
The newly adjusted value is briefly heard from
the signa l gene rator .
(D Tips
-The warning tones can a lso be adjusted
directly from the visual display or the rear v
iew camera* image. Simply press
the
Settings control button.
- Changed settings are activated when the
parking system is switched on again.
- The settings are automatically stored
and assigned to the remote cont rol key
that is in use .
Error messages
Applies to vehicles: with parking system plus/rear view
camera/peripheral cameras
T here is an error in the system if the LED in
the
p, q~ button is blinking and you hear a con
tinuous alarm for a few seconds after switch
ing on the parking system or when the park
ing system is already activated. If the error is
not corrected before you switc h
off the igni
tion, the LED in the
Pwi button will blink the
next t ime you sw itch on the parking system by
shifting into reverse.
Parking system plus
If a sensor is fa ulty, the~ symbol will appear
in front of/behind the vehicle in the Infotain
ment display. If a rear sensor is faulty, only
obstacles that are in areas @ and ® are
shown
Q page 111, fig. 121. If a front sensor
is faulty, only obstacles that are in areas ©
and @are shown.
Peripheral cameras*
There is also a system error if:
- the
i:80 ·• symbol appears in the display and
the corresponding display area is shown in
blue. The camera is not working in this area.
- all segments aro und the vehicles are red or
if no segments are displayed.
Drive to your authorized Audi dealer or au
thorized repa ir facility immed iately to have
the malfunction corrected.