2014 AUDI RS7 SPORTBACK warning
[x] Cancel search: warningPage 99 of 292
(dynamic). The goal is a high level of agility
and ability to accelerate on curves. The vehicle
is very responsive to steering.
Curve light*
The curve light adapts to driving on curves.
The pivoting action and the lighting are also
adapted to the mode.
Adaptive cruise control*
The behavior when accelerating can be adjust
ed from comfo rtable to sporty, depending on
the drive se lect mode . Adaptive cruise control
also responds to the driving behavior of the
vehicle ahead in a more conservative or sporty
manner .
Engine sound
The sound of the engine is adapted to these
l ected mode and ranges from subtle to sporty.
(D Note
-Make sure there is enough clearance
above and below the vehicle when park
in g. The height of the vehicle can change
once it is parked due to temperature
fluctuations, changes to the load condi
tions and changes to the driving modes,
which can affect clearance.
- When transporting the vehicle on a car
carrier, train, ship or by other means, on
ly tie the veh icle down at the running
surface of the tires, which is the outer
circumference. Securing the vehicle at
the axle components, suspension struts
or tow ing eyes is not permitted because
the pressure in the air suspension struts
can change during transport. The vehicle
may not be secured sufficiently if this
happens.
(D} Tips
- In some models, the maximum vehicle
speed can only be reached in the
Auto
and Dynamic modes.
- Se lecting the
Dynamic mode results in
spo rty shifting characteristics. The S
gear position engages automatically .
Audi drive select 97
-In vehicles that have dynamic steering*,
operating noise is heard when starting or
stopping the engine. This does not indi
cate a problem.
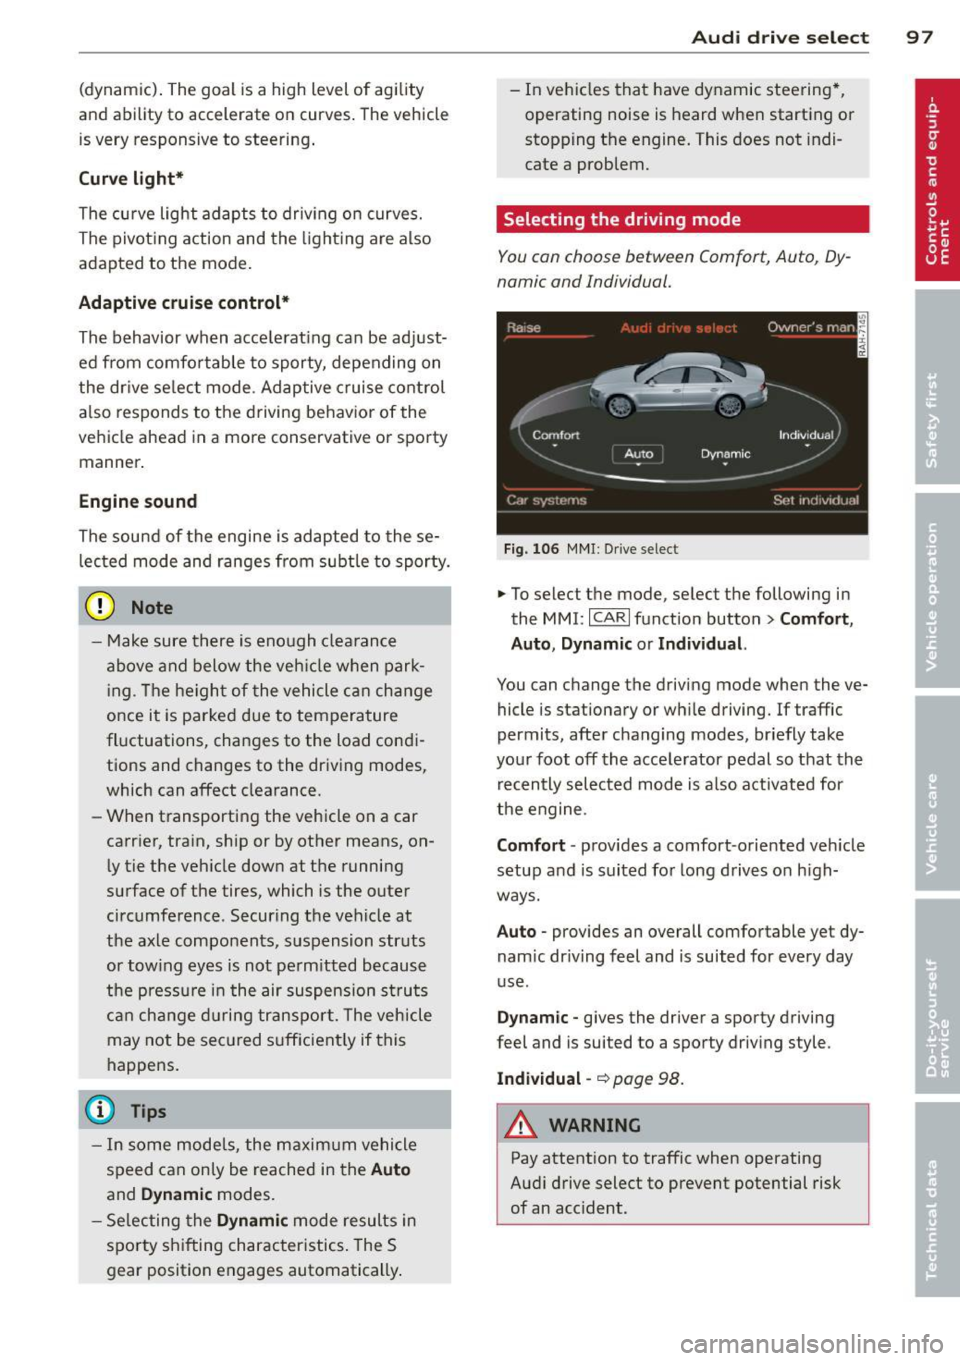
Selecting the driving mode
You can choose between Comfort, Auto, Dy
namic and Individual.
Fig. 106 MMI: Drive select
.,. To select the mode, select the following in
the
MMI: ICARI function button> Comfort,
Auto, Dynamic or Individual.
You can change the driving mode when the ve
hicle is stationary or wh ile driving. If traffic
permits, after changing modes, briefly take
your foot off the accelerator pedal so that the
recently selected mode is also activated for
the engine.
Comfort · provides a comfort-oriented veh icle
setup and is suited for long drives on h igh
ways.
Auto · provides an overall comfortable yet dy
nam ic dr iving feel and is suited for every day
use .
Dynamic -gives the driver a sporty driving
feel and is suited to a sporty driving style.
Individual -~page 98.
&_ WARNING
Pay attention to traffic when operating
Audi drive select to prevent potential risk
of an acc ident.
-
Page 103 of 292
Pedestrian warning
Applies to vehicles: with nig ht v ision assistant
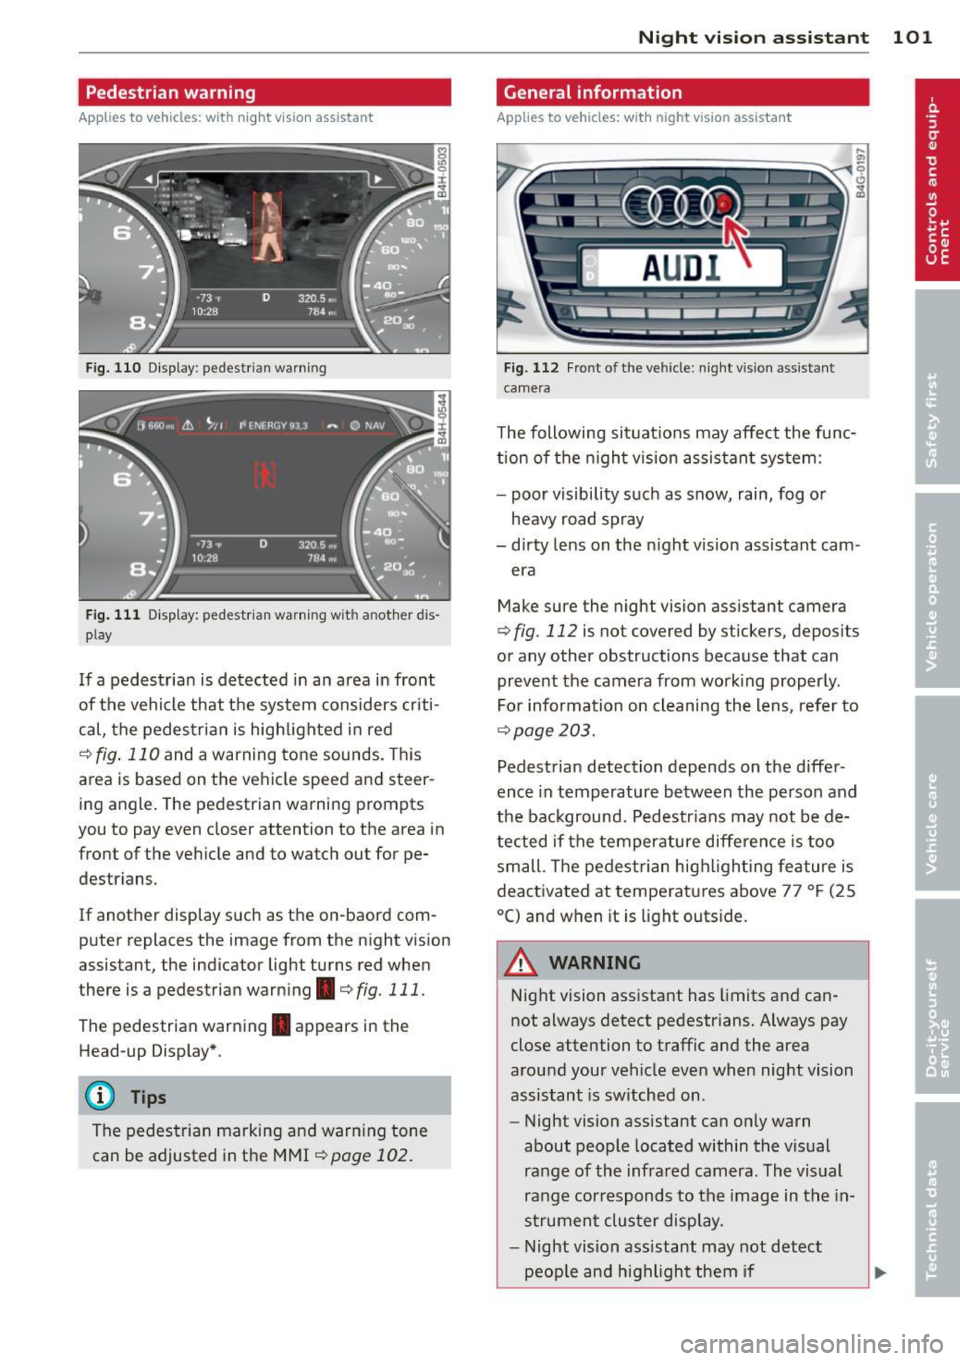
F ig. 110 D isplay : pedestri an w arning
Fig . 1 11 D isp lay: pedestr ian warning w it h an ot her di s
p lay
I f a pedestrian is detected in a n area in front
of the vehicle that the sys tem considers cr iti
cal, the pedestria n is high lighted in red
¢ fig . 110 and a warning tone sounds. This
area is based on the ve hicle speed and steer
ing angle. The pedestrian warning prompts
you to pay even close r attention to the area in
front of the vehicle and to watch out for pe
destrians.
If another display such as the on-baord com puter replaces the image from the night vision
assistant, the indicator light turns red when
there is a pedestrian warning . ¢
fig. 111 .
The pedestrian warn ing . appears in the
Head-up Display* .
(D Tips
The pedestrian marking and warn ing tone
can be adjusted in the MMI
¢page 102.
N ig ht visi on ass is ta n t 101
General information
Applies to vehicles: with night vision assistant
...
-. . .--:::: ====::;;; ::;;;::;;;== ===--......._--~
Fig. 112 Fro nt o f th e ve hicle : n ight v is ion ass istant
camera
il!,
T he following situations may affect the func
tion o f the nigh t vision assis tant sys tem:
- poor visibility such as snow, rain, fog or
heavy road spray
- dirty lens on the n ight vision assistant cam -
era
Make sure the night vision assistant camera
¢
fig . 112 is not covered by stickers, depos its
or any other obstructions because that can
prevent the camera from work ing properly .
For information on cleaning the lens, refer to
¢ page 203.
Pedestrian detection depends on the differ
ence in temperature between the person and
the background. Pedestr ians may not be de
tected if the temperature difference is too small . T he pedestrian high ligh ting feature is
deactivated at temperatures above 77 °F (25
°C) and when it is light outs ide.
A WARNING
-
Night vision assistant has limits and can
not always detect pedestr ians. Always pay
close attention to traffic and the area
around your vehicle even when night vision
assistant is sw itched on .
- Night vision assistant can only warn
about people located within the visual
range of the infra red camera. The visual
range corresponds to the image in th e in
s trument clus ter di splay.
- Night vision assistant may not detect
peop le and highlight them if
Page 104 of 292
102 Night vision assistant
-they are not in an upright position, for
example if they are s itting, crouching
or lying down and/or
- if the o utline in the display is inc om
plete or interrupted, fo r example be
cause the person is partially hidden by
a parked vehicle.
{D) Tips
- Pedestrian detection and the pedestrian
warming are lim ited to objects that are
detected as pedestrians. The system
does not detect animals. Even though
the shape and warmth radiated by each
object detected is evaluated, the system
does have limitat ions and it can give in
correct warnings.
- For techn ical reasons, the image pauses
in split second intervals .
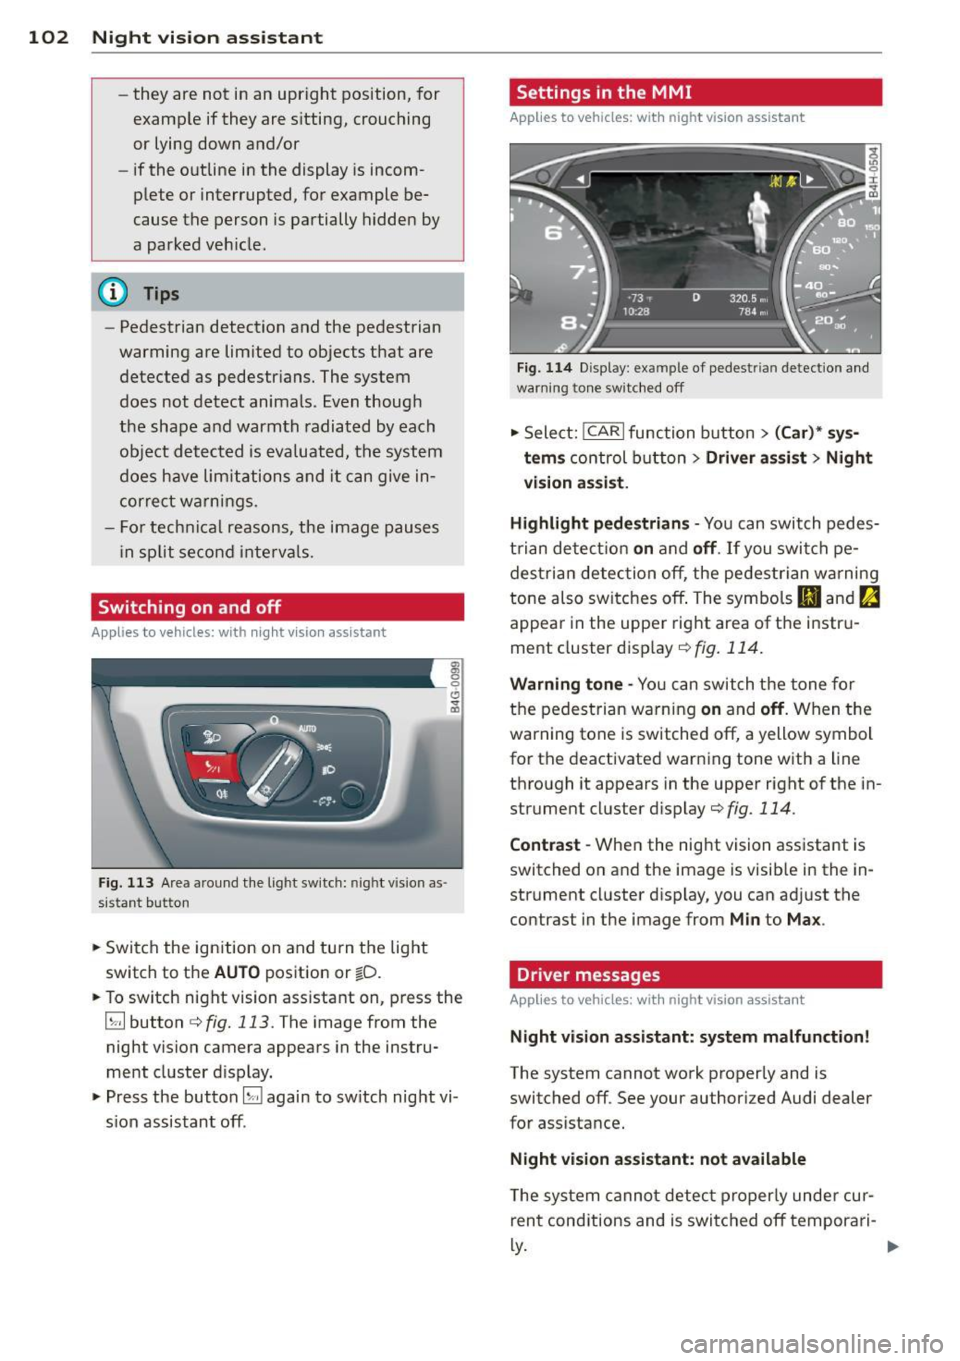
Switching on and off
Applies to vehicles: with night visio n ass istant
Fig. 113 Area a round the light switch: night vision as ·
sistant button
• Switch the ignition on and turn the light
switch to the
AUTO position or ~D.
• To switch night vision assistant on, press the
~ button c:> fig. 113. The image from the
night vision camera appears in the instru
ment cluster d isplay.
• Press the button~ again to switch night vi
s ion assistant off .
Settings in the MMI
Applies to vehicles: wit h night vision assistant
Fig. 114 Display : example of pedestrian detection and
warning to ne switc hed off
• Select: !CAR I function button > (Car)* sys
tems
control button > Driver assist > Night
vision assist.
Highlight pedestrians -
You can switch pedes
trian detect ion
on and off. If you switch pe
destria n detection off, the pedestrian warning
tone also switches off. The symbols
Bl and ~
appear in the uppe r right area of the instru
ment cluster disp lay
c:> fig. 114.
Warning tone -You can switch the tone for
the pedestrian warning
on and off. When the
warning tone is sw itched off, a yellow symbol
for the deactivated warning tone with a line
through it appears in the upper right of the in
strument cluster display
c:> fig. 114 .
Contrast -When the nig ht vision ass istant is
switched on and the image is visib le in the in
strument cluster display, you can adj ust the
contrast in the image from
Min to Max .
Driver messages
Applies to vehicles: wit h night vision assista nt
Night vision assistant: system malfunction!
The system cannot work properly and is
switched off. See your authorized Audi dealer
for assistance.
Night vision assistant: not available
T he system cannot detect properly under cur
rent conditions and is switched off tempora ri-
~-~
Page 107 of 292
power. Shi fting may become noticeable when
accelerating .
When the veh icle is stationary or at speeds
be low 1 mph (2 km/h), you must always apply
the foot brake before and while moving the
lever to D/S out of N.
A WARNING
Read and follow all WARNINGS ¢.& in
Driving the automatic transmission on
page 106.
(D Note
Coasting downhill with the transmission in
N and the engine not running will result in
damage to the automatic transmission
and possibly the catalytic converter.
@ Tips
-Audi drive select: you can adj ust the
sporty sh ift characteristics in the
Dy
namic driving mode.Swill appear in the
i nstrument cluster display i nstead of D.
- If you accidenta lly select N while driv ing,
take your foot off the acce lerator pedal
i mmediately and wait fo r the e ngine to
s low down to idle before selecting D/S.
- If there is a power failure, the se lector
lever will not move out of t he P position .
The eme rgency release can be us ed if
t hi s happens
r::!>page 109.
Automatic Tra nsmi ssi on 105
Automatic Shift Lock (ASL)
The Automatic Shift Lock safeguards you
against accidentally shifting into a forward or
the reverse gear and causing the vehicle to
move unintentionally.
*
}
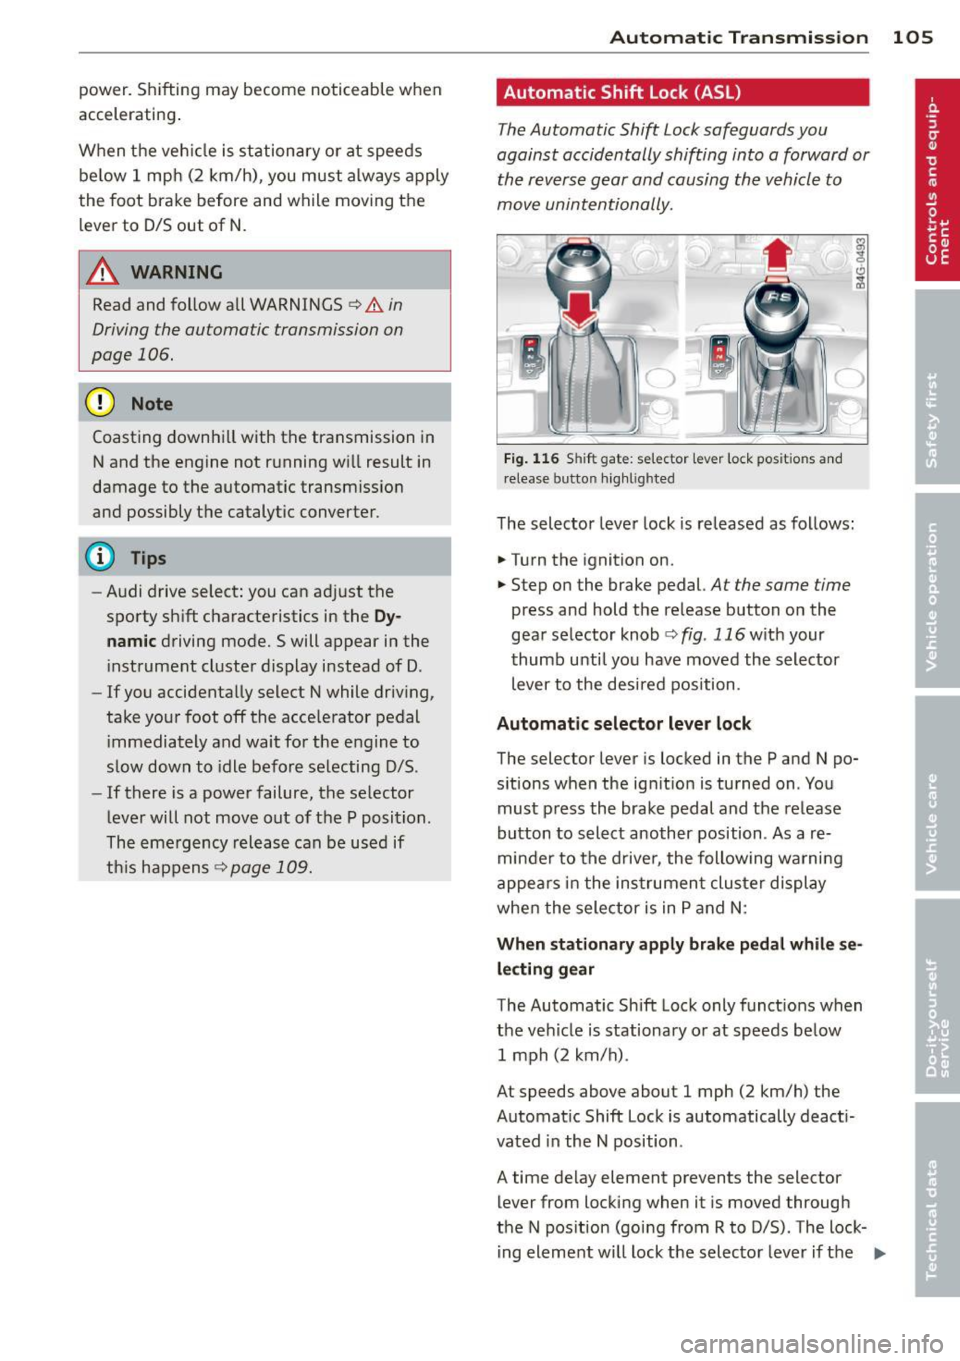
Fig. 1 16 Shift gate: selector lever lock positions and
r elease button highlig hted
T he selector leve r lock is released as follows:
"" Turn the ignition on.
"" Step on the brake pedal.
At the same time
press and hold the re lease button on the
gear selector knob
¢fig . 116w ith your
t humb unti l you have moved the selector
lever to the desired position .
Automatic selector leve r lock
The selector lever is locked in the P and N po·
s itions when the ignition is turned on . You
must p ress the brake pedal and the re lease
button to select another position . As a re
minde r to the d rive r, the following warni ng
appe ars i n the ins trumen t clus ter display
whe n the sele ctor is in P and N:
Wh en stationary apply brake pedal while se
lect ing gear
The Automatic Shift Lock only funct ions when
the veh icle is stationa ry o r at speeds below
1 mph (2 km/h) .
At speeds above about 1 mph (2 km/h) the
Automat ic Shift Lock is automatically deact i
vated in the N position .
A time delay element prevents the selector
lever from locking when it is moved through
the N pos ition (go ing from R to D/S) . The lock·
i ng eleme nt will lock the selec to r l ever if the
IIJ,,
Page 108 of 292
106 Automatic Transmission
lever is left in N (Neutral) for more than ap
proximately 2 second, without the brake ped
a l being pressed .
Release button
The release button on the selector lever pre
vents the lever from being accidentally shifted
into certain positions. Depending on the direc
tion of the shift, the se lector lever locks at d if
ferent positions. The positions are highlighted in the illustration
c:;, fig. 116.
Driving the automatic transmission
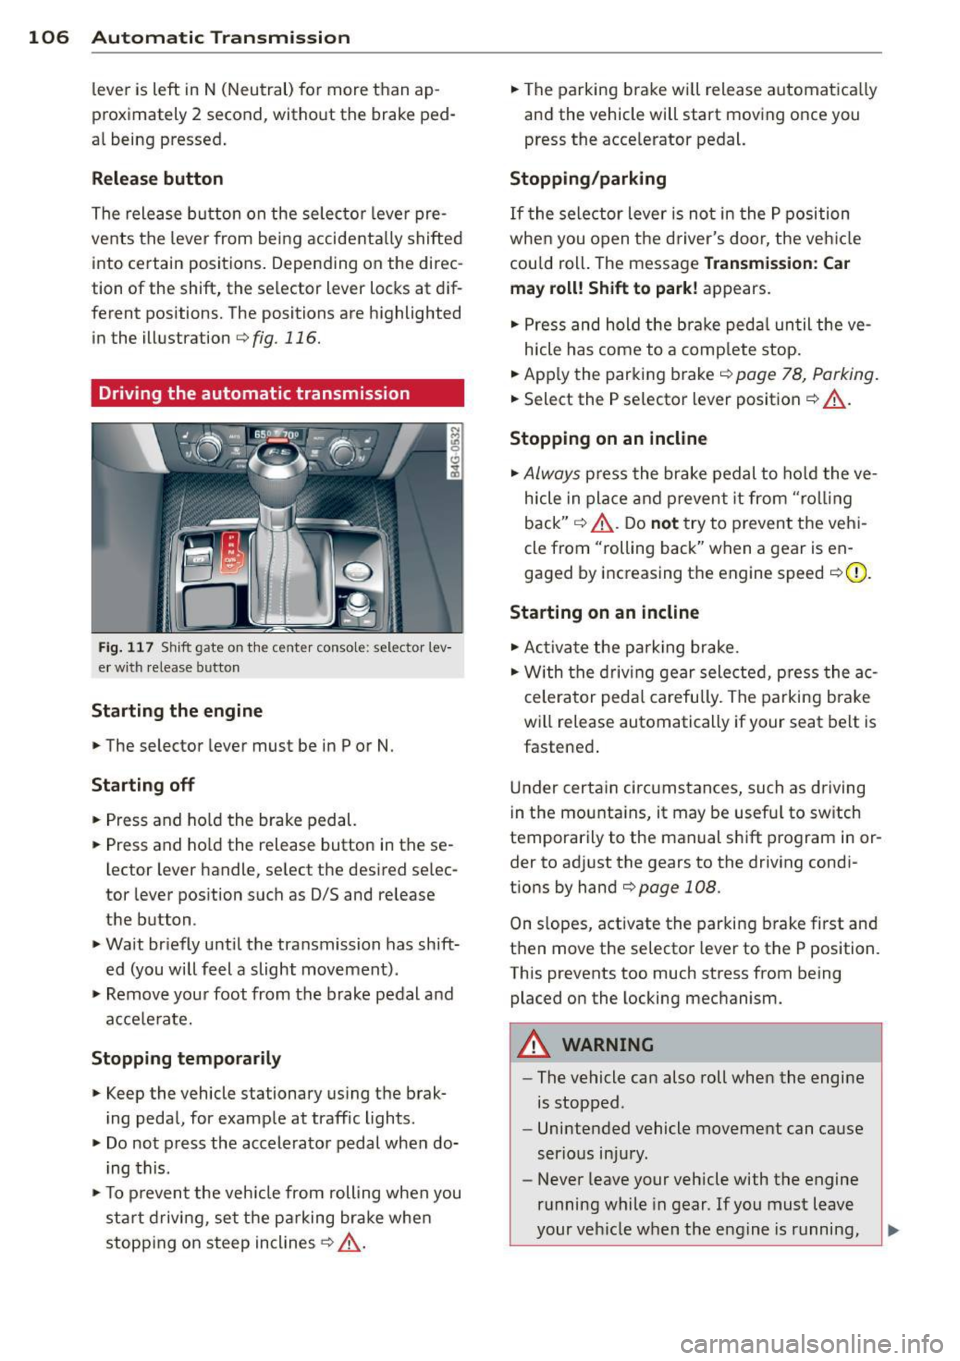
Fig. 117 Sh ift gate on the center conso le: selector lev
er w ith release button
Starting the engine
,.. The selector lever must be in P or N.
Starting off
,.. Press and ho ld the brake pedal.
,.. Press and ho ld the release button in these
lector lever handle, se lect the desired se lec
tor lever position such as 0/5 and release
the button .
,.. Wait briefly until the transmission has shift
ed (you will feel a slight movement) .
,.. Remove your foot from the brake pedal and
acce le rate.
Stopping temporarily
,.. Keep the vehicle stationary us ing the brak
ing peda l, for example at traffic lights.
,.. Do not press the accelerator pedal when do
ing this .
,.. To prevent the veh icle from rolling when you
sta rt driving, set the parking brake whe n
stopping on steep inclines
c:;, _& .
,.. The parking brake will release automatica lly
and the vehicle will start moving once you
press the acce lerator pedal.
Stopping/parking
If the sele ctor lever is not in the P position
whe n you open t he driver's door, the veh icle
could roll. The message
Transmission: Car
may roll! Shift to park!
appears.
,.. Press and hold the brake pedal until the ve-
hicle has come to a complete stop.
,.. App ly the parking brake
c::> page 78, Parking.
,.. Select the P selector lever position c:;, _& .
Stopping on an incline
,.. Always press the brake pedal to hold the ve
hicle in place and prevent it from "rol ling
back"
c:;, _& . Do not try to prevent the vehi
cle from "rolling back" when a gear is en
gaged by increasing the engine speed
c::>(D .
Starting on an incline
,.. Activate the parking brake.
,.. With the driving gear selected, press the ac
celerator pedal carefully. The parking brake
will release automatically if your seat belt is
fastened .
Under certain circumstances, such as driving
in the mounta ins, it may be usefu l to sw itch
temporarily to the manual shift program in or
der to adj ust the gears to the driving condi
t ions by hand
c::>page 108 .
On slopes, activate the parking brake first and
then move the selector lever to the P position.
This prevents too much stress from being placed on the locking mechanism.
A WARNING
-
- The vehicle can also roll when the engine
is stopped .
- Unintended vehicle movement can cause
serious injury.
- Never leave your vehicle with the engine
running while in gear . If you must leave
your vehicle when the engine is running,
Page 109 of 292
activate the parking brake and move the
selector lever to P.
- Power is sti ll transmitted to the wheels
when the engine is running at idle. To
prevent the vehicle from "creeping", you
must keep your foot on the brake when
the engine is running and the selector
lever is in D/S or R or "tiptronic" mode is
selected.
- Do not press the accelerator pedal when changing the selector lever pos ition
wh ile the vehicle is stat ionary and the
engine is running .
- Never shift into
R or P wh ile driving .
- Before driv ing down a steep slope, re -
duce your speed and shift into a lower
gear with "tiptronic".
- Do not ride the brakes or press the brake
peda l too often or too long when dr iv ing
down a hill. Constant braking causes the brakes to ove rheat and substant ially re
duces braking performance, increases
braking distance or ca uses comp lete fail
vre of the brake system .
- To prevent the vehicle from rolling back
when stopping on inclines, always hold it in place with the brake pedal or parking
brake.
- Never hold the vehic le on an incline with
a slipping clutch . The clutch opens auto
matically when it becomes too hot from
the overload. An indicator lamp
[O] illu
minates and a dr iver message appears
~ page 108 when the clutch is overload
ed .
- If the engine must remain running, never have any driv ing position engaged when
check ing under the hood.
M ake sure the
selector lever has secure ly engaged and
is locked in P with the parking bra ke set
¢ page 213 . Otherwise, any increase in
engine speed may set the vehicle in mo
t ion, even with the park ing brake ap
plied.
(D Note
- When stopping on an incline, do not try to hold the vehicle in place by pressing
Aut omat ic Tr ans missio n 107
the acce lerator pedal while a d riving gea r
is se lected. This can cause the transmis
sion to ove rheat and can damage it. Acti
vate the parking brake or press the brake peda l to prevent the vehicle from rolling .
- Allowing the vehicle to roll when the en gine is stopped and the selector lever is
in N will damage the transmission be
cause
i t is not lubricated under those cir
cumstances.
(D Tips
For safety reasons, the parking brake is re
leased automatically o nly when the driv
e r's safety belt is engaged in the buckle .
, Hill descent control
The hill descent control system assists the
driver when driving down declines .
Hill descent contro l is activa ted when these
lector lever is in D/S and you press the brake
pedal. The transmission automatically selects
a gear that is suitable for the incline . H ill de
scent cont ro l t ries to ma inta in the speed ach
ieved a t the t ime of braking, with in phys ica l
and tec hni cal lim itations. If may st ill be nec
essary to adj ust the speed with the brakes .
Hill descent contro l sw itches off once the de
cl in e leve ls out or yo u press the acce le rato r
pedal.
On vehicles with the cruise cont ro l system*
¢ page 79 , hill descent control is also activat
ed whe n the speed is set.
&_ WARNING
-
Hill descent co nt rol cannot overcome
physical lim itations, so it may not be ab le
to maintain a constant speed under a ll
conditions. A lways be ready to apply the
brakes .
Page 110 of 292
108 Automatic Transmission
Manual shift program
Using the manual shift program you can
manually select gears .
,
I f I
I
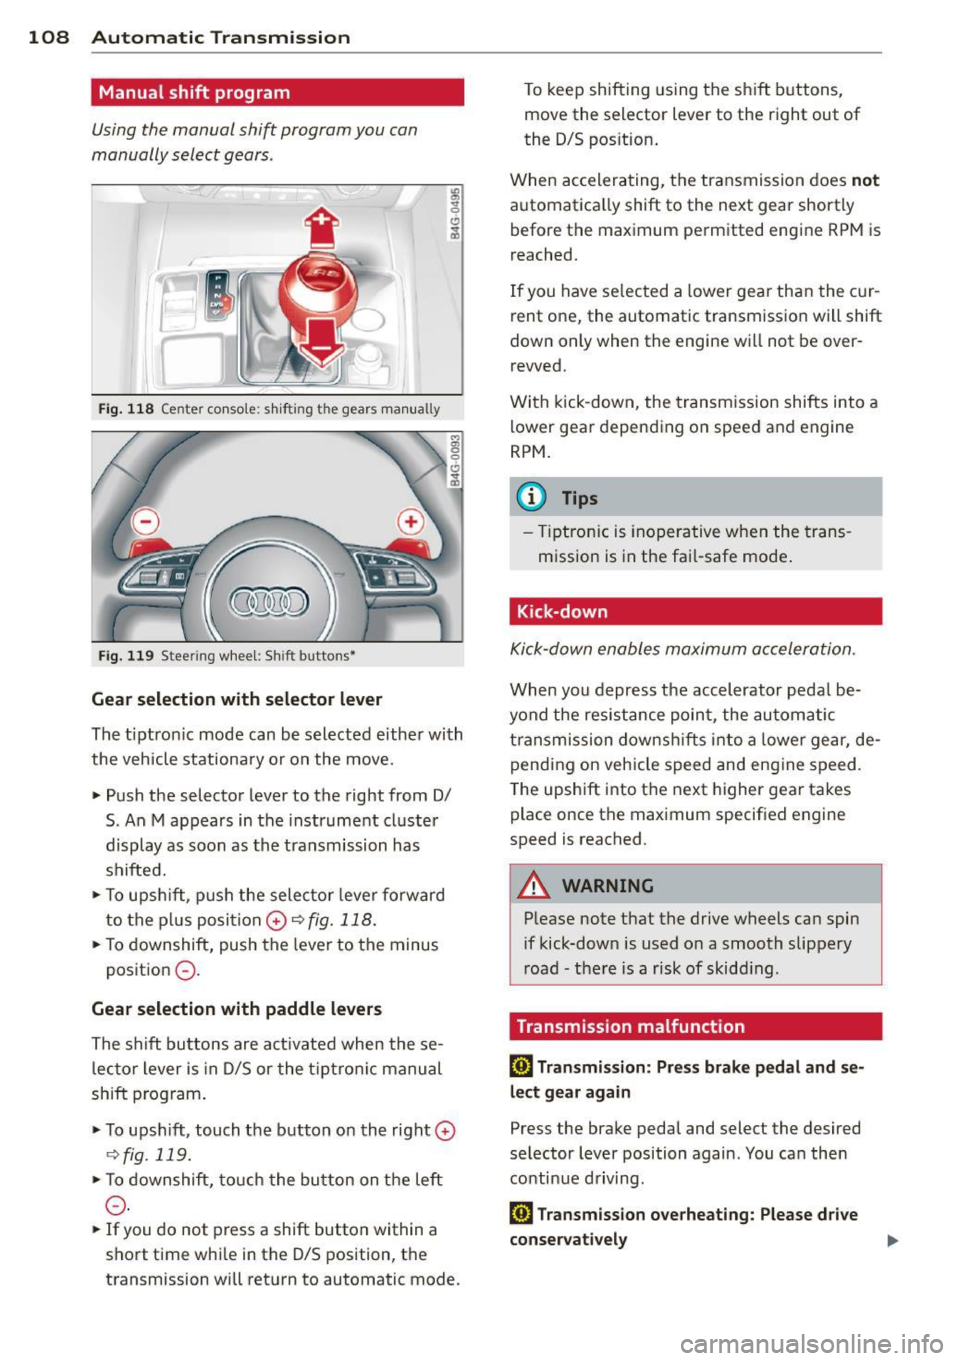
Fi g. 118 Center co nsole: s hiftin g t he gears ma nua lly
Fi g. 119 Stee ring wheel : Sh ift butto ns•
Gear s election w ith selector l ever
The tiptro nic mode can be selected e ither with
the vehicle stationary or on the move.
,.. Push the selector lever to the right from 0/
S. An M appears in the instrument cluster
display as soon as the transmission has
shifted.
,.. To upsh ift, push the selector lever forward
to the pl us posi tion
0 c::::> fig. 118.
,.. To downshift, push the lever to the minus
position
0 -
Gear selection with paddle levers
The shift buttons are act ivated when these
lector lever is in 0/S or the t iptro nic manual
shift p rogram .
,.. To upsh ift, touch the button on the right
0
c::::> fig . 119.
,.. To downshift, touch the button on the left
0 -
... If you do not press a shift button within a
short time whi le in the 0/S posit ion, the
transmission will return to automatic mode . To keep shifting using the sh
ift buttons,
move the selector lever to the right out of
the 0/S position.
When accelerating, the transmission does
not
automat ica lly shift to the next gear shortly
before the maximum permitted engine RPM is
reached.
If you have se lected a lower gear than the c ur
rent one, the automatic transmissio n will shift
down only when the engine will not be over
revved.
With kick-down , the transmission shifts into a
lower gear depending on speed and engine
RPM.
(D Tips
- Tiptron ic is inoperative when the trans
m ission is in the fa il-safe mode .
Kick-down
Kick-down enables maximum acceleration .
When you depress the accelerator pedal be
yond the resistance point , the au tomatic
t ransmission downsh ifts into a lower gear, de
pending on vehicle speed and engine speed .
T he upsh ift into the next higher gear takes
place once the maximum specified engine
speed is reached .
_& WARNING
-
Please note that the drive wheels can spin
if kick-down is used on a smooth slippery
r oad -there is a risk of skidd ing .
Transmission malfunction
[O] Tran smi ssion: Press br ake pedal and s e
lect ge ar again
Press the brake pedal and select the desired
selector lever position again . You ca n the n
continue d riving .
[O] Transmi ssion o verheating: Please d riv e
conse rvat ively
Page 112 of 292
110 Parking system s
Parking systems
General information
A ppl ies to vehicles: with parkin g system plus/rear view
camera/peripheral cameras
Depending on your vehicle's equ ipment, vari
ous parking a ids wi ll help you when pa rk ing
and maneuvering.
The
p ar king sy st e m plu s assists you when
pa rking by audib ly and visually indicat ing ob
jects detected
in front of and behind the vehi
cle
~ page 111.
The rear view ca m era shows the area behind
the vehicle in the Infotainment d isp lay. This
d isplay assists you when you are c ross o r par
allel parking
q page 112. In addit ion, you are
assisted by the functions from the parking
system plus
~ page 111 .
The peripher al cam era s ass ist you with park
ing and maneuvering. You are aided by var ious
cameras depending on the vehicle equipment leve l
¢page 115. In addition, you are assist
ed by the functions from the parking system
plus ¢ page 111.
A WARNING
- Always look for traff ic and check the area
around your vehicle by looking at it di
rectly as well . The parking system cannot
rep lace the d river's attent ion. The dr iver
is always respons ible for safety during
p arki ng and for all other maneuvers.
- Please note that some surfaces, such as
clothing, a re not detected by the system.
- Senso rs and cameras have blind spots in
wh ich peop le and objects ca nnot be de
te cted. Be especially cau tious of children
and animals.
- T he sensors can be displaced by impacts
or damage to the radia to r grille, bumpe r,
wheel housing and the unde rbody. The
par king systems may become impaired
as a resu lt . Have your authorized Audi
dealer or qualified workshop check their
function. -
Make s ure the sensors are not covered by
stickers, deposits or any other obstruc
tions as it may impair the sensor func
tion . For information on cleaning, refer
to
~ page 203 .
(D Note
- Some objects are not detected by the
system under certain c ircumstances:
- Obje cts su ch as ba rrie r chains, trailer
draw bars, vertical po les or fences
- Objects above t he senso rs such as wall
extensions
- Objects w ith specific surfaces or struc
tures su ch as chain link fences or pow
der snow.
- If you conti nue d riving closer to a low- ly
ing object, it may disappea r from the
sensor range. Note th at yo u w ill no lon
ger be warned abo ut this obstacle.
(j) Tips
- T he system may provide a wa rni ng even
t ho ugh the re are no obs ta cl es in the cov
erage a rea in some situa tions, such as:
- certain road surfaces or for long grass.
- externa l ultrasonic sources e.g. from
clean ing vehicles.
- heavy rain, snow or thick vehicle ex
ha ust.
- We recommend that you practice park
ing in a traff ic-free location or park ing
lot to become familiar w ith the system.
When doing this, there should be good light and weather cond itions .
- You can change the volume and pitch of
the s ignals as we ll as the disp lay
¢page 120.
- What appears in the infotainment dis
play is somewhat time-delayed .