Page 76 of 653

�Î
�Î
The lef t or right turn signal indicator
blinks when you signal a lane change
or turn. If an indicator does not blink
or blinks rapidly, it usually means
one of the turn signal bulbs is
burned out (see pages and ).
Replace the bulb as soon as possible,
since other drivers cannot see that
you are signaling.
When you press the hazard warning
button, both turn signal indicators
and all turn signals on the outside of
the vehicle f lash. This indicator normally comes on
when you turn the ignition switch to
the ON (II) position and goes of f
af ter the engine starts. If it comes on
at any other time, there is a problem
in the electric power steering system.
Models equipped with the
keyless access system have an
engine start/stop button instead
of an ignition switch. ON Mode
is the equivalent of ON (II). For
more inf ormation, see pagesand . If this happens, stop the vehicle in a
saf e place and turn of f the engine.
Reset the system by restarting the
engine. The indicator will stay on,
but should go of f af ter driving a
short distance. If it does not go of f ,
or comes back on again while driving,
take the vehicle to your dealer to
have it checked. With the indicator
on, the EPS may be turned of f ,
making the vehicle harder to steer.
If you turn the steering wheel to the
f ull lef t or right position repeatedly
while stopping or driving at very low
speed, you may f eel slightly harder
steering in order to prevent damage
to the steering system caused by
overheating. This may also happen if
you hold the steering wheel on the
f ull lef t or right position f or a while.
You will also see a ‘‘CHECK POWER
STEERING SYSTEM’’ message on
the multi-information display.
:
558 562
184 187
Instrument Panel Indicators
Turn Signal and
Hazard Warning
Indicators Electric Power Steering
(EPS) Indicator
70
12/07/20 10:38:46 31TK4640_075
Page 114 of 653
�Û�Ý�Û�Ý
Adjust Alarm Volume
Select the warning alarm volume
f rom three levels.
You can choose this item to
customize f rom ‘‘METER SETUP’’
by pressing the INFO ( / ) button
repeatedly. Press the SEL/RESET button to see
the selections.
Select the desired level by pressing
the INFO ( / ) button, then enter
your selection by pressing the SEL/
RESET button.When your selection is successf ully
completed, the display changes as
shown above, and then goes back to
the customizable item screen.
If the ‘‘SETTING INCOMPLETE’’
message appears, go back to
‘‘ADJUST ALARM VOLUME’’ and
repeat the procedure again.
Multi-Inf ormation Display
108
12/07/20 10:43:35 31TK4640_113
Page 142 of 653

�Î
�Î
�Î
�Î
�Î
�Î
�Î
�Î
�Î �Î
�Î �Î
�Î
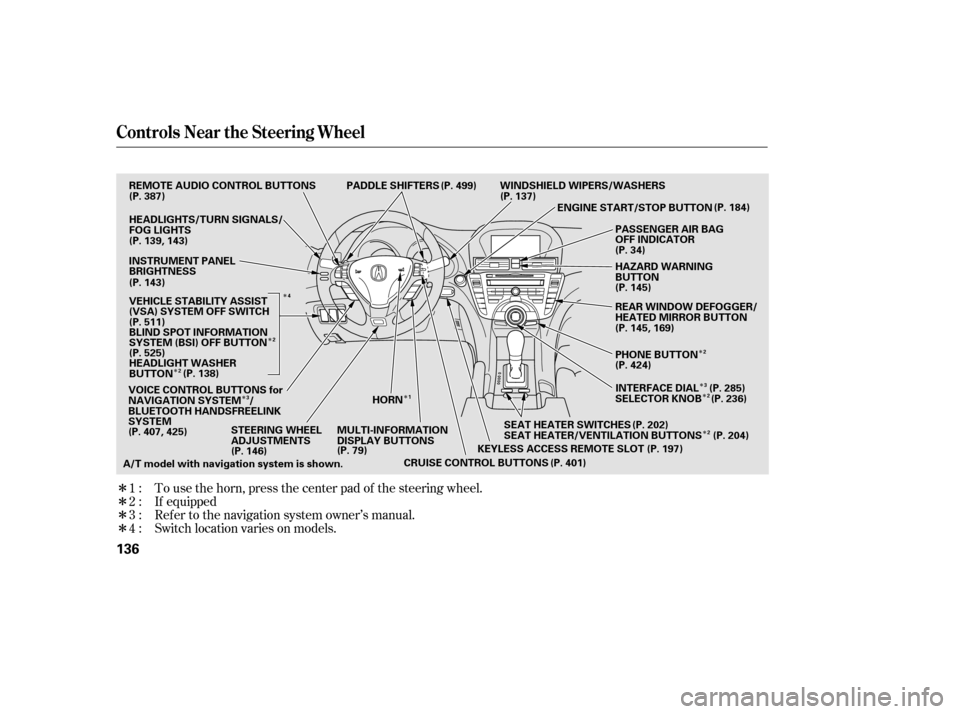
To use the horn, press the center pad of the steering wheel.
If equipped
Ref er to the navigation system owner’s manual.
1:
2:
3:
4 : Switch location varies on models.
Controls Near the Steering Wheel
136
SEAT HEATER SWITCHES
PADDLE SHIFTERS
CRUISE CONTROL BUTTONS WINDSHIELD WIPERS/WASHERS
STEERING WHEEL
ADJUSTMENTS MULTI-INFORMATION
DISPLAY BUTTONSHORN
KEYLESS ACCESS REMOTE SLOTENGINE START/STOP BUTTON
A/T model with navigation system is shown. VOICE CONTROL BUTTONS for
NAVIGATION SYSTEM /
BLUETOOTH HANDSFREELINK
SYSTEM
SEAT HEATER/VENTILATION BUTTONS
(P. 387)
(P. 407, 425) (P. 146) (P. 79)
(P. 401)(P. 197)
(P. 204)
(P. 202) (P. 184)
REMOTE AUDIO CONTROL BUTTONS
HEADLIGHTS/TURN SIGNALS/
FOG LIGHTS
(P. 139, 143)
INSTRUMENT PANEL
BRIGHTNESS
(P. 143)
(P. 525) BLIND SPOT INFORMATION
SYSTEM (BSI) OFF BUTTON
HEADLIGHT WASHER
BUTTON (P. 511)
(P. 138) PASSENGER AIR BAG
OFF INDICATOR
(P. 34)
HAZARD WARNING
BUTTON
REAR WINDOW DEFOGGER/
HEATED MIRROR BUTTON
(P. 145, 169)
PHONE BUTTON
(P. 424)
INTERFACE DIAL (P. 285)
SELECTOR KNOB (P. 236) (P. 145)
(P. 499)
(P. 137)
VEHICLE STABILITY ASSIST
(VSA) SYSTEM OFF SWITCH
1
3
2
2
2 2
3 2
4
12/07/20 10:46:46 31TK4640_141
Page 151 of 653

Push the button between the center
vents to turn on the hazard warning
lights (f our-way f lashers). This
causes all f our outside turn signals
and both indicators in the instrument
panel to f lash. Use the hazard
warning lights if you need to park in
a dangerous area near heavy traffic,
or if your vehicle is disabled.The rear window def ogger clears f og,
frost,andthinicefromthewindow.
Push the def ogger button to turn it
onandoff.Theindicatorinthe
button comes on to show the
def ogger is on. If you do not turn it
of f , the def ogger will shut itself of f
withinabout10to30minutes
according to the outside temperature.
It also shuts of f when you turn of f
the ignition switch, or set the power
mode to VEHICLE OFF (LOCK) onmodels with keyless access system.
You have to turn it on again when
you restart the vehicle.
Make sure the rear window is clear
and you have good visibility bef ore
starting to drive.
The def ogger wires on the inside of
the rear window can be accidentally
damaged. When cleaning the glass,
always wipe side-to-side.
Pushing this button also turns the
mirror heaters on or of f . For more
inf ormation, see page .
169
Hazard Warning Button Rear Window Def ogger
Hazard Warning Button, Rear Window Def ogger
Inst rument s and Cont rols
145
HAZARD WARNING BUTTON
U.S. model is shown.
12/07/20 10:47:50 31TK4640_150
Page 167 of 653

�µ
�Î
�Î
CONT INUED
See pages f or important saf etyinf ormation and warnings about how toproperly position the seats and seat-backs.
Driver’s seat only:
1513
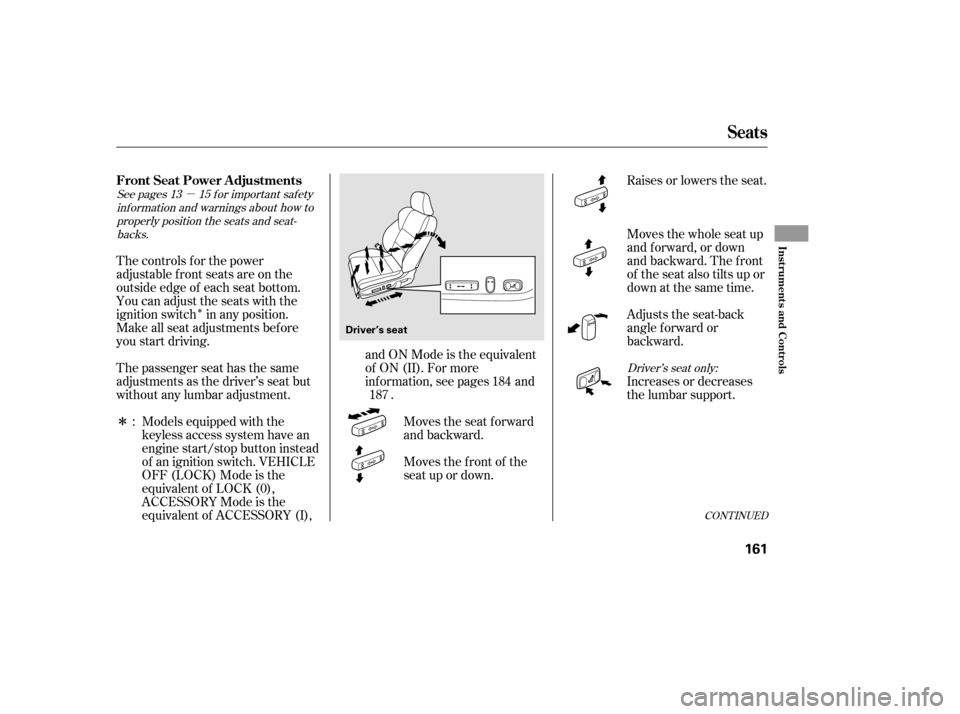
The passenger seat has the same
adjustments as the driver’s seat but
without any lumbar adjustment. Raises or lowers the seat.
Moves the whole seat up
and f orward, or down
and backward. The front
of the seat also tilts up or
down at the same time.
Adjusts the seat-back
angle f orward or
backward.
The controls f or the power
adjustable front seats are on the
outside edge of each seat bottom.
You can adjust the seats with the
ignition switch in any position.
Make all seat adjustments bef ore
you start driving.
Models equipped with the
keyless access system have an
engine start/stop button instead
of an ignition switch. VEHICLE
OFF (LOCK) Mode is the
equivalent of LOCK (0),
ACCESSORY Mode is the
equivalent of ACCESSORY (I), and ON Mode is the equivalent
of ON (II). For more
information, see pages and
.
Moves the seat forward
and backward.
Moves the f ront of the
seat up or down. Increases or decreases
the lumbar support.
: 187
184
Seats
Front Seat Power A djustments
Inst rument s and Cont rols
161
Driver’s seat
12/07/20 10:50:05 31TK4640_166
Page 168 of 653
They are most ef f ective when you
adjust them so the center of the back
of the occupant’s head rests against
the center of the restraint.
Your vehicle is equipped with head
restraints in all seating positions to
help protect you and your
passengers f rom the likelihood of
whiplash and other injuries. The driver’s seat includes a memory
f eature. Two seat positions can be
stored in separate memories. You
canthenselectamemorizedposition
by pushing the appropriate memory
button. Ref er to page f or how to
memorize and select the seat
positions. 170
See page f or important saf ety
inf ormation and a warning aboutimproperly positioning head restraints. 15
Seats
Head Restraints
162
Passenger’s seat
12/07/20 10:50:11 31TK4640_167
Page 523 of 653

If there is a problem with the TPMS,
thetirepressuremonitorshowsa
‘‘TPMS ERROR’’ message and the
tire pressure readings are not
displayed. If this happens, you will
f irst see a system warning message
‘‘CHECK TPMS SYSTEM’’ on the
multi-inf ormation display.If there is a problem with the TPMS,
youwillseetheabovemessageon
the multi-information display.If the low tire pressure/TPMS
indicator comes on, or the multi-
inf ormation display shows a
‘‘CHECK TPMS SYSTEM’’ message,
the VSA system automatically turns
on even when the VSA system is
turned of f by pressing the VSA OFF
switch (see page ). If this
happens, you cannot turn the VSA
system of f by pressing the VSA OFF
switch again.
When you restart the vehicle with
thecompactsparetire,theTPMS
system message will also be
displayed on the multi-information
display af ter several miles
(kilometers) driving.
If you see this message, the system
is of f and is not monitoring the tire
pressures. Have the system checked
by your dealer as soon as possible.
Also, the low tire pressure/TPMS
indicator begins to f lash, then stays
on (see page ). 511
515
TPMS System Failure
Tire Pressure Monitoring System (TPMS)
Driving
517
U.S. model Canadian model
12/07/20 11:37:05 31TK4640_522
Page 524 of 653

If you have a f lat tire, the low tire
pressure/TPMS indicator and tire
monitor indicator will come on.
Replace the indicated f lat tire with
thecompactsparetire(seepage).
After the flat tire is replaced with the
spare tire, the low tire pressure/
TPMS indicator stays on while
driving. Af ter several miles
(kilometers) driving, this indicator
begins to f lash, then stays on again.
You will also see a ‘‘CHECK TPMS
SYSTEM’’ message on the multi-
inf ormation display. This is normal;
the system cannot monitor the spare
tire pressure. Manually check the
spare tire pressure to be sure it is
correct.
This indicator and the warning
message on the multi-inf ormation
display will go of f , af ter several miles
(kilometers) driving, when the spare tire is replaced with the specified
regular tire equipped with the tire
pressure monitor sensor.
Never use a puncture-repairing agent
in a f lat tire. If used, you will have to
replace the tire pressure sensor.
Havetheflattirerepairedbyyour
dealer as soon as possible.
If the low tire pressure/TPMS
indicator and the low tire position on
the low tire pressure monitor do not
go out af ter inf lating the tires to the
specified values, have your dealer
check the system as soon as possible. Each wheel (except the compact
sparetirewheel)isequippedwitha
tire pressure sensor. You must use
TPMS specif ic wheels. It is
recommended that you always have
your tires serviced by your dealer or
qualif ied technician.
This device complies with the
appropriate requirements or the
required standards. See page f or
more inf ormation.
583 628
Changing a T ire with T PMS
Tire Pressure Monitoring System (TPMS)
518
12/07/20 11:37:12 31TK4640_523