2014 Acura RLX mirror
[x] Cancel search: mirrorPage 152 of 518

151
uuAdjusting the MirrorsuPower Door Mirrors
Controls
■Folding in the door mirrors
Press the lock button on the keyless access remote, or press the door lock button on
any door.
uThe mirrors start folding in automatically.■Folding out the door mirrors
Press the unlock button on the keyless access remote, or grab the door handle on
any door.
uThe mirrors start folding out automatically.
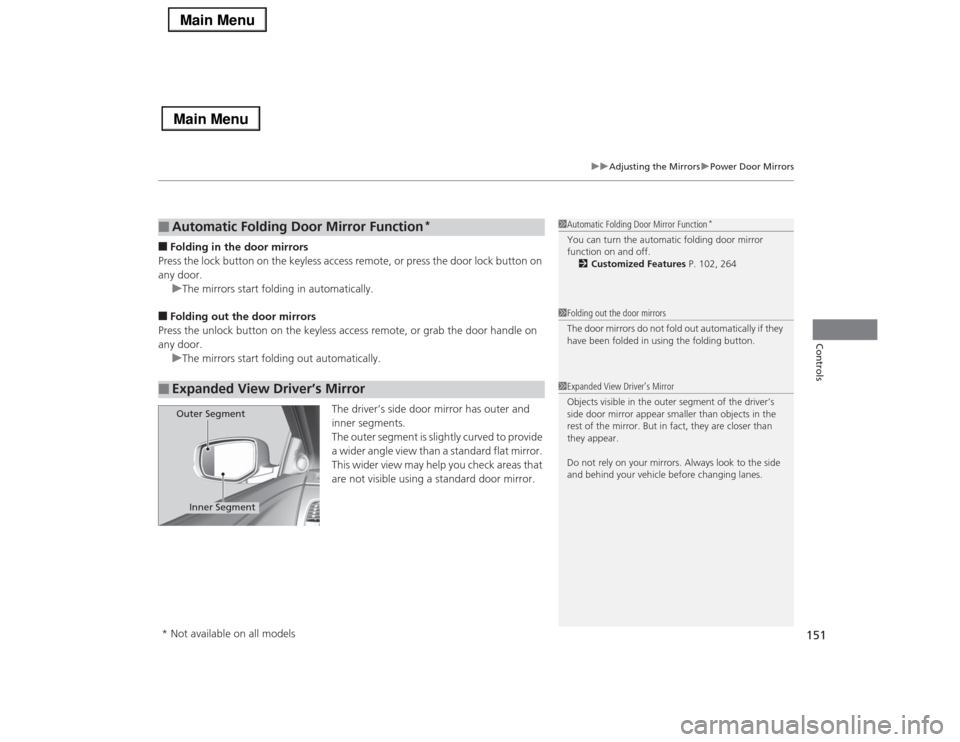
The driver’s side door mirror has outer and
inner segments.
The outer segment is slightly curved to provide
a wider angle view than a standard flat mirror.
This wider view may help you check areas that
are not visible using a standard door mirror.■
Automatic Folding Door Mirror Function
*
■
Expanded View Driver’s Mirror
1Automatic Folding Door Mirror Function
*
You can turn the automatic folding door mirror
function on and off.
2Customized Features P. 102, 2641Folding out the door mirrors
The door mirrors do not fold out automatically if they
have been folded in using the folding button.1Expanded View Driver’s Mirror
Objects visible in the outer segment of the driver’s
side door mirror appear smaller than objects in the
rest of the mirror. But in fact, they are closer than
they appear.
Do not rely on your mirrors. Always look to the side
and behind your vehicle before changing lanes.
Inner Segment
Outer Segment
* Not available on all models
Page 268 of 518

267
uuCustomized Featuresu
Continued
Features
“Trip A” Reset Timing“Trip B” Reset Timing
Language Selection
Adjust Outside Temp. Display
Forward Collision Warning DistanceACC Forward Vehicle Detect Beep
*
ACC Display Speed Unit
*
Turn by Turn Display
*
Default
Memory Position Link
Door Unlock Mode
Keyless Access Light Flash
Interior Light Dimming TimeHeadlight Auto Off TimerAuto Light Sensitivity
Key And Remote Unlock ModeKeyless Lock Answer BackSecurity Relock Timer
Auto Door LockAuto Door Unlock
Vehicle
Settings
Meter
SetupDriver
Assist
System
SetupKeyless
Access
SetupLighting
SetupDoor
Setup
Keyless Access Beep
Lane Keeping Assist Suspend Beep
*
Blind Spot Info
*
Auto Tilt & TelescopicAuto Seatbelt Tension
*
Auto Folding Door Mirror
*
Driving
Position
Setup
* Not available on all models
Page 278 of 518

277
uuCustomized Featuresu
Continued
Features
*1:Default SettingSetup
GroupCustomizable Features Description Selectable Settings
Vehicle
SettingsDoor
SetupAuto Door LockChanges the setting for the automatic locking
feature.With Vehicle Speed
*1/
Shift from P/Off
Auto Door UnlockChanges the setting for when the doors unlock
automatically.All Doors When
Driver’s Door Opens*1/
All Doors When
Shifted to Park/All
Doors When Ignition
Switched Off/Off
Key And Remote Unlock
ModeSets up either the driver’s door or all doors to
unlock on the first push of the remote.Driver Door
*1/All
Doors
Keyless Lock Answer BackLOCK/UNLOCK- The exterior lights flash.
LOCK (2nd push)- The beeper sounds.On
*1/Off
Security Relock TimerChanges the time it takes for the doors to relock
and the security system to set after you unlock
the vehicle without opening any door.90seconds/
60seconds/
30seconds
*1
Auto Folding Door Mirror
*
Changes how you can fold the door mirrors.
Auto Fold With
Keyless
*1/Manual Only
Wiper
SetupWiper Action
*
Changes the setting for the automatic
intermittent wipers in the AUTO position.Rain Sensing
*1/
Intermittent/Speed
Sensitive
Front Wiper Action
*
Changes the setting for the wipers in the INT
position.Speed Sensitive
*1/
Intermittent
* Not available on all models
Page 337 of 518

336Driving
Before DrivingDriving PreparationCheck the following items before you start driving.
•Make sure there are no obstructions on the windows, door mirrors, exterior
lights, or other parts of the vehicle.
uRemove any frost, snow, or ice.
uRemove any snow on the roof, as this can slip down and obstruct your field of
vision while driving. If frozen solid, remove ice once it has softened.
uWhen removing ice from around the wheels, be sure not to damage the wheel
or wheel components.
•Make sure the hood is securely closed.
uIf the hood opens while driving, your front view will be blocked.
•Make sure the tires are in good condition.
uCheck air pressures, and check for damage and excessive wear.
2Checking and Maintaining Tires P. 437
•Make sure there are no people or objects behind or around the vehicle.
uThere are blind spots from the inside.■
Exterior Checks
1Exterior ChecksNOTICEWhen doors are frozen shut, use warm water around
the door edges to melt any ice. Do not try to force
them open, as this can damage the rubber trim
around the doors. When done, wipe dry to avoid
further freezing.
Do not pour warm water into the key cylinder.
You will be unable to insert key if the water freezes in
the hole.
Heat from the engine and exhaust can ignite
flammable materials left under the hood, causing a
fire. If you’ve parked your vehicle for an extended
period, inspect and remove any debris that may have
collected, such as dried grass and leaves that have
fallen or have been carried in for use as a nest by a
small animal.
Also check under the hood for leftover flammable
materials after you or someone else has performed
maintenance on your vehicle.
Page 338 of 518

Continued
337
uuBefore DrivinguDriving Preparation
Driving
•Store or secure all items on board properly.
uCarrying too much cargo, or improperly storing it, can affect your vehicle’s
handling, stability, stopping distance, and tires, and make it unsafe.
2Maximum Load Limit P. 339
•Do not pile items higher than the seat height.
uThey can block your view and may be thrown forward in the event of sudden
braking.
•Do not place anything in the front seat footwells. Make sure to secure the floor
mat.
uAn object or unsecured floor mat can interfere with your brake and accelerator
pedal operation while driving.
•If you have any animals on board, do not let them move around in the vehicle.
uThey may interfere with driving and a crash could occur.
•Securely close and lock all doors and the trunk.
2Locking/Unlocking the Doors from the Inside P. 121
•Adjust your seating position properly.
uAdjust the head restraint, too.
2Adjusting the Seats P. 152
2Adjusting the Head Restraints P. 155
•Adjust the mirrors and steering wheel properly for your driving.
uAdjust them while sitting in the proper driving position.
2Adjusting the Mirrors P. 149
2Adjusting the Steering Wheel P. 148
■
Interior Checks
1Interior Checks
The headlight aim is set by the factory, and does not
need to be adjusted. However, if you regularly carry
heavy items in the trunk have the aiming readjusted
at a dealer or by a qualified technician.
Page 366 of 518

Continued
365
uuWhen DrivinguForward Collision Warning (FCW)
*
Driving
■Automatic shutoff
FCW may automatically shut itself off and the FCW indicator comes and stays on when:
•The temperature inside the system is high.
•The windshield is blocked by dirt, mud, leaves, wet snow, etc.
Once the conditions that caused FCW to shut off improve or are addressed (e.g.,
cleaning), the system comes back on.
1Forward Collision Warning (FCW)
*
Never apply a film or attach any objects to the
windshield that could obstruct the FCW camera’s
field of vision.
Scratches, nicks, and other damage to the windshield
within the FCW camera’s field of vision can cause the
system to operate abnormally. If this occurs, we
recommend that you replace the windshield with a
genuine Acura replacement windshield. Making even
minor repairs within the camera’s field of vision or
installing an aftermarket replacement windshield
may also cause the system to operate abnormally.
After replacing the windshield, have a dealer
recalibrate the camera. Proper calibration of the FCW
camera is necessary for the system to operate
properly.
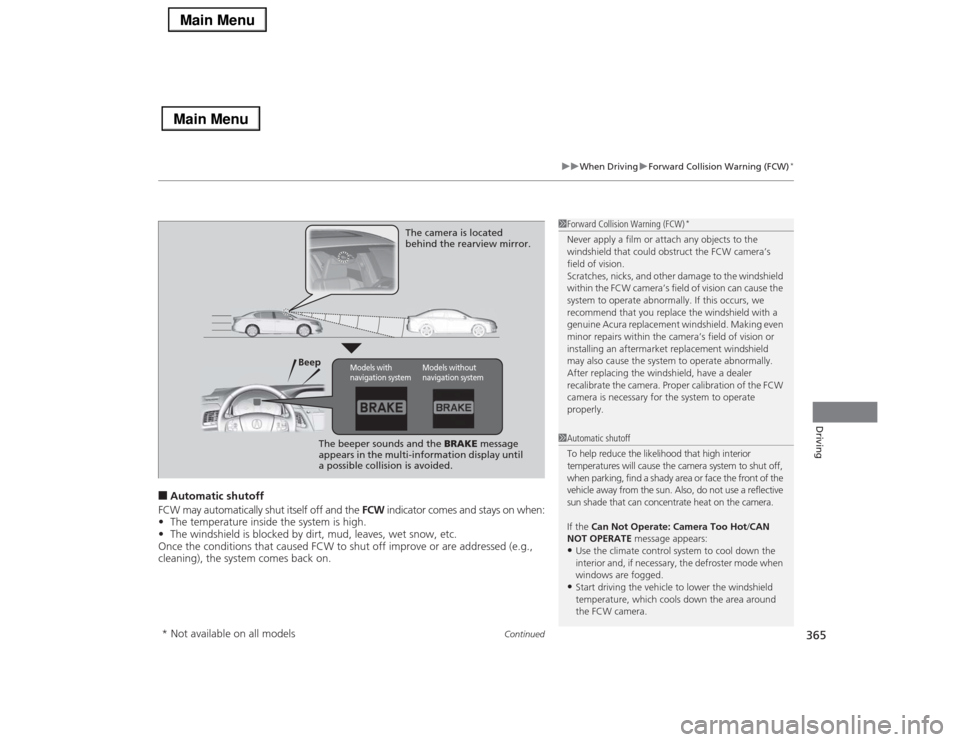
BeepThe camera is located
behind the rearview mirror.
The beeper sounds and the BRAKE message
appears in the multi-information display until
a possible collision is avoided.
Models with
navigation system
Models without
navigation system
1Automatic shutoff
To help reduce the likelihood that high interior
temperatures will cause the camera system to shut off,
when parking, find a shady area or face the front of the
vehicle away from the sun. Also, do not use a reflective
sun shade that can concentrate heat on the camera.
If the Can Not Operate: Camera Too Hot/CAN
NOT OPERATE message appears:•Use the climate control system to cool down the
interior and, if necessary, the defroster mode when
windows are fogged.•Start driving the vehicle to lower the windshield
temperature, which cools down the area around
the FCW camera.
* Not available on all models
Page 369 of 518

uuWhen DrivinguLane Departure Warning (LDW)
368Driving
The camera is located behind the rearview
mirror.
Press the LDW button to turn the system on
and off.
uThe indicator in the button comes on
when the system is on.
■
LDW Camera
1LDW Camera
Never apply a film or attach any objects to the
windshield that could obstruct the LDW camera’s
field of vision.
Scratches, nicks, and other damage to the windshield
within the LDW camera’s field of vision can cause the
system to operate abnormally. If this occurs, we
recommend that you replace the windshield with a
genuine Acura replacement windshield. Making even
minor repairs within the camera’s field of vision or
installing an aftermarket replacement windshield
may also cause the system to operate abnormally.
After replacing the windshield, have a dealer
recalibrate the camera. Proper calibration of the LDW
camera is necessary for the system to operate properly.
Do not place an object on the top of the instrument
panel. It may reflect onto the windshield and prevent
the system from detecting lane lines properly.
To help reduce the likelihood that high interior
temperatures will cause the camera system to shut off,
when parking, find a shady area or face the front of the
vehicle away from the sun. Also, do not use a reflective
sun shade that can concentrate heat on the camera.
If the Can Not Operate: Camera Too Hot/CAN
NOT OPERATE message appears:•Use the climate control system to cool down the
interior and, if necessary, the defroster mode when
windows are fogged.•Start driving the vehicle to lower the windshield
temperature, which cools down the area around
the LDW camera.
LDW Camera■
LDW On and Off
LDW Button Indicator
Page 379 of 518

378
uuWhen DrivinguBlind Spot Information (BSI) System
*
Driving
Blind Spot Information (BSI) System
*
Is designed to detect vehicles in specified alert zones adjacent to your vehicle,
particularly in harder to see areas commonly known as “blind spots.”
When the system detects vehicles approaching from behind in adjacent lanes, the
appropriate indicator comes on for a few seconds, providing assistance when you
change lanes.■How the system works
1Blind Spot Information (BSI) System
*
Important Safety Reminder
Like all assistance systems, BSI has limitations. Over
reliance on BSI may result in a collision.
The system is for your convenience only. Even if an
object is within the alert zone, the following
situations may occur.•The BSI alert indicator may not come on due to
obstruction (splashes, etc.) even without the Blind
Spot Not Available multi-information display
appearing.•The BSI alert indicator may come on even with the
message appearing.
The BSI alert indicator may not come on under
following conditions:•A vehicle does not stay in the alert zone for more
than two seconds.•A vehicle is parked in a side lane.•The speed difference between your vehicle and the
vehicle you are passing is greater than 6 mph (10
km/h).•An object not detected by the radar sensors
approaches or passes your vehicle.
3
WARNING
Failure to visually confirm that it is safe to
change lanes before doing so may result in
a crash and serious injury or death.
Do not rely only on the blind spot
information system when changing lanes.
Always look in your mirrors, to either side
of your vehicle, and behind you for other
vehicles before changing lanes.
●The shift lever is in
(D.
●Your vehicle speed is
between 20 mph (32 km/h)
and 100 mph (160 km/h)
Alert zone range
A: Approx. 1.6 ft. (0.5 m)
B: Approx. 10 ft. (3 m)
C: Approx. 10 ft. (3 m)Radar Sensors:
underneath the
rear bumper
cornersAlert Zone
A
B
C
* Not available on all models