Page 267 of 518
266
uuCustomized Featuresu
Features
System Device Information
Factory Data Reset
Background ColorHeader Clock Display
Clock Reset
Auto Time Zone
*
Auto Daylight
*
Clock
Clock AdjustmentClock Format
Clock
UnitsLanguage
Voice Command Tips
Others
Wallpaper
Clock/Wallpaper
Type
* Not available on all models
Page 271 of 518
270
uuCustomized Featuresu
Features
Auto Daylight
*
Clock Reset
Info Screen Preference
Clock FormatAuto Time Zone
*
Clock/Wallpaper TypeClock Adjustment
Clock
Default
Others
Info
SettingsNavi
Settings
*
See the Navigation System Manual.
AcuraLink Subscription Status
AcuraLink Msg NoticeDelete AcuraLink Message
AcuraLink
*
* Not available on all models
Page 273 of 518
272
uuCustomized Featuresu
Features
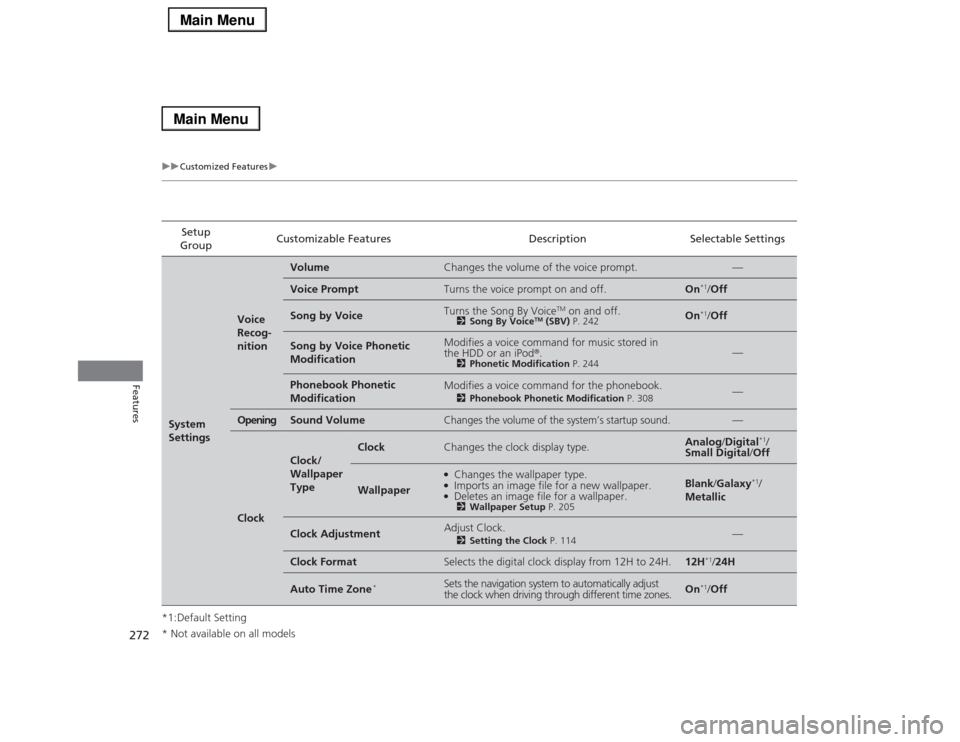
*1:Default SettingSetup
GroupCustomizable Features Description Selectable SettingsSystem
Settings
Voice
Recog-
nition
Volume
Changes the volume of the voice prompt.
—
Voice Prompt
Turns the voice prompt on and off.
On
*1/Off
Song by Voice
Turns the Song By Voice
TM on and off.
2Song By Voice
TM (SBV) P. 242
On
*1/Off
Song by Voice Phonetic
Modification
Modifies a voice command for music stored in
the HDD or an iPod®.
2Phonetic Modification P. 244
—
Phonebook Phonetic
Modification
Modifies a voice command for the phonebook.
2Phonebook Phonetic Modification P. 308
—
Opening
Sound Volume
Changes the volume of the system’s startup sound.
—
Clock
Clock/
Wallpaper
Type
Clock
Changes the clock display type.
Analog/Digital
*1/
Small Digital/Off
Wallpaper
●Changes the wallpaper type.●Imports an image file for a new wallpaper.●Deletes an image file for a wallpaper.2Wallpaper Setup P. 205
Blank/Galaxy
*1/
Metallic
Clock Adjustment
Adjust Clock.
2Setting the Clock P. 114
—
Clock Format
Selects the digital clock display from 12H to 24H.
12H
*1/24H
Auto Time Zone
*
Sets the navigation system to automatically adjust
the clock when driving through different time zones.
On
*1/Off
* Not available on all models
Page 274 of 518
273
uuCustomized Featuresu
Continued
Features
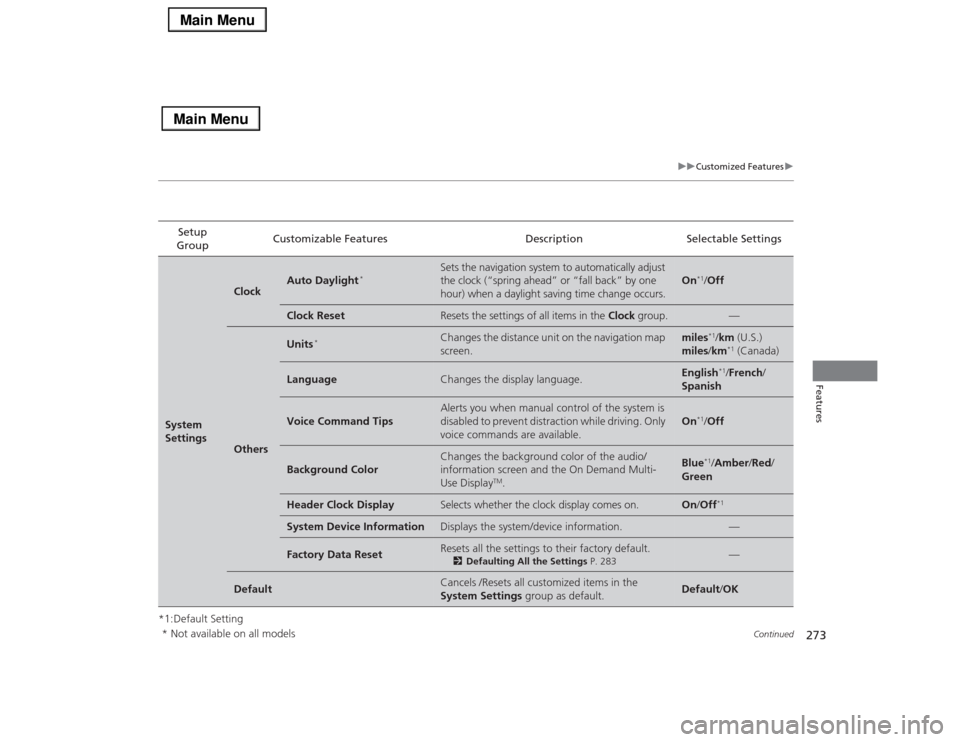
*1:Default SettingSetup
GroupCustomizable Features Description Selectable SettingsSystem
Settings
Clock
Auto Daylight
*
Sets the navigation system to automatically adjust
the clock (“spring ahead” or “fall back” by one
hour) when a daylight saving time change occurs.
On
*1/Off
Clock Reset
Resets the settings of all items in the Clock group.
—
Others
Units
*
Changes the distance unit on the navigation map
screen.
miles
*1/km (U.S.)
miles/km*1 (Canada)
Language
Changes the display language.
English
*1/French/
Spanish
Voice Command Tips
Alerts you when manual control of the system is
disabled to prevent distraction while driving. Only
voice commands are available.
On
*1/Off
Background Color
Changes the background color of the audio/
information screen and the On Demand Multi-
Use Display
TM.
Blue
*1/Amber/Red/
Green
Header Clock Display
Selects whether the clock display comes on.
On/Off
*1
System Device Information
Displays the system/device information.
—
Factory Data Reset
Resets all the settings to their factory default.
2Defaulting All the Settings P. 283
—
Default
Cancels /Resets all customized items in the
System Settings group as default.
Default/OK
* Not available on all models
Page 283 of 518
282
uuCustomized Featuresu
Features
*1:Default SettingSetup
GroupCustomizable Features Description Selectable Settings
Info
SettingsAcura
Link
*
AcuraLink Msg NoticeSelects whether newly received AcuraLink
messages to be displayed.On
*1/Off
Delete AcuraLink MessageDeletes AcuraLink messages. —
AcuraLink Subscription Status
Displays your current AcuraLink subscription status. —
ClockClock/
Wallpaper
TypeClock
See System Settings on P. 271 to P. 273. Wallpaper
Clock Adjustment
Clock Format
Auto Time Zone
*
Auto Daylight
*
Clock Reset
Other Info Screen PreferenceSelects the top menu when the INFO button is
pressed.
●Info Top- A brief menu pops up.●Info Menu- A full menu pops up.●Off- A menu does not pop up.Info Top/Info
Menu
*1/Off
DefaultCancels/Resets all customized items in the Info
Settings group as default.Default/OK
* Not available on all models
Page 426 of 518
425
uuMaintenance Under the HooduEngine Coolant
Maintenance
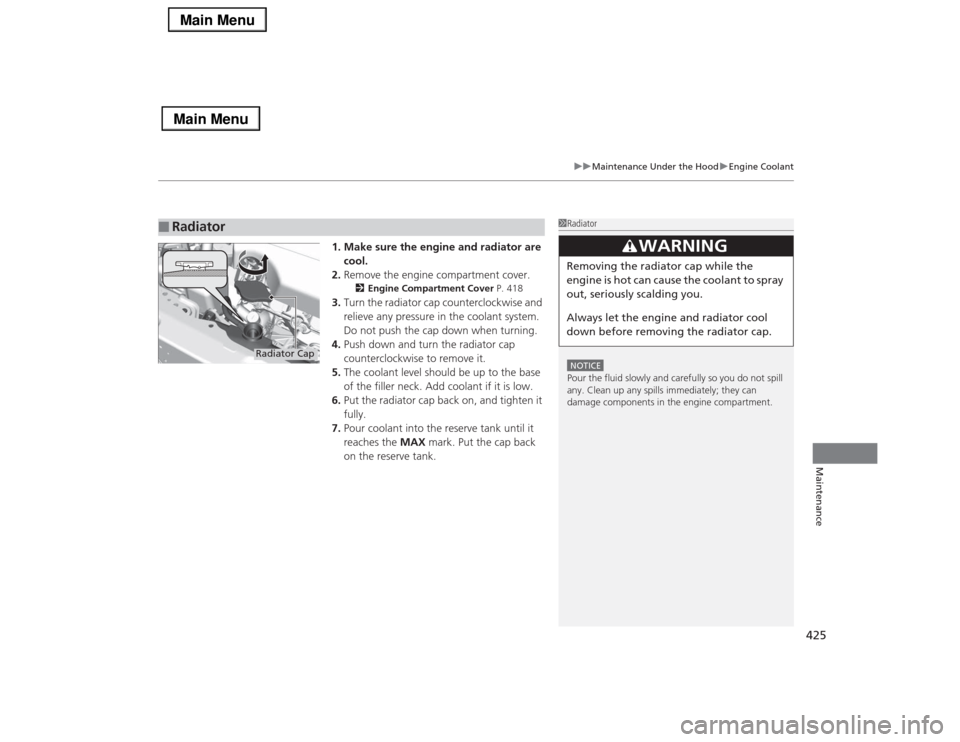
1. Make sure the engine and radiator are
cool.
2.Remove the engine compartment cover.
2Engine Compartment Cover P. 418
3.Turn the radiator cap counterclockwise and
relieve any pressure in the coolant system.
Do not push the cap down when turning.
4.Push down and turn the radiator cap
counterclockwise to remove it.
5.The coolant level should be up to the base
of the filler neck. Add coolant if it is low.
6.Put the radiator cap back on, and tighten it
fully.
7.Pour coolant into the reserve tank until it
reaches the MAX mark. Put the cap back
on the reserve tank.
■
Radiator
1RadiatorNOTICEPour the fluid slowly and carefully so you do not spill
any. Clean up any spills immediately; they can
damage components in the engine compartment.
3
WARNING
Removing the radiator cap while the
engine is hot can cause the coolant to spray
out, seriously scalding you.
Always let the engine and radiator cool
down before removing the radiator cap.
Radiator Cap
Page 447 of 518
446Maintenance
BatteryChecking the Battery
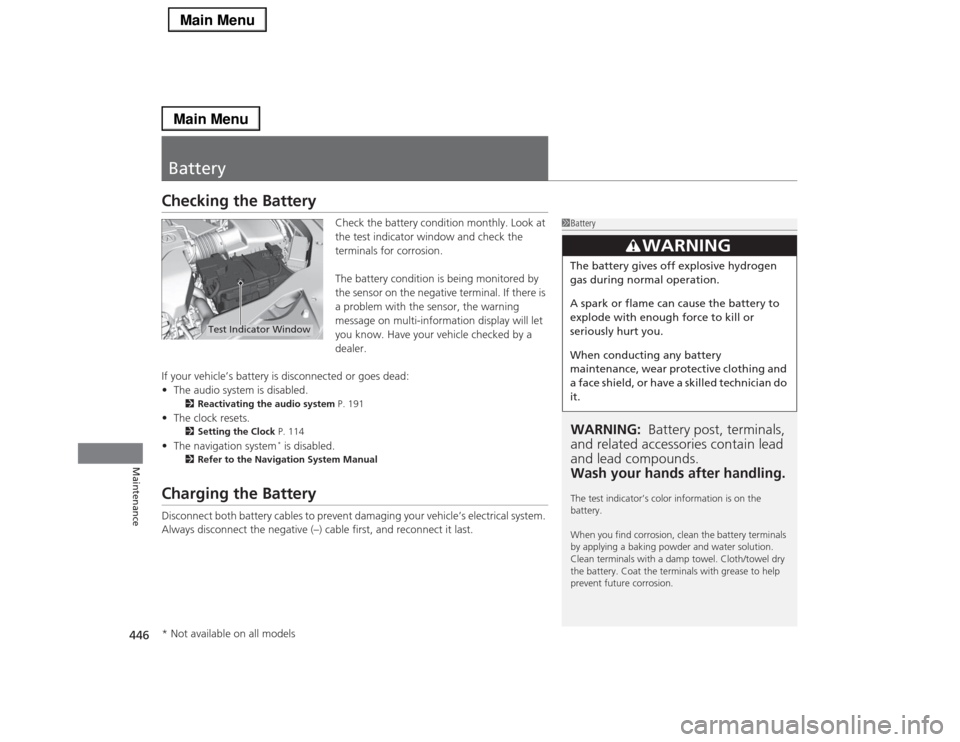
Check the battery condition monthly. Look at
the test indicator window and check the
terminals for corrosion.
The battery condition is being monitored by
the sensor on the negative terminal. If there is
a problem with the sensor, the warning
message on multi-information display will let
you know. Have your vehicle checked by a
dealer.
If your vehicle’s battery is disconnected or goes dead:
•The audio system is disabled.
2Reactivating the audio system P. 191
•The clock resets.
2Setting the Clock P. 114
•The navigation system
* is disabled.
2Refer to the Navigation System Manual
Charging the BatteryDisconnect both battery cables to prevent damaging your vehicle’s electrical system.
Always disconnect the negative (–) cable first, and reconnect it last.
1BatteryWARNING: Battery post, terminals,
and related accessories contain lead
and lead compounds.
Wash your hands after handling.The test indicator’s color information is on the
battery.
When you find corrosion, clean the battery terminals
by applying a baking powder and water solution.
Clean terminals with a damp towel. Cloth/towel dry
the battery. Coat the terminals with grease to help
prevent future corrosion.
3
WARNING
The battery gives off explosive hydrogen
gas during normal operation.
A spark or flame can cause the battery to
explode with enough force to kill or
seriously hurt you.
When conducting any battery
maintenance, wear protective clothing and
a face shield, or have a skilled technician do
it.
Test Indicator Window
* Not available on all models
Page 470 of 518
Continued
469
uuIf a Tire Goes FlatuChanging a Flat Tire
Handling the Unexpected
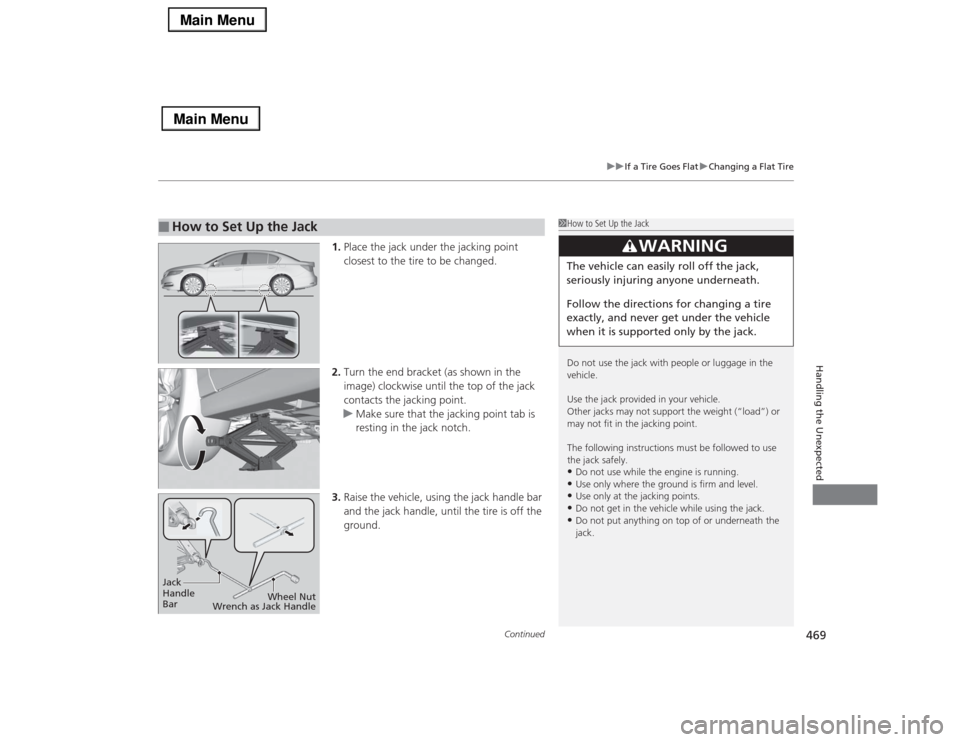
1.Place the jack under the jacking point
closest to the tire to be changed.
2.Turn the end bracket (as shown in the
image) clockwise until the top of the jack
contacts the jacking point.
uMake sure that the jacking point tab is
resting in the jack notch.
3.Raise the vehicle, using the jack handle bar
and the jack handle, until the tire is off the
ground.
■
How to Set Up the Jack
1How to Set Up the Jack
Do not use the jack with people or luggage in the
vehicle.
Use the jack provided in your vehicle.
Other jacks may not support the weight (“load”) or
may not fit in the jacking point.
The following instructions must be followed to use
the jack safely.•Do not use while the engine is running.•Use only where the ground is firm and level.•Use only at the jacking points.•Do not get in the vehicle while using the jack.•Do not put anything on top of or underneath the
jack.
3
WARNING
The vehicle can easily roll off the jack,
seriously injuring anyone underneath.
Follow the directions for changing a tire
exactly, and never get under the vehicle
when it is supported only by the jack.
Jack
Handle
BarWheel Nut
Wrench as Jack Handle