2014 Acura MDX remote control
[x] Cancel search: remote controlPage 144 of 500

143
uuOperating the Switches Around the Steering WheeluENGINE START/STOP Button
Controls
Warning buzzers may sound from inside or/
and outside the vehicle to remind you that the
keyless access remote is out of the vehicle. If
the buzzer continues even after the remote is
put back inside, place it within its operational
range.■When the power mode is in ON
If the keyless access remote is taken out of the
vehicle, and the driver’s door is closed,
warning buzzers sound from both inside and
outside the vehicle. A warning message on
the MID notifies the driver inside that the
remote is out.■When the power mode is in
ACCESSORY
If the keyless access remote is taken out of the
vehicle, and the driver’s door is closed, a
warning buzzer sounds from outside the
vehicle.
■Keyless Access Remote Reminder
1Keyless Access Remote Reminder
When the keyless access remote is within the
system’s operational range, and the driver’s door is
closed, the warning function cancels.
If the keyless access remote is taken out of the vehicle
after the engine has been started, you can no longer
change the ENGINE START/STOP button mode or
restart the engine. Always make sure if the remote is
in your vehicle when you operate the ENGINE
START/STOP button.
Removing the keyless access remote from the vehicle
through a window does not activate the warning
buzzer.
Do not put the keyless access remote on the
dashboard or in the glove box. It may cause the
warning buzzer to go off. Under some other
conditions that can prevent the vehicle from locating
the remote, the warning buzzer may also go off even
if the remote is within the system’s operational
range.
Page 148 of 500

147
uuOperating the Switches Around the Steering WheeluLight Switches
Controls
The headlights automatically come on when the wipers are used several times within
a certain intervals with the headlight switch in AUTO.
The headlights automatically go off a few minutes later if the wipers are stopped.
The headlights, all other exterior lights, and the instrument panel lights turn off 15
seconds after you set the power mode to VEHICLE OFF (LOCK), take the remote with
you, and close the driver’s door.
If you set the power mode to VEHICLE OFF (LOCK) with the headlight switch on, but
do not open the door, the lights turn off after 10 minutes (three minutes, if the
switch is in the AUTO position).
The lights turn on again when you unlock or open the driver’s door. If you unlock
the door, but do not open it within 15 seconds, the lights go off. If you open the
driver’s door, you will hear a lights on reminder chime.■Headlight Integration with Wiper■Automatic Lighting Off Feature
1Automatic Lighting Control
Adjust the auto light sensitivity as follows:
Setting
The exterior lights come on
when the ambient light is at
MaxHighMidLowMin
Bright
Dark
1Headlight Integration with Wiper
This feature activates during the headlights are off in
AUTO.
The instrument panel brightness does not change
when the headlights come on.
When the ambient light is at dark, the automatic
lighting control feature overrides, and the headlights
come on with or without the wipers sweeping more
than several times.1Automatic Lighting Off Feature
You can change the headlight auto off timer setting.
2Customized Features P. 104, 248
Page 156 of 500

155
uuOperating the Switches Around the Steering WheeluDriving Position Memory System
Continued
Controls
Driving Position Memory SystemYou can store two driver’s seat (except for power lumbar), steering wheel and door
mirror positions with the driving position memory system.
When you unlock and open the driver’s door with a remote transmitter, or keyless
access system, the seat and door mirrors adjust automatically to one of the two
preset positions.
The steering wheel will move to the stored position when you set the power mode
to ACCESSORY.
The MID shows you which remote transmitter you used to unlock the vehicle when
you enter.
•DRIVER 1 transmitter is linked to memory button 1.
•DRIVER 2 transmitter is linked to memory button 2.
1Driving Position Memory System
Using the audio/information screen or MID, you can
disable the automatic seat, steering wheel and door
mirrors adjustment function.
2Customized Features P. 104, 248
DRIVER 1 DRIVER 2
Page 186 of 500

185
Continued
Controls
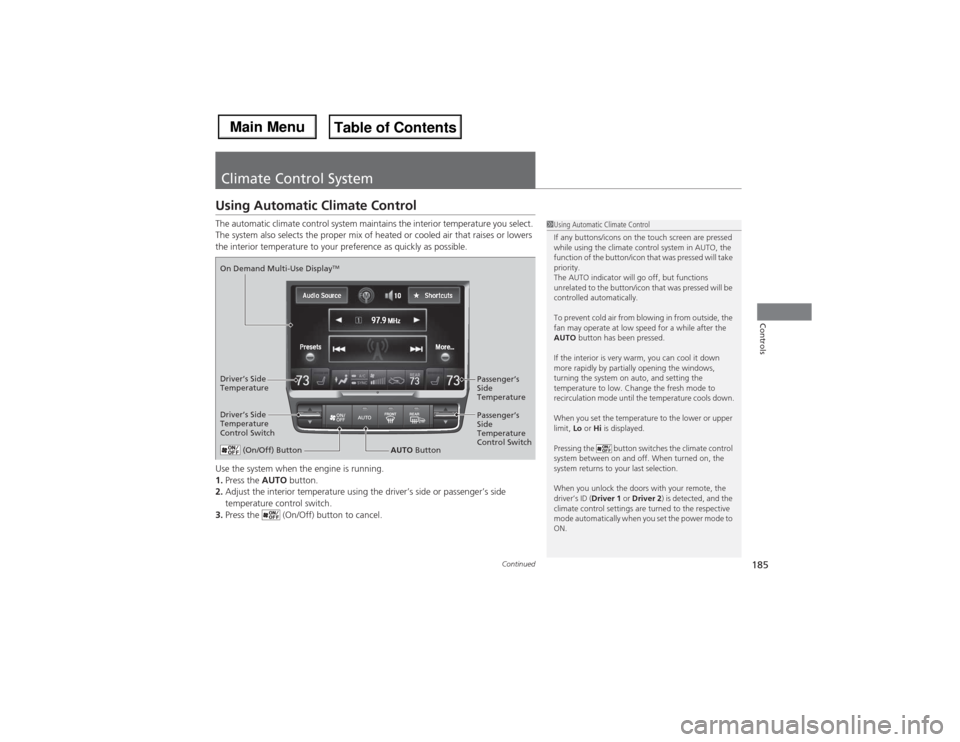
Climate Control SystemUsing Automatic Climate ControlThe automatic climate control system maintains the interior temperature you select.
The system also selects the proper mix of heated or cooled air that raises or lowers
the interior temperature to your preference as quickly as possible.
Use the system when the engine is running.
1.Press the AUTO button.
2.Adjust the interior temperature using the driver’s side or passenger’s side
temperature control switch.
3.Press the (On/Off) button to cancel.
1Using Automatic Climate Control
If any buttons/icons on the touch screen are pressed
while using the climate control system in AUTO, the
function of the button/icon that was pressed will take
priority.
The AUTO indicator will go off, but functions
unrelated to the button/icon that was pressed will be
controlled automatically.
To prevent cold air from blowing in from outside, the
fan may operate at low speed for a while after the
AUTO button has been pressed.
If the interior is very warm, you can cool it down
more rapidly by partially opening the windows,
turning the system on auto, and setting the
temperature to low. Change the fresh mode to
recirculation mode until the temperature cools down.
When you set the temperature to the lower or upper
limit, Lo or Hi is displayed.
Pressing the button switches the climate control
system between on and off. When turned on, the
system returns to your last selection.
When you unlock the doors with your remote, the
driver’s ID (Driver 1 or Driver 2) is detected, and the
climate control settings are turned to the respective
mode automatically when you set the power mode to
ON.
(On/Off) Button
AUTO Button On Demand Multi-Use Display
TM
Driver’s Side
Temperature
Control SwitchPassenger’s
Side
Temperature
Control Switch Passenger’s
Side
Temperature Driver’s Side
Temperature
Page 198 of 500

197
Features
This chapter describes how to operate technology features.
Audio System
About Your Audio System ................ 198
USB Port .......................................... 199
Auxiliary Input Jack .......................... 200
Audio System Theft Protection ......... 201
Audio Remote Controls .................... 202
Audio System Basic Operation........ 203
On Demand Multi-Use Display
TM....... 204
Audio/Information Screen ................ 211
Adjusting the Sound ........................ 215
Display Setup ................................... 216
Playing AM/FM Radio ....................... 217
Playing XM® Radio ........................... 221Playing a CD .................................... 224
Playing an iPod®............................... 227
Playing Internet Radio ...................... 231
Playing a USB Flash Drive ................. 234
Playing Bluetooth® Audio................. 237
Audio Error Messages
CD Player ......................................... 239
iPod®/USB Flash Drive....................... 240
Pandora®......................................... 241
Aha
TM Radio ..................................... 243
General Information on the Audio
System
XM® Radio Service ........................... 244Recommended CDs ......................... 245
Compatible iPod®, iPhone®, and USB Flash
Drives ................................................. 247
Customized Features........................ 248
Defaulting All the Settings ............... 265
HomeLink® Universal Transceiver... 266
Bluetooth® HandsFreeLink®
Using HFL ........................................ 268
HFL Menus ...................................... 270
Compass
*.......................................... 301
* Not available on all models
Page 199 of 500

198Features
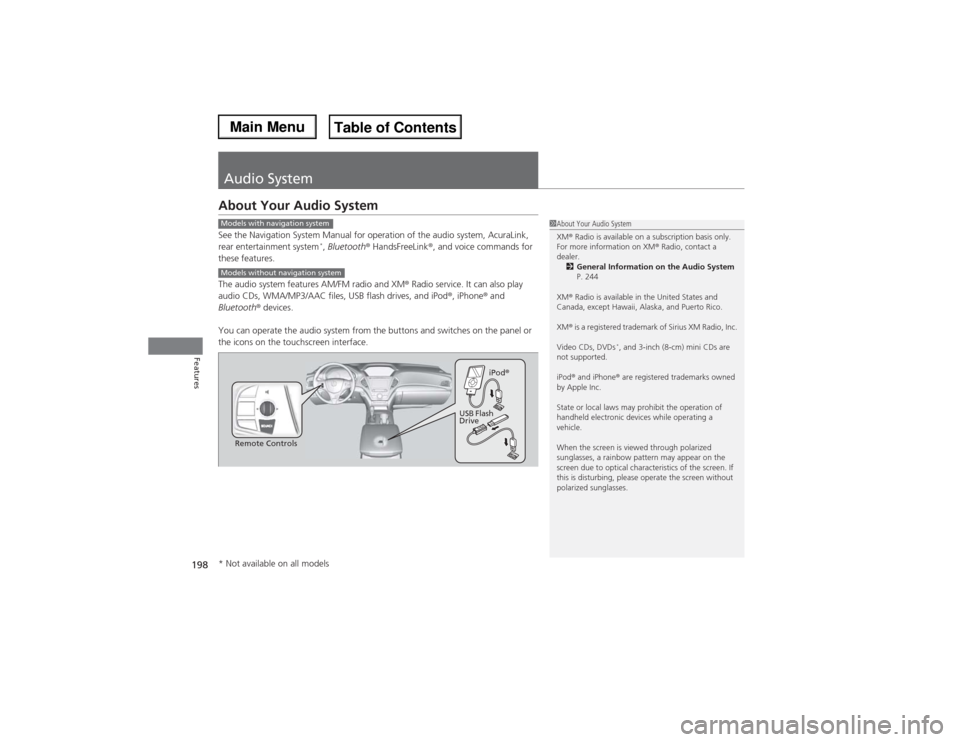
Audio SystemAbout Your Audio SystemSee the Navigation System Manual for operation of the audio system, AcuraLink,
rear entertainment system
*, Bluetooth® HandsFreeLink®, and voice commands for
these features.
The audio system features AM/FM radio and XM® Radio service. It can also play
audio CDs, WMA/MP3/AAC files, USB flash drives, and iPod®, iPhone® and
Bluetooth® devices.
You can operate the audio system from the buttons and switches on the panel or
the icons on the touchscreen interface.
1About Your Audio System
XM® Radio is available on a subscription basis only.
For more information on XM® Radio, contact a
dealer.
2General Information on the Audio System
P. 244
XM® Radio is available in the United States and
Canada, except Hawaii, Alaska, and Puerto Rico.
XM® is a registered trademark of Sirius XM Radio, Inc.
Video CDs, DVDs
*, and 3-inch (8-cm) mini CDs are
not supported.
iPod® and iPhone® are registered trademarks owned
by Apple Inc.
State or local laws may prohibit the operation of
handheld electronic devices while operating a
vehicle.
When the screen is viewed through polarized
sunglasses, a rainbow pattern may appear on the
screen due to optical characteristics of the screen. If
this is disturbing, please operate the screen without
polarized sunglasses.
Models with navigation systemModels without navigation system
Remote ControlsiPod®
USB Flash
Drive
* Not available on all models
Page 203 of 500

202
uuAudio SystemuAudio Remote Controls
Features
Audio Remote ControlsAllows you to operate the audio system while driving.
SOURCE Button
Cycles through the audio modes as follows:
FM AM XM CD USB iPod®
Bluetooth® Audio Pandora® Aha
TM
AUX
Left Selector Wheel
Roll Up: To increase the volume.
Roll Down: To decrease the volume.
Push: To mute. Push again to unmute.
•When listening to the radio
Shift to the right: To select the next preset radio station.
Shift to the left: To select the previous preset radio station.
Shift to the right and hold: To select the next strong station.
Shift to the left and hold: To select the previous strong station.
•When listening to a CD, iPod®, USB flash drive, or Bluetooth® Audio
Shift to the right: To skip to the next song.
Shift to the left: To go back to the beginning of the current or previous song.
Shift to the right and hold: To go to the group up. (Bluetooth® Audio only)
Shift to the left and hold: To go to the group down. (Bluetooth® Audio only)
•When listening to a CD or USB flash drive
Shift to the right and hold: To skip to the next folder.
Shift to the left and hold: To go back to the previous folder.
•When listening to Pandora® and Aha
TM
Shift to the right: To skip to the next song.
Shift to the right and hold: To select the next station.
Shift to the left and hold: To select the previous station.
1Audio Remote Controls
The CD mode appears only when a CD is loaded.
Pandora®, Bluetooth® Audio, or Aha
TM mode appears
when a connection (Bluetooth® or USB) is established
with a device.
To select audio mode, press the SOURCE button,
then shift the left selector wheel to the right or left.
Left Selector WheelSOURCE Button
Page 219 of 500

uuAudio System Basic OperationuPlaying AM/FM Radio
218Features
To store a station:
1.Tune to the selected station.
2.Press the MENU button.
3.Rotate to select Save Preset, then press .
4.Rotate to select the preset number you want to store that station, then press
.
You can also store that station by the following procedure.
1.Tune to the selected station.
2.Rotate to select the preset number you want to store the station.
3.Press and hold for a few seconds.
1.Tune to the selected station.
2.Select More.
3.Select Save Preset.
4.Select the preset number you want to store that station.
You can also store that station by the following procedure.
1.Tune to the selected station.
2.Change the display to the preset screen.
3.Select and hold the preset number you want to store that station.■Preset Memory
1Playing AM/FM Radio
The ST indicator appears on the display indicating
stereo FM broadcasts.
Stereo reproduction in AM is not available.
Switching the Audio Mode
Press the SOURCE button on the steering wheel.
2Audio Remote Controls P. 202
You can also switch the mode by pressing the MENU
button and selecting Change Source on the Audio
menu screen.
You can store 6 AM stations and 12 FM stations into
the preset memory.
Interface DialOn Demand Multi-Use Display
TM