Page 258 of 500

257
uuCustomized Featuresu
Continued
Features
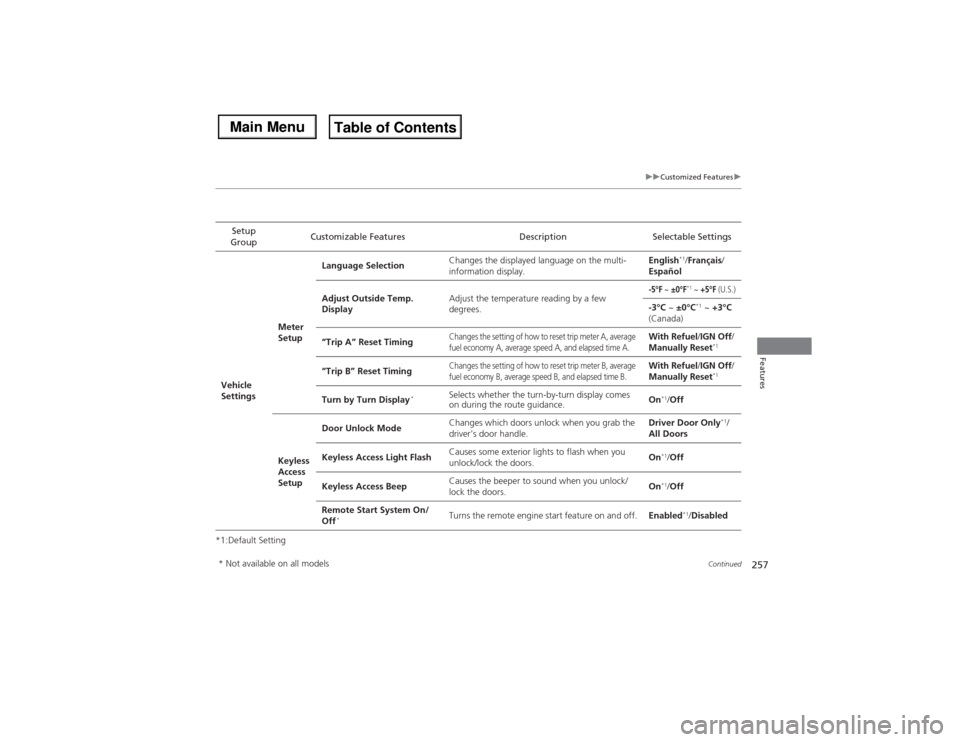
*1:Default SettingSetup
GroupCustomizable Features Description Selectable SettingsVehicle
SettingsMeter
SetupLanguage SelectionChanges the displayed language on the multi-
information display.English
*1/Français/
Español
Adjust Outside Temp.
DisplayAdjust the temperature reading by a few
degrees.
-5°F
~ ±0°F
*1 ~ +5°F
(U.S.)
-3°C ~ ±0°C
*1 ~ +3°C
(Canada)
“Trip A” Reset Timing
Changes the setting of how to reset trip meter A, average
fuel economy A, average speed A, and elapsed time A.
With Refuel/IGN Off/
Manually Reset
*1
“Trip B” Reset Timing
Changes the setting of how to reset trip meter B, average
fuel economy B, average speed B, and elapsed time B.
With Refuel/IGN Off/
Manually Reset
*1
Turn by Turn Display
*
Selects whether the turn-by-turn display comes
on during the route guidance.On
*1/Off
Keyless
Access
SetupDoor Unlock ModeChanges which doors unlock when you grab the
driver’s door handle.Driver Door Only
*1/
All Doors
Keyless Access Light FlashCauses some exterior lights to flash when you
unlock/lock the doors.On
*1/Off
Keyless Access BeepCauses the beeper to sound when you unlock/
lock the doors.On*1/Off
Remote Start System On/
Off
*
Turns the remote engine start feature on and off.Enabled
*1/Disabled
* Not available on all models
Page 261 of 500

260
uuCustomized Featuresu
Features
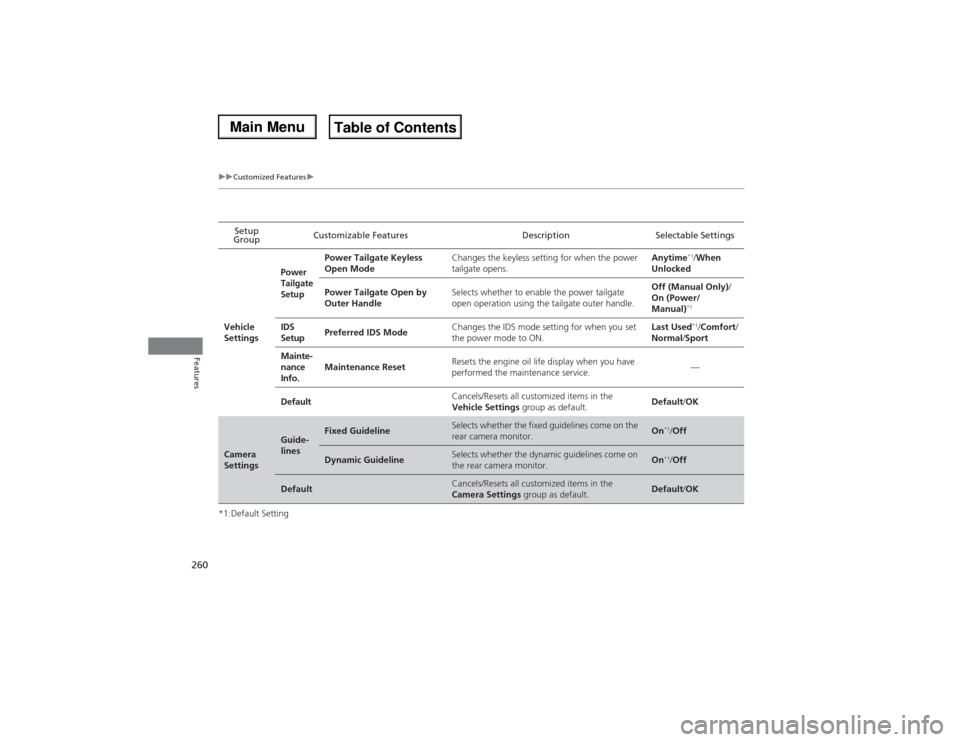
*1:Default SettingSetup
GroupCustomizable Features Description Selectable Settings
Vehicle
Settings
Power
Tailgate
Setup
Power Tailgate Keyless
Open ModeChanges the keyless setting for when the power
tailgate opens.Anytime
*1/When
Unlocked
Power Tailgate Open by
Outer HandleSelects whether to enable the power tailgate
open operation using the tailgate outer handle. Off (Manual Only)/
On (Power/
Manual)*1
IDS
SetupPreferred IDS ModeChanges the IDS mode setting for when you set
the power mode to ON.Last Used
*1/Comfort/
Normal/Sport
Mainte-
nance
Info.Maintenance ResetResets the engine oil life display when you have
performed the maintenance service.—
DefaultCancels/Resets all customized items in the
Vehicle Settings group as default.Default/OK
Camera
Settings
Guide-
lines
Fixed Guideline
Selects whether the fixed guidelines come on the
rear camera monitor.
On
*1/Off
Dynamic Guideline
Selects whether the dynamic guidelines come on
the rear camera monitor.
On
*1/Off
Default
Cancels/Resets all customized items in the
Camera Settings group as default.
Default/OK
Page 397 of 500
396
uuMaintenance Under the HooduOpening the Hood
Maintenance
Opening the Hood
1.Park the vehicle on a level surface, and set
the parking brake.
2.Pull the hood release handle under the
lower left corner of the dashboard.
uThe hood will pop up slightly.
3.Push up the hood latch lever in the center
of the hood to release the lock mechanism,
and open the hood.
4.Lift the hood up most of the way.
uThe hydraulic supports will lift it up the
rest of the way and hold it up.
When closing, lower it to approximately 12
inches (30 cm), then press down firmly with
your hands.
1Opening the HoodNOTICEDo not open the hood when the wiper arms are
raised.
The hood will strike the wipers, and may damage
either the hood or the wipers.
When closing the hood, check that the hood is
securely latched.
If the hood latch lever moves stiffly, or if you can
open the hood without lifting the lever, the latch
mechanism should be cleaned and lubricated.
Hood Release Handle
Pull
Lever
Page 438 of 500

437
Handling the Unexpected
This chapter explains how to handle unexpected troubles.
Tools
Types of Tools .................................. 438
If a Tire Goes Flat
Changing a Flat Tire
*....................... 439
Temporarily Repairing a Flat Tire
*..... 446
Engine Does Not Start
Checking the Engine ........................ 457
If the Keyless Access Remote Battery is
Weak ............................................. 458
Emergency Engine Stop ................... 459
Jump Starting.................................... 460
Shift Lever Does Not Move.............. 462Overheating
How to Handle Overheating............. 463
Indicator, Coming On/Blinking
If the Low Oil Pressure Indicator Comes
On ............................................. 465If the Charging System Indicator Comes
On ................................................. 465
If the Malfunction Indicator Lamp Comes
On or Blinks ................................... 466If the Brake System Indicator (Red) Comes
On .................................................... 467
If the Speed-Sensitive Electric Power Steering
(EPS) System Indicator Comes On ........... 467If the Low Tire Pressure/TPMS Indicator
Comes On or Blinks ....................... 468
Fuses
Fuse Locations ................................. 469
Inspecting and Changing Fuses ........ 474
Emergency Towing........................... 475
When You Cannot Unlock the Fuel Fill
Door................................................. 476When You Cannot Open the Tailgate
.. 477
* Not available on all models
Page 444 of 500

Continued
443
uuIf a Tire Goes FlatuChanging a Flat Tire
*
Handling the Unexpected
1.Place the jack under the jacking point
closest to the tire to be changed.
2.Turn the end bracket clockwise as shown in
the image until the top of the jack contacts
the jacking point.
uMake sure that the jacking point tab is
resting in the jack notch.
3.Raise the vehicle, using the jack handle bar
and the jack handle, until the tire is off the
ground.
■How to Set Up the Jack
1How to Set Up the Jack
Do not use the jack with people or luggage in the
vehicle.
Use the jack provided in your vehicle.
Other jacks may not support the weight (“load”) or
may not fit in the jacking point.
The following instructions must be followed to use
the jack safely.•Do not use while the engine is running.•Use only where the ground is firm and level.•Use only at the jacking points.•Do not get in the vehicle while using the jack.•Do not put anything on top of or underneath the
jack.
3
WARNING
The vehicle can easily roll off the jack,
seriously injuring anyone underneath.
Follow the directions for changing a tire
exactly, and never get under the vehicle
when it is supported only by the jack.
Jack Handle BarWheel Nut Wrench as Jack Handle
Page 446 of 500

445
uuIf a Tire Goes FlatuChanging a Flat Tire
*
Handling the Unexpected
1.Remove the center cap and place the flat
tire face up under the hoist.
2.Insert the hoist bracket into the center hole
of the flat tire.
3.Turn the wheel nut wrench with the jack
handle bar clockwise until the flat tire rests
against the underbody of the vehicle and
you hear the hoist click.
4.Securely put the jack and wheel nut wrench
back in the tool case. Store the case in the
cargo area.
If you replace a flat tire with the spare tire, the low tire pressure/TPMS indicator
comes on while you are driving. After driving for a few miles (kilometers), the
indicator will start blinking for a short time and then stay on. Tire Pressure
Monitor Problem appears on the multi-information display (MID), but this is
normal.
If you replace the tire with a specified regular tire, the warning message on the MID
and the low tire pressure/TPMS indicator will go off after a few miles (kilometers).
■Storing the Flat Tire
1Storing the Flat Tire
3
WARNING
Loose items can fly around the interior in a
crash and can seriously injure the
occupants.
Store the jack and tools securely before
driving.
Wheel Nut WrenchJack Handle Bar■TPMS and the Spare Tire
1TPMS and the Spare Tire
The system cannot monitor the pressure of the spare
tire. Manually check the spare tire pressure to be sure
that it is correct.
Use the TPMS specific wheels. Each is equipped with
a tire pressure sensor mounted inside the tire behind
the valve stem.
Page 477 of 500
476Handling the Unexpected
When You Cannot Unlock the Fuel Fill DoorIf you cannot unlock the fuel fill door, use the following procedure.
1.Open the tailgate.
2.Lift the cargo floor lid by the handle in the
center.
3.Remove the cargo floor box and set it aside.
4.Wrap a cloth around the flat-tip
screwdriver. Put it into the cover slot as
shown in the image, and remove the cover.
5.Pull the release lever toward you.
uThe release lever unlocks the fuel fill door
when it is pulled.■What to Do When Unable to Unlock the Fuel Fill Door
1What to Do When Unable to Unlock the Fuel Fill Door
After taking these steps, contact a dealer to have the
vehicle checked.
Cover
Release Lever
Page:
< prev 1-8 9-16 17-24