Page 61 of 234
60
System Setup
Data Reset
Reset Factory Default Settings
HINFO button Set up Other Reset Factory Default
Reset all the settings on the Setup screens and multi-view rear camera brightness
settings to their factory default.
Rotate i to select Yes. Press u to
reset the settings.1 Reset Factory Default Settings
When you transfer the vehicle to a third party,
reset all settings to de fault and delete all
personal data.
The following settings are reset:
•Brightness, Contrast, Black Level, Volume,
Interface Dial Feedback , Brightness (multi-view
rear camera)
•Basic Settings: Units, Voice Recognition Tutor,
Display Voice Command Tips, Verbal Reminder
•Routing & Guidance: Rerouting, Unverified
Area Routing, Edit Waypoint Search Area,
Guidance Mode
•Clock Adjustment: Auto Daylight, Auto Time
Zone, Time
•Vehicle: Off-road Tracking
•Colour: Map Colour, Menu Colour
•Route Preference
Page 62 of 234
61
Data ResetClear Personal Data
System Setup
Clear Personal Data
HINFO button Set up Other Clear Personal Data
Delete uploaded data, calendar entries, ad dress book, or stored destinations, or reset
other settings to their factory defaults.
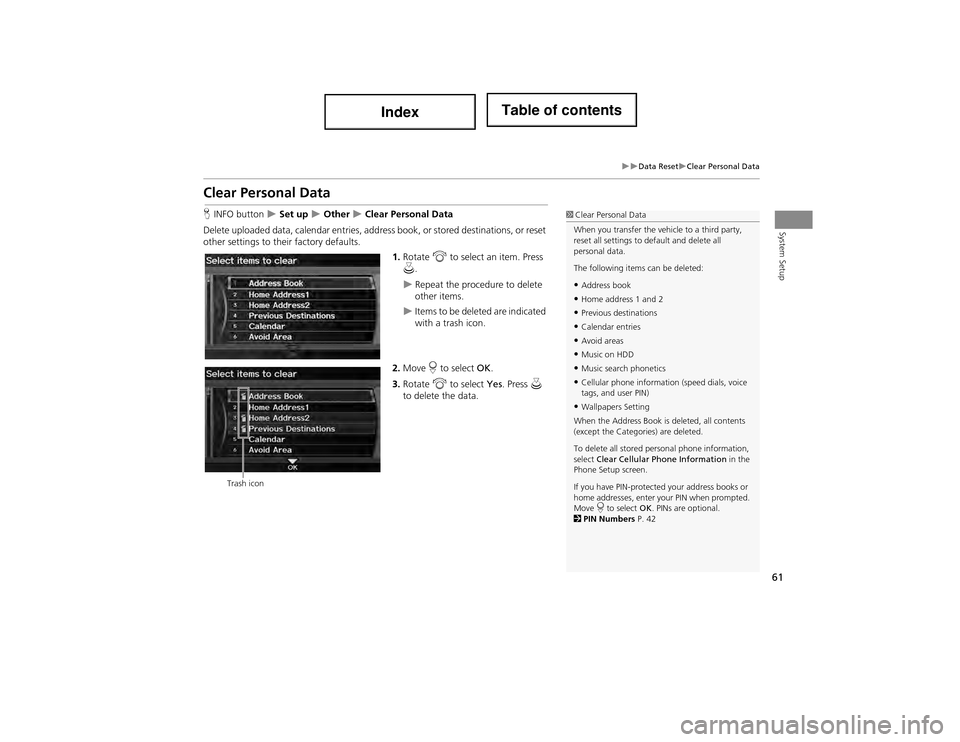
1.Rotate i to select an item. Press
u .
Repeat the procedure to delete
other items.
Items to be deleted are indicated
with a trash icon.
2. Move r to select OK.
3. Rotate i to select Yes. Press u
to delete the data.
1 Clear Personal Data
When you transfer the vehicle to a third party,
reset all settings to de fault and delete all
personal data.
The following items can be deleted:
•Address book
•Home address 1 and 2
•Previous destinations
•Calendar entries
•Avoid areas
•Music on HDD
•Music search phonetics
•Cellular phone information (speed dials, voice
tags, and user PIN)
•Wallpapers Setting
When the Address Book is deleted, all contents
(except the Categor ies) are deleted.
To delete all stored personal phone information,
select Clear Cellular Phone Information in the
Phone Setup screen.
If you have PIN-protected your address books or
home addresses, enter your PIN when prompted.
Move r to select OK. PINs are optional.
2 PIN Numbers P. 42
Trash icon
Page 126 of 234
125
Audio SystemAudio System Theft Protection
Audio
Audio System Theft Protection
The system is disabled when it is disconnected from the power source, such as when
the battery is disconnected or goes dead.
■ Reactivating the System
1. Set the power mode to ON, and turn on the system.
If you set the power mode to ACCESSORY, you will be requested to enter the
security code. See step 3.
2. Press and hold the VOL 9 (Volume/Power) button again for more than two
seconds.
The system is reactivated when the sy stem’s control unit recognizes that the
system is in your vehicle.
If the control unit fails to recognize, “ENTER CODE” appears on the navigation
screen.
3. Enter the security code.
If you do not enter the code correctly a fter 10 tries, leave the system for one
hour before trying again, or visit a dealer to have the system reset.
1Audio System Theft Protection
Find the audio system’s security code and serial
number label in your Owner’s Manual kit.
Do not store the label in your vehicle. If you lose
the label, you must fi rst retrieve the serial
number, and then obtain the code from a dealer.
Page 127 of 234
126
Audio
Playing FM/AM Radio
Selecting FM/AM Mode
1.Press the FM/AM button.
Press the FM/AM button again, if necessar y, to select the frequency band (AM,
FM1, FM2).
2. Select a station using the Preset buttons and the bars (SKIP, TUNE, SCAN/A.SEL).
On the FM bands, you can also use the CATEGORY bar and TITLE button to
select a station provided by the Radio Data System (RDS).
The band and frequency are displayed on the display.
Audio Screen Control
H AUDIO button (in FM/AM mode)
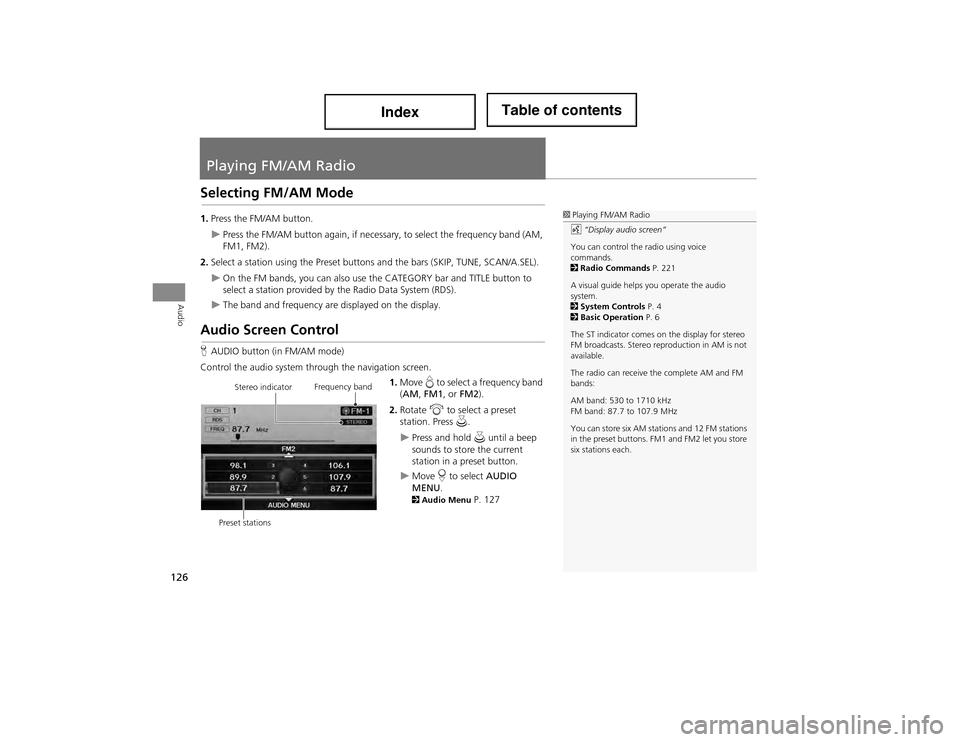
Control the audio system through the navigation screen. 1.Move e to select a frequency band
( AM , FM1 , or FM2 ).
2. Rotate i to select a preset
station. Press u.
Press and hold u until a beep
sounds to store the current
station in a preset button.
Move r to select AUDIO
MENU .
2Audio Menu P. 127
1Playing FM/AM Radio
d “Display audio screen”
You can control the radio using voice
commands.
2 Radio Commands P. 221
A visual guide helps you operate the audio
system.
2 System Controls P. 4
2 Basic Operation P. 6
The ST indicator comes on the display for stereo
FM broadcasts. Stereo reproduction in AM is not
available.
The radio can receive the complete AM and FM
bands:
AM band: 530 to 1710 kHz
FM band: 87.7 to 107.9 MHz
You can store six AM statio ns and 12 FM stations
in the preset buttons. FM1 and FM2 let you store
six stations each.
Stereo indicator Frequency band
Preset stations
Page 128 of 234

127
Playing FM/AM RadioAudio Menu
Audio
Audio Menu
HAUDIO button (in FM/AM mode) AUDIO MENU
Rotate i to select an item. Press u.
The following items are available:
• Sound Setup : Displays the sound preferences screen.
2Adjusting the Sound P. 158
• Read Radio Text : Displays the text information broadcast by the current RDS
station.
2 Radio Text Display P. 129
• RDS Search : Searches for programmes by RDS category.
2Searching for Programm es by RDS Category P. 128
• Scan : Scans for stations with a strong signal in the current band and plays a 10-
second sample. Select Scan again to stop scanning and play the current selection.
• A.Sel (Auto Select) : When set to ON, scans and automaticall y stores up to six
AM stations and 12 FM stations with a strong signal in the preset buttons.
• Tune : Tunes the radio to the frequency you select. Rotate i to select a
frequency.
1 Audio Menu
The A.SEL indicator comes on the display when
A.Sel is ON . If you do not like the stations Auto
Select has stored, you can change the
frequencies stored in the preset buttons
manually. Set A.Sel to OFF to restore the
previous preset button settings.
Page 131 of 234
130
Audio
Playing XM® Radio
Selecting XM Mode
1.Press the XM button.
Press the XM button again, if necessary, to select the channel band (XM1,
XM2).
2. Select a channel using the Preset buttons and the bars (SKIP, TUNE, CATEGORY,
SCAN/A.SEL).
The band and channel are displayed.
Audio Screen Control
HAUDIO button (in XM mode)
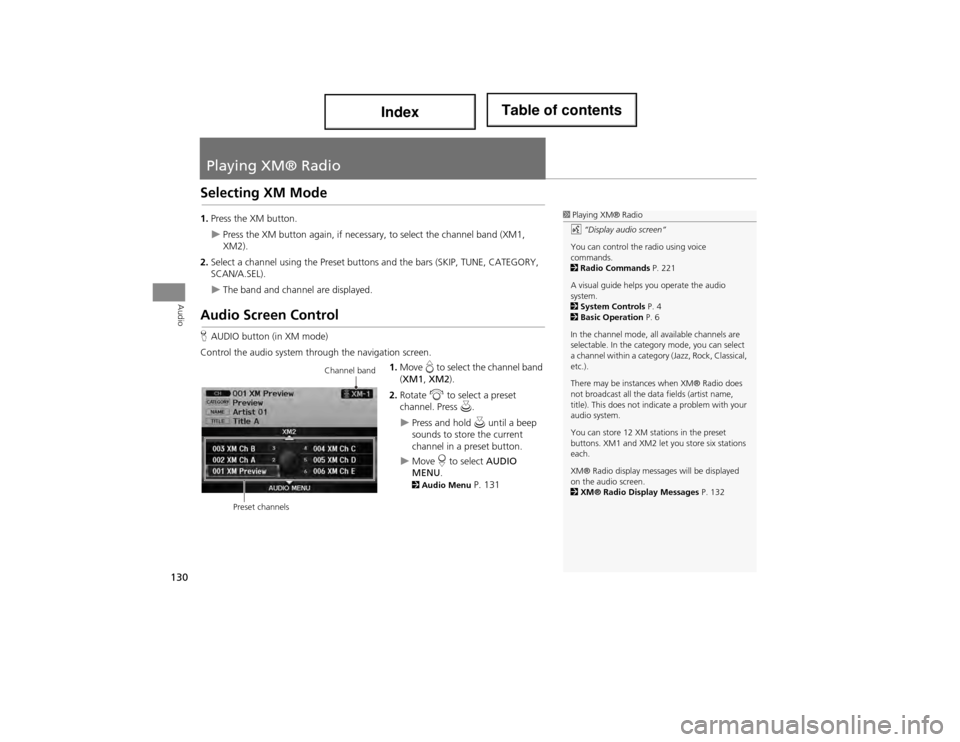
Control the audio system through the navigation screen. 1.Move e to select the channel band
( XM1 , XM2 ).
2. Rotate i to select a preset
channel. Press u.
Press and hold u until a beep
sounds to store the current
channel in a preset button.
Move r to select AUDIO
MENU .
2Audio Menu P. 131
1Playing XM® Radio
d “Display audio screen”
You can control the radio using voice
commands.
2 Radio Commands P. 221
A visual guide helps you operate the audio
system.
2 System Controls P. 4
2 Basic Operation P. 6
In the channel mode, all available channels are
selectable. In the catego ry mode, you can select
a channel within a category (Jazz, Rock, Classical,
etc.).
There may be instances when XM® Radio does
not broadcast all the data fields (artist name,
title). This does not indi cate a problem with your
audio system.
You can store 12 XM stations in the preset
buttons. XM1 and XM2 let you store six stations
each.
XM® Radio display messag es will be displayed
on the audio screen.
2 XM® Radio Display Messages P. 132
Channel band
Preset channels
Page 134 of 234
133
Audio
Playing a Disc
Selecting Disc Mode
1.Press the DISC button to play a CD or other disc.
2. Insert a disc into the disc slot.
The disc automatically begins playing.
3. Select a track using the bars (S KIP, TUNE, CATEGORY, SCAN/A.SEL).
The track number and elapsed time are displayed on the display. Title
information for audio CDs is displayed if found in the Gracenote® Album Info
(Gracenote® Media Database) stored on the built-in hard disc drive (HDD). Text
information stored on MP3/WMA/AAC discs is also displayed.
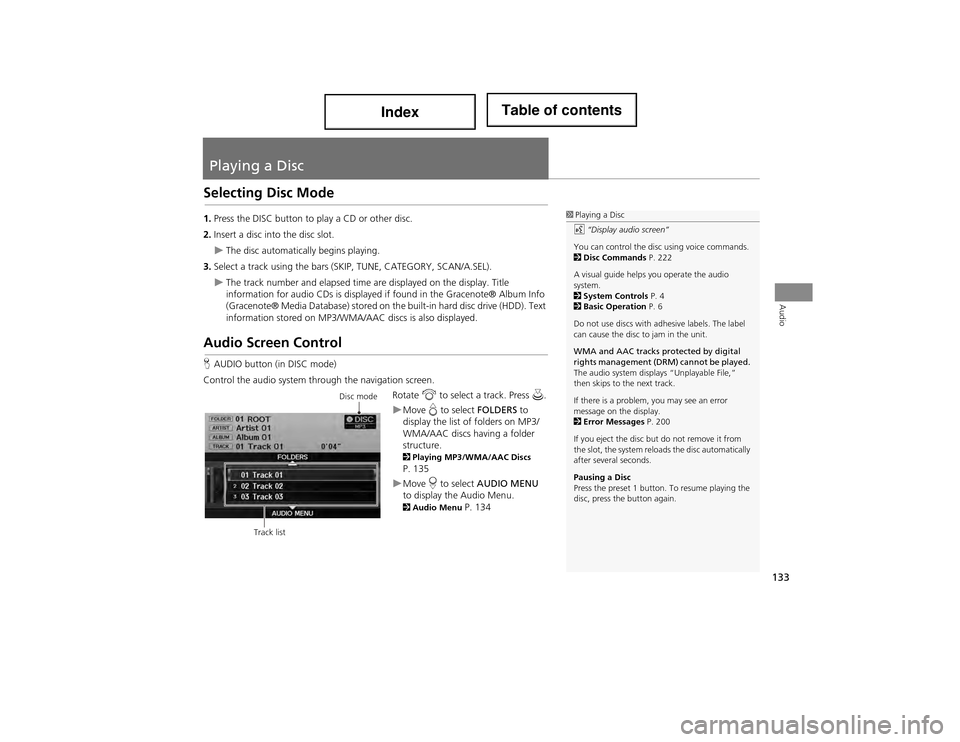
Audio Screen Control
H AUDIO button (in DISC mode)
Control the audio system through the navigation screen. Rotate i to select a track. Press u.
Move e to select FOLDERS to
display the list of folders on MP3/
WMA/AAC discs having a folder
structure.
2 Playing MP3/WMA/AAC Discs P. 135
Move r to select AUDIO MENU
to display the Audio Menu.
2 Audio Menu P. 134
1Playing a Disc
d “Display audio screen”
You can control the disc using voice commands.
2 Disc Commands P. 222
A visual guide helps you operate the audio
system.
2 System Controls P. 4
2 Basic Operation P. 6
Do not use discs with adhesive labels. The label
can cause the disc to jam in the unit.
WMA and AAC tracks protected by digital
rights management (DRM) cannot be played.
The audio system displays “Unplayable File,”
then skips to the next track.
If there is a problem, you may see an error
message on the display.
2 Error Messages P. 200
If you eject the disc but do not remove it from
the slot, the system reload s the disc automatically
after several seconds.
Pausing a Disc
Press the preset 1 button. To resume playing the
disc, press the button again.
Disc mode
Track list
Page 161 of 234
160
Audio Remote ControlsSteering Wheel Controls
Audio
FM/AM, XM
•Press the N (Channel) button to select th e next preset station (channel).
• Press the B (Channel) button to select the previous preset station (channel).
• FM/AM: Press and hold for one second to scan for a station with a strong signal.
• XM: Press and hold for one second to skip to the next or previous station
(channel) in the current category.
DISC, HDD, iPod®, USB, Bluetooth® Audio (on some phones)
• Press the N button to skip to the end of the current track.
• Press the B button to skip to the beginnin g of the current track. Press the B
button again to go to the beginning of the previous track.
• Press and hold to skip forward or backward to the first track of the next folder.
■CH (Channel) Button