Page 128 of 234

127
Playing FM/AM RadioAudio Menu
Audio
Audio Menu
HAUDIO button (in FM/AM mode) AUDIO MENU
Rotate i to select an item. Press u.
The following items are available:
• Sound Setup : Displays the sound preferences screen.
2Adjusting the Sound P. 158
• Read Radio Text : Displays the text information broadcast by the current RDS
station.
2 Radio Text Display P. 129
• RDS Search : Searches for programmes by RDS category.
2Searching for Programm es by RDS Category P. 128
• Scan : Scans for stations with a strong signal in the current band and plays a 10-
second sample. Select Scan again to stop scanning and play the current selection.
• A.Sel (Auto Select) : When set to ON, scans and automaticall y stores up to six
AM stations and 12 FM stations with a strong signal in the preset buttons.
• Tune : Tunes the radio to the frequency you select. Rotate i to select a
frequency.
1 Audio Menu
The A.SEL indicator comes on the display when
A.Sel is ON . If you do not like the stations Auto
Select has stored, you can change the
frequencies stored in the preset buttons
manually. Set A.Sel to OFF to restore the
previous preset button settings.
Page 132 of 234
131
Playing XM® RadioAudio Menu
Audio
Audio Menu
HAUDIO button (in XM mode) AUDIO MENU
Rotate i to select an item. Press u.
The following items are available:
• Sound Setup : Displays the sound preferences screen.
2Adjusting the Sound P. 158
• Mode : Sets CH (channel mode) or CAT (category mode) scan mode.
• Channel List : Displays the list of available chan nels. Scroll the list to select a
channel.
• Channel Scan : Scans for channels with a strong signal in the current band and
plays a 10-second sample. Select Channel Scan again to stop scanning and play
the current selection.
• Category Scan : Scans for channels with a strong signal in the selected category in
the current band and plays a 10-second sample. Select Category Scan again to
stop scanning and play the current selection.
• Tune : Tunes to the channel you select. Rotate i to select a channel.
Page 134 of 234

133
Audio
Playing a Disc
Selecting Disc Mode
1.Press the DISC button to play a CD or other disc.
2. Insert a disc into the disc slot.
The disc automatically begins playing.
3. Select a track using the bars (S KIP, TUNE, CATEGORY, SCAN/A.SEL).
The track number and elapsed time are displayed on the display. Title
information for audio CDs is displayed if found in the Gracenote® Album Info
(Gracenote® Media Database) stored on the built-in hard disc drive (HDD). Text
information stored on MP3/WMA/AAC discs is also displayed.
Audio Screen Control
H AUDIO button (in DISC mode)
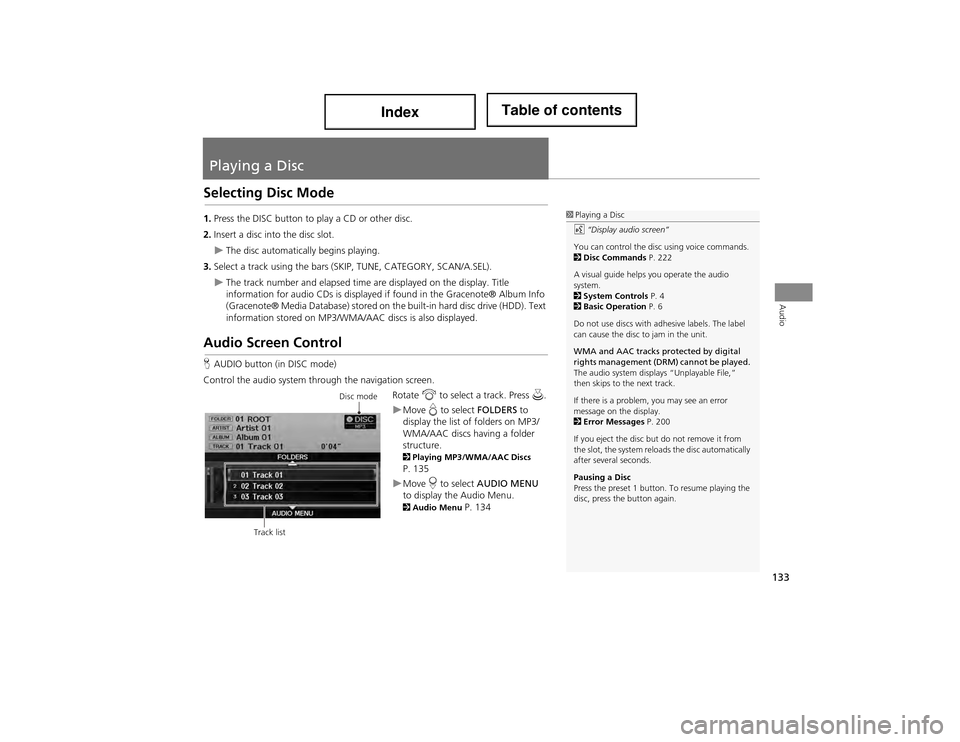
Control the audio system through the navigation screen. Rotate i to select a track. Press u.
Move e to select FOLDERS to
display the list of folders on MP3/
WMA/AAC discs having a folder
structure.
2 Playing MP3/WMA/AAC Discs P. 135
Move r to select AUDIO MENU
to display the Audio Menu.
2 Audio Menu P. 134
1Playing a Disc
d “Display audio screen”
You can control the disc using voice commands.
2 Disc Commands P. 222
A visual guide helps you operate the audio
system.
2 System Controls P. 4
2 Basic Operation P. 6
Do not use discs with adhesive labels. The label
can cause the disc to jam in the unit.
WMA and AAC tracks protected by digital
rights management (DRM) cannot be played.
The audio system displays “Unplayable File,”
then skips to the next track.
If there is a problem, you may see an error
message on the display.
2 Error Messages P. 200
If you eject the disc but do not remove it from
the slot, the system reload s the disc automatically
after several seconds.
Pausing a Disc
Press the preset 1 button. To resume playing the
disc, press the button again.
Disc mode
Track list
Page 135 of 234
134
Playing a DiscAudio Menu
Audio
Audio Menu
HAUDIO button (in DISC mode) AUDIO MENU
Rotate i to select an item. Press u.
The following items are available, depending on the type of disc:
• Record CD : Records a music CD onto the HDD for playback using HDD Audio.
2Recording a Music CD to HDD P. 140
• Sound Setup : Displays the sound preferences screen.
2Adjusting the Sound P. 158
• HDD Setup: Displays menu for setting HDD preferences for recording music CDs
and for updating Gracenote® information.
2 Recording a Music CD to HDD P. 1402Music Search Setup P. 442Updating Gracenote® Album Info P. 146
• Repeat :
6 : Repeats the current track.
7 : Repeats all tracks in the current folder.
• Random :
F : Plays all tracks on the current disc in random order.
I : Plays all tracks in the current folder in random order.
Page 136 of 234
135
Playing a DiscPlaying MP3/WMA/AAC Discs
Audio
•Scan :
1 : Scans all tracks on the disc (or in the selected folder) in the order they were
recorded (stored) and plays a 10-second sample. Select OFF to stop scanning and
play the current selection.
2 : Scans the first track in each folder on the disc and plays a 10-second
sample. Select OFF to stop scanning and play the current selection.
Playing MP3/WMA/AAC Discs
HAUDIO button (in DISC mode) FOLDERS
Change the folder on MP3/WMA/AAC discs that have tracks stored in a folder
structure.
1.Rotate i to select a folder. Press
u .
The system displays the track
list.
2. Rotate i to select a track. Press
u .
The system begins playing the
selected track.
1Playing MP3/WMA/AAC Discs
Folder List
•Any tracks not in a folder are automatically
added to a “ROOT” folder, which is displayed
at the top of the Folder List.
•If the root folder has additional folders in a
lower layer, they are listed on the screen.
Page 138 of 234

137
Audio
Playing Hard Disc Drive (HDD) Audio
The Hard Disc Drive (HDD) Audio function plays tracks from music CDs that have
been recorded onto the built-in HDD. You can arrange the tracks in playlists or play
the tracks using various search methods.
Selecting HDD Mode
1. Press the HDD/AUX button to pl ay tracks stored on the HDD.
2. Select a track by genre, artist, album, recording date, playlist, or track list.
The track number and elapsed time are displayed on the display. Title
information is displayed if found in the Gracenote® Album Info (Gracenote®
Media Database) stored on the HDD.
The HDD has two types of playlists: orig inal playlists and user playlists. An
original playlist is automatically cr eated for each album when a music CD is
recorded. You can customise up to six user playlists provided on the HDD by
adding tracks from your original playlists.
1 Playing Hard Disc Drive (HDD) Audio
d “Display audio screen”
You can control the HDD audio using voice
commands.
2 HDD Commands P. 222
A visual guide helps you operate the audio
system.
2 System Controls P. 4
2 Basic Operation P. 6
Music tracks recorded on HDD cannot be
recorded onto CDs or other devices.
Tracks are recorded at four times the playback
speed using ultra-efficient compression
technology; therefore, sound quality may vary
slightly from the original.
If the HDD is ever replaced, all music data is lost
and cannot be recovered.
If there is a problem, you may see an error
message on the display.
2 Error Messages P. 200
Page 142 of 234
141
Playing Hard Disc Drive (HDD) AudioRecording a Music CD to HDD
Audio
HAUDIO button (in DISC or HDD mode) AUDIO MENU HDD Setup
1. Rotate i to select CD
Recording . Press u.
2. Rotate i to select MANUAL .
Press u.
3. Move r to select RETURN.
4. Move r to select AUDIO MENU .
5. Rotate i to select Record CD .
Press u.
During recording, rotate i to
select Cancel CD Recording .
Press u to cancel.
■Recording a CD Manually1 Recording a CD Manually
Music Search Setup
Use this feature to se t up the music search
abilities when using Song By Voice™ (SBV)
commands.
2 Music Search Setup P. 61
Page 143 of 234
142
Playing Hard Disc Drive (HDD) AudioSearching for Music
Audio
Searching for Music
HAUDIO button (in HDD mode) MUSIC SEARCH
Search for music record ed to HDD using six different methods.
1.Rotate i to select a search
category. Press u.
2. Rotate i to select an item. Press
u .
Move w or y to select
alphabetical tabs on some
screens.
The first track begins playing.
1 Searching for Music
Albums, Artists , and Tracks display lists in
alphabetical order. Record Date displays albums
in chronological order.
You can also search for music on the HDD
through voice commands using SBV.
2 Searching for Music Using Song By
Voice™ (SBV) P. 151
SHUFFLE ALL TRACKS
Move r to select SHUFFLE ALL TRACKS to
shuffle the playback of all tracks that have been
recorded to HDD.
PLAY SELECTED
Move r to select PLAY SELECTED to play all the
items listed below.