Page 176 of 234
175
Bluetooth® HandsFreeLink®Making a Call
Bluetooth ® HandsFreeLink®
HPHONE button Phone Book
1.Rotate i to select a name. Press
u .
Move w or y to select
alphabetical tabs to display the
entries in the group.
2. Rotate i to select a number.
Press u to begin dialing.
H PHONE button
Dial
1.Enter a phone number.
2. Move r to select DIAL to begin
dialing.
■ Using the Phonebook1 Using the Phonebook
Your phonebook is automatically imported when
the phone is paired.
Up to three icons are displayed for each
phonebook entry. If there are more than three
numbers for an entry, “…” is displayed.
This feature is not available on all phones.
PreferenceFax
HomeCar
MobileVoice
WorkOther
Pager
■Entering a Phone Number
1 Entering a Phone Number
A command that consists of several words can be
spoken together. For example, say d “123-456-
7890” at once.
Continued
Page 178 of 234

177
Bluetooth® HandsFreeLink®Receiving a Call
Bluetooth® HandsFreeLink®
Receiving a Call
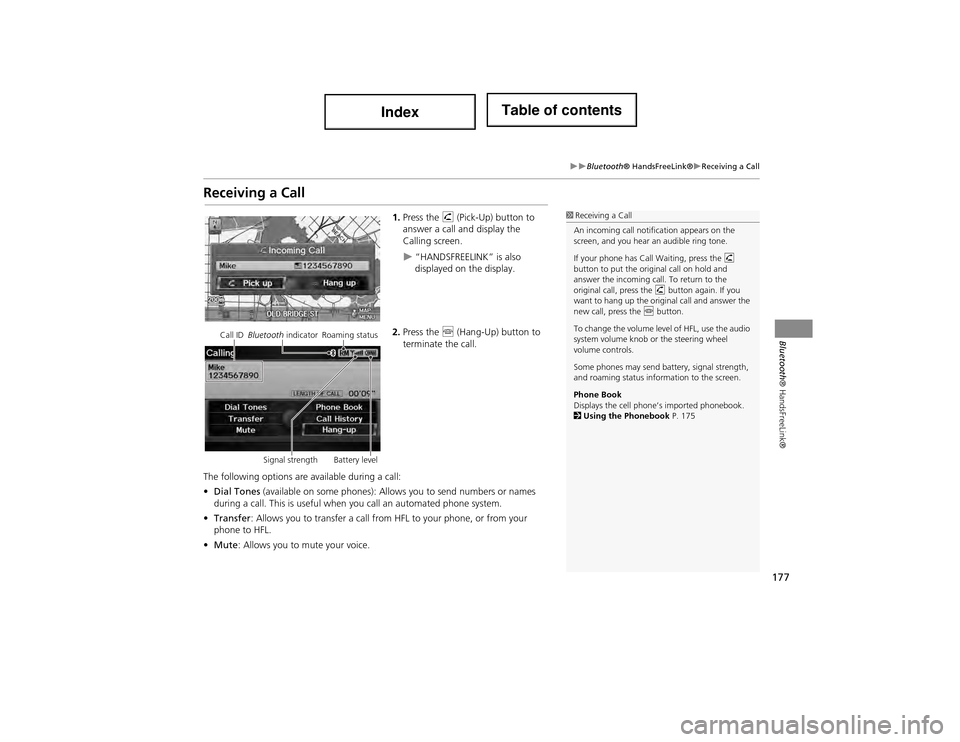
1.Press the h (Pick-Up) button to
answer a call and display the
Calling screen.
“HANDSFREELINK” is also
displayed on the display.
2. Press the j (Hang-Up) button to
terminate the call.
The following options are available during a call:
• Dial Tones (available on some phones): Allows you to send numbers or names
during a call. This is useful when you call an automated phone system.
• Transfer : Allows you to transfer a call from HFL to your phone, or from your
phone to HFL.
• Mute : Allows you to mute your voice.
1Receiving a Call
An incoming call notification appears on the
screen, and you hear an audible ring tone.
If your phone has Call Waiting, press the h
button to put the original call on hold and
answer the incoming call. To return to the
original call, press the h button again. If you
want to hang up the original call and answer the
new call, press the j button.
To change the volume level of HFL, use the audio
system volume knob or the steering wheel
volume controls.
Some phones may send ba ttery, signal strength,
and roaming status information to the screen.
Phone Book
Displays the cell phone ’s imported phonebook.
2 Using the Phonebook P. 175
Call ID Bluetooth indicator Roaming status
Signal strength Battery level
Page 179 of 234

178
Bluetooth® HandsFreeLink®HFL Menus
Bluetooth® HandsFreeLink®
HFL Menus
The power mode must be in ACCESSORY or ON to use HFL.
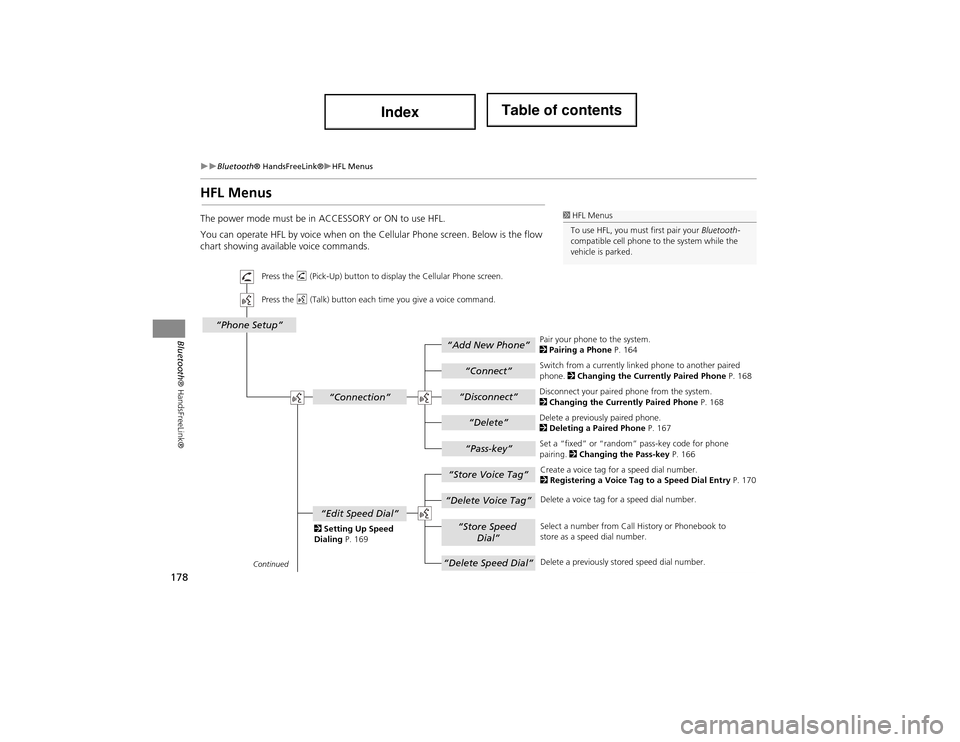
You can operate HFL by voice when on the Cellular Phone screen. Below is the flow
chart showing available voice commands.1 HFL Menus
To use HFL, you must first pair your Bluetooth-
compatible cell phone to the system while the
vehicle is parked.
“Add New Phone”
“Connect”
“Pass-key”
“Connection”
“Phone Setup”
“Disconnect”
“Delete”
“Store Voice Tag”
“Delete Voice Tag”
“Store Speed
Dial”
“Delete Speed Dial”
“Edit Speed Dial”
Continued
Press the h (Pick-Up) button to display the Cellular Phone screen.
Press the d (Talk) button each time you give a voice command.
Pair your phone to the system.
2Pairing a Phone P. 164
Set a “fixed” or “random” pass-key code for phone
pairing. 2Changing the Pass-key P. 166
Delete a previously paired phone.
2
Deleting a Paired Phone P. 167
Switch from a currently linked phone to another paired
phone.
2Changing the Currently Paired Phone P. 168
Disconnect your paired phone from the system.
2 Changing the Currently Paired Phone P. 168
Create a voice tag for a speed dial number.
2 Registering a Voice Tag to a Speed Dial Entry P. 170
Delete a voice tag for a speed dial number.
Select a number from Call History or Phonebook to
store as a speed dial number.
Delete a previously stored speed dial number.
2
Setting Up Speed
Dialing P. 169
Page 180 of 234
179
Bluetooth® HandsFreeLink®HFL Menus
Bluetooth® HandsFreeLink®
“Phone Book”
“Call History”
“Name”
“PIN”
“Edit Phone Name/PIN”
“Auto Transfer On/Off”
“Auto Answer On/Off”
“Text Message Notice”
“Clear Cellular Phone
Information”
Continued
Press the h (Pick-Up) button to displa y the Cellular Phone screen.
Press the d (Talk) button each time you give a voice command. Delete all paired phones,
phonebook entries, speed dials, and pass-keys.
2 Phone Setup P. 172
Display the paired phone’s imported phonebook.
2 Using the Phonebook P. 175
Display the last 30 incoming, outgoing, or missed calls.
2
Using Call History P. 176
Turn the auto transfer on or off.
2
Phone Setup P. 172
Turn the auto answer on or off.
2 Phone Setup P. 172
2
Editing User Name
and PIN P. 171 Create a user name for a paired phone.
Create a PIN for a paired phone.
Turn the text message no tification on or off.
2 Phone Setup P. 172
Page 181 of 234
180
Bluetooth® HandsFreeLink®HFL Menus
Bluetooth® HandsFreeLink®
“Dial Tones”
“Dial”
“Mute”
“Transfer”
“One”
“Two”
“Three”
“More Speed
Dial”
“Speed dial entries”
“Dial”
“Text Message”
The first three on the Cellular Phone screen.
Display a list of all 20 speed dial entries.
2
Using Speed Dial P. 176
2 Using Speed Dial P. 176 Send numbers or names during a call.
Say a phone number to dial.
2
Entering a Phone Number P. 175
Mute your voice during a call.
Transfer a call from HFL to your phone, or from your
phone to HFL.
Display received te xt messages list.
2 Text Messages P. 181
Page 182 of 234

181
Bluetooth® HandsFreeLink®
Text Messages
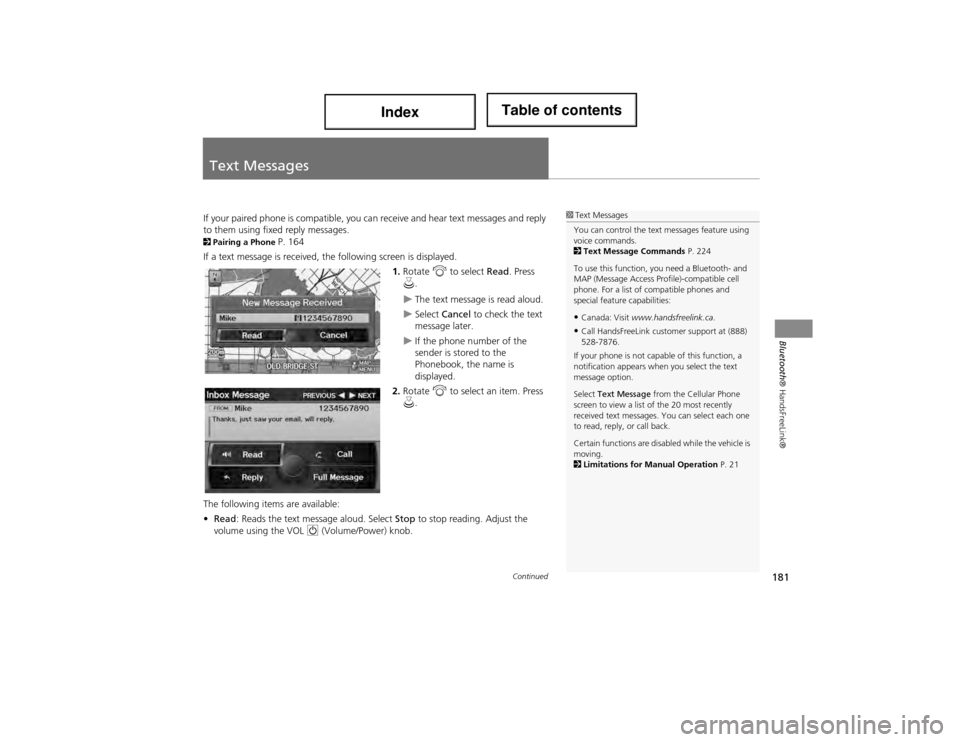
If your paired phone is compatible, you ca n receive and hear text messages and reply
to them using fixed reply messages.
2 Pairing a Phone P. 164
If a text message is received, the following screen is displayed.
1.Rotate i to select Read. Press
u .
The text message is read aloud.
Select Cancel to check the text
message later.
If the phone number of the
sender is stored to the
Phonebook, the name is
displayed.
2. Rotate i to select an item. Press
u .
The following items are available:
• Read : Reads the text me ssage aloud. Select Stop to stop reading. Adjust the
volume using the VOL 9 (Volume/Power) knob.
1Text Messages
You can control the text messages feature using
voice commands.
2 Text Message Commands P. 224
To use this function, you need a Bluetooth- and
MAP (Message Access Profile)-compatible cell
phone. For a list of compatible phones and
special feature capabilities:
•Canada: Visit www.handsfreelink.ca .
•Call HandsFreeLink customer support at (888)
528-7876.
If your phone is not capable of this function, a
notification appears when you select the text
message option.
Select Text Message from the Cellular Phone
screen to view a list of the 20 most recently
received text messages. You can select each one
to read, reply, or call back.
Certain functions are disabled while the vehicle is
moving.
2 Limitations for Manual Operation P. 21
Continued
Page 183 of 234
182
Text MessagesHFL Menus
Bluetooth® HandsFreeLink®
•Reply : Replies to the message using a fixed reply message. You cannot create
your own messages.
2 Replying to the Message P. 182
• Call: Calls the sender.
• Full Message : Displays the entire message body.
• PREVIOUS : Displays the previous message.
• NEXT : Displays the next message.
1.Rotate i to select the message
you want to use. Press u.
2. Rotate i to select Send. Press
u .
■Replying to the Message
1 Text Messages
You can set up text message notification when
the first message for the paired phone is
received. You can change the setting from the
Phone Setup screen.
2 Phone Setup P. 172
If you delete a messag e on the phone, the
message is also deleted in the system. If you send
a message from the system , the message goes to
your phone’s outbox.
Page 185 of 234

184
Other Features
Calendar
HINFO button Calendar
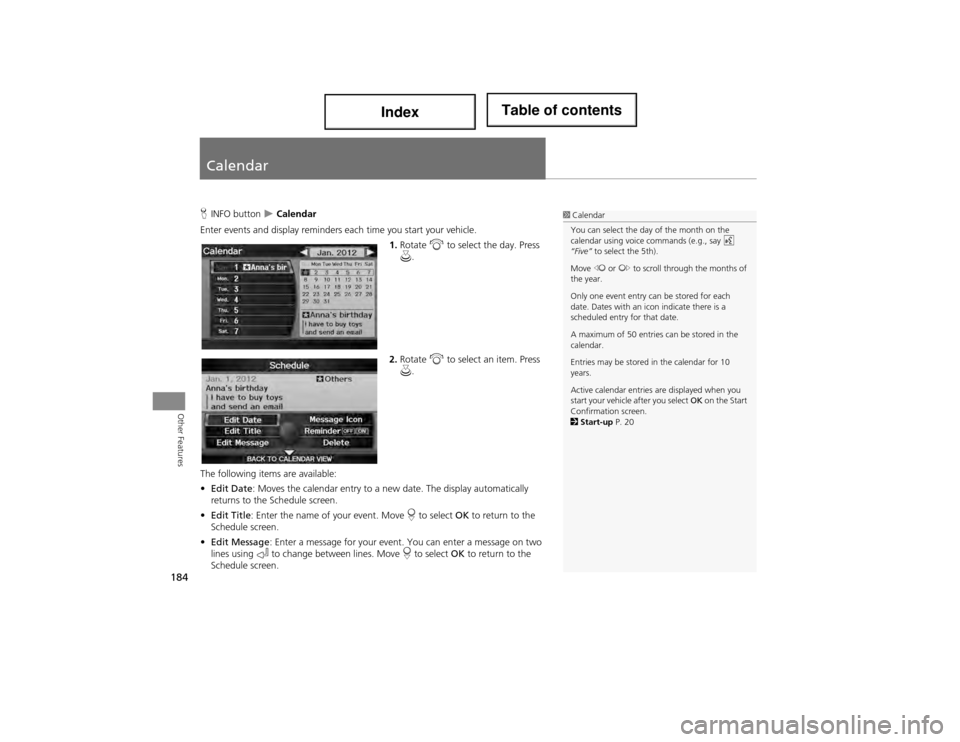
Enter events and display reminders each time you start your vehicle.
1.Rotate i to select the day. Press
u .
2. Rotate i to select an item. Press
u .
The following items are available:
• Edit Date : Moves the calendar entry to a ne w date. The display automatically
returns to the Schedule screen.
• Edit Title : Enter the name of your event. Move r to select OK to return to the
Schedule screen.
• Edit Message : Enter a message for your event. You can enter a message on two
lines using k to change between lines. Move r to select OK to return to the
Schedule screen.1 Calendar
You can select the day of the month on the
calendar using voice commands (e.g., say d
“Five” to select the 5th).
Move w or y to scroll through the months of
the year.
Only one event entry can be stored for each
date. Dates with an icon indicate there is a
scheduled entry for that date.
A maximum of 50 entries can be stored in the
calendar.
Entries may be stored in the calendar for 10
years.
Active calendar entries are displayed when you
start your vehicle after you select OK on the Start
Confirmation screen.
2 Start-up P. 20