2014.5 VAUXHALL INSIGNIA recommended
[x] Cancel search: recommendedPage 184 of 321
182Driving and operating
Hill and trailer considerations
System performance on hills depends
on vehicle speed, vehicle load, traffic
conditions and the road gradient. It
may not detect a vehicle in your path
while driving on hills. On steep hills,
you may have to use the accelerator
pedal to maintain your vehicle speed.
When going downhill you may have to brake to maintain or reduce your
speed.
Note that applying the brake
deactivates the system. It is not
recommended to use adaptive cruise
control on steep hills.
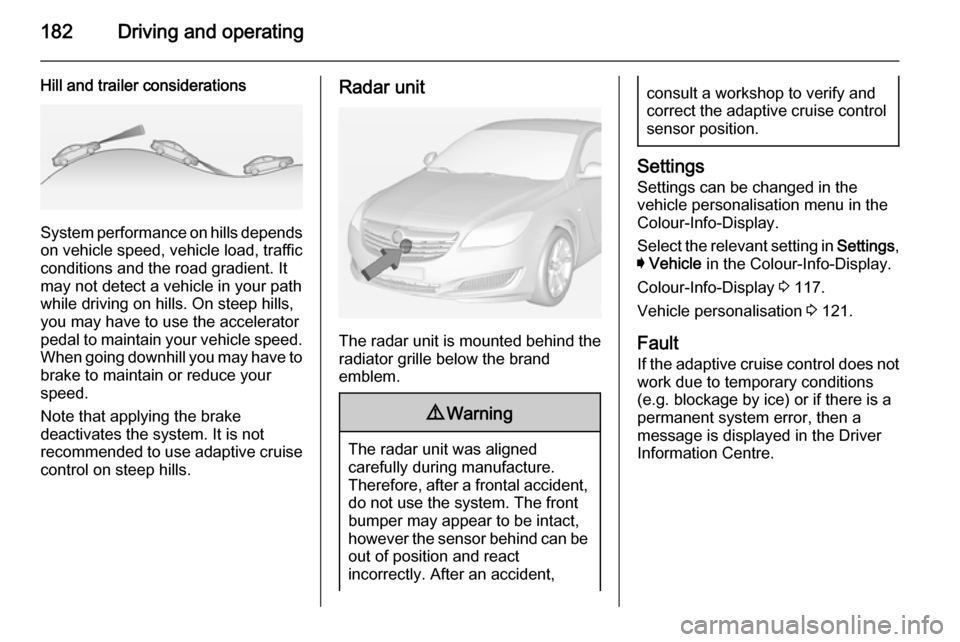
Radar unit
The radar unit is mounted behind the
radiator grille below the brand
emblem.
9 Warning
The radar unit was aligned
carefully during manufacture.
Therefore, after a frontal accident, do not use the system. The front
bumper may appear to be intact,
however the sensor behind can be
out of position and react
incorrectly. After an accident,
consult a workshop to verify and
correct the adaptive cruise control
sensor position.
Settings
Settings can be changed in the
vehicle personalisation menu in the
Colour-Info-Display.
Select the relevant setting in Settings,
I Vehicle in the Colour-Info-Display.
Colour-Info-Display 3 117.
Vehicle personalisation 3 121.
Fault
If the adaptive cruise control does not
work due to temporary conditions
(e.g. blockage by ice) or if there is a
permanent system error, then a
message is displayed in the Driver
Information Centre.
Page 206 of 321

204Driving and operating
When the system recognises an
unintended lane change, the control indicator ) changes to yellow and
flashes. Simultaneously a chime
sound is activated.
Deactivation
The system is deactivated by
pressing ) button; the LED in the
button extinguishes.
At speeds below 35 mph the system
is inoperable.
Fault
The lane departure warning system
may not operate properly when:
■ the windscreen is not clean
■ there are adverse environmental conditions, e.g. heavy rain, snow,
direct sunlight or shadows
The system cannot operate when no
lane marking is detected.Fuel
Fuel for petrol engines
Only use unleaded fuel that complies
with European standard EN 228 or
E DIN 51626-1 or equivalent.
Your engine is capable of running
with E10 fuel that fulfills these
standards. E10 fuel contains up to
10 % bioethanol.
Use fuel with the recommended
octane rating 3 272. Use of fuel with
too low an octane rating can reduce
engine power and torque and slightly increases fuel consumption.Caution
Do not use fuel or fuel additives
that contain metallic compounds
such as manganese-based
additives. This may cause engine
damage.
Page 213 of 321

Driving and operating211
General informationThe official fuel consumption and
specific CO 2 emission figures quoted
relate to the EU base model with standard equipment.
Fuel consumption data and CO 2
emission data are determined
according to regulation R (EC) No.
715/2007 (in the version respectively
applicable), taking into consideration
the vehicle weight in running order, as specified by the regulation.
The figures are provided only for the
purpose of comparison between
different vehicle variants and must not be taken as a guarantee for the
actual fuel consumption of a
particular vehicle. Additional
equipment may result in slightly
higher results than the stated
consumption and CO 2 figures.
Furthermore, fuel consumption is
dependent on personal driving style
as well as road and traffic conditions.Trailer hitch
General information
The factory-fitted towing equipment is folded up under the rear bumper
fascia.
Entrust retrofitting of towing
equipment to a workshop. It may be
necessary to make changes that
affect the cooling system, heat
shields or other equipment. Only use
towing equipment that has been
approved for your vehicle.
To avoid vehicle damage, the power
tailgate cannot be operated with the
radio remote control when a trailer is
electrically connected.
Fitting of towing equipment could
cover the opening of the towing eye.
If this is the case use the coupling ball
bar for towing.Driving characteristics and
towing tips Before attaching a trailer, lubricate
the coupling ball. However, do not do
so if a stabiliser, which acts on the coupling ball, is being used to reduce snaking movements.
For trailers with low driving stability
and trailers with a permitted gross
vehicle weight of more than 1400 kg
(Front-wheel drive)/1600 kg (All- wheel drive) the use of a stabiliser is
strongly recommended when driving
above 50 mph.
If the trailer starts snaking, drive more
slowly, do not attempt to correct the
steering and brake sharply if
necessary.
When driving downhill, drive in the
same gear as if driving uphill and
drive at a similar speed.
Adjust tyre pressure to the value
specified for full load 3 286.
Page 219 of 321

Vehicle care2179Danger
The ignition system and Xenon
headlights use extremely high
voltage. Do not touch.
Bonnet
Opening
Pull the release lever and return it to
its original position.
Move the safety catch sideways to the left vehicle side and open the bonnet.
The bonnet is held open
automatically.
Air intake 3 149.
If the bonnet is opened during an
Autostop, the engine will be restarted automatically for safety reasons.
Stop-start system 3 156.
Closing
Lower the bonnet and allow it to drop into the catch. Check that the bonnet
is engaged.
Engine oil
Check the engine oil manually on aregular basis to prevent damage to
the engine. Ensure that the correct
specification of oil is used.
Recommended fluids and lubricants
3 265.
Check with the vehicle on a level
surface. The engine must be at
operating temperature and switched
off for at least 5 minutes.
Pull out the dipstick, wipe it clean, insert it to the stop on the handle, pull
out and read the engine oil level.
Insert dipstick to the stop on the
handle and make half a turn.Caution
It is the owner's responsibility to
maintain the proper level of an
appropriate quality oil in the
engine.
Page 246 of 321

244Vehicle careCaution
Tyre pressure monitoring system
warns just about low tyre pressure condition and does not replace
regular tyre maintenance by the
driver.
All wheels must be equipped with
pressure sensors and the tyres must
have the prescribed pressure.
Notice
In countries where the tyre pressure monitoring system is legally
required, the use of wheels without
pressure sensors will invalidate the
vehicle type approval.
Select the Tyre pressure monitoring
page under the Info Menu in the
Driver Information Centre 3 110
System status and pressure warnings
are displayed by a message with the
corresponding tyre flashing in the
Driver Information Centre.
A detected low tyre pressure
condition is indicated by the control
indicator w 3 107.
If
w lights up, stop as soon as
possible and inflate the tyres as
recommended 3 286.
After inflating driving may be required
to update the tyre pressure values in
the Driver Information Centre. During
this time w may light up.
If w lights up at lower temperatures
and extinguishes after some driving,
this could be an indicator for getting
low pressure. Check tyre pressure.
Vehicle messages 3 119.
If the tyre pressure must be reduced
or increased, switch off ignition.
Only mount wheels with pressure
sensors, otherwise the tyre pressure
will not be displayed and w
illuminates continuously.
A spare wheel or temporary spare
wheel is not equipped with pressure
sensors. The tyre pressure
monitoring system is not operational
for these wheels. Control indicator w
illuminates. For the further three
wheels the system remains
operational.
Page 248 of 321

246Vehicle care
For safety reasons, it is
recommended that the tread depth of
the tyres on one axle should not vary
by more than 2 mm.
The legally permissible minimum
tread depth (1.6 mm) has been
reached when the tread has worn
down as far as one of the tread wear
indicators (TWI). Their position is
indicated by markings on the
sidewall.
If there is more wear at the front than
the rear, swap round front wheels and
rear wheels periodically. Ensure that
the direction of rotation of the wheels
remains the same.
Tyres age, even if they are not used.
We recommend tyre replacement
every 6 years.
Changing tyre and wheel
size If tyres of a different size than those
fitted at the factory are used, it may be necessary to reprogramme the
speedometer as well as the nominal
tyre pressure and make other vehicle
modifications.
After converting to a different tyre
size, have the label with tyre
pressures replaced.9 Warning
Use of unsuitable tyres or wheels
may lead to accidents and will
invalidate the vehicle type
approval.
Wheel covers
Wheel covers and tyres that are
factory approved for the respective
vehicle and comply with all of the
relevant wheel and tyre combination requirements must be used.
If the wheel covers and tyres used are
not factory approved, the tyres must
not have a rim protection ridge.
Wheel covers must not impair brake
cooling.9 Warning
Use of unsuitable tyres or wheel
covers could lead to sudden
pressure loss and thereby
accidents.
Wheel caps
Tyres of size 245/35 R20 have a
specific wheel cap. To remove the
cap from the dismantled wheel first
disengage the arms one by one. Then
press the cap in the middle area from
behind and remove it.
Page 259 of 321

Vehicle care257
far away from the discharged
battery as possible, however at
least 60 cm.
Route the leads so that they cannot
catch on rotating parts in the engine
compartment.
To start the engine: 1. Start the engine of the vehicle providing the jump.
2. After 5 minutes, start the other engine. Start attempts should be
made for no longer than
15 seconds at an interval of
1 minute.
3. Allow both engines to idle for approx. 3 minutes with the leads
connected.
4. Switch on electrical consumers (e.g. headlights, heated rear
window) of the vehicle receiving
the jump start.
5. Reverse above sequence exactly when removing leads.Towing
Towing the vehicle
5-door Hatchback, 4-door Saloon,
Sports Tourer: disengage cap at
bottom and remove downwards.
Country Tourer: insert a screwdriver
in the slot at the lower edge of the cap. Release the cap by carefully moving
the screwdriver downwards. To
prevent damage it is recommended to place a cloth between the screwdriver
and the frame.
Page 260 of 321

258Vehicle care
VXR: insert screwdriver in the slot at
the upper bend of the cap. Release
the cap by carefully moving the
screwdriver downwards. To prevent
damage it is recommended to place a cloth between the screwdriver and
the frame.
The towing eye is stowed with the vehicle tools 3 241.Screw in the towing eye as far as it will
go until it stops in a horizontal
position.
Attach a tow rope – or better still a tow
rod – to the towing eye.
The towing eye must only be used for towing and not for recovering the
vehicle.
Switch on ignition to release steering wheel lock and to permit operation of
brake lights, horn and windscreen
wiper.
Transmission in neutral.
Caution
Drive slowly. Do not drive jerkily.
Excessive tractive force can
damage the vehicle.
When the engine is not running,
considerably more force is needed to
brake and steer.
To prevent the entry of exhaust gases from the towing vehicle, switch on the
air recirculation and close the
windows.
Vehicles with manual transmission
and All-wheel drive: If the vehicle is
towed with all four wheels on the
ground then there are no technical
limitations for speed and distance. If
only one axle has been raised, the
maximum speed is 30 mph. There is
no distance limitation.
Vehicles with automatic transmission
and Front-wheel drive: The vehicle
must be towed facing forwards, not
faster than 50 mph nor further than
60 miles . In all other cases and when
the transmission is defective, the front
axle must be raised off the ground.