2014.5 VAUXHALL INSIGNIA ESP
[x] Cancel search: ESPPage 76 of 143

76Navigation
Route settings
Select the MENU screen button in the
interaction selector bar and then
select the Routing Preferences list
item to display the respective
submenu.Route style
To define by what criteria a route may
be calculated, select the Route Style
menu item.
Select Fast, Eco Friendly or Short
from the list.
If Eco Friendly has been selected, the
eco-friendly route style may be
adapted to the load of the vehicle.
Select the Edit Eco Profile menu item
to display the respective submenu.
Repeatedly select Roof Load and
Trailer to toggle between the
available load options. Set the
options as needed.Road selection
Select from the list which road types
may be included in the calculation of
the route.Traffic incidents
Select the MENU screen button in the
interaction selector bar and then
select the Traffic list item to display
the respective submenu.Nearby Traffic Incidents
To display a list of the traffic incidents around the current location, select the
Show Nearby Traffic Incidents menu
item.
Depending on which incidents you
wish to be displayed, select the Along
Route or the All screen button at the
bottom of the screen.
To display details on a traffic incident of the list, select the respective
incident.Traffic Icons on the map
If Show Icons on Map is activated,
traffic incident icons around the
current location and along the route
are displayed on the map.
Set Show Icons on Map to On or Off.Traffic routing
This submenu contains settings of
how the system may deal with traffic
incidents before and during route
guidance.
Select the Traffic Routing
Preferences menu item to display the
respective submenu.
If you wish slow traffic to be generally
avoided, set Avoid Slow Traffic to On .
Select Automatically Avoid Traffic or
Ask Me before Avoiding .Types of traffic incidents
Select Traffic Types to display the
respective submenu.
Select the types of traffic incidents to be avoided.TMC stations
The TMC radio stations supply
information on the current traffic
situation considered in the calculation of the route.
Select TMC Station to display the
respective submenu.
The default setting is Auto consulting
different TMC stations.
Page 77 of 143

Navigation77
If you wish a specific TMC station to
be observed, select the respective
station from the list.
If this station is no longer received,
the system switches back to the
Auto function.
Route guidance menu Notice
The route guidance menu may only
be displayed if route guidance is
active.
The route guidance menu provides
additional options to change route
settings during active route guidance.
To display the route guidance menu,
tap on the arrow symbol indicating
your next turning manoeuvre on the
right side of the screen. The route
guidance menu is displayed.
Depending on which type of route you
are in, the route guidance menu is
displayed differently.
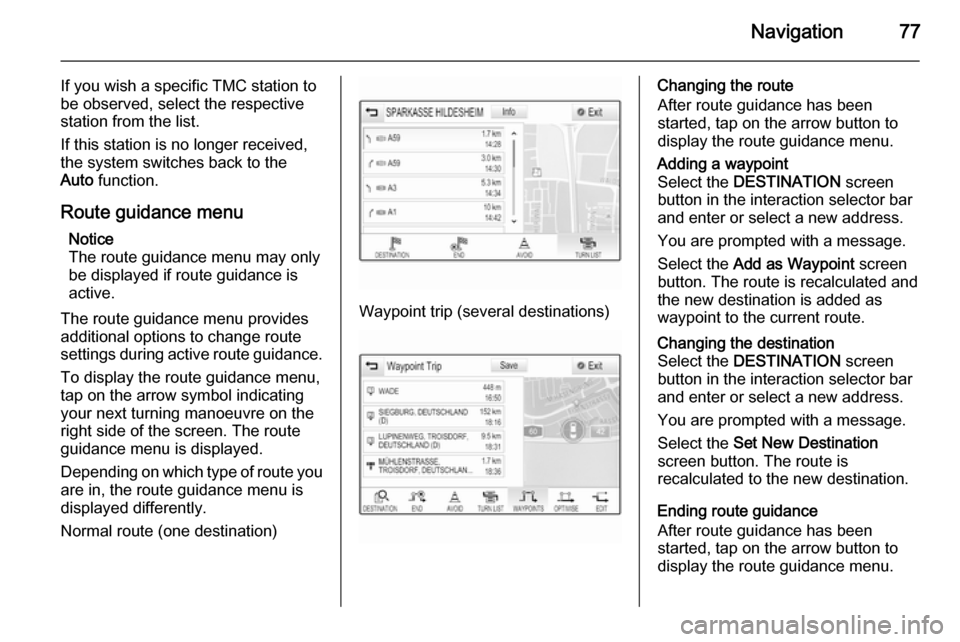
Normal route (one destination)
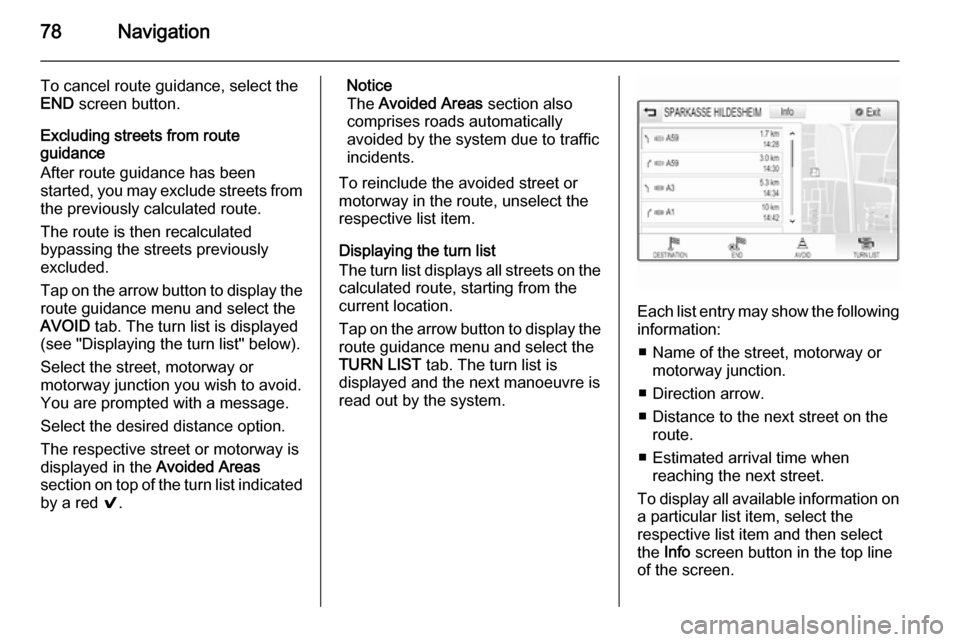
Waypoint trip (several destinations)
Changing the route
After route guidance has been
started, tap on the arrow button to
display the route guidance menu.Adding a waypoint
Select the DESTINATION screen
button in the interaction selector bar
and enter or select a new address.
You are prompted with a message.
Select the Add as Waypoint screen
button. The route is recalculated and
the new destination is added as
waypoint to the current route.Changing the destination
Select the DESTINATION screen
button in the interaction selector bar
and enter or select a new address.
You are prompted with a message.
Select the Set New Destination
screen button. The route is
recalculated to the new destination.
Ending route guidance
After route guidance has been
started, tap on the arrow button to
display the route guidance menu.
Page 78 of 143

78Navigation
To cancel route guidance, select theEND screen button.
Excluding streets from route
guidance
After route guidance has been
started, you may exclude streets from the previously calculated route.
The route is then recalculated
bypassing the streets previously
excluded.
Tap on the arrow button to display the
route guidance menu and select the
AVOID tab. The turn list is displayed
(see "Displaying the turn list" below).
Select the street, motorway or
motorway junction you wish to avoid.
You are prompted with a message.
Select the desired distance option. The respective street or motorway isdisplayed in the Avoided Areas
section on top of the turn list indicated
by a red 9.Notice
The Avoided Areas section also
comprises roads automatically
avoided by the system due to traffic
incidents.
To reinclude the avoided street or
motorway in the route, unselect the
respective list item.
Displaying the turn list
The turn list displays all streets on the
calculated route, starting from the
current location.
Tap on the arrow button to display the
route guidance menu and select the
TURN LIST tab. The turn list is
displayed and the next manoeuvre is
read out by the system.
Each list entry may show the following information:
■ Name of the street, motorway or motorway junction.
■ Direction arrow.
■ Distance to the next street on the route.
■ Estimated arrival time when reaching the next street.
To display all available information on a particular list item, select the
respective list item and then select
the Info screen button in the top line
of the screen.
Page 79 of 143

Navigation79
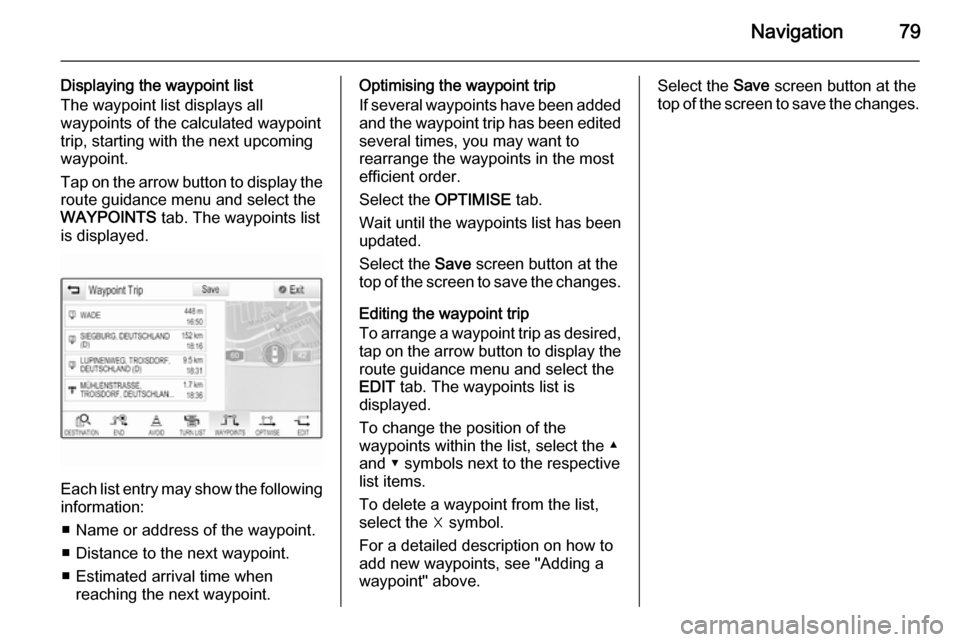
Displaying the waypoint list
The waypoint list displays all
waypoints of the calculated waypoint trip, starting with the next upcoming
waypoint.
Tap on the arrow button to display the
route guidance menu and select the
WAYPOINTS tab. The waypoints list
is displayed.
Each list entry may show the following
information:
■ Name or address of the waypoint.
■ Distance to the next waypoint.
■ Estimated arrival time when reaching the next waypoint.
Optimising the waypoint trip
If several waypoints have been added
and the waypoint trip has been edited
several times, you may want to
rearrange the waypoints in the most
efficient order.
Select the OPTIMISE tab.
Wait until the waypoints list has been
updated.
Select the Save screen button at the
top of the screen to save the changes.
Editing the waypoint trip
To arrange a waypoint trip as desired, tap on the arrow button to display the
route guidance menu and select the
EDIT tab. The waypoints list is
displayed.
To change the position of the
waypoints within the list, select the ▲
and ▼ symbols next to the respective
list items.
To delete a waypoint from the list, select the ☓ symbol.
For a detailed description on how to
add new waypoints, see "Adding a
waypoint" above.Select the Save screen button at the
top of the screen to save the changes.
Page 81 of 143

Speech recognition81
speech recognition, speech
recognition is not available.
In such a case, you need to select
another language for the display, if
you want to control the Infotainment system via voice input. For
changing the display language, see
"Language" in chapter "System
settings" 3 43.Address input of destinations in
foreign countries
In case you want to enter the address of a destination located in a foreign
country via voice input, you need to
change the language of the
Infotainment display to the language
of the foreign country.
E.g., if the display is currently set to English and you want to enter the
name of a city located in France, you
need to change the display language
to French.
Exceptions: If you want to enter
addresses in Belgium, you may
optionally change the display
language to French or Dutch. For
addresses in Switzerland you mayoptionally change the display
language to French, German, or
Italian.
For changing the display language, see "Language" in chapter "Systemsettings" 3 43.Input order for destination addresses
The order in which the parts of an
address need to be entered using the speech recognition system is
dependent on the country where the
destination is located.
■ Austria, Germany:
■ Belgium, France, Great Britain:
■ Italy, Netherlands, Portugal, Russia, Spain, Switzerland:
Setting up the speech recognition Several settings and adaptions for the embedded speech recognition of the
Infotainment system can be
performed.
Press the ; button and then select
the SETTINGS icon.
Select the Voice menu item to enter
the respective submenu.Confidence Threshold
Depending on the option selected in
the corresponding submenu, the
speech recognition appears more or
less 'confident' in correctly
understanding your commands.
Confirm More : If selected, the system
asks you relatively often to confirm your commands. Consequently, the
system performs the correct action in most cases.
Page 82 of 143

82Speech recognition
Confirm Less: If selected, the system
asks you less often to confirm your
voice inputs. Consequently, the
system might sometimes misinterpret your commands and not perform the
correct action.
Notice
When starting to use the speech recognition, it may be advantageous
to use the Confirm More setting. As
you get more experienced, i.e., you
get to know how to pronounce your
commands in a way the speech
recognition understands you
correctly, it may be advantageous to
use the Confirm Less setting.Prompt Length
The length and the detailedness of
the questions and statements the
speech recognition gives out can be
adjusted in the corresponding
submenu.Audio Feedback Speed
The speed with which the speech
recognition asks questions or makes
statements can be adjusted in the
corresponding submenu.If Medium is selected, the system's
speech rate corresponds to natural
speech.
Notice
When starting to use the speech
recognition, it may be advantageous
to use the Long setting. As you get
more experienced, it may be
advantageous to use the Short
setting.
Voice pass-thru application
The voice pass-thru application of the Infotainment system allows access tothe speech recognition commands on
your smartphone. See your
smartphone manufacturer's user
guide to find out whether your
smartphone supports this feature.
Usage
Embedded speech recognition Activating speech recognition Notice
Speech recognition is not available
during an active phone call.Activation via the w button on the
steering wheel
Press the w button on the left-hand
side of the steering wheel.
The audio system mutes, a voice
output message prompts you to say a command, and a help menu with the
most important commands currently
available is shown in the Driver
Information Centre.
As soon as the speech recognition is
ready for voice input, a beep is heard. The speech recognition symbol in the
upper left corner of the help menu changes from white to red.
Page 84 of 143

84Speech recognition
In the following situations, a dialogue
sequence is automatically cancelled:
■ If you do not say any command for a certain period of time (by default
you are prompted three times to
say a command).
■ If you say commands that are not recognised by the system (by
default you are prompted three
times to say a correct command).
Operation via speech commands
The speech recognition can
understand commands that are either
naturally stated in sentence form, or
direct commands stating the
application and the action.
For best results: ■ Listen for the voice prompt and wait
for the beep before saying a
command or replying.
■ Say " Help" or read the example
commands on the screen.■ The voice prompt can be interrupted by pressing the w button
again
■ Wait for the beep and then speak the command naturally, not too
fast, not too slow. Use short and direct commands.
Usually phone and audio commands
can be spoken in a single command. For example, "Call David Smith at
work", "Play" followed by the artist or
song name, or "Tune to" followed by
the radio frequency and the
waveband.
Navigation destinations, however,
are too complex for a single
command. First, state a command that explains the type of destination
needed, such as "Directions to an
Address", "Navigate to an
intersection", "Find a Place of
Interest", or "Directions to a contact".
The system responds with requesting
more details.
When searching for a "Place of
Interest," only major chains may be
selected by name. Chains are
businesses with at least 20 locations.For other POIs, say the name of a
category like "Restaurants,"
"Shopping centres," or "Hospitals".
Direct commands are easier
understood by the system, e.g. "Call
01234567". Examples of these direct
commands are displayed on most of
the screens while a speech
recognition session is active.
If you say "Phone" or "Phone
commands", the system understands
that a phone call is requested and
responds with respective questions
until enough details are gathered. If
the phone number has been saved
with a name and a place, the direct
command should include both, for
example "Call David Smith at work".Selecting list items
When a list is displayed, a voice
prompt asks to confirm or select an
item from that list. A list item may be
manually selected, or by speaking the
line number of the item.
Page 87 of 143

Phone87phones is prohibited, if
interference is caused by the
mobile phone or if dangerous
situations can occur.
Bluetooth
The Phone portal is certified by the
Bluetooth Special Interest Group
(SIG).
You will find further information about the specification on the Internet at
http://www.bluetooth.com
Bluetooth connection
Bluetooth is a radio standard for the
wireless connection of e.g. mobile
phones, iPod/iPhone models, or other devices.
To be able to set up a Bluetooth
connection to the Infotainment
system, the Bluetooth function of the
Bluetooth device must be activated.
For further information, please
consult the user guide of the
Bluetooth device.
Via the Bluetooth settings menu,
pairing (PIN code exchange between
Bluetooth device and Infotainment
system) and connecting of the
Bluetooth devices to the Infotainment
system are carried out.
Bluetooth settings menu
Press the ; button and then select
the SETTINGS icon.
Select Bluetooth to display the
respective submenu.
Pairing a device Important information ■ Up to five devices can be paired to the system.
■ Only one paired device can be connected to the Infotainment
system at a time.
■ Pairing normally only needs to be carried out once, unless the deviceis deleted from the list of paired
devices. If the device has beenconnected previously, the
Infotainment system automatically
establishes a connection.
■ Bluetooth operation considerably drains the device's battery.
Therefore, connect the device to
the power outlet for charging.
Pairing via the Settings application 1. Press the ; button and then
select the SETTINGS icon.
Select Bluetooth to display the
respective submenu.
2. Select Pair Device . Alternatively,
select Device Management to
display the device list and then
select the Pair Device screen
button.
3. A message is displayed on the Infotainment system indicating
the name and PIN code of the
Infotainment system.
4. Start Bluetooth searching on the Bluetooth device to be paired.
5. Confirm the pairing procedure: ◆If SSP (secure simple pairing) is
supported: