Page 129 of 244
127
Partner-2-VU_en_Chap07_Verification_ed02-2014
Recommendations on storage
AdBlue® freezes at about -11°C
and deteriorates above 25°C. It is
recommended that bottles be stored in
a cool area and protected from direct
sunlight.
Under these conditions, the additive
can be kept for at least a year.
If the additive has frozen, can be used
once it has completely thawed out.
Never store bottles of AdBlue
® in
your vehicle. Procedure
Before topping-up, ensure that the
vehicle is parked on a flat and level
surface.
In wintry conditions, ensure that the
temperature of the vehicle is above
-11°C. Otherwise, by freezing, the
AdBlue
® cannot be poured into its tank.
Park your vehicle in a warmer area for
a few hours to allow the top-up to be
carried out.
F
Switch of
f the ignition and remove
the key.
-
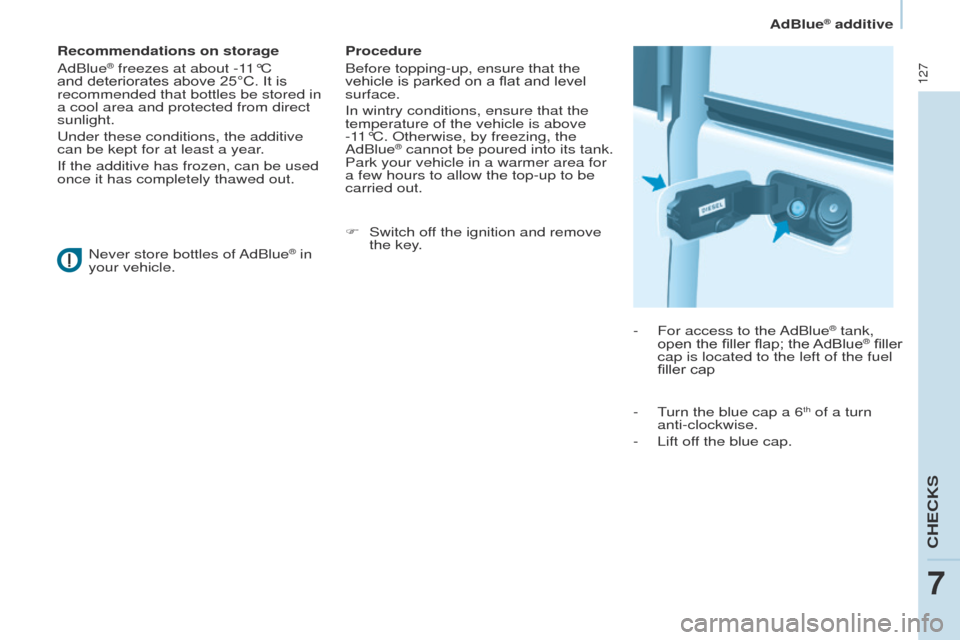
For access to the
AdBlue
® tank,
open the filler flap; the AdBlue® filler
cap is located to the left of the fuel
filler cap
-
T
urn the blue cap a 6
th of a turn
anti-clockwise.
-
Lift of
f the blue cap.
CHECKS
7
AdBlue® additive
Page 133 of 244
131
Partner-2-VU_en_Chap08_Aide-rapide_ed02-2014
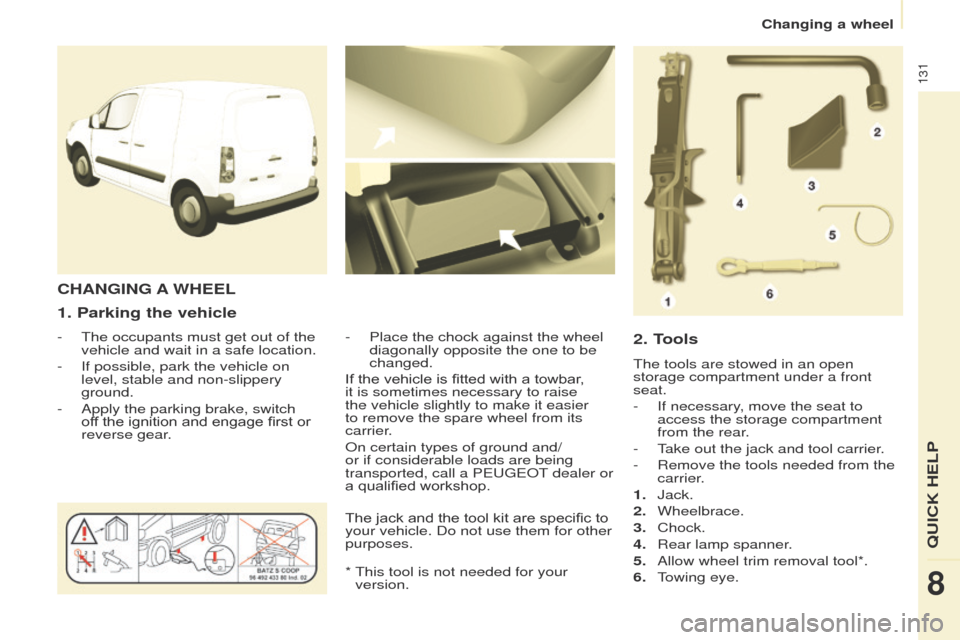
1. Parking the vehicle
- The occupants must get out of the
vehicle and wait in a safe location.
-
If possible, park the vehicle on
level, stable and non-slippery
ground.
-
Apply the parking brake, switch
of
f the ignition and engage first or
reverse gear. -
Place the chock against the wheel
diagonally opposite the one to be
changed.
CHANGING A WHEEL
2. Tools
The tools are stowed in an open
storage compartment under a front
seat.
-
If necessary
, move the seat to
access the storage compartment
from the rear.
-
T
ake out the jack and tool carrier.
-
Remove the tools needed from the
carrier
.
1.
Jack.
2.
Wheelbrace.
3.
Chock.
4.
Rear lamp spanner
.
5.
Allow wheel trim removal tool*.
6.
T
owing eye.
If the vehicle is fitted with a towbar,
it is sometimes necessary to raise
the vehicle slightly to make it easier
to remove the spare wheel from its
carrier.
On certain types of ground and/
or if considerable loads are being
transported, call a PEUGEOT dealer or
a qualified workshop.
*
This tool is not needed for your
version.
The jack and the tool kit are specific to
your vehicle. Do not use them for other
purposes.
QUICK HELP
8
Changing a wheel
Page 139 of 244
137
Partner-2-VU_en_Chap08_Aide-rapide_ed02-2014
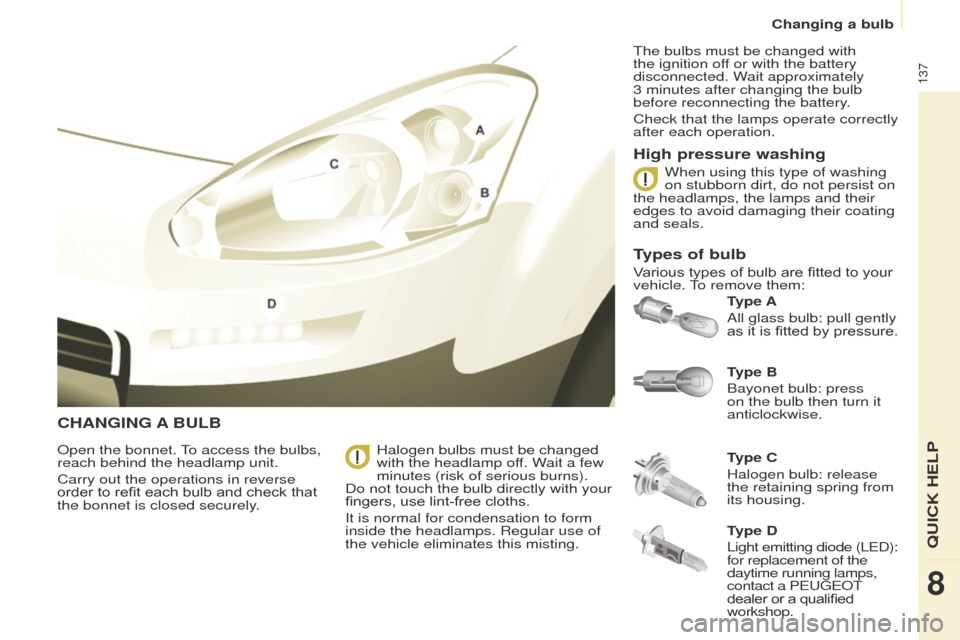
CHANGING A BULB
Type B
Bayonet bulb: press
on the bulb then turn it
anticlockwise. Type A
All glass bulb: pull gently
as it is fitted by pressure.
Open the bonnet. To access the bulbs,
reach behind the headlamp unit.
Carry out the operations in reverse
order to refit each bulb and check that
the bonnet is closed securely. Type C
Halogen bulb: release
the retaining spring from
its housing.
Halogen bulbs must be changed
with the headlamp off. Wait a few
minutes (risk of serious burns).
Do not touch the bulb directly with your
fingers, use lint-free cloths.
It is normal for condensation to form
inside the headlamps. Regular use of
the vehicle eliminates this misting. The bulbs must be changed with
the ignition off or with the battery
disconnected. Wait approximately
3
minutes after changing the bulb
before reconnecting the battery.
Check that the lamps operate correctly
after each operation.
High pressure washing
Types of bulb
Various types of bulb are fitted to your
vehicle. To remove them: When using this type of washing
on stubborn dirt, do not persist on
the headlamps, the lamps and their
edges to avoid damaging their coating
and seals.
Type D
Light emitting diode (LED):
for replacement of the
daytime running lamps,
contact a PEUGEOT
dealer or a qualified
workshop.
QUICK HELP
8
Changing a bulb
Page 140 of 244
138
Partner-2-VU_en_Chap08_Aide-rapide_ed02-2014
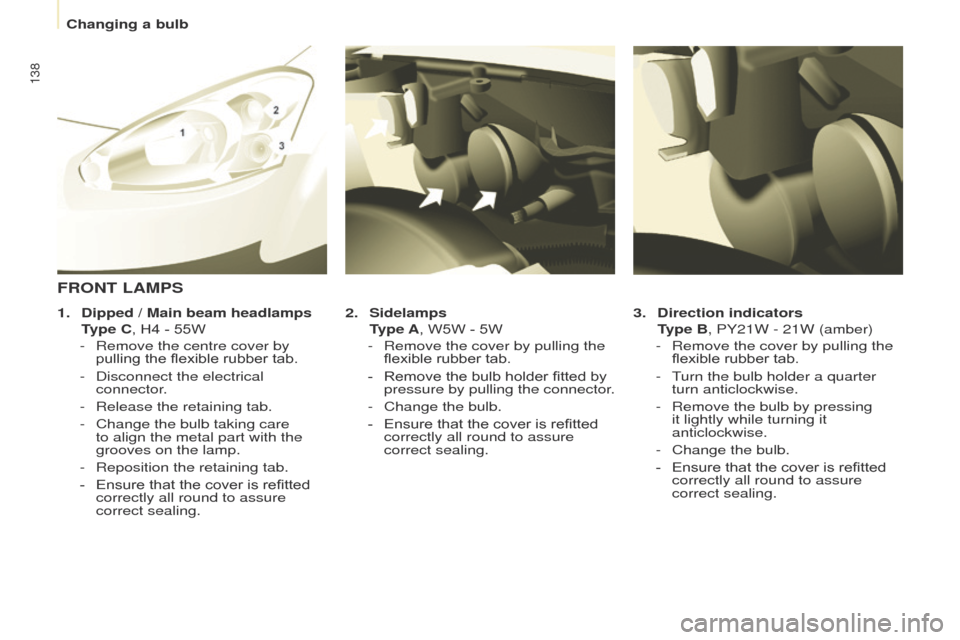
3. Direction indicators
T
ype B, PY21W - 21W (amber)
-
Remove the cover by pullin
g the
flexible rubber tab.
-
T
urn the bulb holder a quarter
turn anticlockwise.
-
Remove the bulb by pressing
it lightly while turning it
anticlockwise.
-
Change the bulb.
-
Ensure that the cover is refitted
correctly all round to assure
correct sealing.
2.
Sidelamps
T
ype A, W5W - 5W
-
Remove the cover by pullin
g the
flexible rubber tab.
-
Remove the bulb holder fitted by
pressure by pullin
g the connector.
-
Change the bulb.
-
Ensure that the cover is refitted
correctly all round to assure
correct sealing.
FRONT LAMPS
1. Dipped / Main beam headlamps
T
ype C, H4 - 55W
-
Remove the centre cover by
pullin
g the flexible rubber tab.
-
Disconnect the electrical
connector
.
-
Release the retaining tab.
-
Change the bulb taking care
to align the metal part with the
grooves on the lamp.
-
Reposition the retaining tab.
-
Ensure that the cover is refitted
correctly all round to assure
correct sealing.
Changing a bulb
Page 142 of 244
140
Partner-2-VU_en_Chap08_Aide-rapide_ed02-2014
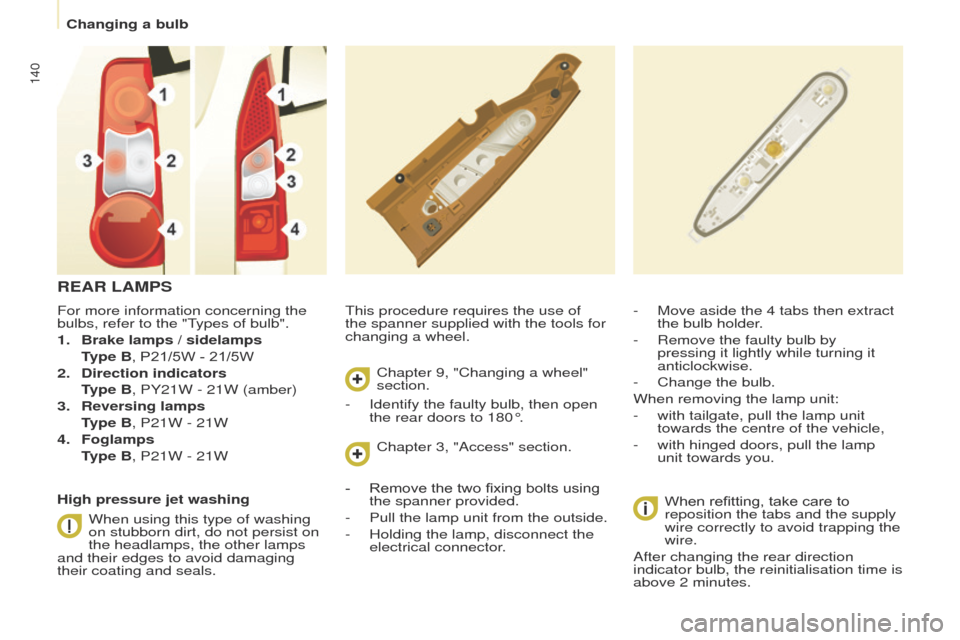
For more information concerning the
bulbs, refer to the "Types of bulb".
1.
Brake lamps / sidelamps
T
ype B, P21/5W - 21/5W
2.
Direction indicators
T
ype B, PY21W - 21W (amber)
3.
Reversing lamps
T
ype B, P21W - 21W
4.
Foglamps
T
ype B, P21W - 21W This procedure requires the use of
the spanner supplied with the tools for
changing a wheel.
-
Move aside the 4 tabs then extract
the bulb holder
.
-
Remove the faulty bulb by
pressing it lightly while turning it
anticlockwise.
-
Change the bulb.
When removing the lamp unit:
-
with tailgate, pull the lamp unit
towards the centre of the vehicle,
-
with hinged doors, pull the lamp
unit towards you.
When refitting, take care to
reposition the tabs and the supply
wire correctly to avoid trapping the
wire.
After changing the rear direction
indicator bulb, the reinitialisation time is
above 2 minutes.
REAR LAMPS
High pressure jet washing
When using this type of washing
on stubborn dirt, do not persist on
the headlamps, the other lamps
and their edges to avoid damaging
their coating and seals. Chapter 9, "Changing a wheel"
section.
Chapter 3, "Access" section.
-
Identify the faulty bulb, then open
the rear doors to 180°.
-
Remove the two fixing bolts using
the spanner provided.
-
Pull the lamp unit from the outside.
-
Holding the lamp, disconnect the
electrical connector
.
Changing a bulb
Page 157 of 244
155
Partner-2-VU_en_Chap09_Caract-technique_ed02-2014
WEIGHTS AND TOWED LOADS
The weights and towable loads for your
vehicle can be found on the vehicle's
registration certificate.
These values, expressed in kg, are
laos present on the manufacturer's
plate or label.The recommended nose weight is
the downward force on the towball
(removable with or without tools).
In each country, it is imperative that
the towed loads authorised by local
legislation are complied with. To find
out your vehicle's towing capacities
and its gross train weight, consult a
PEUGEOT dealer.
The kerb weight is equal to the weight
without load + driver (75 kg) + fuel tank
filled to 90%.
The GTW and towed load values
indicated are valid up to a maximum
altitude of 1000 metres. The value of
the towed load mentioned must be
reduced by 10 % for each additional
1000 metres.
With load transfer, the braked trailer
weight can be increased, on condition
that the equivalent of this load is
removed from the vehicle so that the
GTW is not exceeded. High ambient temperatures
may result in a reduction in the
performance of the vehicle in
order to protect the engine. When the
ambient temperature is higher than
37
°C, limit the towed weight.
Refer to chapter 9, "Identification
markings" section.
ENGINE CHARACTERISTICS
The engine characteristics (capacity,
maximum power, maximum power
speed, fuel, CO
2 emissions...) for your
vehicle are given in the registration
document.
These characteristics correspond
to the values type-approved
on a test bed, under conditions
defined in European legislation
(Directive
1999/99/EC).
For more information, refer to the
manufacturer's website or sales
brochure for the model. Contact
a PEUGEOT dealer or a qualified
workshop. GVW: gross vehicle weight, the
maximum authorised weight.
GTW: gross train weight, the maximum
weight for vehicle plus trailer.
Towing with a lightly loaded
vehicle can adversely affect road
holding.
Towing a trailer increases braking
distances.
When towing, the maximum permitted
speed is reduced (comply with the
legislation in force in the country).
TECHNICAL DATA
9
Weights
Page 167 of 244
04
10.9
Partner-2-VU_en_Chap10b_RT6-2-8_ed02-2014
List of recent destinations."
Navigation - guidance"
To delete the list of recent destinations, select " Guidance
options " in the navigation menu then select " Delete last
destinations" and confirm. Select "Ye s " then confirm.
Deleting just one destination is not possible. Go from the list to the menu (left/right).
"Select destination"
"Journey leg and route
"
"Guidance options "
"Map management"
"Stop / Restore guidance "
Press N AV
.
orTo make full use of all of the
functions of your navigation
system, update the mapping
regularly. Contact a
PEUGEOT dealer or order
your mapping update at
http://peugeot.navigation.com
A short press on the end of the
lighting control stalk repeats
the last navigation message.
NAVIGATION - GUIDANCE
Access to the "NAVIGATION" menu
Page 232 of 244
09
10.74
Partner-2-VU_en_Chap10c_RD45_ed02_2014
SCREEN MENU MAP(S)
Radio-CD
* The settings vary according to vehicle.REG mode
CD repeat
Shuffle play
Vehicle config*
R wiper in rev
Options
Guide lighting
Diagnostic
RDS options
View
Abandon
1
2
3
3
1
2
2
2
2
1
2
2
Screen A
MAIN FUNCTION
Option A1
Option A11
Option A
Option B...1
2
3
1