Page 38 of 192

36
Bipper_en_Chap03_pret-a-partir_ed02-2014
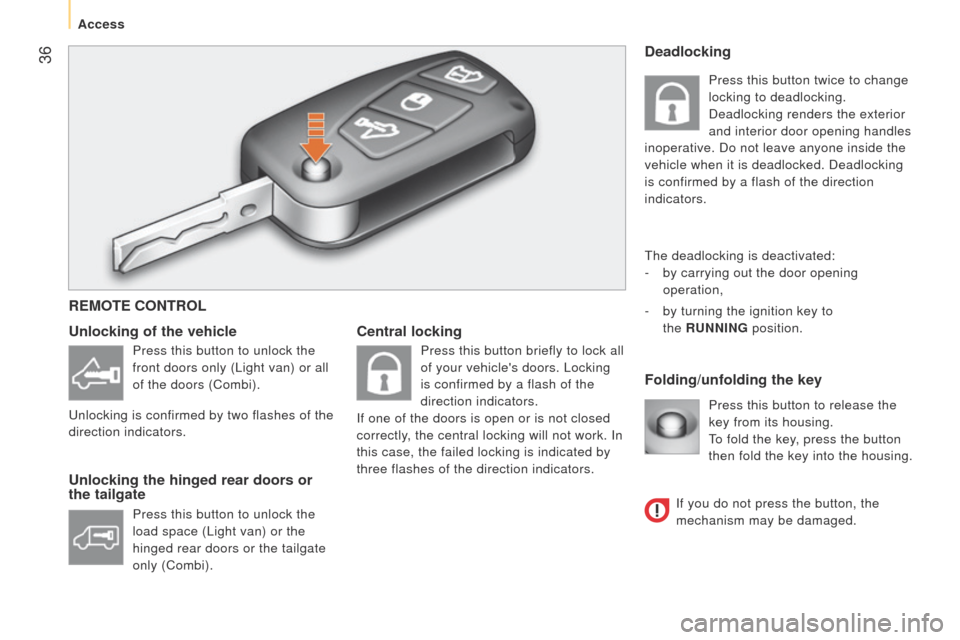
Central lockingFolding/unfolding the key
Unlocking of the vehicle
Unlocking the hinged rear doors or
the tailgate
Press this button to release the
key from its housing.
to fold the key
, press the button
then fold the key into the housing.
Deadlocking
the deadlocking is deactivated:
-
by carrying out the door opening
operation,
-
by turning the ignition key to
the
RUNNING
position.
REMOTE CONTROL
Press this button to unlock the
front doors only (l ight van) or all
of the doors (Combi).
u
nlocking is confirmed by two flashes of the
direction indicators.
Press this button to unlock the
load space (
l ight van) or the
hinged rear doors or the tailgate
only (Combi). Press this button briefly to lock all
of your vehicle's doors.
l ocking
is confirmed by a flash of the
direction indicators.
If one of the doors is open or is not closed
correctly, the central locking will not work. In
this case, the failed locking is indicated by
three flashes of the direction indicators. Press this button twice to change
locking to deadlocking.
Deadlocking renders the exterior
and interior door opening handles
inoperative. Do not leave anyone inside the
vehicle when it is deadlocked. Deadlocking
is confirmed by a flash of the direction
indicators.
If you do not press the button, the
mechanism may be damaged.
Access
Page 43 of 192
41
Bipper_en_Chap03_pret-a-partir_ed02-2014
OPENING FROM THE OUTSIDE
Driver's door
use the remote control to unlock from the
outside.
Pull the handle towards you.
If the remote control does not work, insert
the metal part of the key in the lock on the
driver's side.
Sliding side door
Pull the handle towards you then towards
the rear.
Slide the door fully to pass the point of
resistance in the open position.
When the fuel filler flap is open, a
safety system checks the sliding of the
side door (Combi).
Tailgate (Combi)
After unlocking the vehicle using the remote
control or the key, pull the central handle
and lift the tailgate.If your vehicle is parked on a slope,
guide the side door as it slides.
t
he
door could open or close more quickly due
to the incline of the ground, risking injury.
As a safety precaution and to guarantee
correct operation, do not drive with the
sliding side door open.
3
READY TO SET OFF
Access
Page 45 of 192

43
Bipper_en_Chap03_pret-a-partir_ed02-2014
Good practice
When opening, take care not to obstruct the
guide space on the floor to allow the door to
slide correctly.
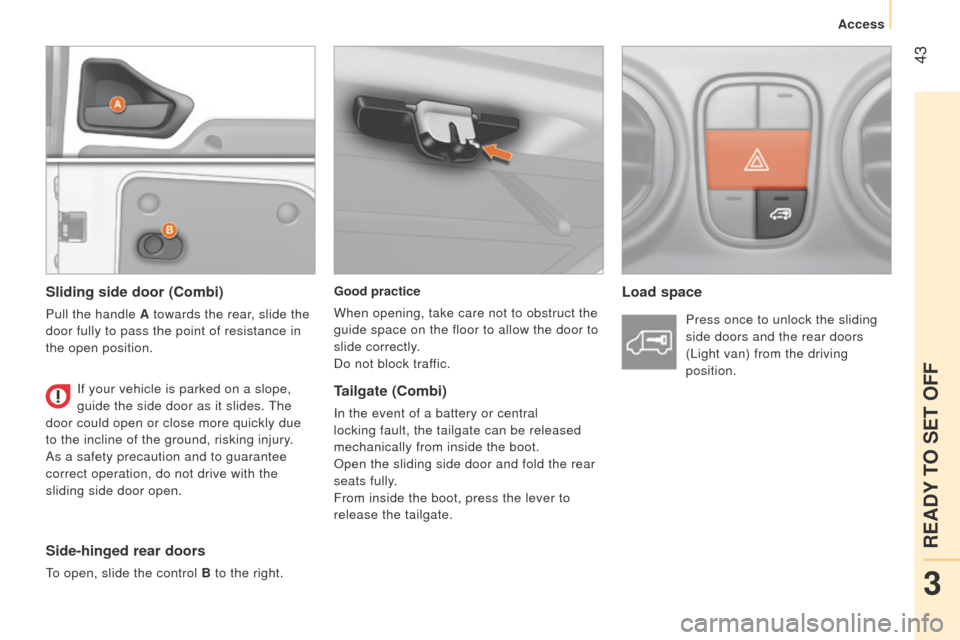
Do not block traffic.Load space
Sliding side door (Combi)
Pull the handle A towards the rear, slide the
door fully to pass the point of resistance in
the open position.
Side-hinged rear doors
to open, slide the control B to the right.
If your vehicle is parked on a slope,
guide the side door as it slides.
t
he
door could open or close more quickly due
to the incline of the ground, risking injury.
As a safety precaution and to guarantee
correct operation, do not drive with the
sliding side door open. Press once to unlock the sliding
side doors and the rear doors
( l ight van) from the driving
position.
Tailgate (Combi)
In the event of a battery or central
locking fault, the tailgate can be released
mechanically from inside the boot.
Open the sliding side door and fold the rear
seats fully.
From inside the boot, press the lever to
release the tailgate.
3
READY TO SET OFF
Access
Page 47 of 192

45
Bipper_en_Chap03_pret-a-partir_ed02-2014
Sliding side door (Combi)
use the grab handle to pass the point of
resistance and start the movement.
t
hen
use the handle to guide the door closed.
Child safety
this prevents either of the rear doors being
opened from inside.
F
t
urn the switch on each rear door a
quarter of a turn using the ignition key.
CLOSING FROM THE OUTSIDE
Sliding side door
Pull the handle towards you then towards
the front to pass the point of resistance
(
l ight van) or to release the door retaining
device (Combi).
Slide the door fully until it is closed.
Hinged rear doors
Start by closing the small hinged door, this is
secured automatically when closed.
Close the large door using its handle.
Tailgate (Combi)
lower the tailgate using the interior grab
handle.
If your vehicle is on a slope, guide the
sliding door all the way until closed.
t
his is because the door could open or close
itself more quickly because of the incline
and result in injuries.
3
READY TO SET OFF
Access
Page 84 of 192

82
Bipper_en_Chap04_ergonomie_ed02-2014
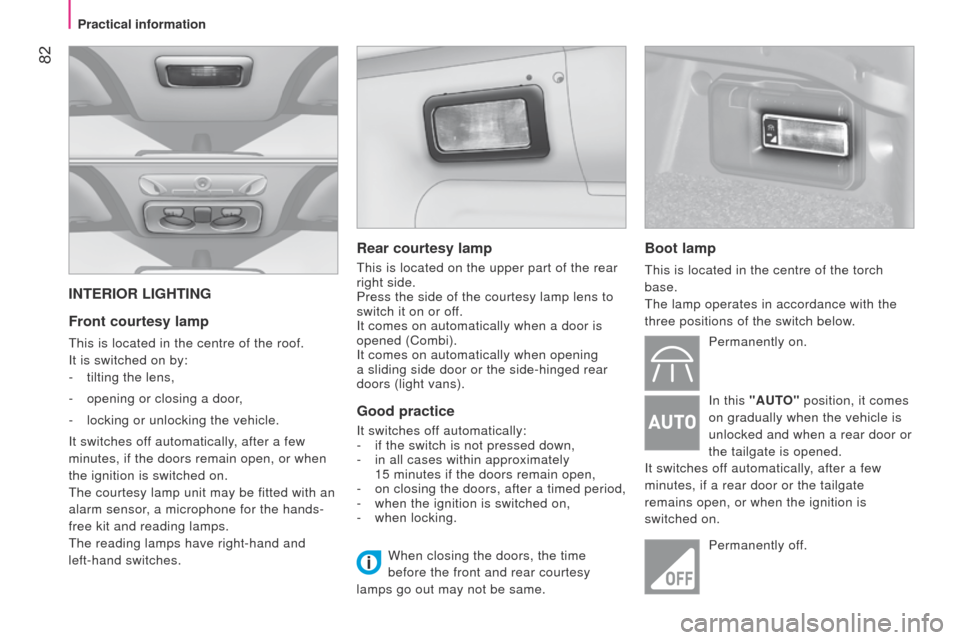
INTERIOR LIGHTING
Front courtesy lamp
this is located in the centre of the roof.
It is switched on by:
-
tilting the lens,
-
opening or closing a door
,
-
locking or unlocking the vehicle.
It switches of
f automatically, after a few
minutes, if the doors remain open, or when
the ignition is switched on.
t
he courtesy lamp unit may be fitted with an
alarm sensor, a microphone for the hands-
free kit and reading lamps.
t
he reading lamps have right-hand and
left-hand switches.
Rear courtesy lamp
this is located on the upper part of the rear
right side.
Press the side of the courtesy lamp lens to
switch it on or off.
It comes on automatically when a door is
opened (Combi).
It comes on automatically when opening
a sliding side door or the side-hinged rear
doors (light vans).
Good practice
It switches off automatically:
- if the switch is not pressed down,
-
in all cases within approximately
15 minutes if the doors remain open,
-
on closing the doors, after a timed period,
-
when the ignition is switched on,
-
when locking.
Boot lamp
this is located in the centre of the torch
base.
t
he lamp operates in accordance with the
three positions of the switch below.
Permanently on.
In this "AUTO"
position, it comes
on gradually when the vehicle is
unlocked and when a rear door or
the tailgate is opened.
It switches off automatically, after a few
minutes, if a rear door or the tailgate
remains open, or when the ignition is
switched on.
Permanently off.
When closing the doors, the time
before the front and rear courtesy
lamps go out may not be same.
Practical information
Page 166 of 192

164
Bipper_en_Chap09_aide-rapide_ed02-2014
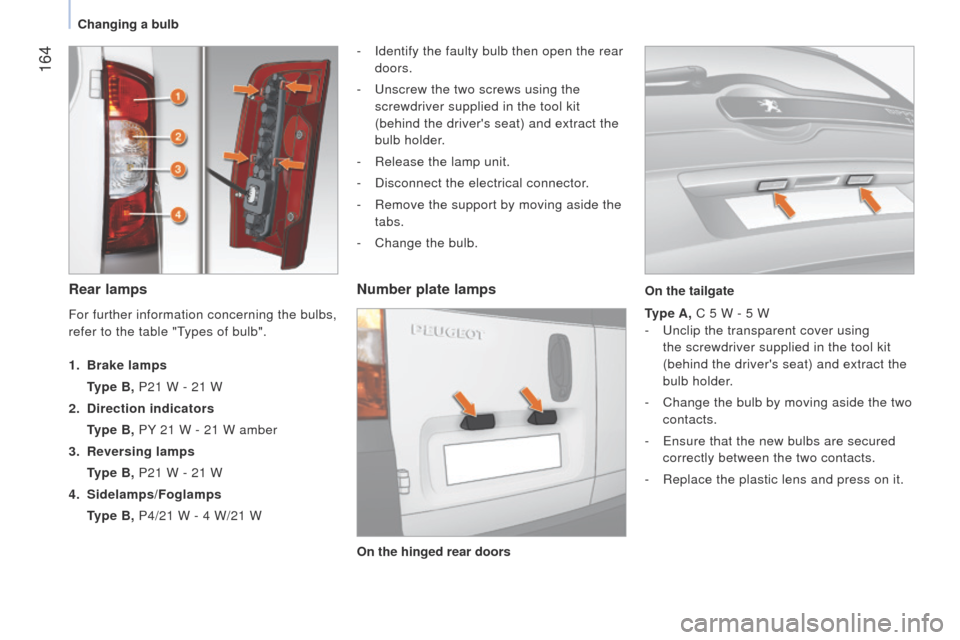
Rear lamps
- Identify the faulty bulb then open the rear
doors.
-
u nscrew the two screws using the
screwdriver supplied in the tool kit
(behind the driver's seat) and extract the
bulb holder.
-
Release the lamp unit.
-
Disconnect the electrical connector
.
-
Remove the support by moving aside the
tabs.
-
Change the bulb.
Number plate lamps
Type A, C 5 W - 5 W
- u nclip the transparent cover using
the screwdriver supplied in the tool kit
(behind the driver's seat) and extract the
bulb holder.
-
Change the bulb by moving aside the two
contacts.
-
e nsure that the new bulbs are secured
correctly between the two contacts.
-
Replace the plastic lens and press on it.
For further information concerning the bulbs,
refer to the table "
t
ypes of bulb".
1.
Brake lamps
T
ype B, P21 W - 21 W
2.
Direction indicators
T
ype B, PY 21 W - 21 W amber
3.
Reversing lamps
T
ype B, P21 W - 21 W
4.
Sidelamps/Foglamps
T
ype B, P4/21
W - 4
W/21
W On the hinged rear doors On the tailgate
Changing a bulb
Page 167 of 192
165
Bipper_en_Chap09_aide-rapide_ed02-2014
Third brake lamp
On the hinged rear doors
Type B, W 5 W - 5 W (4 bulbs)
- u nclip the transparent cover using the
screwdriver located in the tool kit.
-
Disconnect the electrical connector
.
-
Remove the bulb holder by squeezing the
two tabs.
-
Remove the faulty bulb.
-
Change the bulb. On the tailgate
T
ype B, W5W - 5W (5 bulbs)
-
Open the tailgate.
-
Remove the two cover retaining screws,
then the cover.
-
Remove the bulb holder by squeezing the
two tabs.
-
Remove the faulty bulb.
-
Change the bulb.
If you encounter any dif
ficulty, consult a
P
euge O t
dealer or a qualified workshop.
9
QUICK HELP
Changing a bulb