2014.5 Peugeot Bipper height adjustment
[x] Cancel search: height adjustmentPage 6 of 192

4
Bipper_en_Chap01_vue-ensemble_ed02-2014
EXTERIOR (LIGHT VAN)
Rear lamp, direction indicators, 3rd brake lamp ..........46-47, 164-165
Right-hand side:
fuel filler cap, fuel tank
...................
142
fuel cut-off ...............................
142-143
l
oad space
.................................
77-78
Rear doors
............................
36, 42-45
Opening/Closing to 180°
...........
42, 44
Number plate lamps
......................164
Rear parking sensors
......................88
Spare wheel, changing a wheel, tools
..................................... 155-157
towing, lifting .................................172
towbar .................................... 137-13
8
Dimensions
.............................
174-175
Accessories
............................
139-140
Roof rack
.......................................
139
Key, remote control, battery
........
36-38
Central locking
.....................
36, 42, 44
Opening/Closing front windows
....... 37
Confidential card .............................. 39
Alarm
...............................................
40
Wiper blades.................................. 156
Door mirrors
..................................... 51
Side repeater
................................. 163
Front lamps, foglamps,
direction indicators
... 46-47, 161-162
Headlamp beam height adjustment ....... 47
Changing bulbs.......................161-16 5
Opening/Closing doors
........
.................... 36, 38, 41-45
Opening the bonnet
....................... 144
Configuration -
Autoclose
.................... 42, 44, 83, 85 Brakes, pads..........................
147, 149
Hill start assist
.................................60
Braking assistance
.................112-113
trajectory control
....................113-115
tyres, pressures
....................159, 183
Snow chains
..................................160
Location
Page 7 of 192

5
Bipper_en_Chap01_vue-ensemble_ed02-2014
EXTERIOR (COMBI)
Brakes, pads..........................147, 149
Hill start assist ................................. 60
Braking assistance
.................112-113
trajectory control
....................113-115
Under-inflation detection ......... 116-117
tyres, pressures
....................159, 183
Snow chains
.................................. 160
Dimensions
.............
176-177, 178-179
Accessories
............................
139-140
Roof bars
.......................................
139
Key, remote control, battery
........
36-38
Central locking
.....................
36, 42, 44
Opening/Closing front windows
....... 37
Confidential card .............................. 39
Alarm
...............................................
40
Wiper blades.................................. 166
Door mirrors
.....................................
51
Side repeater
................................. 163
Front lamps, foglamps, direction indicators
.................
46-47, 161-162
Headlamp beam height adjustment
....
47
Changing bulbs.......................161-165
Opening/Closing doors
........
.................... 36, 38, 41-45
Child lock
......................................... 45
Rear windows
.................................. 52
Opening the bonnet
....................... 144
Configuration -
Autoclose
.................... 42, 44, 83, 85 Right-hand side:
fuel filler cap, fuel tank
...................
142
fuel cut-off ...............................
142-143
Rear fittings ................................
80-81
Rear doors
............................
36, 42-45
Opening/Closing to 180°
...........
42, 44
Number plate lamps
......................
164
Rear parking sensors
......................
88
Spare wheel, changing a wheel, tools,
temporary puncture
repair kit ...............
155-157, 158-159
towing, lifting ................................. 172
towbar .................................... 137-13
8
Rear lamps, direction indicators,
3
rd brake lamp ..........46-47, 164-165
1
OVERVIEW
Location
Page 14 of 192

12
Bipper_en_Chap01_vue-ensemble_ed02-2014
INSTRUMENTS AND CONTROLS
Instrument panels, screens, dials ........25
Warning lamps, indicator lamps ......26-33
Indicators, gauge .......................... 34-35Steering wheel, adjustments
...........
53
Horn ...............................................
11 2
Dashboard / Centre console .......18-19
l
ighting controls
......................... 46-47
g
uide-me-home lighting
.................. 47
Parking lamps
.................................. 46
Cruise control
............................. 49-50
Configuration / Personalisation
of the vehicle
...........................84-87
Setting the time........................... 84-85
Headlamp beam height adjustment
... 47
l
ighting dimmer
............................... 35
Anti-slip regulation / Intelligent traction control
..................... 113-115
Reinitialisation of under-infaltion detection
.......
.............................. 11 7
Front/rear foglamps
......................... 47
Fuses
...................................... 167-169
Opening the bonnet
....................... 144 Starting, ignition switch
..............39, 59
Front/rear wipers
.............................48
Screenwash
.....................................48
trip computer
..................................83
e
lectric windows
..............................52
Door mirrors
.....................................51
Location
Page 35 of 192

33
Bipper_en_Chap03_pret-a-partir_ed02-2014
Displaydisplaysindicates Solution - action
Stop & Start on.
engine S
t
OP
mode
invoked following a stop of
the vehicle. As soon as you want to move off, the
warning lamp goes off and the engine starts
automatically in S
t
ARt mode.
flashes for a few
seconds then goes
off. temporary unavailability
of S
t
OP
mode or
S
t
ARt mode invoked
automatically. Particular case with S
t
OP
mode and S t
ARt
mode.
"Ready to set of
f - Starting and stopping"
section.
g
ear shift indicator the arrow pointing up. a suggested change up. "Ready to set off -
g earbox and steering
wheel" section.
Headlamp beam height adjustment of the
headlamps.a position from 0 to 3
according to the load in
the vehicle. Adjust using the buttons in the side control panel.
"Ready to set off - Steering mounted controls
section".
Ambient temperature
(°C /°F) the temperature, flashing
and accompanied by a
message in the screen.weather conditions which
could result in the presence
of ice on the road.
Be especially vigilant and do not brake sharply.
"Safety - Driving safety" section.
Date (YYYY/MM/DD)
time (HH:MM) a setting:
of the Date.
of
the t
ime.a configuration via the
SET / Back button on the
side control panel. "
t
echnology on board - V
ehicle configuration"
menu.
3
READY TO SET OFF
Instruments and controls
Page 49 of 192

47
Bipper_en_Chap03_pret-a-partir_ed02-2014
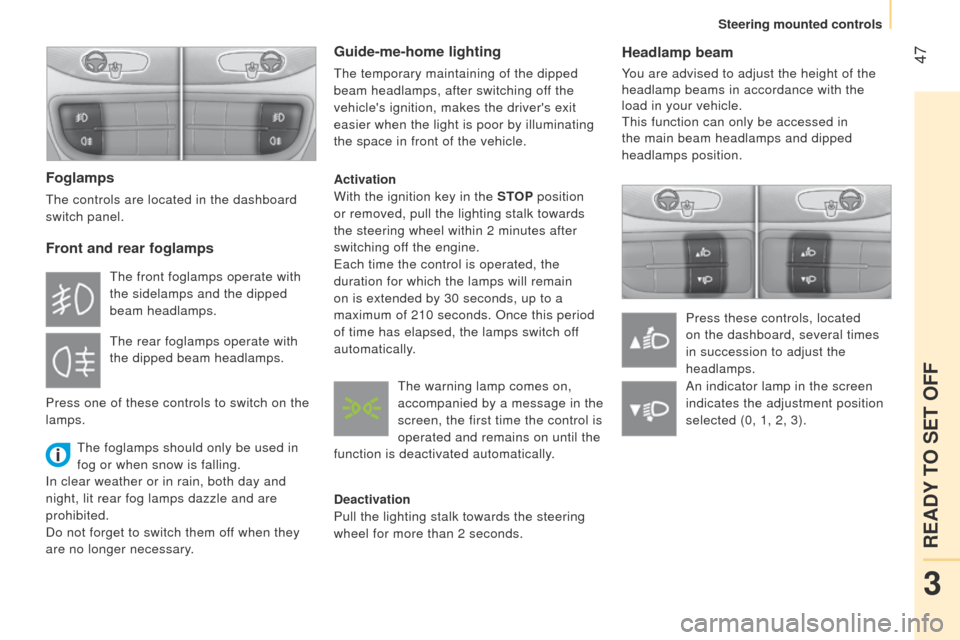
Headlamp beam
You are advised to adjust the height of the
headlamp beams in accordance with the
load in your vehicle.
t
his function can only be accessed in
the main beam headlamps and dipped
headlamps position.
Press these controls, located
on the dashboard, several times
in succession to adjust the
headlamps.
Foglamps
the controls are located in the dashboard
switch panel.
Front and rear foglamps
the foglamps should only be used in
fog or when snow is falling.
In clear weather or in rain, both day and
night, lit rear fog lamps dazzle and are
prohibited.
Do not forget to switch them off when they
are no longer necessary.
Guide-me-home lighting
the temporary maintaining of the dipped
beam headlamps, after switching of f the
vehicle's ignition, makes the driver's exit
easier when the light is poor by illuminating
the space in front of the vehicle.
Activation
With the ignition key in the STOP position
or removed, pull the lighting stalk towards
the steering wheel within 2 minutes after
switching off the engine.
e
ach time the control is operated, the
duration for which the lamps will remain
on is extended by 30 seconds, up to a
maximum of 210 seconds. Once this period
of time has elapsed, the lamps switch off
automatically.
Deactivation
Pull the lighting stalk towards the steering
wheel for more than 2 seconds.
t
he front foglamps operate with
the sidelamps and the dipped
beam headlamps.
t
he rear foglamps operate with
the dipped beam headlamps.
Press one of these controls to switch on the
lamps.
t
he warning lamp comes on,
accompanied by a message in the
screen, the first time the control is
operated and remains on until the
function is deactivated automatically. An indicator lamp in the screen
indicates the adjustment position
selected (0, 1, 2, 3).
3
READY TO SET OFF
Steering mounted controls
Page 55 of 192

53
Bipper_en_Chap03_pret-a-partir_ed02-2014
Good practice
to change gear smoothly
, always press the
clutch pedal fully down.
to prevent the mat from becoming caught under the pedal:
- ensure that the mat is positioned correctly ,
-
never fit one mat on top of another
.
Avoid leaving your hand on the gear knob as
the force exerted, even if slight, may cause
wear of the internal components of the
gearbox over time.
MANUAL GEARBOX
Reverse
gear
Never engage reverse gear until the vehicle
is completely stationary.
t
he lever should be moved slowly to reduce
the noise on engaging reverse gear.
If your vehicle is fitted with parking
sensors, the system comes into
operation when reverse gear is engaged,
confirmed by an audible signal.
Refer to the "
t
echnology on board -
Parking sensors" section.
STEERING WHEEL ADJUSTMENT
When the vehicle is stationary, release the
steering wheel adjustment by pushing the
lever down.
Adjust the steering wheel for height and
reach, then lock by pulling the lever up fully. When traversing a flooded road or a
ford, drive at walking pace.
3
READY TO SET OFF
Gearbox and steering wheel
Page 66 of 192

64
Bipper_en_Chap04_ergonomie_ed02-2014
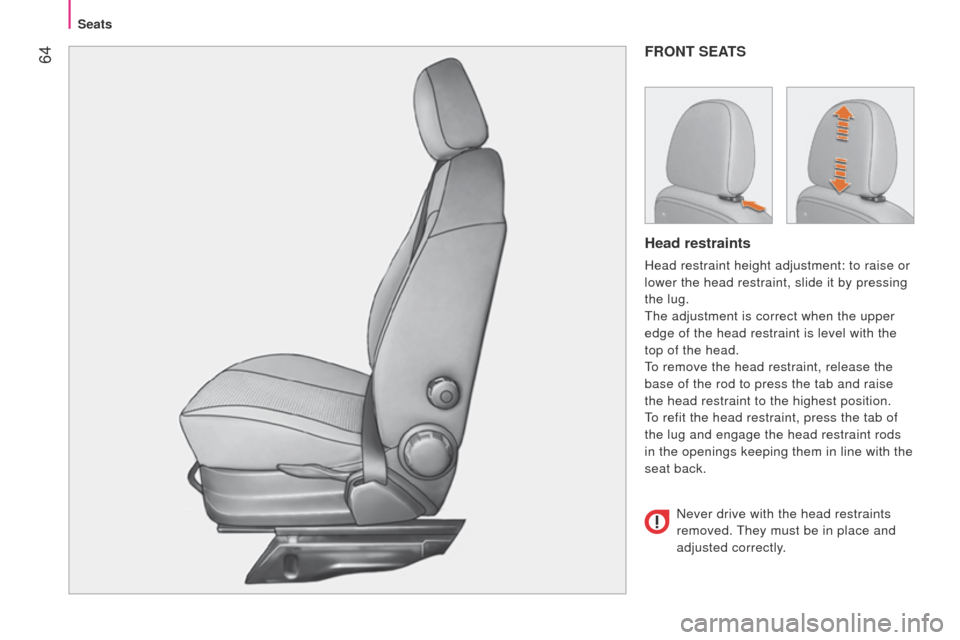
FRONT SEATS
Head restraints
Head restraint height adjustment: to raise or
lower the head restraint, slide it by pressing
the lug.
t
he adjustment is correct when the upper
edge of the head restraint is level with the
top of the head.
to remove the head restraint, release the
base of the rod to press the tab and raise
the head restraint to the highest position.
to refit the head restraint, press the tab of
the lug and engage the head restraint rods
in the openings keeping them in line with the
seat back.
Never drive with the head restraints
removed.
t
hey must be in place and
adjusted correctly.
Seats
Page 67 of 192

65
Bipper_en_Chap04_ergonomie_ed02-2014
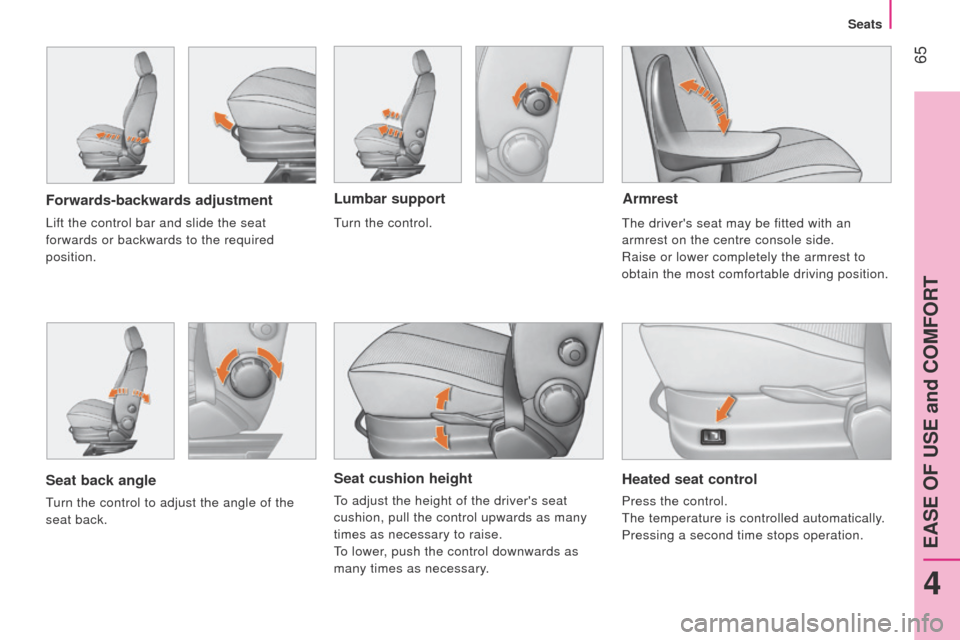
Seat cushion height
to adjust the height of the driver's seat
cushion, pull the control upwards as many
times as necessary to raise.
to lower
, push the control downwards as
many times as necessary.
Forwards-backwards adjustment
Heated seat control
Press the control.
t
he temperature is controlled automatically.
Pressing a second time stops operation.
l
ift the control bar and slide the seat
forwards or backwards to the required
position.
Lumbar support
Seat back angle
turn the control to adjust the angle of the
seat back.
turn the control.
Armrest
the driver's seat may be fitted with an
armrest on the centre console side.
Raise or lower completely the armrest to
obtain the most comfortable driving position.
4
EASE OF USE and COMFORT
Seats