2014.5 Peugeot Bipper towing
[x] Cancel search: towingPage 13 of 192
11
Bipper_en_Chap01_vue-ensemble_ed02-2014
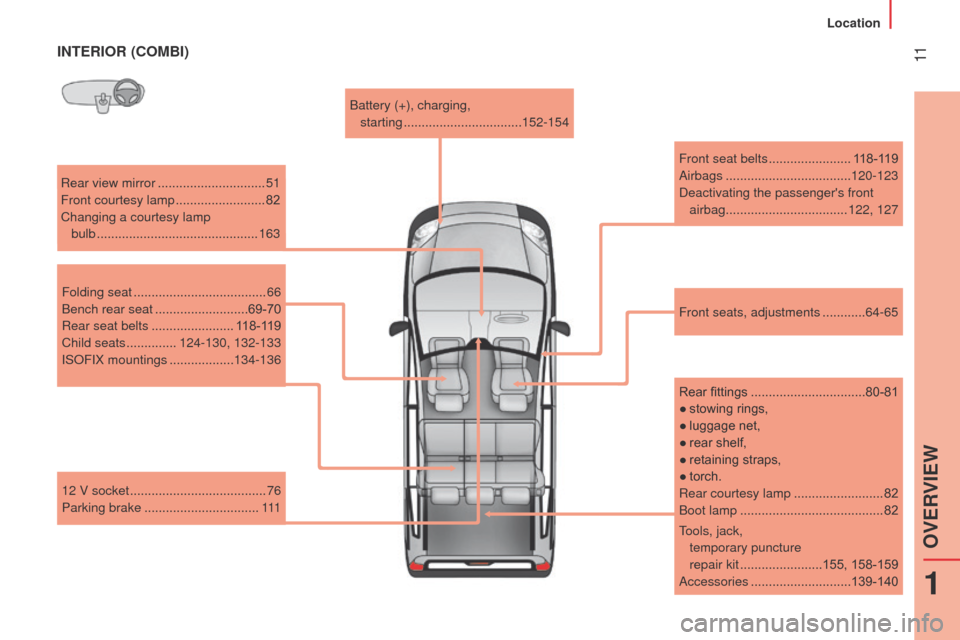
INTERIOR (COMBI)
Rear view mirror ..............................51
Front courtesy lamp .........................82
Changing a courtesy lamp bulb
............................................. 163
Front seats, adjustments
............64-65
12 V socket
...................................... 76
Parking brake
................................ 111Battery (+), charging,
starting .................................
152-154
Front seat belts .......................
118-119
Airbags ...................................
120-123
Deactivating the passenger's front airbag
..................................122, 127
Folding seat
..................................... 66
Bench rear seat
..........................69-70
Rear seat belts
.......................118-119
Child seats
..............124-130, 132-133
ISOFIX mountings
..................134-136
Rear fittings
................................80-81
●
stowing
rings,
●
luggage
net,
●
rear shelf,
●
retainin
g straps,
●
torch.
Rear courtesy lamp
.........................82
Boot lamp
........................................82
tools, jack,
temporary puncture
repair kit
.......................155, 158-159
Accessories
............................139-140
1
OVERVIEW
Location
Page 59 of 192
57
Bipper_en_Chap03_pret-a-partir_ed02-2014
Reinitialisation
turn the ignition key to the MAR position.
Within ten seconds, the gear engaged should
appear in the instrument panel screen.
Otherwise, turn the ignition key to the
STOP
position and wait until the instrument
panel screen goes off.
turn the ignition key to the
MAR position
again. t he illumination of this warning
lamp, accompanied by a message
in the instrument panel screen,
indicates incorrect use of the
gearbox by the driver.
With the ignition on, the flashing this warning
lamp, accompanied by an audible signal and
a message in the instrument panel screen,
indicates a fault with the gearbox.
Have it checked by a P
euge O t
dealer or a
qualified workshop.
If the problem persist, have the system
checked by a P
euge O t
dealer or a
qualified workshop.
Never select neutral N while the vehicle
is moving.
Only engage reverse gear R with the vehicle
immobilised and the brake pedal pressed.
You risk damaging the gearbox if you
press the accelerator and brake pedals
simultaneously.
Back-up mode - Slow move off
this procedure should be applied if pressing
the brake pedal is not recognised by the
system, or if the gearbox has fault on
starting the engine.
Press the brake pedal firmly.
turn the ignition key to the
AV V position for
at least seven seconds.
t
he engine starts.
t
he system is in back-up mode; the gearbox
will not go beyond the 3rd gear engaged and
automated mode is not available.
If the engine does not start, have the
system checked by a P
euge O t
dealer
or a qualified workshop.
Operating faultIn the event of a prolonged stop with
the engine running, it is recommended
that the gearbox be put into neutral
(position N).
With the vehicle stationary, the engine
running and first, second or reverse
gear engaged, the gearbox changes to
neutral automatically, accompanied
by
an audible signal, in the following
circumstances:
-
no action on the accelerator or brake
pedals for at least 3
minutes,
-
brake pedal applied for more than
10
minutes,
-
driver's door opened and no action on the
accelerator or brake pedals for at least
1.5
seconds,
-
a gearbox fault. When towing your vehicle, ensure that
the gearbox is in neutral (position N ).
When traversing a flooded road or a
ford, drive at walking pace.
3
READY TO SET OFF
Gearbox and steering wheel
Page 80 of 192
78
Bipper_en_Chap04_ergonomie_ed02-2014
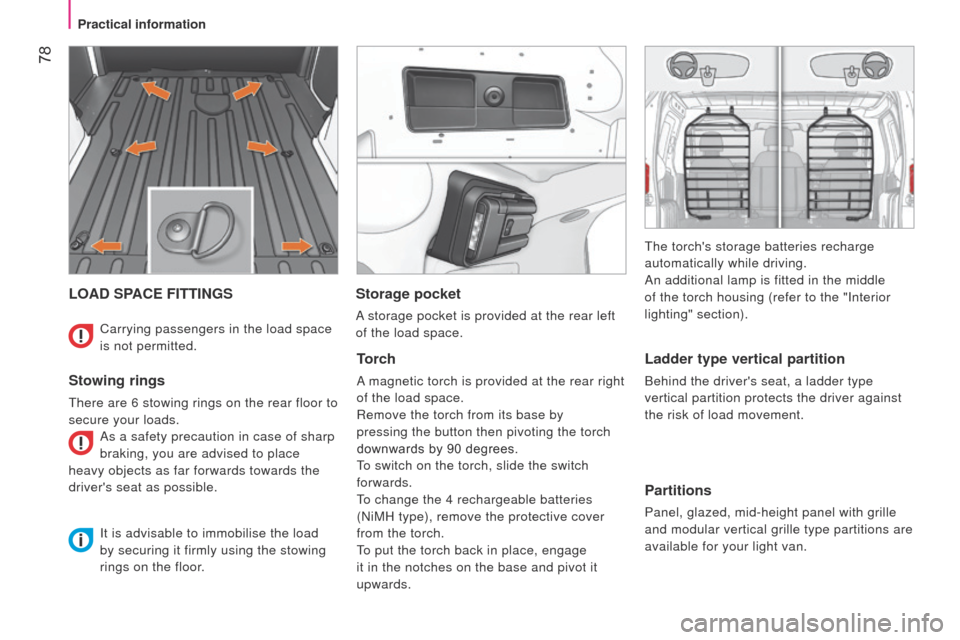
LOAD SPACE FITTINGS
Stowing rings
there are 6 stowing rings on the rear floor to
secure your loads. As a safety precaution in case of sharp
braking, you are advised to place
heavy objects as far forwards towards the
driver's seat as possible.
Storage pocket
A storage pocket is provided at the rear left
of the load space.
Torch
A magnetic torch is provided at the rear right
of the load space.
Remove the torch from its base by
pressing the button then pivoting the torch
downwards by 90 degrees.
to switch on the torch, slide the switch
forwards.
to change the 4 rechargeable batteries
(NiMH type), remove the protective cover
from the torch.
to put the torch back in place, engage
it in the notches on the base and pivot it
upwards.
Ladder type vertical partition
Behind the driver's seat, a ladder type
vertical partition protects the driver against
the risk of load movement.
Partitions
Panel, glazed, mid-height panel with grille
and modular vertical grille type partitions are
available for your light van.
Carrying passengers in the load space
is not permitted.
It is advisable to immobilise the load
by securing it firmly using the stowing
rings on the floor.
t
he torch's storage batteries recharge
automatically while driving.
An additional lamp is fitted in the middle
of the torch housing (refer to the "Interior
lighting" section).
Practical information
Page 82 of 192
80
Bipper_en_Chap04_ergonomie_ed02-2014
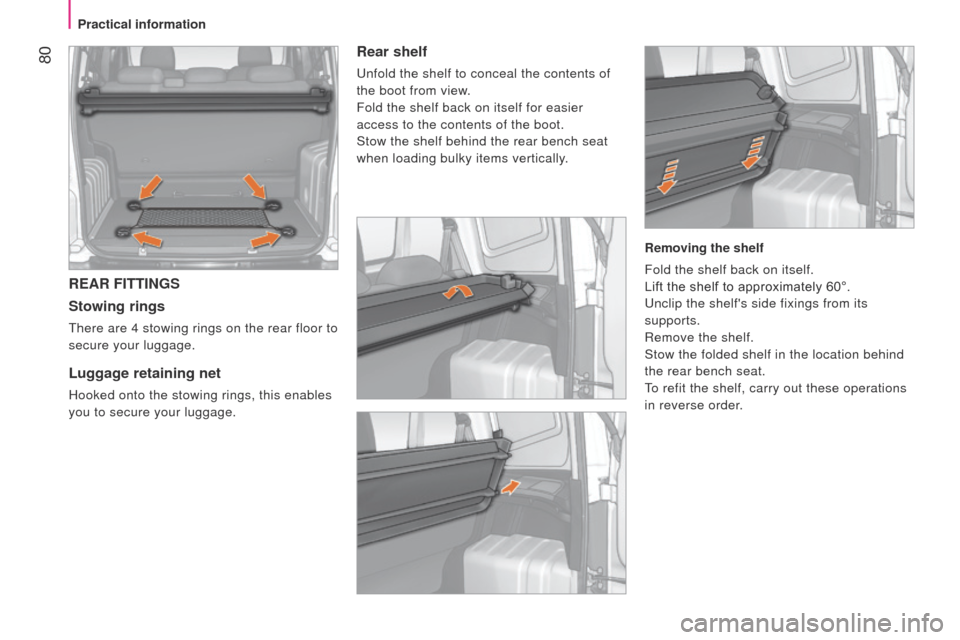
REAR FITTINGS
Stowing rings
there are 4 stowing rings on the rear floor to
secure your luggage.
Luggage retaining net
Hooked onto the stowing rings, this enables
you to secure your luggage.
Rear shelf
unfold the shelf to conceal the contents of
the boot from view .
Fold the shelf back on itself for easier
access to the contents of the boot.
Stow the shelf behind the rear bench seat
when loading bulky items vertically.
Removing the shelf
Fold the shelf back on itself.
Lift the shelf to approximately 60°.
u
nclip the shelf's side fixings from its
supports.
Remove the shelf.
Stow the folded shelf in the location behind
the rear bench seat.
to refit the shelf, carry out these operations
in reverse order.
Practical information
Page 139 of 192
137
Bipper_en_Chap07_accessoire_ed02-2014
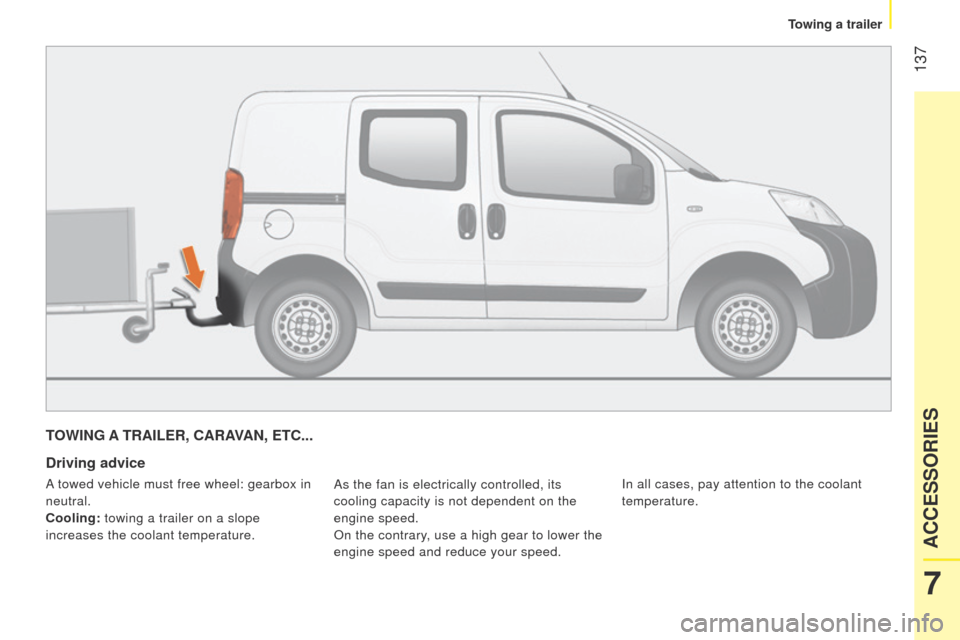
TOWING A TRAILER, CARAVAN, ETC...
Driving advice
As the fan is electrically controlled, its
cooling capacity is not dependent on the
engine speed.
On the contrary, use a high gear to lower the
engine speed and reduce your speed.In all cases, pay attention to the coolant
temperature.
A towed vehicle must free wheel: gearbox in
neutral.
Cooling: towing a trailer on a slope
increases the coolant temperature.
7
ACCESSORIES
Towing a trailer
Page 140 of 192
138
Bipper_en_Chap07_accessoire_ed02-2014
In certain cases of particularly arduous
use (towing the maximum load up a steep
slope in high temperatures), the engine
automatically limits its power. In this case,
automatic cutting off of the air conditioning
allows the engine power to be saved.If the coolant temperature
warning lamp comes on, stop the
vehicle and switch off the engine
as soon as possible.
ChecksSee the "
l evels" section of
chapter 7.
Tyres: check the tyre pressures on the
towing vehicle and the trailer, observing the
recommended pressures.
Brakes: towing increases the braking
distance. Drive at a moderate speed,
change down early and brake gradually. Side wind: sensitivity to side wind is
increased. Drive smoothly and at a
moderate speed.
ABS: the system only controls the vehicle,
not the trailer.
Distribution of loads
Distribute the load in the trailer so that the
heaviest objects are as close as possible
to the axle and the nose weight is close to
the maximum authorised without, however,
exceeding it.
t
he air density decreases with
altitude, so reducing the performance of the
engine.
t
he maximum towed load must be
reduced by 10 % for each 1 000 metres of
altitude.
Refer to the "
t
echnical data -
Identification markings" section. Rear parking sensors: the sensors will be
deactivated automatically when an genuine
P
euge O t towbar is used.
Towbar
We recommend the use of genuine
P
euge O t towbars and their harnesses,
which have been tested and approved from
the design stage of your vehicle, and that
the fitting of this equipment is entrusted to a
P
euge O t
dealer or a qualified workshop.
If this equipment is not fitted by a P
euge O t
dealer
, it is essential that it is fitted using
the electrical pre-equipment located at
the rear of the vehicle and following the
manufacturer's instructions.
t
he operation of the rear parking sensors is
deactivated automatically when the trailer
cable connector is inserted in the towbar
socket.
When the trailer cable is removed, the rear
parking sensors are re-activated.
Refer to the "
t
echnology on board -
Parking sensors" section.
For information on the maximum
weights and towed loads applicable to
your vehicle, refer to the "
t
echnical data -
Weights" section.
Towing a trailer
Page 157 of 192
155
Bipper_en_Chap09_aide-rapide_ed02-2014
CHANGING A WHEEL
Parking the vehicle
As far as possible, park the vehicle on level,
stable and non-slippery ground.
Apply the parking brake, switch off the
ignition and engage first gear (on a hill).
It is imperative that you ensure that the
occupants get out of the vehicle and wait in
a safe location.
If possible, place a chock under the
wheel diagonally opposite the wheel to be
changed.
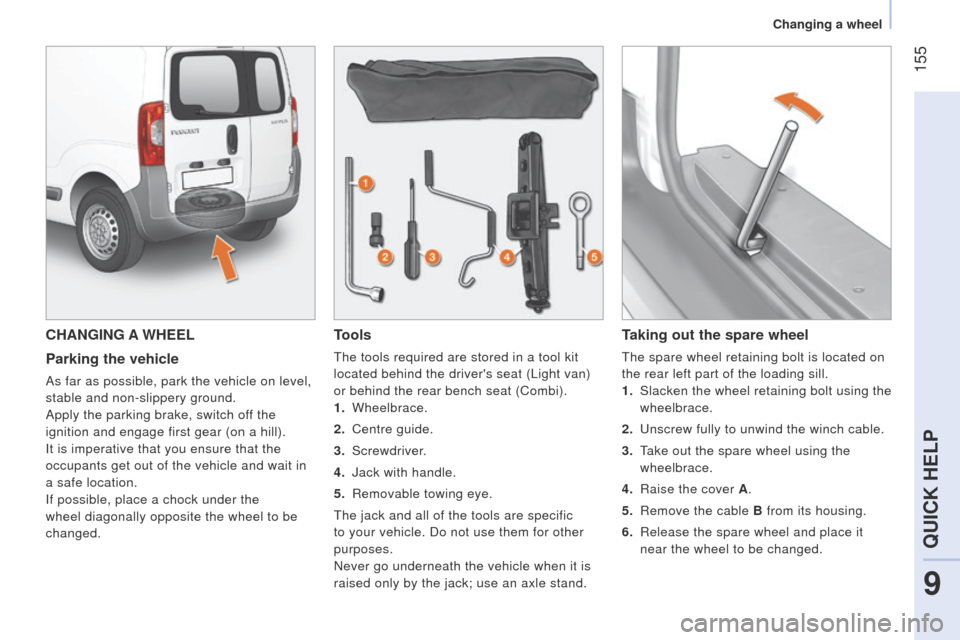
Tools
the tools required are stored in a tool kit
located behind the driver's seat ( l ight van)
or behind the rear bench seat (Combi).
1.
Wheelbrace.
2.
Centre guide.
3.
Screwdriver.
4.
Jack with handle.
5.
Removable towing eye.
t
he jack and all of the tools are specific
to your vehicle. Do not use them for other
purposes.
Never go underneath the vehicle when it is
raised only by the jack; use an axle stand.
Taking out the spare wheel
the spare wheel retaining bolt is located on
the rear left part of the loading sill.
1.
Slacken the wheel retaining bolt using the
wheelbrace.
2.
u nscrew fully to unwind the winch cable.
3.
t
ake out the spare wheel using the
wheelbrace.
4.
Raise the cover
A.
5.
Remove the cable
B from its housing.
6.
Release the spare wheel and place it
near the wheel to be changed.
9
QUICK HELP
Changing a wheel
Page 174 of 192
172
Bipper_en_Chap09_aide-rapide_ed02-2014
TOWING
the removable towing eye is located in the
tool kit behind the driver's seat ( l ight van) or
behind the rear bench seat (Combi).
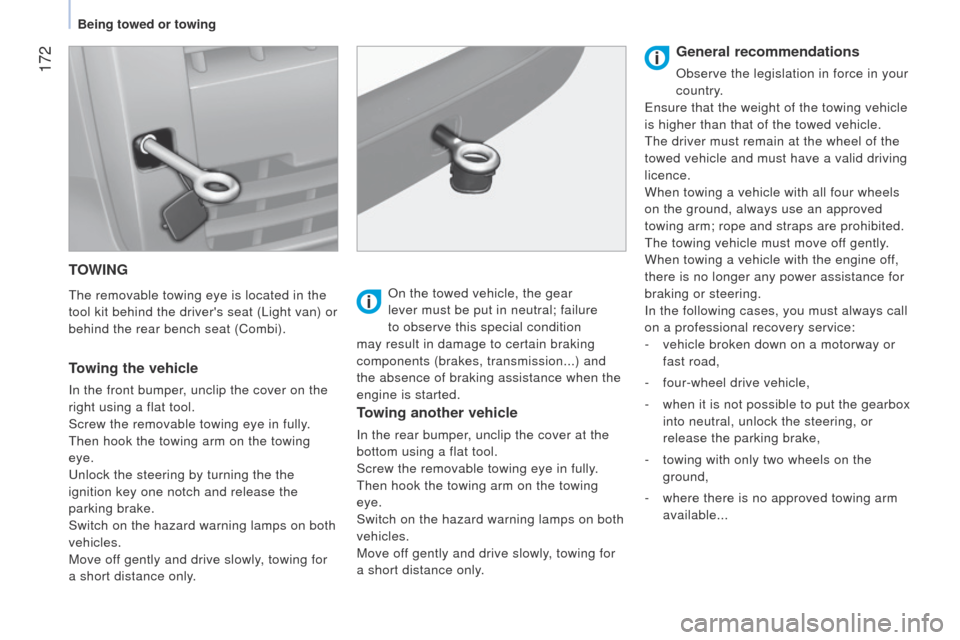
Towing the vehicle
In the front bumper, unclip the cover on the
right using a flat tool.
Screw the removable towing eye in fully.
t
hen hook the towing arm on the towing
eye.
u
nlock the steering by turning the the
ignition key one notch and release the
parking brake.
Switch on the hazard warning lamps on both
vehicles.
Move off gently and drive slowly, towing for
a short distance only. On the towed vehicle, the gear
lever must be put in neutral; failure
to observe this special condition
may result in damage to certain braking
components (brakes, transmission...) and
the absence of braking assistance when the
engine is started.
Towing another vehicle
In the rear bumper, unclip the cover at the
bottom using a flat tool.
Screw the removable towing eye in fully.
t
hen hook the towing arm on the towing
eye.
Switch on the hazard warning lamps on both
vehicles.
Move off gently and drive slowly, towing for
a short distance only.
General recommendations
Observe the legislation in force in your
country.
e
nsure that the weight of the towing vehicle
is higher than that of the towed vehicle.
t
he driver must remain at the wheel of the
towed vehicle and must have a valid driving
licence.
When towing a vehicle with all four wheels
on the ground, always use an approved
towing arm; rope and straps are prohibited.
t
he towing vehicle must move off gently.
When towing a vehicle with the engine off,
there is no longer any power assistance for
braking or steering.
In the following cases, you must always call
on a professional recovery service:
-
vehicle broken down on a motorway or
fast road,
-
four-wheel drive vehicle,
-
when it is not possible to put the gearbox
into neutral, unlock the steering, or
release the parking brake,
-
towing with only two wheels on the
ground,
-
where there is no approved towing arm
available...
Being towed or towing