Page 144 of 192

142
Bipper_en_Chap08_verifications_ed02-2014
FILLING WITH FUEL
Capacity of the fuel tank: approximately 45 litres.
Low fuel level
When the minimum fuel tank level
is reached, this warning lamp
comes on. When it first comes on,
you have approximately 6 litres
of fuel remaining. Refuel without delay to
avoid running out of fuel.
An arrow in the instrument panel indicates
which side of the vehicle the filler flap is
located.
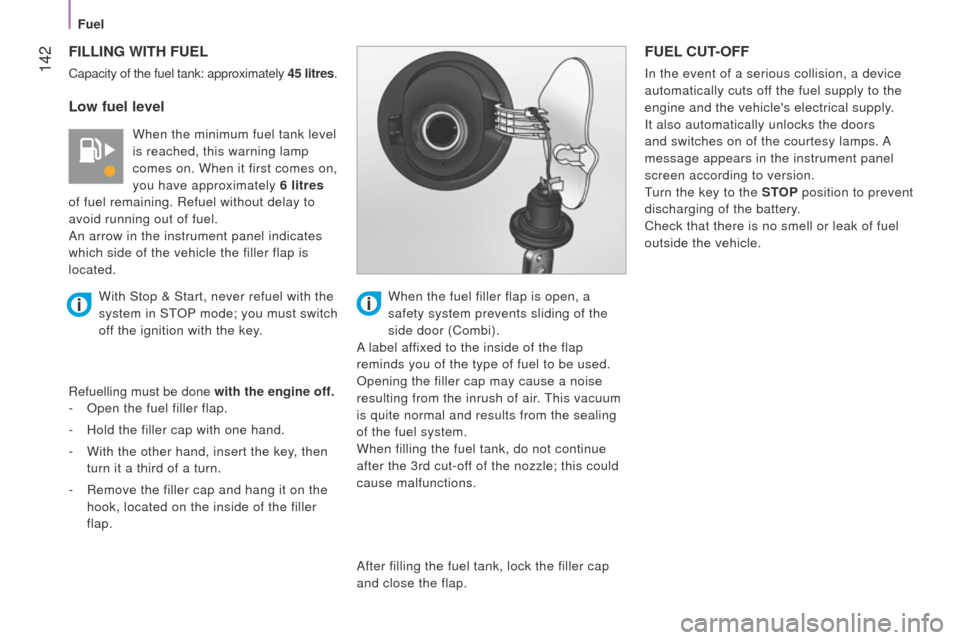
Refuelling must be done with the engine off.
-
Open the fuel filler flap.
-
Hold the filler cap with one hand.
-
With the other hand, insert the key
, then
turn it a third of a turn.
-
Remove the filler cap and hang it on the
hook, located on the inside of the filler
flap.
FUEL CUT-OFF
In the event of a serious collision, a device
automatically cuts off the fuel supply to the
engine and the vehicle's electrical supply.
It also automatically unlocks the doors
and switches on of the courtesy lamps. A
message appears in the instrument panel
screen according to version.
turn the key to the
STOP position to prevent
discharging of the battery.
Check that there is no smell or leak of fuel
outside the vehicle.
With Stop & Start, never refuel with the
system in S
t
OP
mode; you must switch
off the ignition with the key. When the fuel filler flap is open, a
safety system prevents sliding of the
side door (Combi).
A label affixed to the inside of the flap
reminds you of the type of fuel to be used.
Opening the filler cap may cause a noise
resulting from the inrush of air.
t
his vacuum
is quite normal and results from the sealing
of the fuel system.
When filling the fuel tank, do not continue
after the 3rd cut-off of the nozzle; this could
cause malfunctions.
After filling the fuel tank, lock the filler cap
and close the flap.
Fuel
Page 154 of 192

152
Bipper_en_Chap09_aide-rapide_ed02-2014
BATTERY
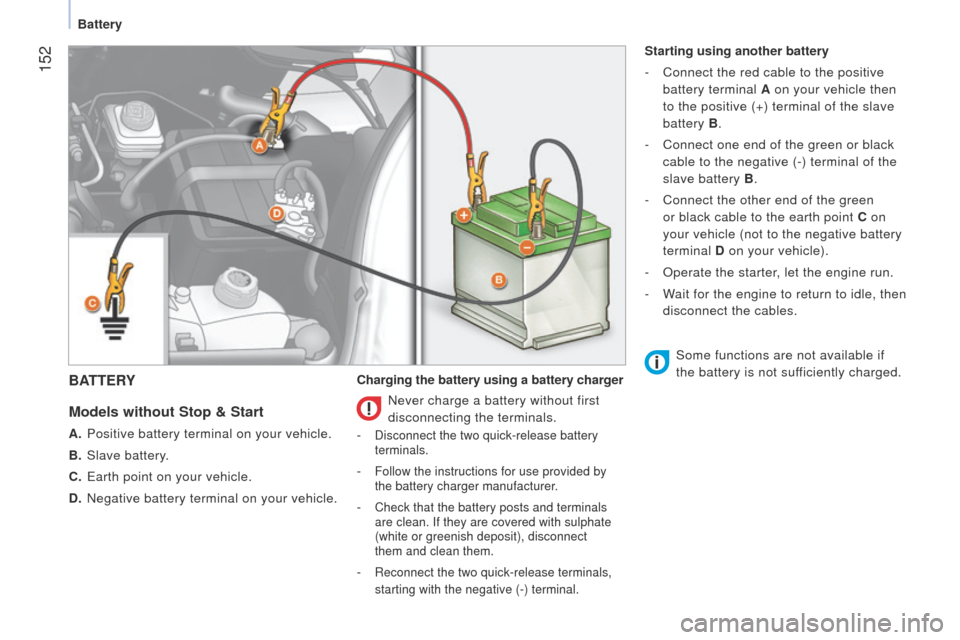
Models
without Stop & Start
A. Positive battery terminal on your vehicle.
B.
Slave battery
.
C.
e arth point on your vehicle.
D.
Negative battery terminal on your vehicle. Charging the battery using a battery charger Starting using another battery
-
Connect the red cable to the positive
battery terminal A on your vehicle then
to the positive (+) terminal of the slave
battery B.
-
Connect one end of the green or black
cable to the negative (-) terminal of the
slave battery B .
-
Connect the other end of the green
or black cable to the earth point C on
your vehicle (not to the negative battery
terminal D on your vehicle).
-
Operate the starter
, let the engine run.
-
W
ait for the engine to return to idle, then
disconnect the cables.
Never charge a battery without first
disconnecting the terminals.
- Disconnect the two quick-release battery
terminals.
- Follow the instructions for use provided by
the battery charger manufacturer.
- Check that the battery posts and terminals
are clean. If they are covered with sulphate
(white or greenish deposit), disconnect
them and clean them.
- Reconnect the two quick-release terminals,
starting with the negative (-) terminal.
Some functions are not available if
the battery is not sufficiently charged.
Battery
Page 155 of 192

153
Bipper_en_Chap09_aide-rapide_ed02-2014
Models with Stop & Start
A. Protective cover.
B.
Positive battery terminal on your vehicle.
C.
Slave battery
.
D.
e arth point on your vehicle.
E.
Connector release button.
F.
Check sensor connector
.
G.
State of charge sensor
.
H.
Negative battery terminal on your vehicle. Charging the battery using a battery charger -
Follow the instructions for use provided
by the battery charger manufacturer.
-
Check that the battery posts and
terminals are clean. If they are covered
with sulphate (white or greenish deposit),
disconnect them and clean them.
-
Reconnect connector
F
of the check
sensor G.
-
Refit the protective cover
A
to the
positive battery terminal B .
Starting using another battery
-
Remove the protective cover
A
from the
positive battery terminal B .
-
Connect the red cable to positive battery
terminal B, then to the (+) terminal of the
slave battery C .
- Connect one end of the green or black
cable to the (-) terminal of the slave
battery C.
-
Connect the other end of the green or
black cable to the earth point D of your
vehicle (not to the negative battery
terminal H of your vehicle).
-
Operate the starter
, let the engine run.
-
W
ait for the engine to return to idle, then
disconnect the cables.
-
Refit the protective cover
A to the
positive battery terminal B .
Do not disconnect the battery to
charge
it.
-
Press the release button
E to disconnect
the connector F .
-
Disconnect the connector
F from the
check sensor G .
-
Remove the protective cover
A from the
positive battery terminal B .
-
Connect the charger cables: (+) to the
positive battery terminal B ; (-) to the
negative battery terminal H .Never remove the check sensor G
from the negative battery terminal H
,
except when replacing the battery.
9
QUICK HELP
Battery
Page 156 of 192

154
Bipper_en_Chap09_aide-rapide_ed02-2014
Batteries contain harmful substances
such as sulphuric acid and lead.
t
hey
must be disposed of in accordance with the
law and must not, in any circumstances be
discarded with household waste.
take used batteries to an authorised waste
disposal site.
It is advisable to disconnect the battery
if the vehicle is not to be used for a
period of more than one month.
to do
this on models with Stop & Start:
-
press the release button
E
to
disconnect connector F ,
-
disconnect connector
F
of check
sensor G.
t
he presence of this label, in particular
with the Stop & Start system, indicates
the use of a 12 V lead-acid battery with
special technology and specification; the
involvement of a P
euge
O
t
dealer or
a qualified workshop is essential when
replacing or disconnecting the battery.
Failure to observe this recommendation may
cause premature wear of the battery.
After refitting the battery by a
P
euge
O
t
dealer or a qualified
workshop, the Stop & Start system will
only be active after a continuous period of
immobilisation of the vehicle, a period which
depends on the climatic conditions and the
state of charge of the battery (up to about
8
hours). Before charging
t
he charging operation must be carried out in
a ventilated area away from naked flames or
any possible sources of sparks to eliminate the
risks of explosion and fire.
Do not attempt to charge a frozen battery: it
must first be thawed to eliminate the risks of
explosion. If the battery has frozen, before
charging it have it checked by a specialist who
will check that the internal components have
not been damaged and that the container is
not cracked, which could mean that there is a
risk of a leak of toxic and corrosive acid.
Before disconnecting
Never disconnect a terminal when the
engine is running.
Before disconnecting the battery, you must
wait for 2 minutes after switching off the
ignition.
Close the windows and doors before
disconnecting the battery. After reconnecting
After every reconnection of the battery,
switch on the ignition and wait 1 minute
before starting to allow the electronic
systems to be initialised. If difficulties are
experienced after this, contact a P
euge O t
dealer or a qualified workshop.
If the battery has been disconnected
for some time, it may be necessary to
reinitialise the following functions:
-
the display screen settings (date, time,
language, distance and temperature
units),
-
the radio stations,
-
the central locking.
Some settings are cleared and must be
reprogrammed. Contact a P euge O t
dealer
or a qualified workshop.
Never remove the check sensor G
from the
negative battery terminal H , except when
replacing the battery.
Battery