Page 116 of 444
Front fittings
1. Sun visor (
see the "Panoramic windscreen" section)
2.
T
icket/card holder
3.
S
torage compartments
4.
I
lluminated glove box
(
see details on a following page)
5.
Doo
r pocket s
6.
U
SB por t / Auxiliar y socket
(
see details on a following page)
7.
C
igarette lighter / 12 V accessor y
socket
(
see details on following pages)
8.
P
ortable ashtray
(
see details on following pages)
9.
C
entre armrest with storage
(
see details on a following page)
Page 118 of 444

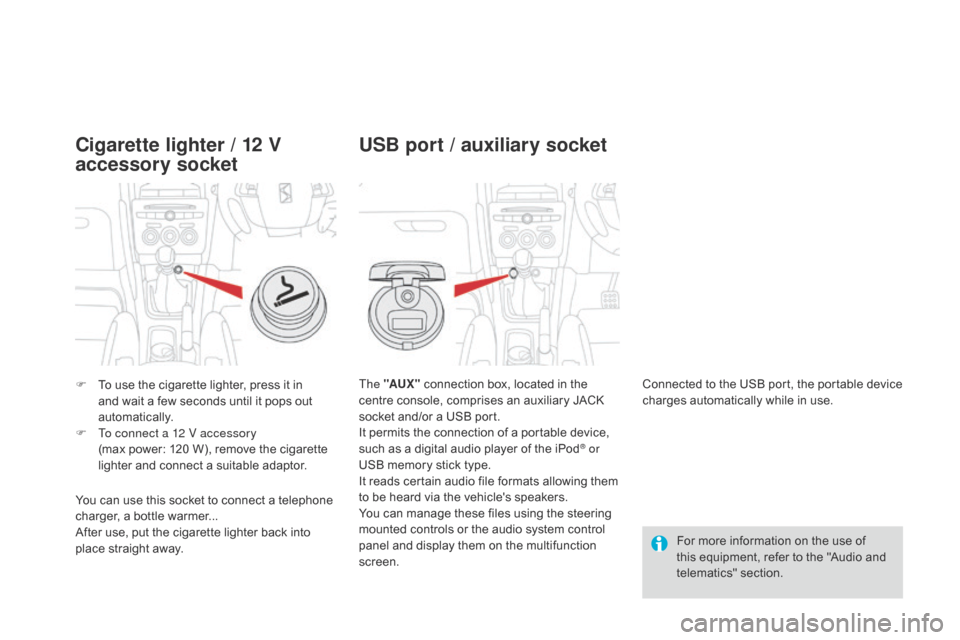
F To use the cigarette lighter, press it in and wait a few seconds until it pops out
automatically.
F
T
o connect a 12 V accessory
(max power:
120 W), remove the cigarette
lighter and connect a suitable adaptor. The "AUX "
connection box, located in the
centre console, comprises an auxiliary JACK
socket and/or a USB port.
It permits the connection of a portable device,
such as a digital audio player of the iPod
® or
USB memory stick type.
It reads certain audio file formats allowing them
to be heard via the vehicle's speakers.
You can manage these files using the steering
mounted controls or the audio system control
panel and display them on the multifunction
screen. For more information on the use of
this equipment, refer to the "Audio and
telematics" section.
Connected to the USB port, the portable device
charges automatically while in use.
You can use this socket to connect a telephone
charger, a bottle warmer...
After use, put the cigarette lighter
back into
place straight away.
Cigarette lighter / 12 V
accessory socket USB port / auxiliary socket
Page 121 of 444
11 9
Front armrest
Comfort and storage system for the driver and front passenger.
The height and length of the armrest cover can be adjusted.
Height adjustment
F Raise the cover to the required position (low, intermediate or high).
F
I
f you raise the cover slightly beyond the
high position, guide it when lowering it to
the low position.
Longitudinal adjustment
F Slide the cover fully for wards or rear wards.
Storage
A storage space is arranged below the armrest
cover. It houses the back-up reader for the
electronic key of the "Keyless Entry and
starting" system, if the vehicle is so equipped.
F
Ra
ise the lever.
F
R
aise the cover fully.
Fittings
Page 128 of 444
To remove the shelf:
F u nhook the two cords,
F
r
aise the shelf slightly, then remove it.
There are several options for storing the shelf:
-
e
ither upright behind the front seats,
-
o
r flat at the base of the boot.
Rear parcel shelf
The hooks can be used to secure shopping
bags.
Hooks
Access to the storage
box
An additional hook under the shelf is
used to hold up the boot floor using its
cord, to facilitate access to the tools
and spare wheel or the temporary
puncture repair kit...
Page 129 of 444
127
F To connect a 12 V accessory (max power: 120 W), remove the cap and
connect an appropriate adaptor.
F
T
urn the key to the ignition on position.
12 V accessory socket
This is a removable lamp, fitted in the boot
wall, which can be used to light the boot or as
a torch.
For the boot lamp function, refer to the
" Visibility - Boot lamp" section.
To r c h
Operation
This torch operates with NiMH type
rechargeable batteries.
It has a battery life of approximately 45 minutes
and charges while you are driving.
Observe the polarities when fitting the
rechargeable batteries.
Never replace the rechargeable batteries
with normal disposable batteries.
Fittings
Page 134 of 444

Lighting controlsSystem for selection and control of the various front and rear lamps providing the vehicle's lighting.
The various front and rear lamps of the vehicle
are designed to adapt the driver's visibility
progressively according to the climatic
conditions:
-
s
idelamps, to be seen,
-
d
ipped beam headlamps to see without
dazzling other drivers,
-
m
ain beam headlamps to see clearly when
the road is clear.
Main lighting
Other lamps are provided to meet the
requirements of particular driving conditions:
-
r
ear foglamps,
-
f
ront foglamps with cornering lighting,
-
d
irectional headlamps for improved
visibility when cornering,
-
d
aytime running lamps to be more visible
during the day,
-
g
uide-me-home and welcome lighting to
facilitate access to the vehicle,
-
p
arking lamps as vehicle position markers.
Additional lighting
The setting of some functions can be adjusted:
- a utomatic illumination of headlamps,
-
g
uide-me-home lighting,
-
w
elcome lighting,
-
d
irectional lighting.
Programming
In some weather conditions (e . l ow
temperature or humidity), the presence
of misting on the internal sur face of the
glass of the headlamps and rear lamps
is normal; it disappears after the lamps
have been on for a few minutes.
Page 135 of 444

133
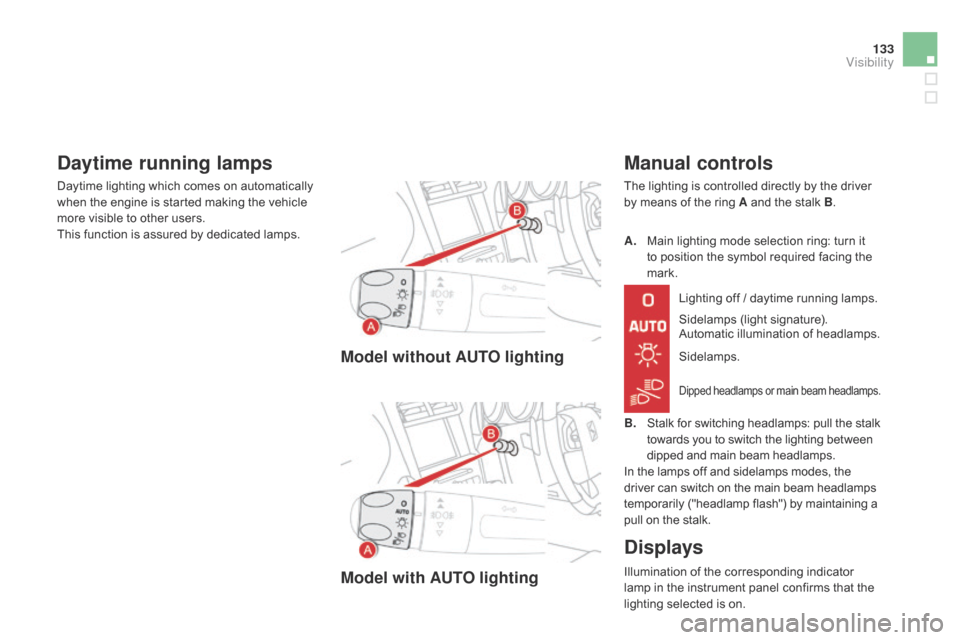
Model without AUTO lighting
Model with AUTO lighting
Manual controls
The lighting is controlled directly by the driver
by means of the ring A and the stalk B.
Sidelamps (light signature).
Automatic illumination of headlamps.
B.
S
talk for switching headlamps: pull the stalk
towards you to switch the lighting between
dipped and main beam headlamps.
In the lamps off and sidelamps modes, the
driver can switch on the main beam headlamps
temporarily ("headlamp flash") by maintaining a
pull on the stalk. A.
M
ain lighting mode selection ring: turn it
to position the symbol required facing the
mark.
Lighting off / daytime running lamps.
Sidelamps.
Dipped headlamps or main beam headlamps.
Displays
Illumination of the corresponding indicator
lamp in the instrument panel confirms that the
lighting selected is on.
Daytime running lamps
Daytime lighting which comes on automatically
when the engine is started making the vehicle
more visible to other users.
This function is assured by dedicated lamps.
Visibility
Page 136 of 444

C. Foglamp selection ring.
The foglamps operate with the dipped and main
beam headlamps.
Rotate and release the ring C:
F
f
or wards a first time to switch on the front
foglamps,
F
f
or wards a second time to switch on the
rear foglamps,
F
r
ear wards a first time to switch off the rear
foglamps,
F
r
ear wards a second time to switch off the
front foglamps.
Model with front and rear
foglamps
In good or rainy weather, by both day
and night, the front foglamps and the
rear foglamps are prohibited. In these
situations, the power of their beams
may dazzle other drivers. They should
only be used in fog or falling snow.
In these weather conditions, you should
switch on the foglamps and dipped
beam headlamps manually, as the
sunshine sensor may detect sufficient
light.
Do not forget to switch off the front and
rear foglamps when they are no longer
necessary.
front and rear foglamps
When the headlamps switch off with automatic
illumination of headlamps (AUTO model)
or when the dipped beam headlamps are
switched off manually, the foglamps and
sidelamps remain on.
F
T
urn the ring rear wards to switch off the
foglamps, the sidelamps will then switch off.