2014.5 Citroen C4 CACTUS RHD parking brake
[x] Cancel search: parking brakePage 195 of 326

193
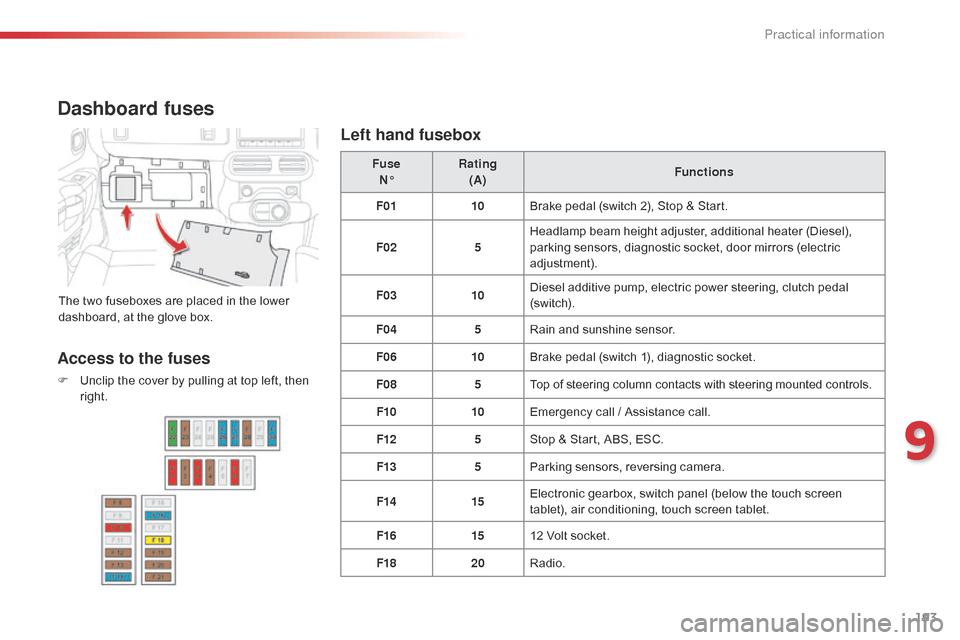
Dashboard fuses
The two fuseboxes are placed in the lower dashboard, at the glove box. Fuse
N° Rating
(A) Functions
F01 10Brake pedal (switch 2), Stop & Start.
F02 5Headlamp beam height adjuster, additional heater (Diesel),
p
arking sensors, diagnostic socket, door mirrors (electric
adj
ustment).
F03 10Diesel additive pump, electric power steering, clutch pedal (
sw i tc h).
F04 5Rain
and sunshine sensor.
F06 10Brake
pedal (switch 1), diagnostic socket.
F08 5Top
of steering column contacts with steering mounted controls.
F10 10Emergency
call / Assistance call.
F12 5Stop
& Start, ABS, ESC.
F13 5Parking
sensors, reversing camera.
F14 15Electronic
gearbox, switch panel (below the touch screen
t
ablet), air conditioning, touch screen tablet.
F16 1512
Volt socket.
F18 20Radio.
Access to the fuses
F Unclip the cover by pulling at top left, then r
ight.
Left hand fusebox
9
Practical information
Page 200 of 326

198
12 V battery
The battery is located under the bonnet.
F or access to the (+) terminal:
F
r
elease the bonnet using the interior lever,
t
hen the exterior safety catch,
F
r
aise the bonnet and secure it with its stay,
F
l
ift the plastic cover for access to
the
(+) terminal.
Access to the battery
Procedure for starting the engine using another battery or charging a discharged battery.
T he presence of this label, in particular
with
the Stop & Start system, indicates
t
he use of a 12 V lead-acid battery with
s
pecial
t
echnology
a
nd
s
pecification;
t
he involvement of a CITROËN dealer
o
r a qualified workshop is essential
w
hen replacing or disconnecting
t
he battery.
After
refitting the battery, the Stop &
S
tart system will only be active after a
c
ontinuous period of immobilisation of the
v
ehicle, a period which depends on the
c
limatic conditions and the state of charge
o
f the battery (up to about 8 hours).
Before doing any work
Immobilise the vehicle: apply the parking brake, put the gearbox in
n
eutral, then switch off the ignition.
Check
that all electrical equipment is
s
witched off.
Practical information
Page 207 of 326

205
Towing another vehicle
F On the rear bumper, press the bottom of t
he cover to unclip it.
F
S
crew the towing eye in fully.
F
I
nstall a towing arm.
F
S
witch on the hazard warning lamps on
b
oth vehicles.
F
M
ove off gently and drive slowly over a
s
hort distance only.
F
O
n
the
front
bumper,
press
at
the
bottom
of
t
he
cover
to
unclip
it.
F
S
crew
the
towing
eye
in
fully.
F
I
nstall
a
towing
arm.
F
P
ut
the
gear
lever
into
neutral
(control
N for
an
electronic
gearbox).
Towing the vehicle
Failure to follow this instruction could l ead to damage to certain components
(
brakes, transmission, ...) and the
a
bsence of braking assistance on
r
estarting the engine. F
U
nlock the steering by turning the ignition
k
ey one notch and release the parking
b
rake.
F
S
witch on the hazard warning lamps on
b
oth vehicles.
F
M
ove off gently and drive slowly over a
s
hort distance only.
9
Practical information
Page 209 of 326

207
Driving advice
Distribution of loads
F Distribute the load in the trailer so that t
he heaviest items are as close as
p
ossible to the axle and the nose weight
a
pproaches the maximum permitted
w
ithout exceeding it.
Air
density decreases with altitude, thus
r
educing engine per formance. Above
1 0
00 metres, the maximum towed load must
b
e reduced by 10 % for every 1 000 metres of
al
titude.
Side wind
F Take into account the increased sensitivity t
o side wind.
Cooling
Towing a trailer on a slope increases the temperature of the coolant.
As
the fan is electrically controlled, its cooling
c
apacity is not dependent on the engine speed.
F
T
o lower the engine speed, reduce your
s
peed.
The
maximum towed load on a long incline
d
epends on the gradient and the ambient
t
emperature.
In
all cases, keep a check on the coolant
t
emperature. F
I
f the warning lamp and the
S
TOP
warning lamp come on,
s
top the vehicle and switch off
t
he engine as soon as possible.
Braking
Towing a trailer increases the braking distance.
T o avoid overheating of the brakes on a long
m
ountain type of descent, the use of engine
b
raking is recommended.
Ty r e s
F Check the tyre pressures of the towing v
ehicle and of the trailer, observing the
re
commended
p
ressures.
Lighting
F Check the electrical lighting and signalling o
n the trailer.
Refer
to
the
"Technical
data"
section
for
details
o
f
the
weights
and
towed
loads
which
apply
to
y
our
vehicle.
When
not
towing
a
trailer,
remove
the
q
uickly-detachable
tow
ball
before
d
riving. The
rear parking sensors will be
d
eactivated automatically if a genuine
C
ITROËN towbar is used.
9
Practical information
Page 226 of 326

224
Brake wear depends on the style of driving, particularly in the case
o
f vehicles used in town, over short
d
istances. It may be necessary to
Brake pads
For information on checking brake disc wear, contact a CITROËN dealer
o
r a qualified workshop.
Brake disc wearOnly use products recommended by CITROËN or products of equivalent
q
uality
an
d
sp
ecification.
In
order to optimise the operation of
u
nits as important as those in the
b
raking system, CITROËN selects and
o
ffers very specific products.
After
washing the vehicle, dampness,
o
r in wintry conditions, ice can form
o
n the brake discs and pads: braking
e
fficiency may be reduced. Make light
b
rake applications to dry and defrost
t
he brakes.Manual gearbox
The gearbox does not require any maintenance (no oil change).
Refer
to the manufacturer's service
s
chedule for the checking interval for
t
his
c
omponent.
Electronic gearbox
The gearbox does not require any maintenance (no oil change).
Refer
to the manufacturer's service
s
chedule for details of the checking
i
nterval for this component.
Parking brake
If excessive travel or a loss of effectiveness of this system is
n
oticed, the parking brake must be
c
hecked, even between two services.
Checking
this system must be done by a
C
ITROËN dealer or a qualified workshop. To
avoid damaging the electrical units,
n
ever use a high pressure jet wash in
t
he engine compartment.
have
the
condition
of
the
brakes
checked,
even
b
etween
v
ehicle
s
ervices.
Unless
there
is
a
leak
in
the
circuit,
a
drop
in
t
he
brake
fluid
level
indicates
that
the
brake
p
ads
are
worn.
Checks
Page 309 of 326

307
C4-cactus_ gb_Chap13_index-alpha_ed02-2014
M
N
L
Labels, identification .....................................23 0
Lamps, front .......................................... 1 83, 214
Lamps,
re
ar
...............................
............ 188, 214
Lamps,
warning and indicator
..................13
-23
Leather
(
care)
...............................
.................214
LED
daytime running lamps
.... 1
09, 113, 183, 184
Level,
AdBlue
® additive ................................. 16 1
Level,
brake
fluid ........................................... 2
21
Levels
and
checks
..............................
...217-2 24
Light-emitting
diodes - LEDs
................ 1
13, 190
Lighting
bulbs
(replacement)
...................................... 1
8 3 -19 0
Lighting
control stalk
..................... 1
08, 109, 114
Lighting
dimmer
..............................
..............123
Lighting,
guide-me home
.............................. 11
4
Lighting,
i
nterior
............................................ 12
2
Loading
..............................
............................... 9
Load
reduction mode
.................................... 2
02
Locating
your
vehicle
...................................... 40
L
ocking
from
the inside
................................... 44
L
ocking
the
doors
.............................. 4
0, 44, 46
Low fuel level
..............................
............ 21, 156
Main
beam
..............................
......108, 183, 185
Maintenance
(
advice)
........................ 9
, 211, 214
Map
reading
lamps
....................................... 12
2
Markings,
id
entification
................................. 23
0
Mat
.......
............................................... 69, 70, 74
Menus
(audio)
............. 2
38, 240, 242, 256, 258,
260, 276, 288, 290
Menus
(Touch
screen tablet)
........... 2
8, 29, 234
Mirror, rear view
.............................................. 55
M
irrors,
door.................................................... 54Misfuel prevention
...............................
..........
15 8
Mountings for ISOFIX seats
.........................
15
0
O
P
Navigation ...............................
......................255 N
umber plate lamps ...................................... 18
9
Oil
change
...............................
......................219
Oil
consumption
............................................ 2
19
oil
filter
...............
........................................... 223
oi
l level .................................................... 27,
219
Opening
the bonnet
...................................... 2
16
Opening
the boot
..............................
..............47
Opening
the doors
...............................
...........45
Operation
indicator lamps
........................ 1
3, 16
Paint
colour code
.......................................... 23
0
Panoramic
glass sunroof
..............................12
1
Parcel shelf, rear
............................................. 76
P
ark Assist
...............................
.....................103
Parking
brake
..........................................8
2, 224
Parking
lam
ps
............................................... 11
4
Parking
sensors, front
...................................10
1
Parking
sensors, rear.................................... 10 0
Particle filter
......................................... 2
22,
2
23
Passenger
c
ompartment
f
ilter
......................2
23
R
Radio ............................................................. 244
RdS ................ ............................................... 247
Rear
door windows
................................. 4
8, 214
Rear
fo
glamp......................................... 110,
188
Rear
s
creen
(
demisting)
.................................. 68
R
echarging the battery
.................................2
01
Reduction
of electrical load
..........................2
02
Regeneration
of the particle filter
.................2
23
Reinitialising
the remote control
.....................42
R
emote control
.......................................... 3
9-43
Removable
screen
(snow
s
hield)
...............................
................210
Removing
a wheel
..............................
..........178
Removing
the mat
...............................
............74
Repair
kit, puncture
....................................... 16
9
Replacing
bu
lbs
..............................
......18 3 -19 0
Replacing
f
uses
..............................
.......191-197
Replacing
the air filter
...................................2
23
Replacing
the oil filter
...................................2
23
Replacing
t
he
p
assenger
c
ompartment filter
...................................... 2
23
Replacing
wiper blades.........................120, 203
Resetting
the service
indicator
...............................
.........................26
Resetting
the trip recorder
..............................37
R
eversing
c
amera
...............................
..........102
Plip
..............................
.............................. 39 - 44
P
ort, US
b
........................... 6
9, 70, 72, 250, 254
Preheater, d
i
esel
..............................
..............
14
Priming the fuel system
................................
16
0
Protecting children
................. 1
34, 136, 141-155
Protectors
...................................................... 2
11
Puncture
................
........................................
169
.
alphabetical index