Page 22 of 176
20
Instrument panel screenWhen the ignition switch is in the "ON" position, press button A repeatedly to display the following information in turn.
Distance recorder
System for measuring the total distance
travelled by the vehicle during its life.
Press button A .
The total distance appears in the screen.Reset to zero
With the ignition on and either trip A or B
displayed, press the button for more than
2
seconds.
Trip distance recorder (Trip A or B)
Each of these trip recorders indicates the
distance travelled since the last reset.
Press button A to display the desired trip.
Changing the speedometer units
With the total distance recorder displayed,
press and hold button A for a few seconds to
change the speedometer units (mph or km/h).
The range indicator is displayed in the units
(miles or km) corresponding to those of the
speedometer (mph or km/h).
Monitoring
Page 23 of 176

21
Service indicator
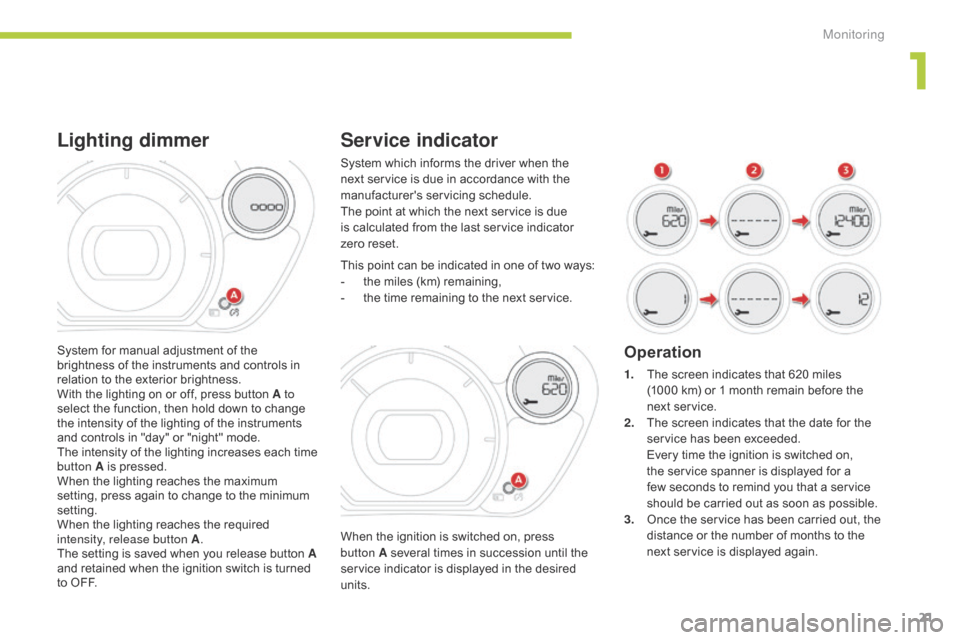
When the ignition is switched on, press
button A several times in succession until the
service indicator is displayed in the desired
units. This point can be indicated in one of two ways:
-
t
he miles (km) remaining,
-
t
he time remaining to the next service.
Operation
1. The screen indicates that 620 miles
(1000 km) or 1 month remain before the
next service.
2.
T
he screen indicates that the date for the
service has been exceeded.
E
very time the ignition is switched on,
the service spanner is displayed for a
few seconds to remind you that a service
should be carried out as soon as possible.
3.
O
nce the service has been carried out, the
distance or the number of months to the
next service is displayed again.
System which informs the driver when the
next service is due in accordance with the
manufacturer's servicing schedule.
The point at which the next service is due
is calculated from the last service indicator
zero
reset.
System for manual adjustment of the
brightness of the instruments and controls in
relation to the exterior brightness.
With the lighting on or off, press button A to
select the function, then hold down to change
the intensity of the lighting of the instruments
and controls in "day" or "night" mode.
The intensity of the lighting increases each time
button A is pressed.
When the lighting reaches the maximum
setting, press again to change to the minimum
setting.
When the lighting reaches the required
intensity, release button A .
The setting is saved when you release button A
and retained when the ignition switch is turned
to OFF.
Lighting dimmer
1
Monitoring
Page 24 of 176
22
The display of "---", indicating that the
service date has arrived, comes on
automatically after a certain time and
distance travelled. The screen then
indicates the time remaining before the
next service is due.
Resetting the service indicator to zero
After each service, the service indicator should
be rest to zero.
The procedures is as follows:
F
S
witch off the ignition (switch in the LOCK
or ACC position).
F
P
ress the reset button A several times in
succession until the service indicator is
displayed.
F
P
ress and hold the reset button for a few
seconds until the spanner flashes .
F
P
ress the reset button while the spanner
is flashing to change the display from "---"
to
"CLEAR" .
T
he distance (or time) remaining before
the
next service is due is displayed.
Monitoring
Page 138 of 176
01
136
FIRST STEPS
Selection of source:
-
FM1, FM2, CD, USB,
AUX,
Streaming.
-
Accept an incoming call.
Long press:
-
access to the calls log of the
telephone connected.
-
or end a call if in progress. Adjust audio settings: sound
ambience, treble, bass,
loudness, distribution, left/
right balance, front/rear
balance, automatic volume.
On / Of
f and volume
adjustment. Abandon the current
operation.
Go up one level (menu or
folder).
Eject CD.
Select a preset radio station.
Radio: long press: preset a
radio station.
Other than radio: see the
corresponding sections.
Automatic search for a lower / higher radio
frequency.
Select previous / next CD, USB track.
Navigation in a list.
Press and hold: fast forwards or backwards.
Open the main menu.
Display the list of stations received, the
CD/USB tracks or folders.
Long press: update the list of stations
received.
Page 139 of 176
02
137
Press SRC/TEL several times in
succession and select the FM1 or FM2
radio band.
Press a button to listen to the
corresponding preset station.
Select the desired radio station and
confirm by pressing
"OK".
Radio
Press LIST to display the list of stations
received in alphabetical order.
The exterior environment (hills, buildings, tunnel, car park, below ground...) may prevent reception, even in RDS station tracking mode.
This phenomenon is normal in the propagation of radio waves and is in no way indicative of a fault with the audio system.
A long press on LIST builds or updates
the list of stations; audio reception is cut
momentarily.
Make a long press on one of the buttons
to preset the station being heard.
The name of the station is displayed
accompanied by an audible signal to
confirm the preset.
A press changes to the next or previous
letter (e.g. A, B, D, F, G, J, K, ...).
Managing the list
Presetting and selecting a station
RADIO
Page 157 of 176

155
FREqUENTLY ASKED q UESTIONS
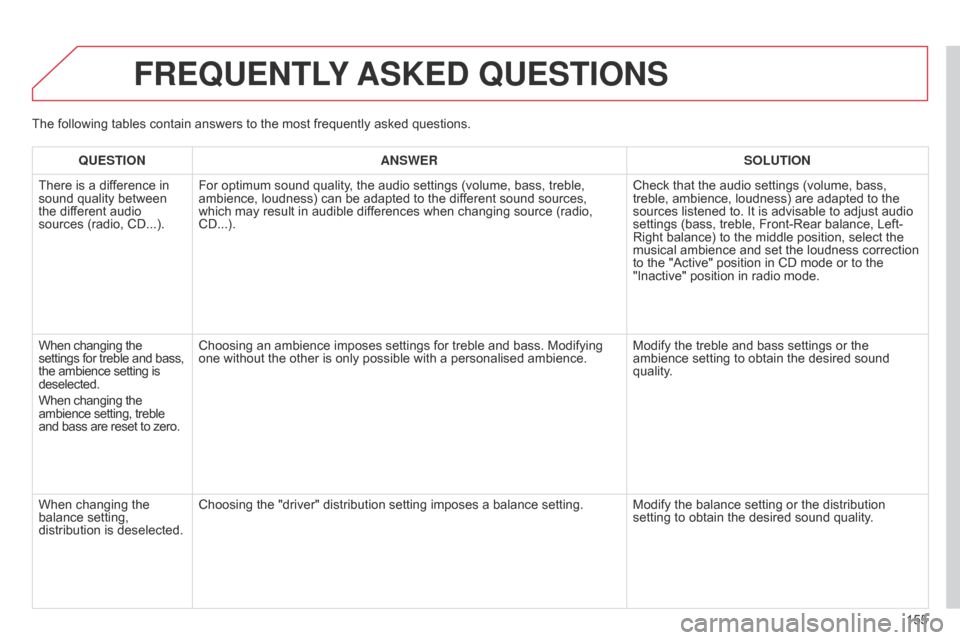
qUESTION ANSWER SOLUTION
There is a dif ference in
sound quality between
the different audio
sources (radio, CD...). For optimum sound quality, the audio settings (volume, bass, treble,
ambience, loudness) can be adapted to the different sound sources,
which may result in audible differences when changing source (radio,
CD...). Check that the audio settings (volume, bass,
treble, ambience, loudness) are adapted to the
sources listened to. It is advisable to adjust audio
settings (bass, treble, Front-Rear balance, Left-
Right balance) to the middle position, select the
musical ambience and set the loudness correction
to the "Active" position in CD mode or to the
"Inactive" position in radio mode.
When changing the
settings for treble and bass,
the ambience setting is
deselected.
When changing the
ambience setting, treble
and bass are reset to zero. Choosing an ambience imposes settings for treble and bass. Modifying
one without the other is only possible with a personalised ambience.
Modify the treble and bass settings or the
ambience setting to obtain the desired sound
quality.
When changing the
balance setting,
distribution is deselected. Choosing the "driver" distribution setting imposes a balance setting.
Modify the balance setting or the distribution
setting to obtain the desired sound quality.
The following tables contain answers to the most frequently asked questions.