Page 24 of 96

INSTRUMENT AND CONTROL FUNCTIONS
3-6
3When the key is turned to “ON”, the
speedometer needle will sweep once
across the speed range and then return
to zero in order to test the electrical cir-
cuit.
EAU11872
Tachometer The electric tachometer allows the rider
to monitor the engine speed and keep it
within the ideal power range.
When the key is turned to “ON”, the ta-
chometer needle will sweep once
across the r/min range and then return
to zero r/min in order to test the electri-
cal circuit.NOTICE
ECA10031
Do not operate the engine in the ta-
chometer red zone.
Red zone: 10000 r/min and above
EAUS1682
Multi-function display
WARNING
EWA12312
Be sure to stop the vehicle before
making any setting changes to the
multi-function display. Changing
settings while riding can distract the
operator and increase the risk of an
accident.
1. Tachometer
2. Tachometer red zone
1. Clock/ambient temperature display
2. Coolant temperature meter
3. Fuel meter
4. Odometer/tripmeter/fuel reserve tripmeter
5. “SELECT” button
6. “RESET” button
U2ABE2E0.book Page 6 Thursday, August 30, 2012 2:36 PM
Page 25 of 96

INSTRUMENT AND CONTROL FUNCTIONS
3-7
3
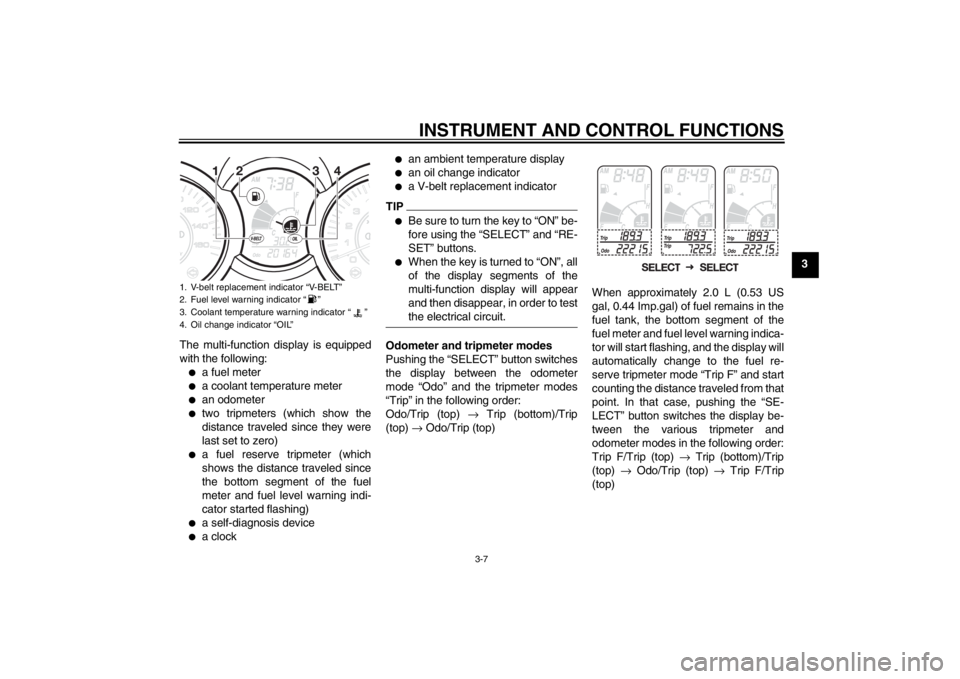
The multi-function display is equipped
with the following:
●
a fuel meter
●
a coolant temperature meter
●
an odometer
●
two tripmeters (which show the
distance traveled since they were
last set to zero)
●
a fuel reserve tripmeter (which
shows the distance traveled since
the bottom segment of the fuel
meter and fuel level warning indi-
cator started flashing)
●
a self-diagnosis device
●
a clock
●
an ambient temperature display
●
an oil change indicator
●
a V-belt replacement indicator
TIP●
Be sure to turn the key to “ON” be-
fore using the “SELECT” and “RE-
SET” buttons.
●
When the key is turned to “ON”, all
of the display segments of the
multi-function display will appear
and then disappear, in order to test
the electrical circuit.
Odometer and tripmeter modes
Pushing the “SELECT” button switches
the display between the odometer
mode “Odo” and the tripmeter modes
“Trip” in the following order:
Odo/Trip (top) → Trip (bottom)/Trip
(top) → Odo/Trip (top)When approximately 2.0 L (0.53 US
gal, 0.44 Imp.gal) of fuel remains in the
fuel tank, the bottom segment of the
fuel meter and fuel level warning indica-
tor will start flashing, and the display will
automatically change to the fuel re-
serve tripmeter mode “Trip F” and start
counting the distance traveled from that
point. In that case, pushing the “SE-
LECT” button switches the display be-
tween the various tripmeter and
odometer modes in the following order:
Trip F/Trip (top) → Trip (bottom)/Trip
(top) → Odo/Trip (top) → Trip F/Trip
(top)
1. V-belt replacement indicator “V-BELT”
2. Fuel level warning indicator “ ”
3. Coolant temperature warning indicator “ ”
4. Oil change indicator “OIL”
U2ABE2E0.book Page 7 Thursday, August 30, 2012 2:36 PM
Page 28 of 96

INSTRUMENT AND CONTROL FUNCTIONS
3-10
3system keys may cause signal interfer-
ence, which may prevent the engine
from starting.
2. If the engine starts, turn it off, and
try starting the engine with the
standard keys.
3. If one or both of the standard keys
do not start the engine, take the
vehicle, the code re-registering
key and both standard keys to a
Yamaha dealer and have the stan-
dard keys re-registered.
If the multi-function display indicates
any error codes, note the code number,
and then have a Yamaha dealer check
the vehicle.
Clock mode
To set the clock:1. Push the “SELECT” button and
“RESET” button together for at
least two seconds.
2. When the hour digits start flashing,
push the “RESET” button to set the
hours.3. Push the “SELECT” button, and
the minute digits will start flashing.
4. Push the “RESET” button to set
the minutes.
5. Push the “SELECT” button and
then release it to start the clock.Ambient temperature display
Pushing the “SELECT” button for at
least two seconds switches the clock
display to the ambient temperature dis-
play. This display shows the ambient
temperature from –10 °C to 50 °C in 1
°C increments. The temperature dis-
played may vary from the ambient tem-
perature. Pushing the “SELECT” button
for at least two seconds switches the
ambient temperature display to the
clock display.
TIP●
If the ambient temperature falls be-
low –10 °C, a lower temperature
than –10 °C will not be displayed.
●
If the ambient temperature climbs
above 50 °C, a higher temperature
than 50 °C will not be displayed.
●
The accuracy of the temperature
reading may be affected when
riding slowly (approximately under
20 km/h (12.5 mi/h)) or when
stopped at traffic signals, railroad
crossings, etc.
U2ABE2E0.book Page 10 Thursday, August 30, 2012 2:36 PM