2013 YAMAHA GRIZZLY 700 differential
[x] Cancel search: differentialPage 8 of 174

EBU17420
TABLE OF CONTENTS
LOCATION OF THE WARNING AND
SPECIFICATION LABELS ............................ 1-1
SAFETY INFORMATION .............................. 2-1
DESCRIPTION .............................................. 3-1Left view ...................................................... 3-1
Right view.................................................... 3-1
Controls and instruments ............................ 3-2
INSTRUMENT AND CONTROL
FUNCTIONS .................................................. 4-1 Main switch ................................................ 4-1
Indicator lights and warning lights .............. 4-2
Multi-function display .................................. 4-5
Handlebar switches .................................... 4-7
Throttle lever ............................................ 4-13
Speed limiter ............................................ 4-13
Front brake lever ...................................... 4-14
Brake pedal and rear brake lever ............. 4-14
Drive select lever ...................................... 4-15
Fuel tank cap ............................................ 4-15
Fuel .......................................................... 4-16
Seat .......................................................... 4-18 Storage compartments .............................4-18
Front carrier ..............................................4-21
Rear carrier ...............................................4-21
Adjusting the front and rear shock
absorber assemblies ...............................4-21
Auxiliary DC jack .......................................4-23
PRE-OPERATION CHECKS ..........................5-1 Fuel .............................................................5-3
Engine oil ....................................................5-3
Final gear oil ...............................................5-3
Differential gear oil ......................................5-3
Coolant .......................................................5-3
Front and rear brakes .................................5-3
Throttle lever ...............................................5-4
Tires ............................................................5-4
Chassis fasteners .......................................5-7
Instruments, lights and switches .................5-7
OPERATION...................................................6-1 Starting the engine ......................................6-1
Operating the drive select lever and driving in reverse ......................................6-2
Engine break-in ...........................................6-4U1HP61E0.book Page 1 Thursday, April 5, 2012 3:33 PM
Page 9 of 174

Parking ....................................................... 6-5
Parking on a slope ..................................... 6-5
Accessories and loading ............................ 6-6
RIDING YOUR ATV ...................................... 7-1 GETTING TO KNOW YOUR ATV............... 7-2
RIDE WITH CARE AND GOOD JUDGMENT .............................................. 7-2
BE CAREFUL WHERE YOU RIDE ............. 7-9
TURNING YOUR ATV .............................. 7-12
CLIMBING UPHILL ................................... 7-13
RIDING DOWNHILL.................................. 7-16
CROSSING A SLOPE............................... 7-17
CROSSING THROUGH SHALLOW WATER ................................................... 7-18
RIDING OVER ROUGH TERRAIN ........... 7-21
SLIDING AND SKIDDING ......................... 7-21
WHAT TO DO IF... .................................... 7-22
WHAT TO DO... ........................................ 7-23
PERIODIC MAINTENANCE AND
ADJUSTMENT ............................................... 8-1 Owner’s manual and tool kit ....................... 8-2
Periodic maintenance chart for the emission control system ................ 8-3
General maintenance and lubrication chart ......................................................... 8-5 Removing and installing panels ................8-10
Removing the radiator grills ......................8-20
Checking the spark plug ...........................8-20
Engine oil and oil filter cartridge ................8-22
Final gear oil .............................................8-27
Differential gear oil ....................................8-29
Coolant .....................................................8-32
Cleaning the air filter element ...................8-39
Cleaning the spark arrester ......................8-43
V-belt case drain plug ...............................8-45
Adjusting the throttle lever free play .........8-45
Valve clearance ........................................8-46
Adjusting the drive select lever safety
system cable ...........................................8-46
Brakes .......................................................8-46
Checking the front and rear brake pads ...8-47
Checking the brake fluid level ...................8-48
Changing the brake fluid ...........................8-49
Checking the front and rear brake lever free play ..................................................8-49
Adjusting the brake pedal free play ..........8-50
Axle boots .................................................8-52
Checking and lubricating the cables .........8-53
Checking and lubricating the front and rear brake levers .....................................8-53
Checking and lubricating the brake pedal .......................................................8-54
U1HP61E0.book Page 2 Thursday, April 5, 2012 3:33 PM
Page 29 of 174
3-2
3
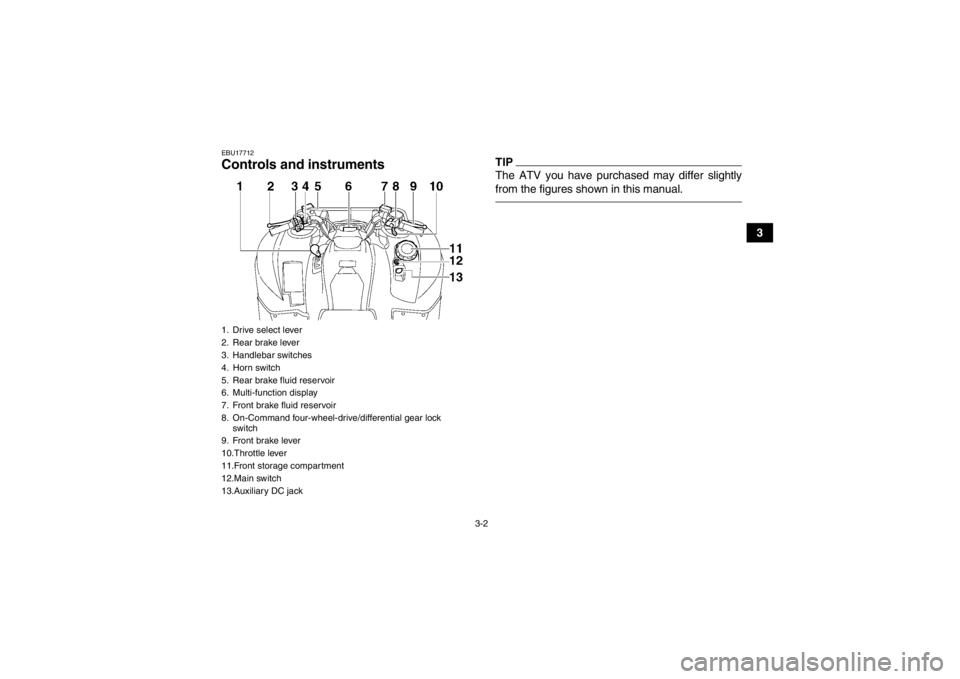
EBU17712Controls and instruments
TIPThe ATV you have purchased may differ slightly
from the figures shown in this manual.
1. Drive select lever
2. Rear brake lever
3. Handlebar switches
4. Horn switch
5. Rear brake fluid reservoir
6. Multi-function display
7. Front brake fluid reservoir
8. On-Command four-wheel-drive/differential gear lock switch
9. Front brake lever
10.Throttle lever
11.Front storage compartment
12.Main switch
13.Auxiliary DC jackU1HP61E0.book Page 2 Thursday, April 5, 2012 3:33 PM
Page 31 of 174
4-2
4
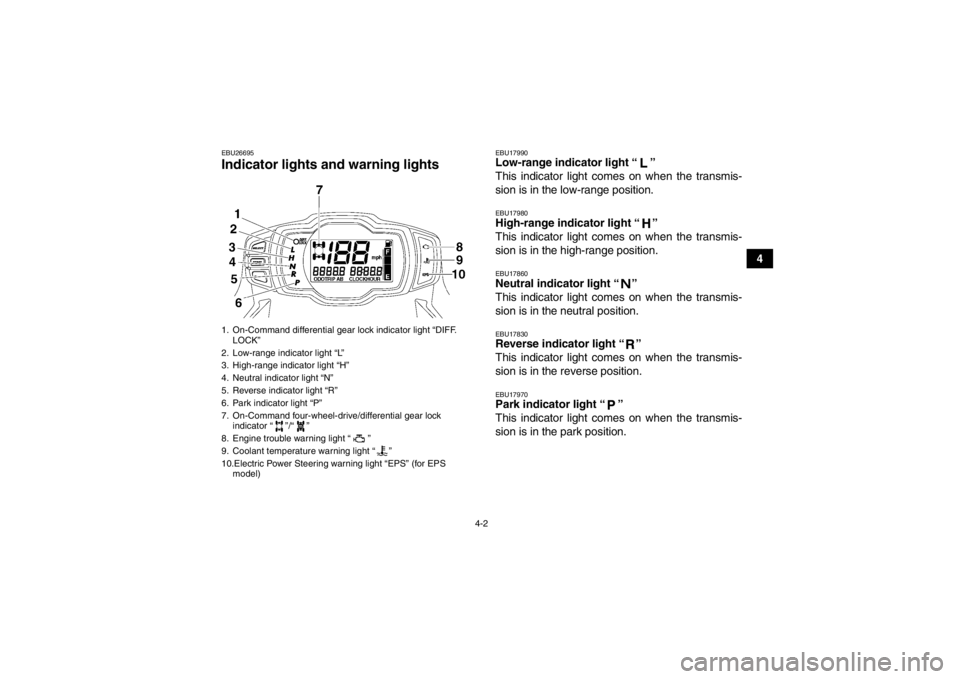
EBU26695Indicator lights and warning lights
EBU17990Low-range indicator light “ ”
This indicator light comes on when the transmis-
sion is in the low-range position.EBU17980High-range indicator light “ ”
This indicator light comes on when the transmis-
sion is in the high-range position.EBU17860Neutral indicator light “ ”
This indicator light comes on when the transmis-
sion is in the neutral position.EBU17830Reverse indicator light “ ”
This indicator light comes on when the transmis-
sion is in the reverse position.EBU17970Park indicator light “ ”
This indicator light comes on when the transmis-
sion is in the park position.
1. On-Command differential gear lock indicator light “DIFF. LOCK”
2. Low-range indicator light “L”
3. High-range indicator light “H”
4. Neutral indicator light “N”
5. Reverse indicator light “R”
6. Park indicator light “P”
7. On-Command four-wheel-drive/differential gear lock indicator “ ”/“ ”
8. Engine trouble warning light “ ”
9. Coolant temperature warning light “ ”
10.Electric Power Steering warning light “EPS” (for EPS model)U1HP61E0.book Page 2 Thursday, April 5, 2012 3:33 PM
Page 33 of 174

4-4
4
after the engine is started, the EPS system may
not be working correctly. When this occurs, have a
Yamaha dealer check the EPS system. The electrical circuit of the warning light can be
checked by turning the key to “ ” (on). If the
warning light does not come on, have a Yamaha
dealer check the electrical circuit.
TIP●If the engine is stopped using the engine stop
switch and the key is in the “ ” (on) position,
the EPS warning light comes on to indicate that
the power assistance for the steering is not func-
tioning.●If the steering load is too heavy (i.e., excessive
steering use when the ATV is traveling at a slow
speed), the power assist is reduced to protect
the EPS motor from overheating.EBU30450On-Command four-wheel-drive indicator “ ”,
On-Command differential gear lock
indicator “ ” and indicator light “DIFF.
LOCK”
The On-Command four-wheel-drive indicator “ ”
comes on when the On-Command four-wheel-
drive switch is set to the “4WD” position. The On-Command differential gear lock
indicator “ ” and the On-Command differential
gear lock indicator light “DIFF. LOCK” come on
when the On-Command differential gear lock
switch is set to the “LOCK” position.
TIP●Due to the synchronizing mechanism in the dif-
ferential gear case, the four-wheel-drive indica-
tor may not come on until the ATV starts moving.●When the On-Command differential gear lock
switch is set to “LOCK” or “4WD”, the
indicator “ ” and the indicator light “DIFF.
LOCK” will flash until the differential gear is com-
pletely locked or unlocked. If the indicator and
the indicator light continue to flash, the differen-
tial is not completely locked or unlocked. In this
case, start moving to allow time for the differen-
tial to lock or unlock.
U1HP61E0.book Page 4 Thursday, April 5, 2012 3:33 PM
Page 37 of 174
4-8
4
EBU18101Start switch “ ”
Push this switch to crank the engine with the start-
er. See the starting instructions on page 6-1 prior
to starting the engine.EBU18154Light switch “ / /OFF”
Set this switch to “ ” to turn on the low beams
and the taillight. Set the switch to “ ” to turn on
the high beams and the taillight. Set the switch to
“OFF” to turn off all the lights.NOTICEECB00043Do not use the headlights with the engine
turned off for an extended period of time, oth-
erwise the battery may discharge to the point
that the starter motor will not operate properly.
If this should happen, remove the battery and
recharge it. (See page 8-56.)EBU18170Horn switch “ ”
Press the switch to sound the horn.
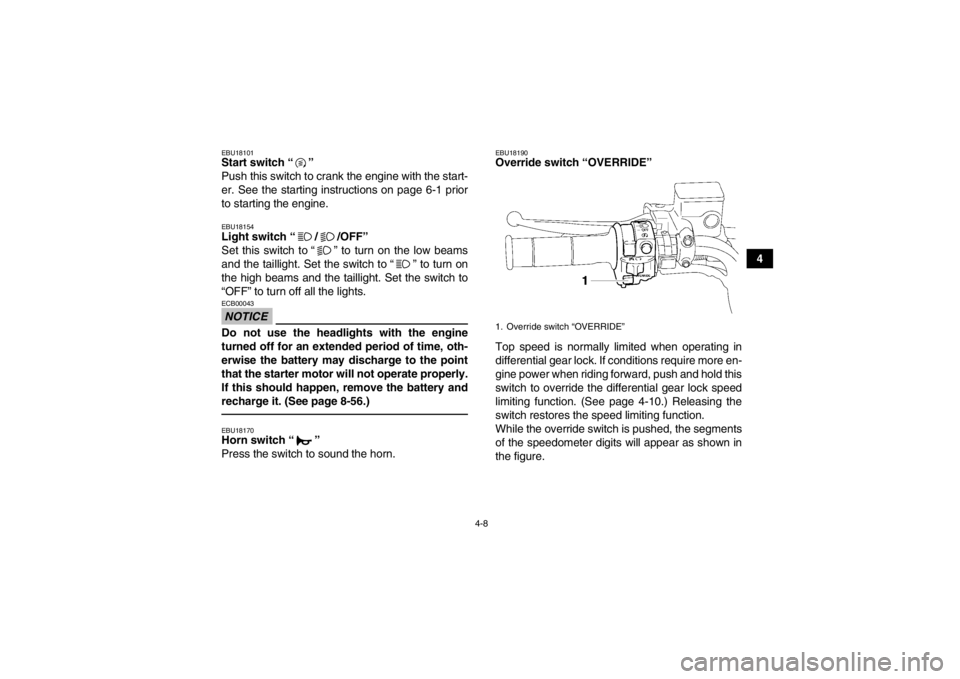
EBU18190Override switch “OVERRIDE”
Top speed is normally limited when operating in
differential gear lock. If conditions require more en-
gine power when riding forward, push and hold this
switch to override the differential gear lock speed
limiting function. (See page 4-10.) Releasing the
switch restores the speed limiting function.
While the override switch is pushed, the segments
of the speedometer digits will appear as shown in
the figure.1. Override switch “OVERRIDE”
U1HP61E0.book Page 8 Thursday, April 5, 2012 3:33 PM
Page 38 of 174
4-9
4
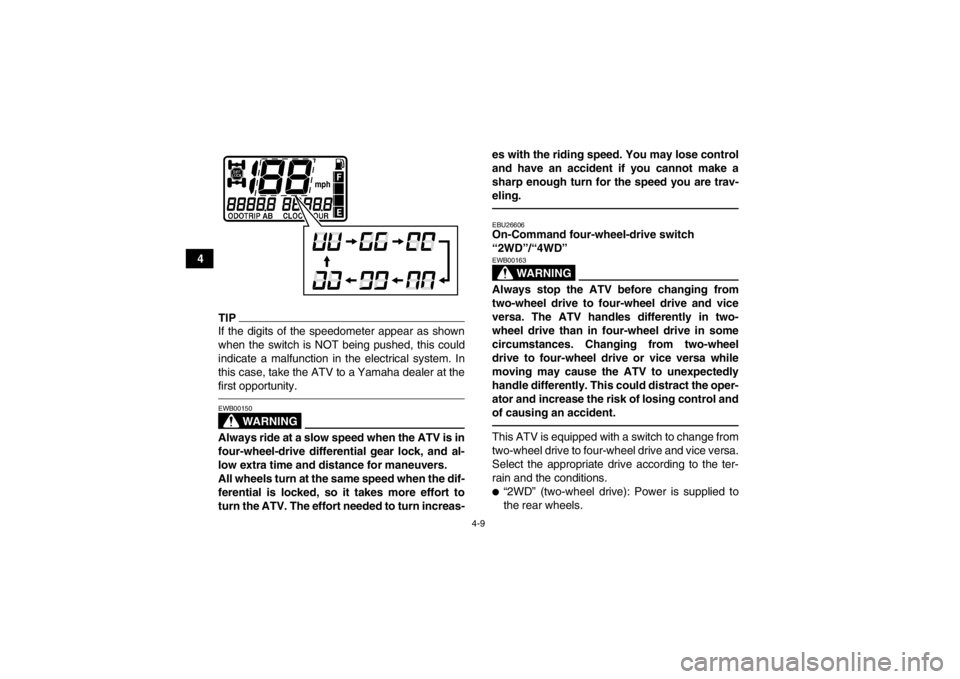
TIPIf the digits of the speedometer appear as shown
when the switch is NOT being pushed, this could
indicate a malfunction in the electrical system. In
this case, take the ATV to a Yamaha dealer at the
first opportunity.
WARNING
EWB00150Always ride at a slow speed when the ATV is in
four-wheel-drive differential gear lock, and al-
low extra time and distance for maneuvers.
All wheels turn at the same speed when the dif-
ferential is locked, so it takes more effort to
turn the ATV. The effort needed to turn increas-es with the riding speed. You may lose control
and have an accident if you cannot make a
sharp enough turn for the speed you are trav-
eling.
EBU26606On-Command four-wheel-drive switch
“2WD”/“4WD”
WARNING
EWB00163Always stop the ATV before changing from
two-wheel drive to four-wheel drive and vice
versa. The ATV handles differently in two-
wheel drive than in four-wheel drive in some
circumstances. Changing from two-wheel
drive to four-wheel drive or vice versa while
moving may cause the ATV to unexpectedly
handle differently. This could distract the oper-
ator and increase the risk of losing control and
of causing an accident.This ATV is equipped with a switch to change from
two-wheel drive to four-wheel drive and vice versa.
Select the appropriate drive according to the ter-
rain and the conditions.●“2WD” (two-wheel drive): Power is supplied to
the rear wheels.
U1HP61E0.book Page 9 Thursday, April 5, 2012 3:33 PM
Page 39 of 174
4-10
4
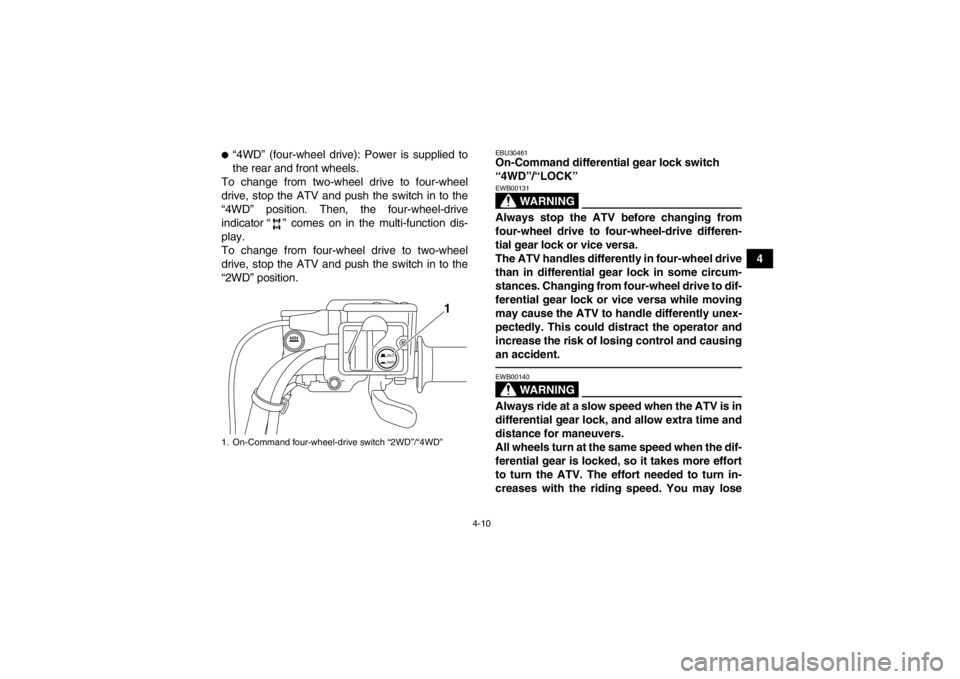
●“4WD” (four-wheel drive): Power is supplied to
the rear and front wheels.
To change from two-wheel drive to four-wheel
drive, stop the ATV and push the switch in to the
“4WD” position. Then, the four-wheel-drive
indicator “ ” comes on in the multi-function dis-
play.
To change from four-wheel drive to two-wheel
drive, stop the ATV and push the switch in to the
“2WD” position.
EBU30461On-Command differential gear lock switch
“4WD”/“LOCK”
WARNING
EWB00131Always stop the ATV before changing from
four-wheel drive to four-wheel-drive differen-
tial gear lock or vice versa.
The ATV handles differently in four-wheel drive
than in differential gear lock in some circum-
stances. Changing from four-wheel drive to dif-
ferential gear lock or vice versa while moving
may cause the ATV to handle differently unex-
pectedly. This could distract the operator and
increase the risk of losing control and causing
an accident.
WARNING
EWB00140Always ride at a slow speed when the ATV is in
differential gear lock, and allow extra time and
distance for maneuvers.
All wheels turn at the same speed when the dif-
ferential gear is locked, so it takes more effort
to turn the ATV. The effort needed to turn in-
creases with the riding speed. You may lose
1. On-Command four-wheel-drive switch “2WD”/“4WD”
2WD
4WD
1
U1HP61E0.book Page 10 Thursday, April 5, 2012 3:33 PM