2013 YAMAHA FJR1300AS check engine
[x] Cancel search: check enginePage 39 of 122

INSTRUMENT AND CONTROL FUNCTIONS
3-24
3
This model is equipped with a self-diag-
nosis device for various electrical cir-
cuits. If a problem is detected in any of
those circuits, the engine trouble warn-
ing light will come on and the informa-
tion display will indicate an error code.
If the information display indicates any
error codes, note the code number, and
then have a Yamaha dealer check the
vehicle.
The self-diagnosis device also detects
problems in the immobilizer system cir-
cuits.
If a problem is detected in the immobi-
lizer system circuits, the immobilizer
system indicator light will flash and the
information display will indicate an error
code when the key is turned to “ON”.
TIPIf the information display indicates error
code 52, this could be caused by tran-
sponder interference. If this error ap-
pears, try the following.1. Use the code re-registering key to
start the engine.
TIPMake sure there are no other immobi-
lizer keys close to the main switch, and
do not keep more than one immobilizer
key on the same key ring! Immobilizer
system keys may cause signal interfer-
ence, which may prevent the engine
from starting.2. If the engine starts, turn it off, andtry starting the engine with the
standard keys.
3. If one or both of the standard keys do not start the engine, take the
vehicle, the code re-registering
key and both standard keys to a
Yamaha dealer and have the stan- dard keys re-registered.NOTICE
ECA11590
If the display indicates an error
code, the vehicle should be checked
as soon as possible in order to avoid
engine damage.
EAU49431
D-mode (drive mode) D-mode is an electronically controlled
engine performance system with two
mode selections (touring mode “T” and
sports mode “S”).
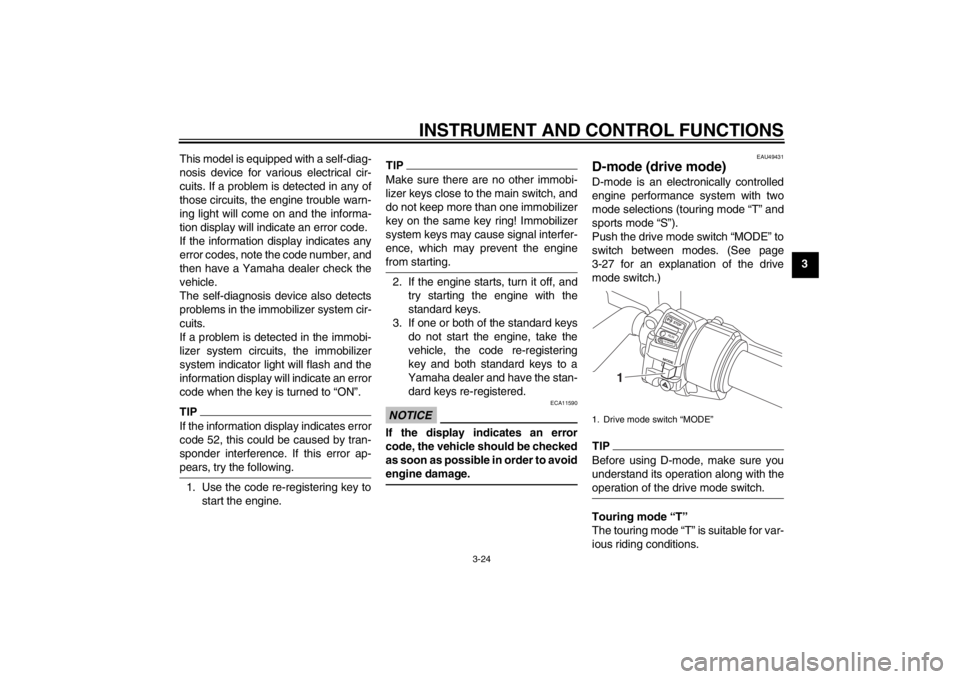
Push the drive mode switch “MODE” to
switch between modes. (See page
3-27 for an explanation of the drive
mode switch.)TIPBefore using D-mode, make sure you
understand its operation along with the
operation of the drive mode switch.Touring mode “T”
The touring mode “T” is suitable for var-
ious riding conditions.1. Drive mode switch “MODE”
STOPM ODERUNSTART
1
U1MDE0E0.book Page 24 Friday, February 15, 2013 1:26 PM
Page 47 of 122

INSTRUMENT AND CONTROL FUNCTIONS
3-32
3
To reset the traction control system
Turn the key to “OFF”. Wait at least 1
second, then turn the key back to “ON”.
The “TCS” indicator/warning light
should go off and the system will be en-
abled. The engine trouble warning light
should go off after the motorcycle
reaches at least 20 km/h (12 mi/h). If
the “TCS” indicator/warning light and/or
engine trouble warning light still remain
on after resetting, the motorcycle may
still be ridden; however, have a
Yamaha dealer check the motorcycle as soon as possible.
EAU13074
Fuel tank cap To open the fuel tank cap
Open the fuel tank cap lock cover, in-
sert the key into the lock, and then turn
it 1/4 turn clockwise. The lock will be re-
leased and the fuel tank cap can be
opened.
To close the fuel tank cap 1. Push the fuel tank cap into position with the key inserted in the lock.
2. Turn the key counterclockwise to the original position, remove it, and
then close the lock cover.
TIPThe fuel tank cap cannot be closed un-
less the key is in the lock. In addition,
the key cannot be removed if the cap is
not properly closed and locked.
WARNING
EWA11091
Make sure that the fuel tank cap is
properly closed after filling fuel.
Leaking fuel is a fire hazard.
1. Unlock.
2. Fuel tank cap lock cover
2
1
U1MDE0E0.book Page 32 Friday, February 15, 2013 1:26 PM
Page 49 of 122

INSTRUMENT AND CONTROL FUNCTIONS
3-34
3
EAUB1301
Fuel tank breather/overflow
hose Before operating the motorcycle:●
Check the fuel tank breather/over-
flow hose connection.
●
Check the fuel tank breather/over-
flow hose for cracks or damage,
and replace it if necessary.
●
Make sure that the end of the fuel
tank breather/overflow hose is not
blocked, and clean it if necessary.
●
Make sure that the fuel tank
breather/overflow hose is routed
through the clamp.
EAU13445
Catalytic converters This vehicle is equipped with catalytic
converters in the exhaust system.
WARNING
EWA10862
The exhaust system is hot after op-
eration. To prevent a fire hazard or
burns:●
Do not park the vehicle near
possible fire hazards such as
grass or other materials that
easily burn.
●
Park the vehicle in a place
where pedestrians or children
are not likely to touch the hot
exhaust system.
●
Make sure that the exhaust sys-
tem has cooled down before do-
ing any maintenance work.
●
Do not allow the engine to idle
more than a few minutes. Long
idling can cause a build-up of
heat.
NOTICE
ECA10701
Use only unleaded gasoline. The use
of leaded gasoline will cause unre-
pairable damage to the catalytic
converter.
1. Fuel tank breather/overflow hose
2. Clamp
2
1
U1MDE0E0.book Page 34 Friday, February 15, 2013 1:26 PM
Page 57 of 122

INSTRUMENT AND CONTROL FUNCTIONS
3-42
3
EAU55423
Adjusting the front and rear
suspension This model is equipped with an elec-
tronically adjustable suspension sys-
tem. The preload of the rear shock
absorber and the damping forces of
both the front fork and rear shock ab-
sorber can be adjusted.
WARNING
EWA12422
Be sure to stop the vehicle before
making any setting changes to the
multi-function meter unit. Changing
settings while riding can distract the
operator and increase the risk of an
accident.Preload
When riding with luggage or a passen-
ger, use the preload adjusting function
to adjust the suspension system to
match the load. There are 4 preload
settings.TIP●
The preload adjusting function will
appear only when the engine is
running.
●
Changing the preload setting will
also adjust the front and rear sus-
pension damping forces accord-
ingly. See “Damping force” on
page 3-44 for more information.
●
About cold temperature operation: When using the preload adjust- ing function, there should be no
weight on the vehicle.
When using the preload adjust- ing function at ambient tempera-
tures near or below 0 °C (32 °F),
to protect the preload adjusting
function motor, the electronically
adjustable suspension system
warning light may come on.
The suspension will still operate as normal, only the preload ad-
justing function cannot be used.
To reset the electronically ad- justable suspension system
warning light, wait approximate-
ly 6 minutes and then turn the
key to “OFF” or immediately turn
the key to “OFF” and then wait 6
minutes. If the electronically adjustable
suspension system warning
light remains on, have a
Yamaha dealer check the sus-
pension system.
To adjust the preload1. Turn the key to “ON”, start the en- gine, and then shift the transmis-
sion into neutral.
2. Push the menu switch “MENU” to switch the function display to the
preload adjusting function.1. Function display
2. Preload adjusting function
3. Preload setting pictogram
GEARN
132
U1MDE0E0.book Page 42 Friday, February 15, 2013 1:26 PM
Page 62 of 122

INSTRUMENT AND CONTROL FUNCTIONS
3-47
3
EAU55361
Ignition circuit cut-off system The ignition circuit cut-off system (com-
prising the sidestand switch and brake
light switches) has the following func-
tions.●
It prevents starting when the side-
stand is up, but neither brake is ap-
plied.
●
It prevents starting when either
brake is applied, but the sidestand
is still down.
●
It cuts the running engine when the
sidestand is moved down.
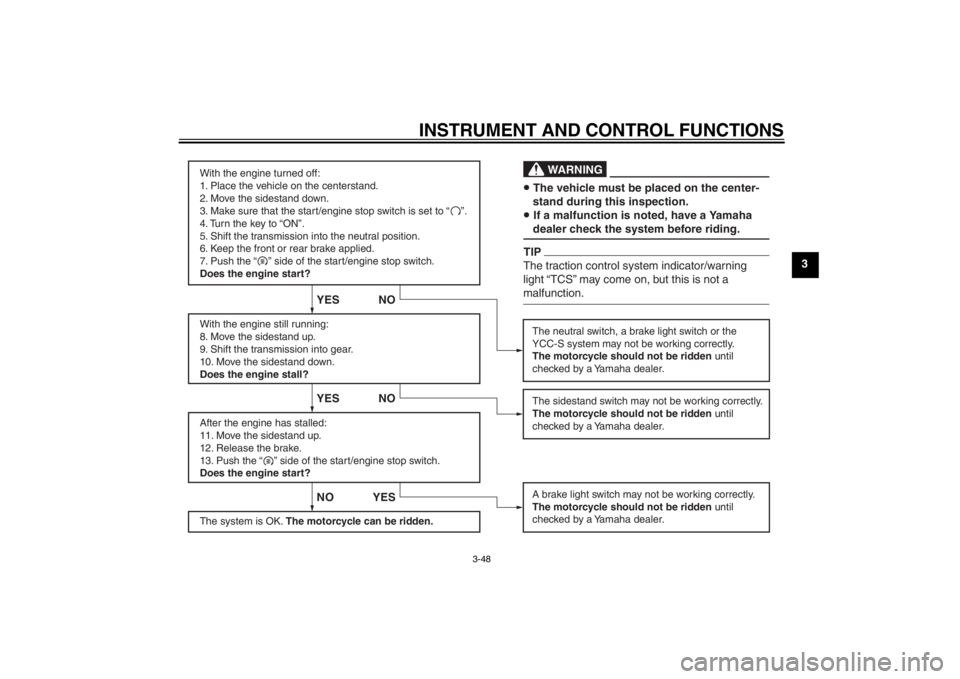
Periodically check the operation of the
ignition circuit cut-off system according
to the following procedure.
U1MDE0E0.book Page 47 Friday, February 15, 2013 1:26 PM
Page 63 of 122

INSTRUMENT AND CONTROL FUNCTIONS
3-48
3
With the engine turned off:
1. Place the vehicle on the centerstand.
2. Move the sidestand down.
3. Make sure that the start/engine stop switch is set to “ ”.
4. Turn the key to “ON”.
5. Shift the transmission into the neutral position.
6. Keep the front or rear brake applied.
7. Push the “ ” side of the start/engine stop switch.
Does the engine start?
With the engine still running:
8. Move the sidestand up.
9. Shift the transmission into gear.
10. Move the sidestand down.
Does the engine stall?
After the engine has stalled:
11. Move the sidestand up.
12. Release the brake.
13. Push the “ ” side of the start/engine stop switch.
Does the engine start?
The system is OK. The motorcycle can be ridden.
NOYES
YES NO YES
NO
The neutral switch, a brake light switch or the
YCC-S system may not be working correctly.
The motorcycle should not be ridden until
checked by a Yamaha dealer.
A brake light switch may not be working correctly.
The motorcycle should not be ridden until
checked by a Yamaha dealer.The sidestand switch may not be working correctly.
The motorcycle should not be ridden until
checked by a Yamaha dealer. The vehicle must be placed on the center-
stand during this inspection.If a malfunction is noted, have a Yamaha
dealer check the system before riding.
WA R N I N G
TIPThe traction control system indicator/warning
light “TCS” may come on, but this is not a
malfunction.
U1MDE0E0.book Page 48 Friday, February 15, 2013 1:26 PM
Page 65 of 122

FOR YOUR SAFETY – PRE-OPERATION CHECKS
4-1
4
EAU15597
Inspect your vehicle each time you use it to make sure the vehicle is in safe operating condition. Always follow the inspection
and maintenance procedures and schedules described in the Owner’s Manual.
WARNING
EWA11151
Failure to inspect or maintain the vehicle properly increases the possibility of an accident or equipment damage.
Do not operate the vehicle if you find any problem. If a problem cannot be corrected by the procedures provided in
this manual, have the vehicle inspected by a Yamaha dealer.Before using this vehicle, check the following points:
ITEMCHECKS PAGE
Fuel Check fuel level in fuel tank.
Refuel if necessary.
Check fuel line for leakage.
Check fuel tank breather/overflow hose for obstructions, cracks or damage, and
check hose connection. 3-33, 3-34
Engine oil Check oil level in engine.
If necessary, add recommended oil to specified level.
Check vehicle for oil leakage. 6-12
Final gear oil Check vehicle for oil leakage. 6-14
Coolant Check coolant level in reservoir.
If necessary, add recommended coolant to specified level.
Check cooling system for leakage. 6-16
Front brake Check operation.
If soft or spongy, have Yamaha dealer bleed hydraulic system.
Check brake pads for wear.
Replace if necessary.
Check fluid level in reservoir.
If necessary, add specified brake fluid to specified level.
Check hydraulic system for leakage. 6-23, 6-23
U1MDE0E0.book Page 1 Friday, February 15, 2013 1:26 PM
Page 69 of 122

OPERATION AND IMPORTANT RIDING POINTS
5-2
5
●
Oil level warning light
●
Engine trouble warning light
●
Traction control system indi-
cator/warning light
●
Cruise control indicator lights
●
Electronically adjustable sus-
pension system warning light
●
Shift down indicator light
●
YCC-S system warning light
●
Stop mode function indicator
light
●
Immobilizer system indicator
light
TIPIf the stop mode function was activated
when the key was turned to “OFF” then
the stop mode function is still activated
and the indicator light will remain on.NOTICE
ECA11833
If a warning or indicator light does
not come on initially when the key is
turned to “ON”, or if a warning or in-
dicator light remains on, see page
3-4 for the corresponding warning
and indicator light circuit check.
The ABS warning light should
come on when the key is turned to
“ON”, and then go off after travel-
ing at a speed of 10 km/h (6 mi/h)
or higher.
NOTICE
ECA17681
If the ABS warning light does not
come on and then go off as ex-
plained above, see page 3-4 for the
warning light circuit check.2. Shift the transmission into the neu-tral position. The neutral indicator
light should come on. If not, ask a
Yamaha dealer to check the elec- trical circuit.
3. Start the engine by pushing the “ ” side of the start/engine
stop switch with the front or rear
brake applied.
If the engine fails to start, release
the start/engine stop switch, wait a
few seconds, and then try again.
Each starting attempt should be as
short as possible to preserve the
battery. Do not crank the engine
more than 10 seconds on any one
attempt.
NOTICE
ECA11042
For maximum engine life, never ac-
celerate hard when the engine is
cold!
U1MDE0E0.book Page 2 Friday, February 15, 2013 1:26 PM