2013 YAMAHA FJR1300A clutch
[x] Cancel search: clutchPage 64 of 118

OPERATION AND IMPORTANT RIDING POINTS
5-1
5
EAU15951
Read the Owner’s Manual carefully to
become familiar with all controls. If
there is a control or function you do not
understand, ask your Yamaha dealer.
WARNING
EWA10271
Failure to familiarize yourself with
the controls can lead to loss of con-
trol, which could cause an accident
or injury.
EAU47150
TIPThis model is equipped with:●
a lean angle sensor to stop the en-
gine in case of a turnover. In this
case, the multi-function meter unit
indicates error code 30, but this is
not a malfunction. Turn the key to
“OFF” and then to “ON” to clear the
error code. Failing to do so will pre-
vent the engine from starting even
though the engine will crank when
pushing the start switch.
●
an engine auto-stop system. The
engine stops automatically if left
idling for 20 minutes. In this case,
the multi-function meter unit indi-
cates error code 70, but this is not
a malfunction. Push the start
switch to clear the error code and
to restart the engine.
EAU54170
Starting the engine In order for the ignition circuit cut-off
system to enable starting, one of the
following conditions must be met:●
The transmission is in the neutral
position.
●
The transmission is in gear with
the clutch lever pulled and the
sidestand up.
See page 3-43 for more informa-
tion.
1. Turn the key to “ON” and make sure that the start/engine stop
switch is set to “ ”.
The following warning lights and
indicator lights should come on for
a few seconds, then go off.●
Oil level warning light
●
Engine trouble warning light
●
Traction control system indi-
cator/warning light
●
Cruise control indicator lights
●
Immobilizer system indicator
light
U1MCE0E0.book Page 1 Thursday, July 19, 2012 6:59 PM
Page 66 of 118
OPERATION AND IMPORTANT RIDING POINTS
5-3
5
NOTICE
ECA10260
●
Even with the transmission in
the neutral position, do not
coast for long periods of time
with the engine off, and do not
tow the motorcycle for long dis-
tances. The transmission is
properly lubricated only when
the engine is running. Inade-
quate lubrication may damage
the transmission.
●
Always use the clutch while
changing gears to avoid damag-
ing the engine, transmission,
and drive train, which are not
designed to withstand the
shock of forced shifting.
EAU16810
Tips for reducing fuel con-
sumption Fuel consumption depends largely on
your riding style. Consider the following
tips to reduce fuel consumption:●
Shift up swiftly, and avoid high en-
gine speeds during acceleration.
●
Do not rev the engine while shifting
down, and avoid high engine
speeds with no load on the engine.
●
Turn the engine off instead of let-
ting it idle for an extended length of
time (e.g., in traffic jams, at traffic
lights or at railroad crossings).
EAU16841
Engine break-in There is never a more important period
in the life of your engine than the period
between 0 and 1600 km (1000 mi). For
this reason, you should read the follow-
ing material carefully.
Since the engine is brand new, do not
put an excessive load on it for the first
1600 km (1000 mi). The various parts in
the engine wear and polish themselves
to the correct operating clearances.
During this period, prolonged full-throt-
tle operation or any condition that might
result in engine overheating must be
avoided.
EAU17123
0–1000 km (0–600 mi)
Avoid prolonged operation above 4500
r/min. NOTICE: After 1000 km (600
mi) of operation, the engine oil and
final gear oil must be changed, and
the oil filter cartridge or element re-
placed.
[ECA10332]
U1MCE0E0.book Page 3 Thursday, July 19, 2012 6:59 PM
Page 71 of 118

PERIODIC MAINTENANCE AND ADJUSTMENT
6-4
6
EAU1770F
General maintenance and lubrication chart NO. ITEM CHECK OR MAINTENANCE JOB ODOMETER READING
ANNUAL
CHECK
1000 km
(600 mi) 10000 km
(6000 mi) 20000 km
(12000 mi) 30000 km
(18000 mi) 40000 km
(24000 mi)
1 Air filter element Clean.
√√
Replace. √√
2 *Clutch Check operation, fluid level and
vehicle for fluid leakage. √√√√√
3 *Front brake Check operation, fluid level and
vehicle for fluid leakage. √√√√√√
Replace brake pads. Whenever worn to the limit
4 *Rear brake Check operation, fluid level and
vehicle for fluid leakage. √√√√√√
Replace brake pads. Whenever worn to the limit
5 *Brake hoses Check for cracks or damage.
Check for correct routing and
clamping. √√√√√
Replace. Every 4 years
6 *Brake fluid Replace. Every 2 years
7 *Wheels Check runout and for damage. √√√√
8 *Tires Check tread depth and for dam-
age.
Replace if necessary.
Check air pressure.
Correct if necessary. √√√√√
9 *Wheel bearings Check bearing for looseness or
damage. √√√√
U1MCE0E0.book Page 4 Thursday, July 19, 2012 6:59 PM
Page 72 of 118

PERIODIC MAINTENANCE AND ADJUSTMENT
6-5
6
10*Swingarm Check operation and for exces-
sive play. √√√√
Lubricate with lithium-soap-based grease. Every 50000 km (30000 mi)
11 *Steering bearings Check bearing play and steering
for roughness. √√√√√
Lubricate with lithium-soap-based grease. Every 20000 km (12000 mi)
12 *Chassis fasteners Make sure that all nuts, bolts and
screws are properly tightened. √√√√√
13 Brake lever pivot
shaft Lubricate with silicone grease.
√√√√√
14 Brake pedal pivot
shaft Lubricate with lithium-soap-based
grease. √√√√√
15 Clutch lever pivot
shaft
Lubricate with silicone grease.
√√√√√
16 Shift pedal pivot
shaft Lubricate with lithium-soap-based
grease. √√√√√
17 Sidestand, center-
stand Check operation.
Lubricate with lithium-soap-based
grease. √√√√√
18 *Sidestand switch Check operation. √√√√√√
19 *Front fork Check operation and for oil leak-
age. √√√√
20 *Shock absorber as-
sembly Check operation and shock ab-
sorber for oil leakage. √√√√
NO. ITEM CHECK OR MAINTENANCE JOB
ODOMETER READING
ANNUAL
CHECK
1000 km
(600 mi) 10000 km
(6000 mi) 20000 km
(12000 mi) 30000 km
(18000 mi) 40000 km
(24000 mi)U1MCE0E0.book Page 5 Thursday, July 19, 2012 6:59 PM
Page 74 of 118
PERIODIC MAINTENANCE AND ADJUSTMENT
6-7
6
EAU17670
TIP●
The air filter needs more frequent service if you are riding in unusually wet or dusty areas.
●
Hydraulic brake and clutch service Regularly check and, if necessary, correct the brake and clutch fluid levels.
Every two years replace the internal components of the brake master cylinders and calipers as well as clutch master and release cylinders, and change the brake and clutch fluids.
Replace the brake and clutch hoses every four years and if cracked or damaged.
U1MCE0E0.book Page 7 Thursday, July 19, 2012 6:59 PM
Page 81 of 118
PERIODIC MAINTENANCE AND ADJUSTMENT
6-14
6
NOTICE
ECA11620
●
In order to prevent clutch slip-
page (since the engine oil also
lubricates the clutch), do not
mix any chemical additives. Do
not use oils with a diesel speci-
fication of “CD” or oils of a high-
er quality than specified. In
addition, do not use oils labeled
“ENERGY CONSERVING II” or
higher.
●
Make sure that no foreign mate-
rial enters the crankcase.
10. Start the engine, and then let it idlefor several minutes while checking
it for oil leakage. If oil is leaking, im-
mediately turn the engine off and
check for the cause.TIPAfter the engine is started, the engine
oil level warning light should go off if the
oil level is sufficient.
NOTICE
ECA10401
If the oil level warning light flickers
or remains on even if the oil level is
correct, immediately turn the engine
off and have a Yamaha dealer check
the vehicle.11. Turn the engine off, and thencheck the oil level and correct it if
necessary.
EAU20016
Final gear oil The final gear case must be checked
for oil leakage before each ride. If any
leakage is found, have a Yamaha deal-
er check and repair the vehicle. In addi-
tion, the final gear oil level must be
checked and the oil changed as follows
at the intervals specified in the periodic
maintenance and lubrication chart.
WARNING
EWA10370
●
Make sure that no foreign mate-
rial enters the final gear case.
●
Make sure that no oil gets on the
tire or wheel.
To check the final gear oil level1. Place the vehicle on the center- stand.TIPMake sure that the vehicle is positioned
straight up when checking the oil level.
A slight tilt to the side can result in a
false reading.2. Remove the final gear oil filler boltand its gasket, and then check the
oil level in the final gear case.
U1MCE0E0.book Page 14 Thursday, July 19, 2012 6:59 PM
Page 89 of 118
PERIODIC MAINTENANCE AND ADJUSTMENT
6-22
6
“broken in”. Therefore, it is ad-
visable before doing any high-
speed riding to ride conserva-
tively for approximately 100 km
(60 mi) after installing a new tire.
●
The tires must be warmed up
before a high-speed run.
●
Always adjust the tire air pres-
sure according to the operating
conditions.
EAU21962
Cast wheels To maximize the performance, durabil-
ity, and safe operation of your vehicle,
note the following points regarding the
specified wheels.●
The wheel rims should be checked
for cracks, bends, warpage or oth-
er damage before each ride. If any
damage is found, have a Yamaha
dealer replace the wheel. Do not
attempt even the smallest repair to
the wheel. A deformed or cracked
wheel must be replaced.
●
The wheel should be balanced
whenever either the tire or wheel
has been changed or replaced. An
unbalanced wheel can result in
poor performance, adverse han-
dling characteristics, and a short-
ened tire life.
EAU22073
Clutch lever Since this model is equipped with a hy-
draulic clutch, adjusting the clutch lever
free play is not needed. However, it is
necessary to check the clutch fluid level
and check the hydraulic system for
leakage before each ride. (See page
6-24.) If the clutch lever free play does
become excessive, and shifting be-
comes rough or clutch slippage occurs,
causing poor acceleration, there may
be air in the clutch system. If there is air
in the hydraulic system, have a
Yamaha dealer bleed the system be-
fore operating the motorcycle.
U1MCE0E0.book Page 22 Thursday, July 19, 2012 6:59 PM
Page 91 of 118
PERIODIC MAINTENANCE AND ADJUSTMENT
6-24
6
EAU22392
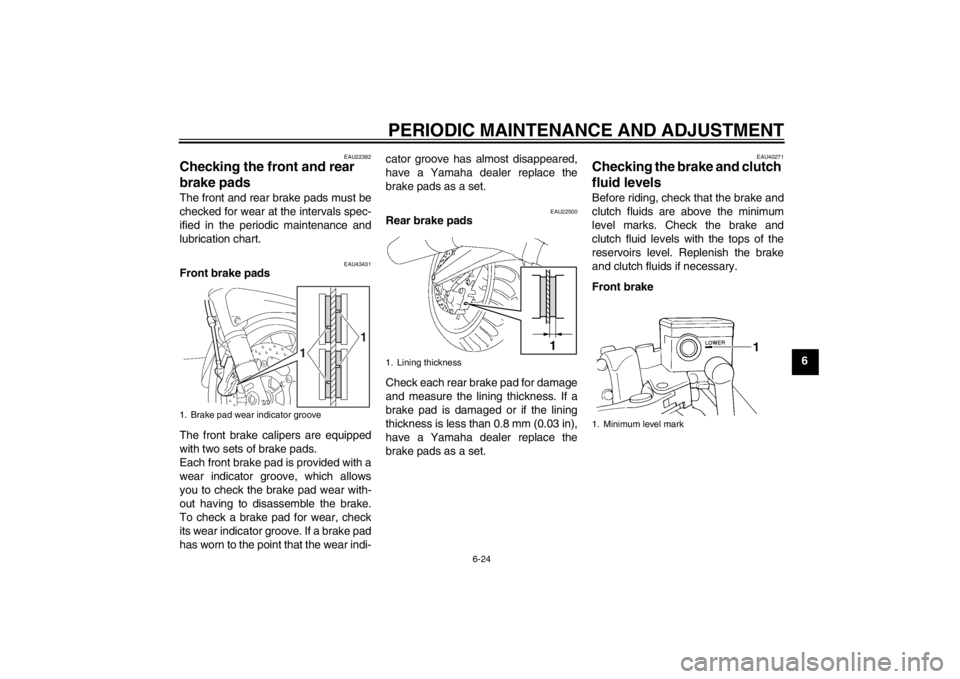
Checking the front and rear
brake pads The front and rear brake pads must be
checked for wear at the intervals spec-
ified in the periodic maintenance and
lubrication chart.
EAU43431
Front brake pads
The front brake calipers are equipped
with two sets of brake pads.
Each front brake pad is provided with a
wear indicator groove, which allows
you to check the brake pad wear with-
out having to disassemble the brake.
To check a brake pad for wear, check
its wear indicator groove. If a brake pad
has worn to the point that the wear indi-cator groove has almost disappeared,
have a Yamaha dealer replace the
brake pads as a set.
EAU22500
Rear brake pads
Check each rear brake pad for damage
and measure the lining thickness. If a
brake pad is damaged or if the lining
thickness is less than 0.8 mm (0.03 in),
have a Yamaha dealer replace the
brake pads as a set.
EAU40271
Checking the brake and clutch
fluid levels Before riding, check that the brake and
clutch fluids are above the minimum
level marks. Check the brake and
clutch fluid levels with the tops of the
reservoirs level. Replenish the brake
and clutch fluids if necessary.
Front brake
1. Brake pad wear indicator groove
1
1
1. Lining thickness
1
1. Minimum level mark
U1MCE0E0.book Page 24 Thursday, July 19, 2012 6:59 PM