Page 87 of 211
Starting the engine, changing gear and
parking
Starting and stopping the engine
Introduction
This chapter contains information on the followingsubjects:
⇒ Ignition lock
⇒ Starting the engine
⇒ Stopping the engine
⇒ Electronic immobilizer
Immobilizer display
If the vehicle key is not valid or there is a fault in the system, then may be displayed in the
instrument cluster. The engine cannot be started ⇒ Electronic immobilizer.
Push-starting or towing
For technical reasons, your vehicle must not be push-started or tow-started. Use jump leads to
start the engine instead.
Additional information and warnings:
\f
Page 204 of 211

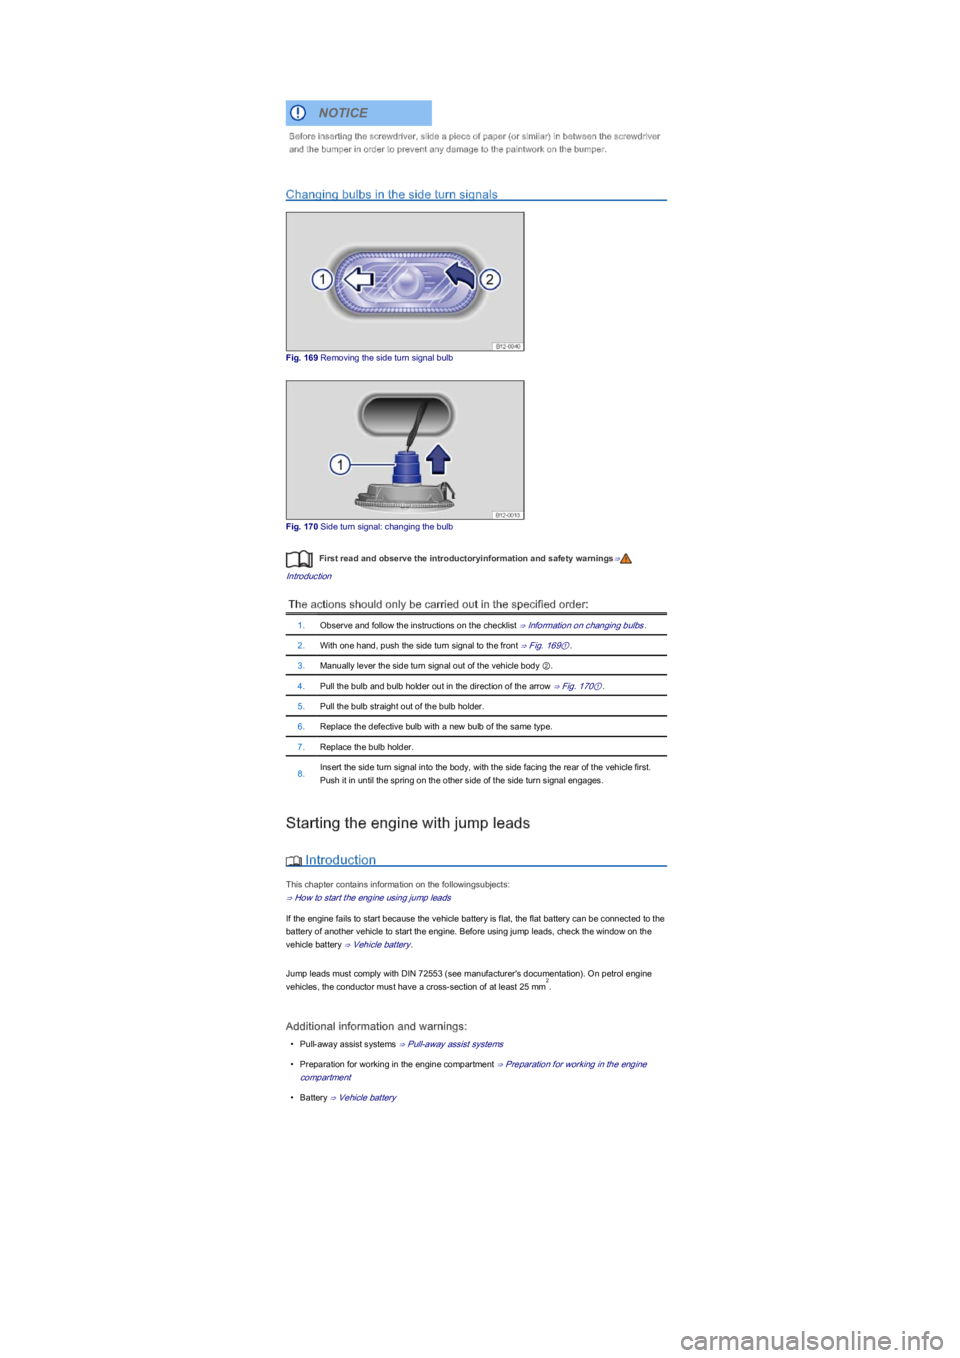
Changing bulbs in the side turn signals
Fig. 169 Removing the side turn signal bulb
Fig. 170 Side turn signal: changing the bulb
First read and observe the introductoryinformation and safety warnings⇒
Introduction
The actions should only be carried out in the specified order:
1.Observe and follow the instructions on the checklist ⇒ Information on changing bulbs.
2.With one hand, push the side turn signal to the front ⇒ Fig. 169①.
3.Manually lever the side turn signal out of the vehicle body ②.
4.Pull the bulb and bulb holder out in the direction of the arrow ⇒ Fig. 170①.
5.Pull the bulb straight out of the bulb holder.
6.Replace the defective bulb with a new bulb of the same type.
7.Replace the bulb holder.
8.Insert the side turn signal into the body, with the side facing the rear of the vehicle first.
Push it in until the spring on the other side of the side turn signal engages.
Starting the engine with jump leads
Introduction
This chapter contains information on the followingsubjects:
⇒ How to start the engine using jump leads
If the engine fails to start because the vehicle battery is flat, the flat battery can be connected to the
battery of another vehicle to start the engine. Before using jump leads, check the window on the
vehicle battery ⇒ Vehicle battery.
Jump leads must comply with DIN 72553 (see manufacturer's documentationyf�����2�Q���S�H�W�U�R�O���H�Q�J�L�Q�H�
vehicles, the conductor must have a cross-section of at least 25 mm.
Additional information and warnings:
\f
Page 205 of 211

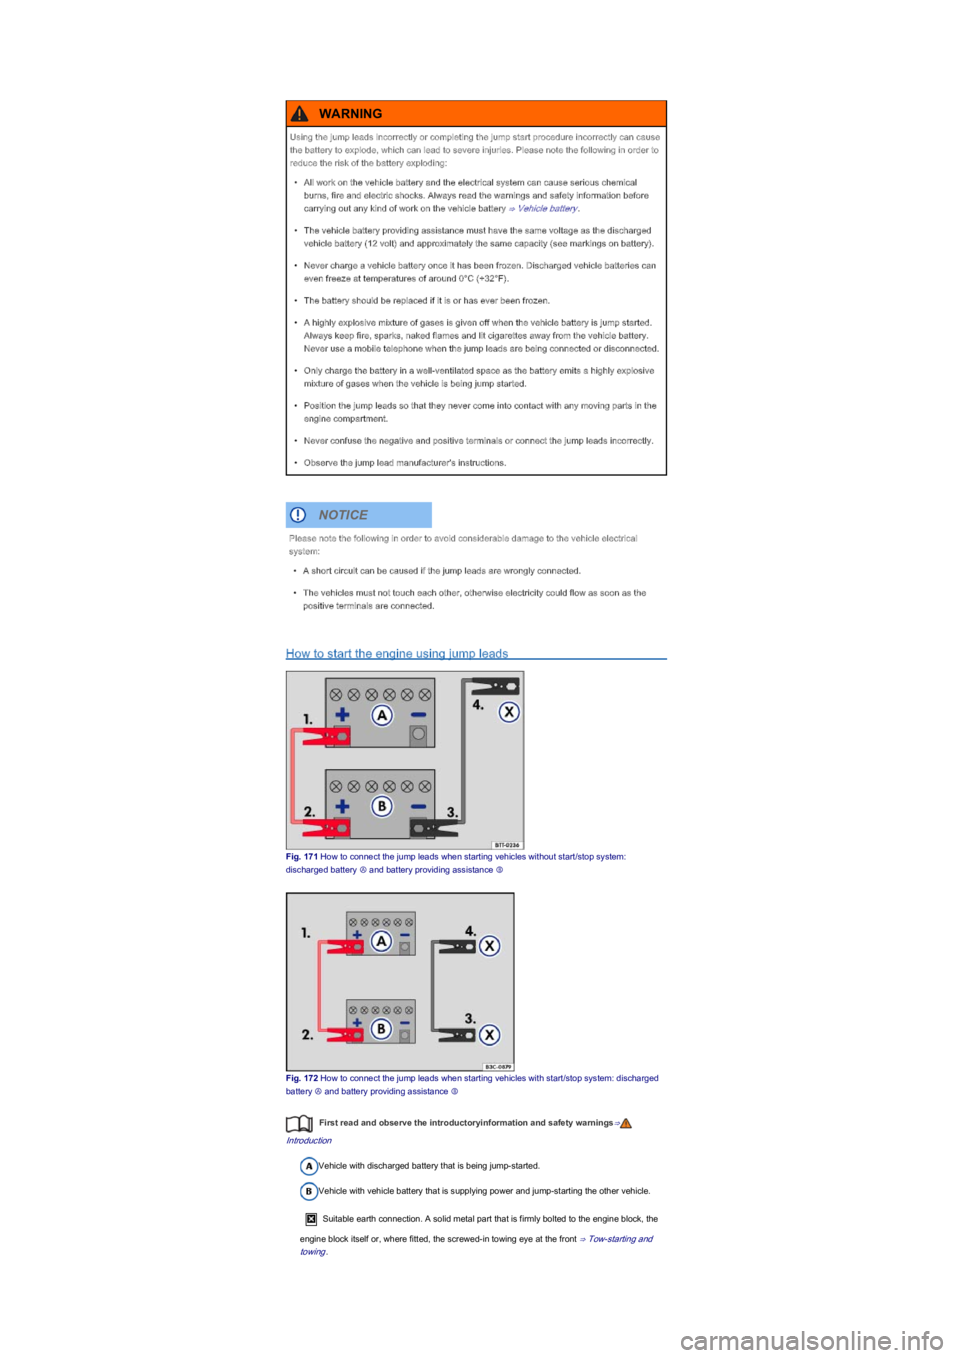
How to start the engine using jump leads
Fig. 171 How to connect the jump leads when starting vehicles without start/stop system:
discharged battery Ⓐ and battery providing assistance Ⓑ
Fig. 172 How to connect the jump leads when starting vehicles with start/stop system: discharged
battery Ⓐ and battery providing assistance Ⓑ
First read and observe the introductoryinformation and safety warnings⇒
Introduction
Vehicle with discharged battery that is being jump-started.
Vehicle with vehicle battery that is supplying power and jump-starting the other vehicle.
Suitable earth connection. A solid metal part that is firmly bolted to the engine block, the
engine block itself or, where fitted, the screwed-in towing eye at the front ⇒ Tow-starting and
towing.
Using the jump leads incorrectly or completing the jump start procedure incorrectly can cause
the battery to explode, which can lead to severe injuries. Please note the following in order to
reduce the risk of the battery exploding:
\f
Page 206 of 211
The discharged vehicle battery must be properly connected to the vehicle's electrical system.
The vehicles must not touch. Otherwise electricity could flow as soon as the positive terminals are
connected.
Ensure that the battery clamps have good metal-to-metal contact with the battery terminals.
If the engine does not start immediately, switch off the starter after about 10 seconds and try again
after about half a minute.
The steps should only be carried out in the specified order.
Attaching the jump leads
\f