2013 VOLKSWAGEN JETTA SPORTWAGEN towing
[x] Cancel search: towingPage 139 of 324

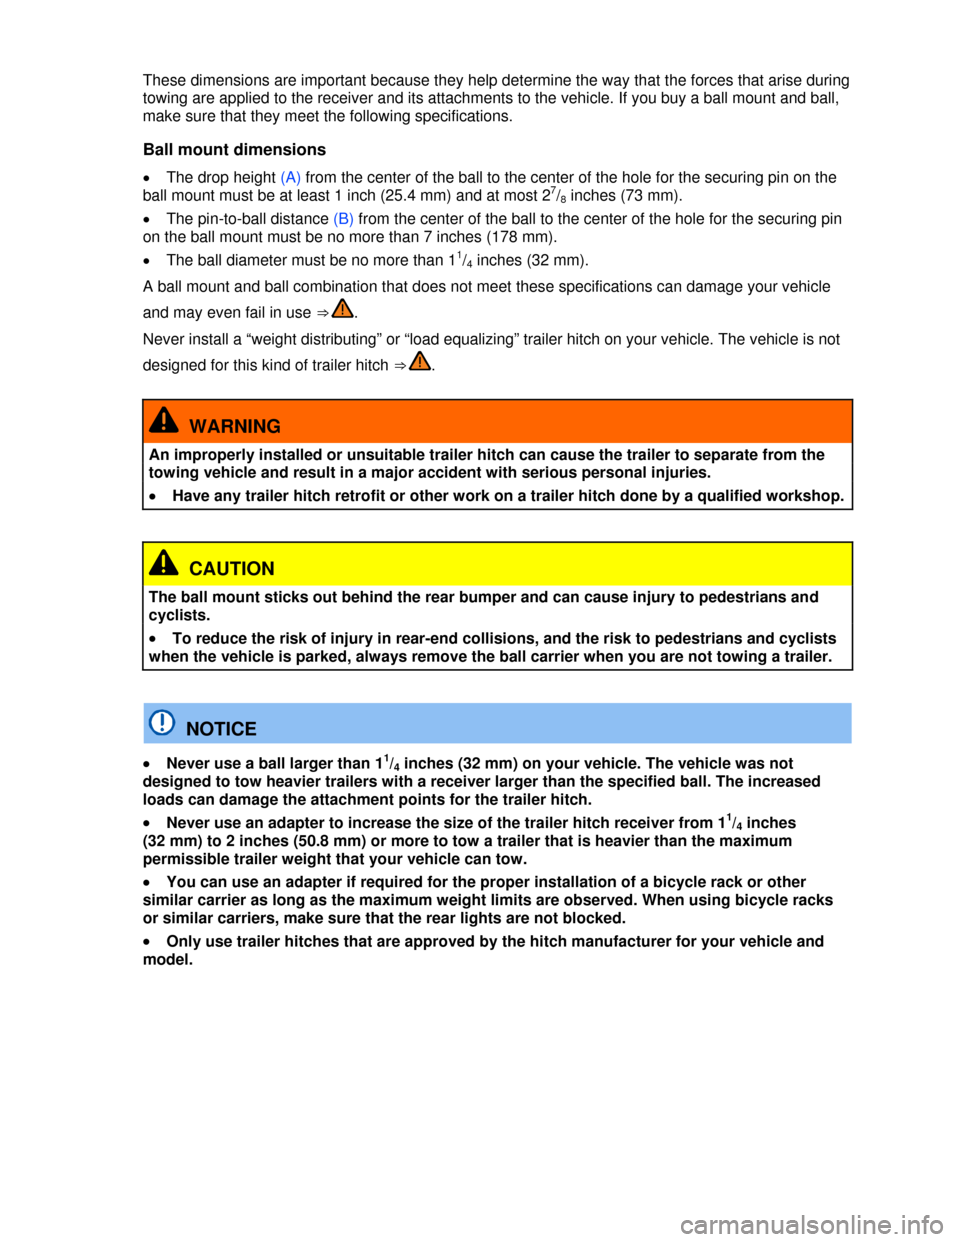
These dimensions are important because they help determine the way that the forces that arise during
towing are applied to the receiver and its attachments to the vehicle. If you buy a ball mount and ball,
make sure that they meet the following specifications.
Ball mount dimensions
�x The drop height (A) from the center of the ball to the center of the hole for the securing pin on the
ball mount must be at least 1 inch (25.4 mm) and at most 27/8 inches (73 mm).
�x The pin-to-ball distance (B) from the center of the ball to the center of the hole for the securing pin
on the ball mount must be no more than 7 inches (178 mm).
�x The ball diameter must be no more than 11/4 inches (32 mm).
A ball mount and ball combination that does not meet these specifications can damage your vehicle
and may even fail in use ⇒ .
Never install a “weight distributing” or “load equalizing” trailer hitch on your vehicle. The vehicle is not
designed for this kind of trailer hitch ⇒ .
WARNING
An improperly installed or unsuitable trailer hitch can cause the trailer to separate from the
towing vehicle and result in a major accident with serious personal injuries.
�x Have any trailer hitch retrofit or other work on a trailer hitch done by a qualified workshop.
CAUTION
The ball mount sticks out behind the rear bumper and can cause injury to pedestrians and
cyclists.
�x To reduce the risk of injury in rear-end collisions, and the risk to pedestrians and cyclists
when the vehicle is parked, always remove the ball carrier when you are not towing a trailer.
NOTICE
�x Never use a ball larger than 11/4 inches (32 mm) on your vehicle. The vehicle was not
designed to tow heavier trailers with a receiver larger than the specified ball. The increased
loads can damage the attachment points for the trailer hitch.
�x Never use an adapter to increase the size of the trailer hitch receiver from 11/4 inches
(32 mm) to 2 inches (50.8 mm) or more to tow a trailer that is heavier than the maximum
permissible trailer weight that your vehicle can tow.
�x You can use an adapter if required for the proper installation of a bicycle rack or other
similar carrier as long as the maximum weight limits are observed. When using bicycle racks
or similar carriers, make sure that the rear lights are not blocked.
�x Only use trailer hitches that are approved by the hitch manufacturer for your vehicle and
model.
Page 141 of 324

(F) 25.6 inches (649 mm)
(G) 41.0 inches (1041 mm)
WARNING
Improper or incorrect connections to the vehicle electrical system can cause malfunctions
that affect the entire vehicle electrical system and cause accidents and serious personal
injury.
�x Never connect the electrical system of the trailer directly to the electrical connections of
the rear lights or other unsuitable power sources. Use only a suitable connector to provide
power to the trailer.
�x Have any trailer hitch retrofit or other work on a trailer hitch done by a qualified workshop.
WARNING
An improperly installed or unsuitable trailer hitch can cause the trailer to separate from the
towing vehicle and result in a major accident with serious personal injuries.
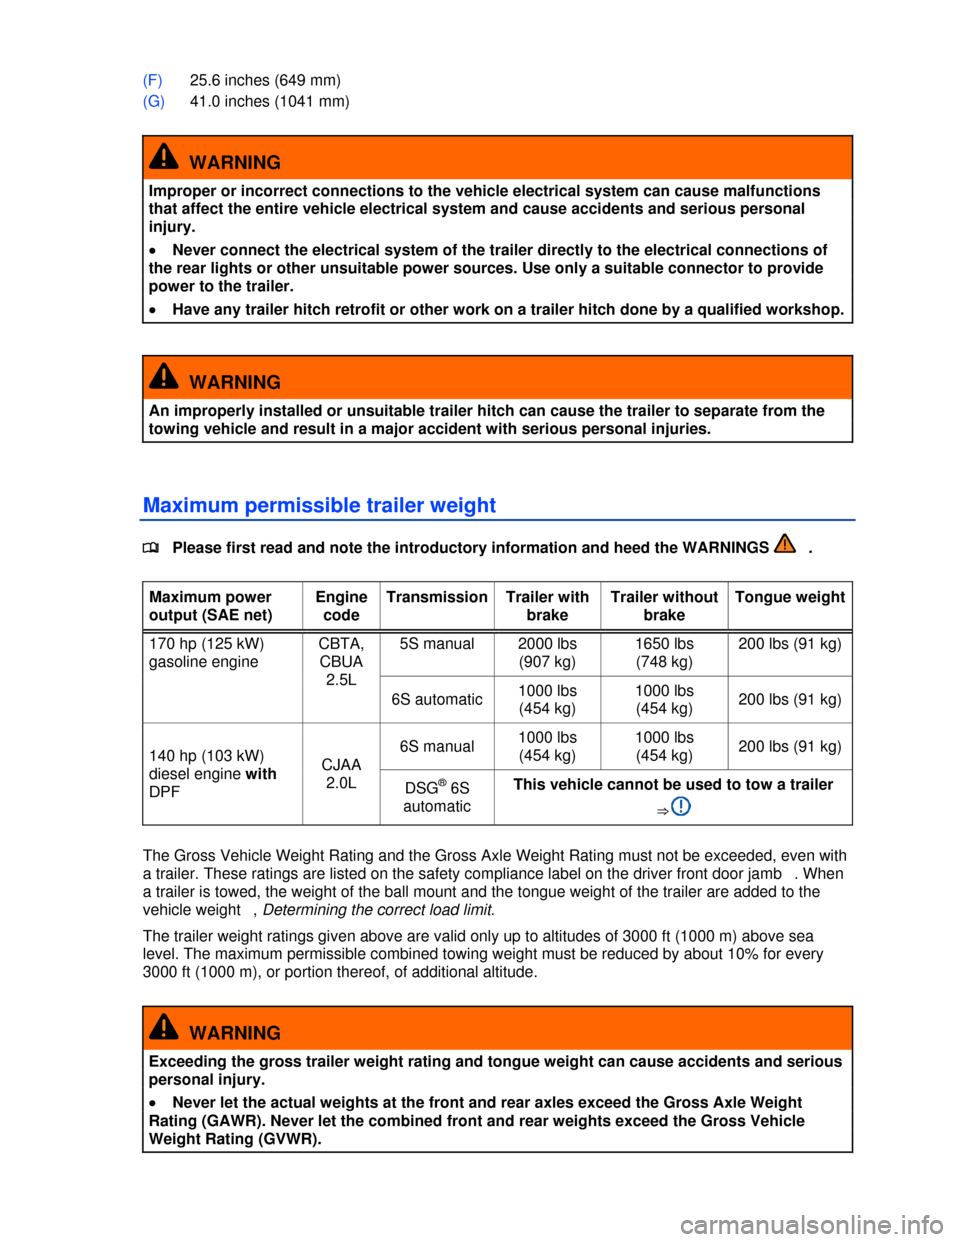
Maximum permissible trailer weight
�
Page 142 of 324

NOTICE
Exceeding the gross weight ratings can cause extensive vehicle damage that is not covered by
any Volkswagen Limited Warranty.
NOTICE
Towing a trailer of any kind with a vehicle that has a diesel engine and DSG automatic
transmission will cause overheating and expensive engine as well as other damage to your
vehicle that will not be covered by any Volkswagen Limited Warranty. Never install a trailer
hitch on one of these vehicles.
Page 164 of 324

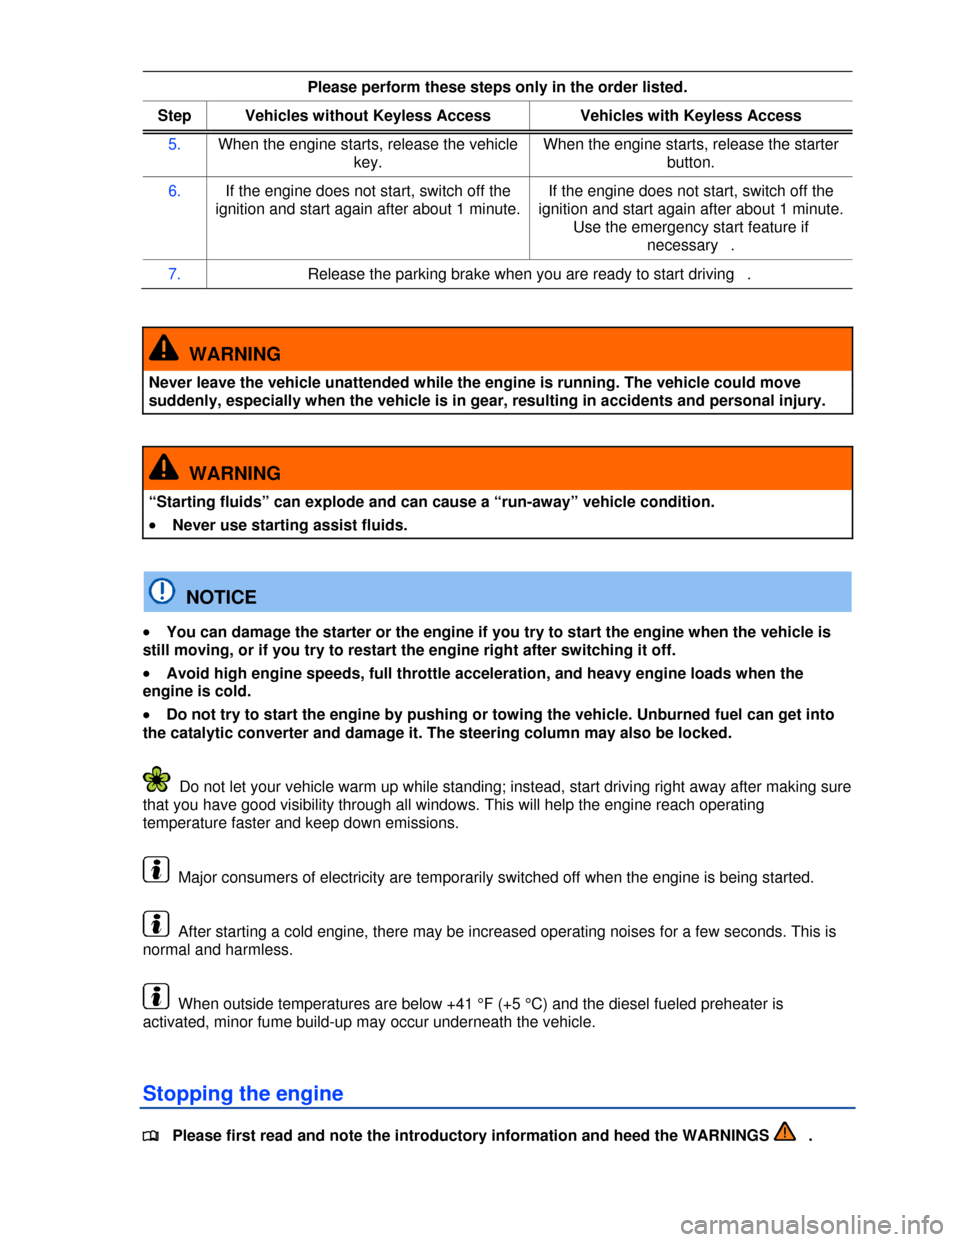
Please perform these steps only in the order listed.
Step Vehicles without Keyless AccessVehicles with Keyless Access
5. When the engine starts, release the vehicle
key.
When the engine starts, release the starter
button.
6. If the engine does not start, switch off the
ignition and start again after about 1 minute.
If the engine does not start, switch off the
ignition and start again after about 1 minute.
Use the emergency start feature if
necessary .
7. Release the parking brake when you are ready to start driving .
WARNING
Never leave the vehicle unattended while the engine is running. The vehicle could move
suddenly, especially when the vehicle is in gear, resulting in accidents and personal injury.
WARNING
“Starting fluids” can explode and can cause a “run-away” vehicle condition.
�x Never use starting assist fluids.
NOTICE
�x You can damage the starter or the engine if you try to start the engine when the vehicle is
still moving, or if you try to restart the engine right after switching it off.
�x Avoid high engine speeds, full throttle acceleration, and heavy engine loads when the
engine is cold.
�x Do not try to start the engine by pushing or towing the vehicle. Unburned fuel can get into
the catalytic converter and damage it. The steering column may also be locked.
Do not let your vehicle warm up while standing; instead, start driving right away after making sure
that you have good visibility through all windows. This will help the engine reach operating
temperature faster and keep down emissions.
Major consumers of electricity are temporarily switched off when the engine is being started.
After starting a cold engine, there may be increased operating noises for a few seconds. This is
normal and harmless.
When outside temperatures are below +41 °F (+5 °C) and the diesel fueled preheater is
activated, minor fume build-up may occur underneath the vehicle.
Stopping the engine
�
Page 187 of 324

slush or snow, ESC cannot perform the same way it would on a dry surface. If the vehicle
“hydroplanes” (rides on a cushion of water instead of the road surface), ESC will not be able to help
you steer the vehicle because contact with the pavement has been interrupted and the vehicle cannot
be braked or steered. During fast cornering, particularly on winding roads, ESC cannot always deal as
effectively with difficult driving situations as it can at lower speeds. When towing a trailer, ESC is not
able to help you regain control as it would if you were not towing a trailer.
Always adjust your speed and driving style to visibility, road, traffic, and weather conditions. ESC
cannot override the vehicle's physical limits, increase the available traction, or keep a vehicle on the
road if road departure is a result of driver inattention. Instead, ESC improves the possibility of keeping
the vehicle under control and on the road during extreme maneuvers by using the driver's steering
inputs to help keep the vehicle going in the intended direction. If you are traveling at a speed that
causes you to run off the road before ESC can provide any assistance, you may not experience the
benefits of ESC.
ESC includes and/or works together with the ABS, BAS, ASR, EDL, and XDL systems (see below).
ESC is switched on all the time. In certain situations when you need less traction or additional traction
cannot be achieved, you can switch off ASR by pressing the �mbutton ⇒ fig. 137. Be sure to switch ASR
on again when you no longer need less traction.
Anti-Lock Brake System (ABS)
ABS helps to keep the wheels from locking up and helps to maintain the driver's ability to steer and
control the vehicle. This means the vehicle is less likely to skid, even during hard braking:
�x Push the brake pedal down hard and hold it there. Don't take your foot off the pedal or reduce the
force on the pedal!
�x Do not “pump” the brake pedal or let up on it!
�x Steer the vehicle while pushing down hard on the brake pedal.
�x ABS stops working if you release or let up on the brake.
When ABS is doing its job, you will notice a slight vibration through the brake pedal and hear a
noise. ABS cannot shorten the stopping distance under all conditions. The stopping distance may
even be longer, for instance, when driving on gravel or on newly fallen snow covering an icy or
slippery surface.
Brake Assist (BAS)
The Brake Assist System can help to reduce stopping distances. If you press the brake pedal very
quickly, BAS detects an emergency situation. It then very quickly builds up full brake system pressure,
maximizing braking power and reducing the stopping distance. This way, ABS can be activated more
quickly and efficiently.
Do not reduce pressure on the brake pedal! BAS switches off automatically as soon as you release or
let up on the brake.
Anti-Slip Regulation (ASR)
ASR reduces engine power directed to spinning wheels and adjusts power to the road conditions.
Even under poor road conditions, ASR can make it easier to get moving, accelerate, and climb hills.
ASR can be switched on or off manually .
Electronic Differential Lock (EDL and XDL)
EDL is applied during regular straight-line acceleration. EDL gently brakes a drive wheel that has lost
traction (spinning) and redirects the drive force to other drive wheels. In extreme cases, EDL
automatically switches off to keep the brake from overheating. As soon as the brake has cooled down,
EDL automatically switches on again.
XDL is an extension of the Electronic Differential Lock system. XDL does not react to drive wheel
slippage when driving straight ahead. Instead, XDL detects slippage of the inside front wheel during
fast cornering. XDL applies enough brake pressure to this wheel in order to stop the slippage. This
improves traction, which helps the vehicle stay on track.
Page 193 of 324

Calm and smooth driving
Consistency is more important than speed. The more smoothly you drive, the less fuel the vehicle
consumes.
When driving on the highway or freeway, a constant, moderate speed is more efficient and economical
than constantly accelerating and braking. Usually you can reach your destination just as quickly by
driving at a moderate, but steady speed.
The cruise control system can assist in maintaining a uniform driving style.
Moderate use of extra electrical loads
Comfort inside the vehicle is nice and important, but it is important to use them in an environmentally
conscious manner.
Some devices can increase fuel consumption when activated (examples):
�x Climate control system (air conditioner): If the air conditioner has to produce starkly contrasting
temperatures, it requires a large amount of energy, which is generated by the engine. The temperature
in the vehicle should therefore not be extremely different from that of the outside temperature. It may
be helpful to ventilate the vehicle before driving and then to drive a short distance with the windows
open. After that, switch on the air conditioner with the windows closed. Keep the windows closed when
driving at high speeds. Open windows increase fuel consumption.
�x Switch off seat heating once it has served its purpose.
�x Switch off the rear window defroster as soon as the windows are free of fog and ice.
Additional factors that increase fuel consumption (examples):
�x Malfunctioning engine control.
�x Driving in the mountains.
�x Towing a trailer.
NOTICE
Never let the vehicle coast or roll down a hill in Neutral (N), especially when the engine is not
running. The transmission will not be lubricated and will be damaged.
Fuel-efficient driving
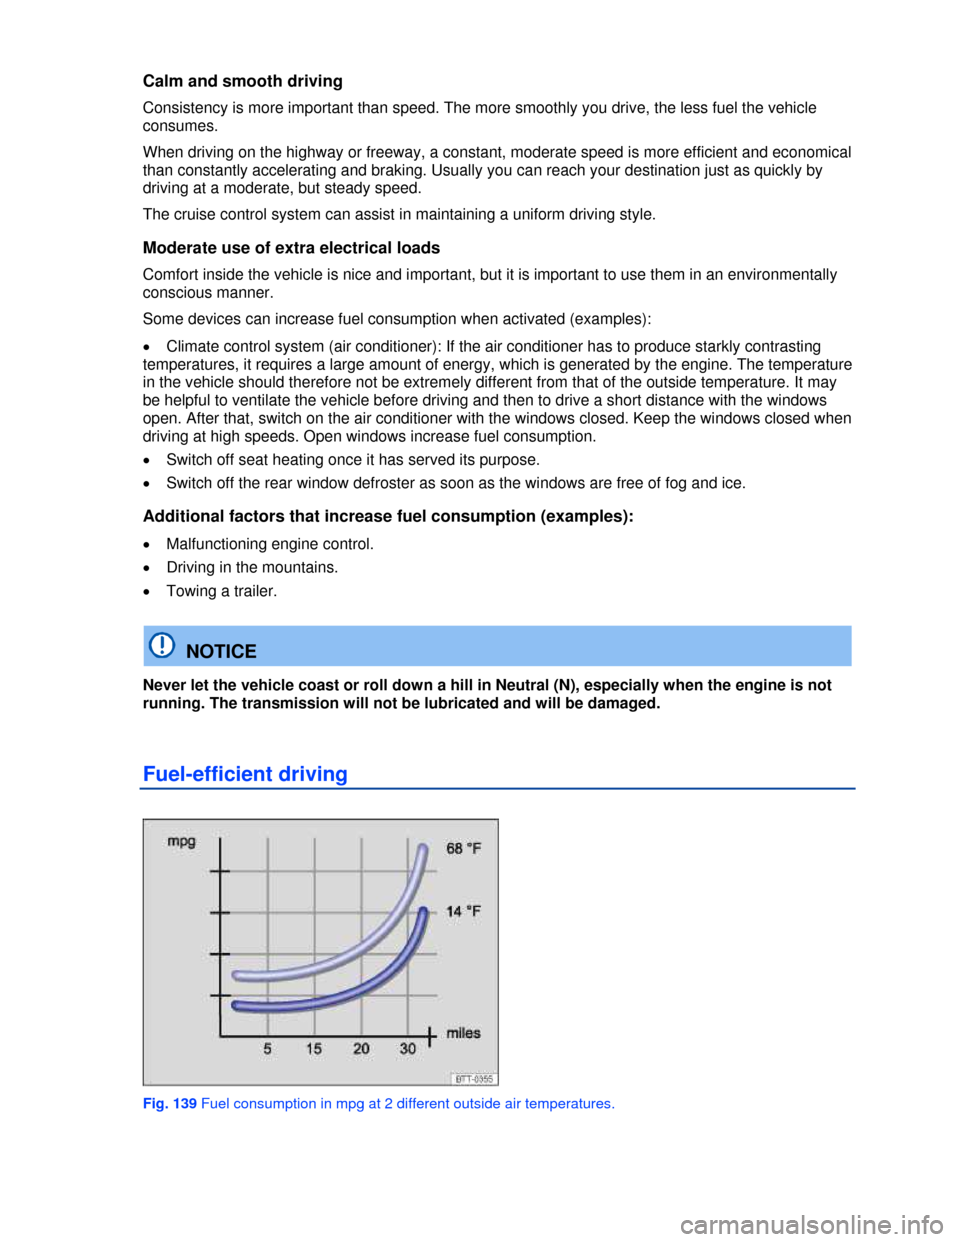
Fig. 139 Fuel consumption in mpg at 2 different outside air temperatures.
Page 291 of 324

Description Possible causes, among
others Possible remedy
Driving in the mountains. No direct corrective action possible.
Towing a trailer or driving with
a roof rack.
– Check use.
– Remove if not in use.
Driving with heavy payload. No direct corrective action possible.
Driving at high engine speed. Select a higher gear.
Page 301 of 324

Contents of the vehicle tool kit ⇒ fig. 181
(1) Screwdriver with a hexagonal socket in the handle for removing or inserting previously
loosened wheel bolts. The screwdriver blade is reversible. The screwdriver may be stored
under the lug wrench.
(2) Adapter for anti-theft wheel bolts. Volkswagen recommends that you always carry the adapter
for the wheel bolts in the vehicle along with the vehicle tool kit. The code number of the wheel
bolt lock is imprinted on the front of the adapter. If lost, a replacement adapter can be ordered
using this number. Record the code number of the wheel bolt lock and store it separately from
the vehicle.
(3) Screw-in towing eye.
(4) Hubcap puller clips for removing hubcaps, wheel covers, or wheel bolt caps.
(5) Jack. Before putting the jack back in the foam insert, make sure to completely crank the jack
down to its original position. The crank must then be locked against the side of the jack;
otherwise, the jack will not fit and cannot be securely stowed.
(6) Lug wrench.