Page 527 of 752
Maintenance and care4
527
4-1. Maintenance and careCleaning and protecting the vehicle exterior ......... 528
Cleaning and protecting the vehicle interior .......... 531
4-2. Maintenance Maintenance requirements .................. 534
General maintenance....... 536
Emission inspection and maintenance (I/M)
programs........................ 539
4-3. Do-it-yourself maintenance Do-it-yourself service precautions .................... 540
Hood ................................ 544
Engine compartment ........ 545
Tires ................................. 559
Tire inflation pressure ...... 567
Wheels ............................. 571
Air conditioning filter......... 574
Wireless remote control battery ............................ 577
Checking and replacing fuses .............................. 579
Light bulbs........................ 590
Page 554 of 752
554 4-3. Do-it-yourself maintenance
Power steering fluid■ Fluid level
The fluid level should be within the appropriate range.
Full (when cold)
Add fluid (when cold)
Full (when hot)
Add fluid (when hot)
Hot: Vehicle has been driven around 50 mph (80 km/h) for 20 minutes, or slightly longer in frigid temperatures. (Fluid
temperature, 140°F - 175°F [60°C - 80°C])
Cold: Engine has not been run for about 5 hours. (Room tem- perature, 50°F - 85°F [10°C - 30°C])
■ Checking the fluid level
Make sure to check the fluid type and prepare the necessary items.
Clean all dirt off the reservoir.
Remove the cap by turning it counterclockwise.
Wipe the dipstick clean.
Reinstall and remove the reservoir cap again.
Check the fluid level.
Fluid type Automatic transmission fluid DEXRON® II or III
Items Rag or paper towel
CAUTION
■Checking the fluid level
Take care, as the reservoir may be hot.
Page 612 of 752

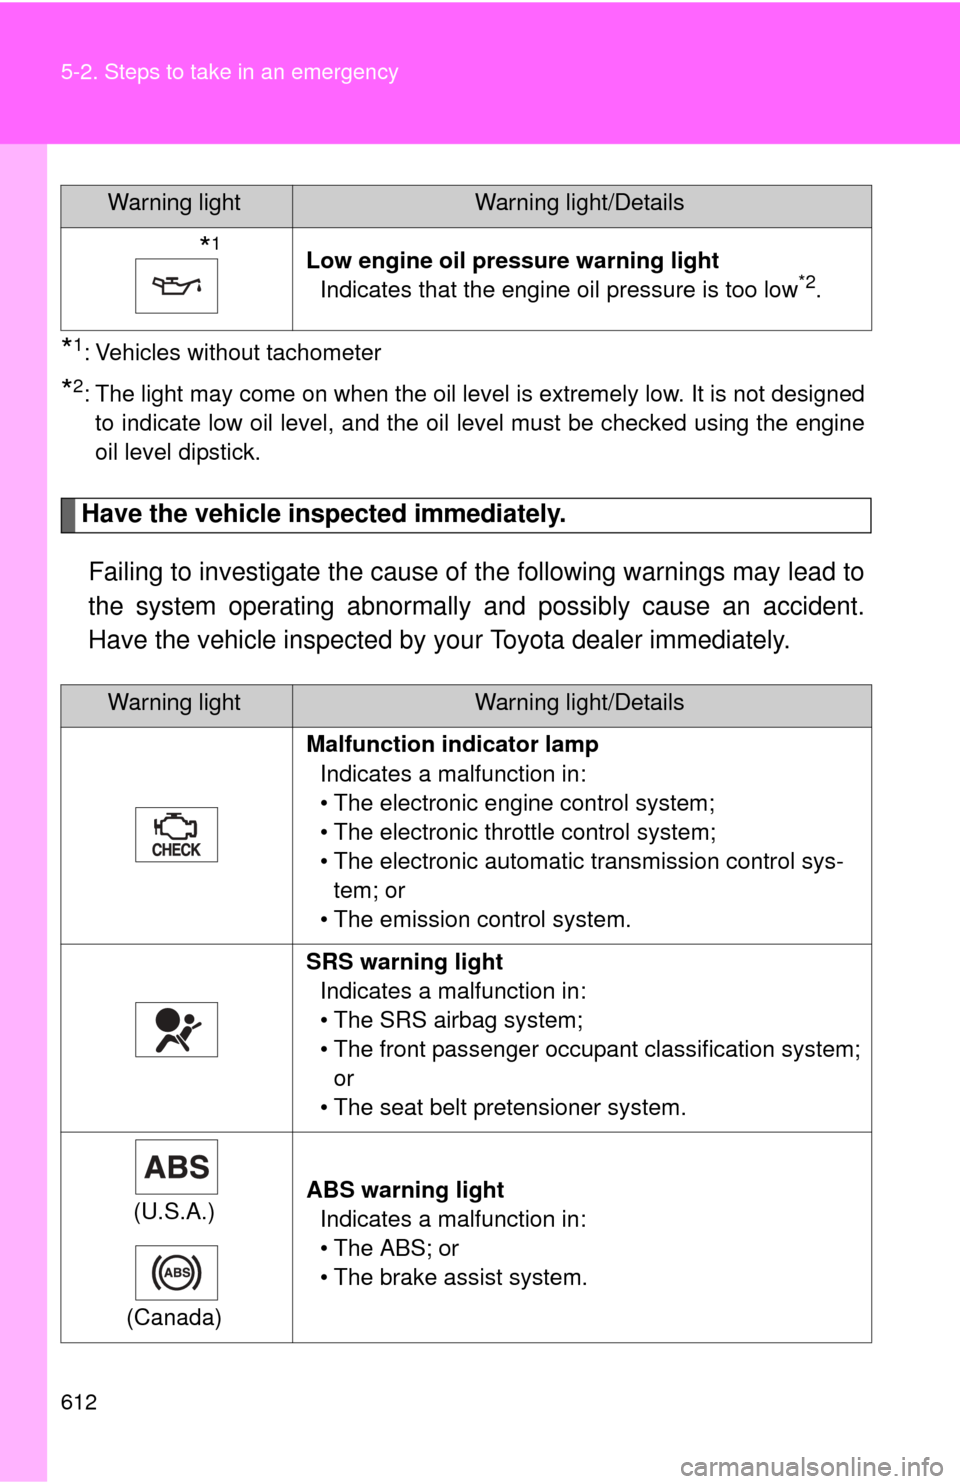
612 5-2. Steps to take in an emergency
*1: Vehicles without tachometer
*2: The light may come on when the oil level is extremely low. It is not designedto indicate low oil level, and the oil level must be checked using the engine
oil level dipstick.
Have the vehicle inspected immediately.
Failing to investigate the cause of the following warnings may lead to
the system operating abnormally and possibly cause an accident.
Have the vehicle inspected by your Toyota dealer immediately.
Warning lightWarning light/Details
*1Low engine oil pressure warning light
Indicates that the engine oil pressure is too low*2.
Warning lightWarning light/Details
Malfunction indicator lamp Indicates a malfunction in:
• The electronic engine control system;
• The electronic throttle control system;
• The electronic automatic transmission control sys-tem; or
• The emission control system.
SRS warning light Indicates a malfunction in:
• The SRS airbag system;
• The front passenger occupant classification system; or
• The seat belt pretensioner system.
(U.S.A.)
(Canada) ABS warning light
Indicates a malfunction in:
• The ABS; or
• The brake assist system.
Page 617 of 752

5
When trouble arises
617
5-2. Steps to take in an emergency
■
Four-wheel drive system warning buzzer
The buzzer indicated that the transfer mode is not selected correctly.
■ Key reminder buzzer
The buzzer indicates that the key has not been removed (with the engine
switch in the ACC or LOCK position and the driver’s door opened).
■ Open moon roof reminder buzzer
The buzzer indicate that the moon roof is still opened (with the engine switch
in the ACC or LOCK position and the driver’s door opened).
■ If the malfunction indicator lamp comes on while driving
First check the following:
● Is your vehicle low on gas?
If it is, refuel the vehicle immediately.
● Is the fuel tank cap loose?
If it is, tighten it securely.
The light will go off after taking several driving trips.
If the light does not go off even after several trips, contact your Toyota dealer
as soon as possible.
■ Front passenger detection sensor and passenger seat belt reminder
If luggage or other load is placed on the right front passenger seat, depend-
ing on its weight, the reminder light to flash and buzzer to sound.
■
When the tire pressure warning light comes on
Check the tire inflation pressure and adjust to the appropriate level.
Pushing the tire pressure warning reset switch does not turn off the tire
pressure warning light.
■The tire pressure warning light may turn on due to natural causes
The tire pressure warning light may turn on due to natural causes such
as natural air leaks or tire inflation pressure changes caused by temper-
ature. In this case, adjusting the ti re inflation pressure will turn off the
warning light (after several minutes).
Page 619 of 752

5
When trouble arises
619
5-2. Steps to take in an emergency
■If the tire pressure warning light frequently comes on after blinking
for 1 minute
If the tire pressure warning light frequently comes on after blinking for 1
minute when the engine switch is turned to the ON position, have it
checked by your Toyota dealer.
■
Customization that can be co nfigured at Toyota dealer
The vehicle speed linked front passenger’s seat belt reminder buzzer can be
disabled. (Customizable features P. 701)
CAUTION
■If the tire pressure warning light comes on
Be sure to observe the following precautions. Failure to do so could
cause loss of vehicle control and result in death or serious injury.
●Stop your vehicle in a safe place as soon as possible. Adjust the tire
inflation pressure immediately.
●If the tire pressure warning light comes on even after tire inflation pres-
sure adjustment, it is pr obable that you have a flat tire. Check the tires.
If the tire is flat, change to the spare tire and have the flat tire repaired
by the nearest Toyota dealer.
●Avoid abrupt maneuvering and braking. If the vehicle tires deteriorate,
you could lose control of the steering wheel or the brakes.
■If a blowout or sudden air leakage should occur
The tire pressure warning syste m may not activate immediately.
Page 651 of 752
5
When trouble arises
651
5-2. Steps to take in an emergency
Positive (+) battery terminal on your vehicle
Positive (+) battery terminal on the second vehicle
Negative (-) battery terminal on the second vehicle
Connect the jumper cable to ground on your vehicle as shown in
the illustration.
Start the engine of the second vehicle. Increase the engine
speed slightly and maintain at that level for approximately 5
minutes to recharge the battery of your vehicle.
Maintain the engine speed of the second vehicle and start
the vehicle’s engine.
Once the vehicle’s engine has started, remove the jumper
cables in the exact reverse order in which they were con-
nected.
Once the engine starts, have the vehicle checked at your Toyota
dealer as soon as possible.
Page 678 of 752
678 6-1. Specifications
Ignition system
Electrical system
Spark plug
Make DENSO
Gap
SK20HR11
0.043 in. (1.1 mm)
NOTICE
■Iridium-tipped spark plugs
Use only iridium-tipped spark plugs. Do not adjust gap when tuning engine.
Battery
Open voltage at
68 F (20 C): 12.6 12.8 V Fully charged
12.2 12.4 V Half charged
11 . 8
12.0 V Discharged
(Voltage checked 20 minutes after the
key is removed with all the lights
turned off)
Charging rates 5 A max.
Page 737 of 752

737
Alphabetical index
Emergency flashers ................ 602
Emergency flashers switch .... 602
Emergency, in case of
Blown fuse ............................ 579
If the engine will not start...... 644
If the shift lever cannot be shifted from P ..................... 646
If the vehicle has
discharged battery ............. 650
If the warning buzzer sounds ............................... 611
If the warning light turns on ....................................... 611
If the warning message
is displayed ........................ 622
If you have a flat tire ............ 626
If you lose your keys............. 649
If you think something is wrong.............................. 609
If your vehicle becomes
stuck................................... 657
If your vehicle has to be stopped in an emergency... 658
If your vehicle needs to be towed ............................ 603
If your vehicle overheats ...... 654 Engine
Compartment ........................545
Engine switch ........................178
Exhaust gas ..........................174
Hood......................................544
How to start the
engine .................................178
Identification number .............672
If the engine will not start ......644
Ignition switch .......................178
Immobilizer system ...............115
Overheating...........................654
Warning light .........................612
Engine coolant
Capacity ................................677
Checking ...............................550
Preparing and checking before winter .......................268
Engine coolan t temperature
gauge ......................................189
Engine immobilizer system.....115
Engine oil Capacity ................................675
Checking ...............................547
Preparing and checking before winter .......................268
Engine switch ...........................178
Event data recorder ...................38E