Page 145 of 328
145
2. SETUP
4
PHONE
2Touch the desired data or “Select
All” , then touch “Delete”.
Multiple data can be selected and deleted
at the same time.
3Touch “Yes”.
■ALTERNATIVE PHONEBOOK
DATA DELETION METHOD
PBAP incompatible but OPP compatible
models
1Press the button or the switch
on the steering wheel.
2Touch “Contacts” on the “Phone”
screen.
3Touch the desired data from the list on
the “Contacts” screen.
4Touch “Options”.
5Touch “Delete” .
6Touch “Yes”.
1Press the “SETUP” button.
2Touch “Phone” on the “Setup” screen.
3Touch “Phonebook” on the “Phone
Settings” screen.
4Touch “Manage Speed Dials” .
5Perform each setting according to the
procedures outlined on the following
pages.
INFORMATION
●When a Bluetooth® phone is deleted,
the phonebook data will be deleted at
the same time.
SPEED DIALS SETTING
Speed dials can be registered and de-
leted.
Page 146 of 328
146
2. SETUP
■THE “Speed Dials” SCREEN CAN
ALSO BE DISPLAYED
From the “Speed Dial” screen
1Press the button or the switch
on the steering wheel.
2Touch “Speed Dials” on the “Phone”
screen.
3Touch “Options”.
From the “Contacts” screen
1Press the button or the switch
on the steering wheel.
2Touch “Contacts” on the “Phone”
screen.
3Touch “Options”.
4Touch “Manage Speed Dials” .
■REGISTERING THE SPEED DIAL
1Touch “New”.
2Touch the desired data to be regis-
tered.
3Touch the desired phone number.
4Touch the desired speed dial location.
Speed dial numbers can be registered
by selecting the desired number from
the phonebook. Up to 18 numbers per
phone can be registered as a speed di-
al.
Page 147 of 328
147
2. SETUP
4
PHONE
5If a location that is already in use is
touched, this screen will be displayed.
Touch “Yes” to replace it.
6When this screen is displayed, the op-
eration is complete.
■THE SPEED DIAL CAN ALSO BE
REGISTERED
From the “Speed Dial” screen
1Press the button or the switch
on the steering wheel.
2Touch “Speed Dials” on the “Phone”
screen.
3Touch “(add new)” .
4Touch “Yes” to set new speed dial.
5Touch the desired data to be regis-
tered.
6Touch the desired phone number.
From the “Contact” screen
1Press the button or the switch
on the steering wheel.
2Touch “Contacts” on the “Phone”
screen.
3Touch the desired data from the list on
the “Contacts” screen.
Page 149 of 328
149
2. SETUP
4
PHONE
5Touch the desired history to delete.
6Touch the desired data, or to delete all
the data touch “Select All”, then touch
“Delete” .
Multiple data can be selected and deleted
at the same time.
7Touch “Yes”.
■THE CALL HISTORY CAN ALSO BE
DELETED
1Press the button or the switch
on the steering wheel.
2Touch “Call History” on the “Phone”
screen.
3Touch “Delete” .
4This screen is displayed.
The following operations are performed in
the same manner as when they are per-
formed from the “Setup” screen.
Other call history can be operated simi-
larly.
Deleting after call history has been dis-
played
1Press the button or the switch
on the steering wheel.
2Touch “Call History” on the “Phone”
screen.
3Touch the desired history to be delet-
ed.
4Touch “Delete” .
5Touch “Yes”.
Page 150 of 328
150
2. SETUP
1Press the “SETUP” button.
2Touch “Phone” on the “Setup” screen.
3Touch “Messaging Settings” .
4Perform each setting according to the
procedures outlined on the following
pages.
5Touch “Save” when each setting is
completed.
1Press the button or the switch
on the steering wheel.
2Touch “Messages” on the “Phone”
screen.
3Touch “Options” .
MESSAGE SETTINGS
Message settings can be changed.
THE “Messaging Settings”
SCREEN CAN ALSO BE
DISPLAYED
SCREEN FOR “Messaging
Settings”
Page 154 of 328

154
2. SETUP
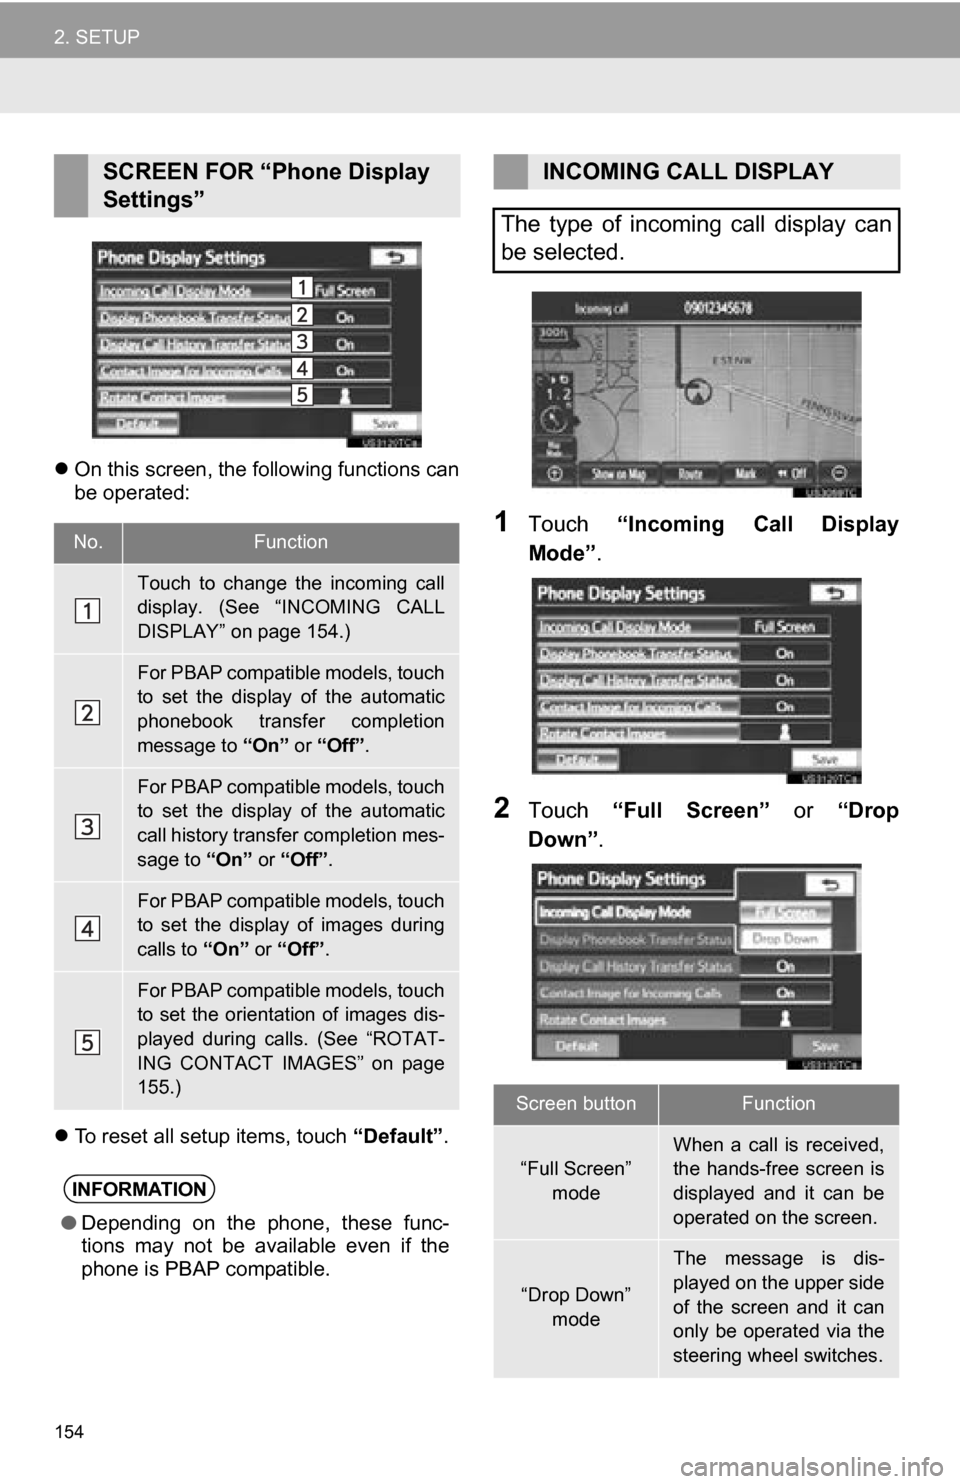
On this screen, the following functions can
be operated:
To reset all setup items, touch “Default”.
1Touch “Incoming Call Display
Mode” .
2Touch “Full Screen” or “Drop
Down” .
SCREEN FOR “Phone Display
Settings”
No.Function
Touch to change the incoming call
display. (See “INCOMING CALL
DISPLAY” on page 154.)
For PBAP compatible models, touch
to set the display of the automatic
phonebook transfer completion
message to “On” or “Off” .
For PBAP compatible models, touch
to set the display of the automatic
call history transfer completion mes-
sage to “On” or “Off” .
For PBAP compatible models, touch
to set the display of images during
calls to “On” or “Off” .
For PBAP compatible models, touch
to set the orientation of images dis-
played during calls. (See “ROTAT-
ING CONTACT IMAGES” on page
155.)
INFORMATION
●Depending on the phone, these func-
tions may not be available even if the
phone is PBAP compatible.
INCOMING CALL DISPLAY
The type of incoming call display can
be selected.
Screen buttonFunction
“Full Screen” mode
When a call is received,
the hands-free screen is
displayed and it can be
operated on the screen.
“Drop Down”
mode
The message is dis-
played on the upper side
of the screen and it can
only be operated via the
steering wheel switches.
Page 187 of 328

187
1. AUDIO/VIDEO SYSTEM OPERATION
5
AUDIO/VIDEO SYSTEM
6. RADIO OPERATION (INTERNET RADIO BROADCAST)
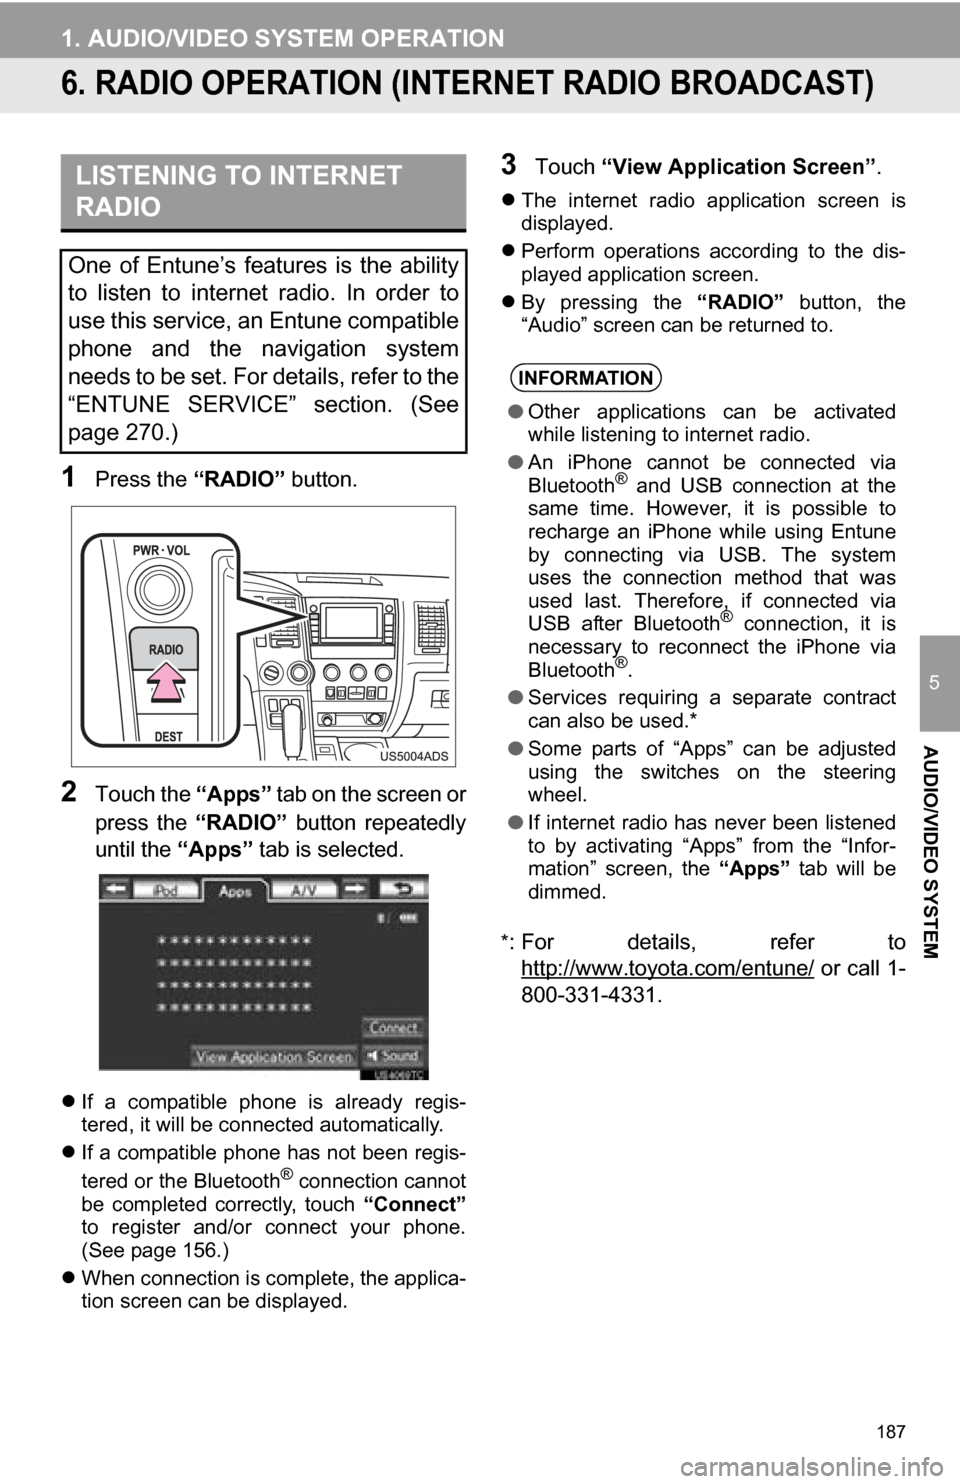
1Press the “RADIO” button.
2Touch the “Apps” tab on the screen or
press the “RADIO” button repeatedly
until the “Apps” tab is selected.
If a compatible phone is already regis-
tered, it will be connected automatically.
If a compatible phone has not been regis-
tered or the Bluetooth
® connection cannot
be completed correctly, touch “Connect”
to register and/or connect your phone.
(See page 156.)
When connection is complete, the applica-
tion screen can be displayed.
3Touch “View Application Screen” .
The internet radio application screen is
displayed.
Perform operations according to the dis-
played application screen.
By pressing the “RADIO” button, the
“Audio” screen can be returned to.
*
: For details, refer to http://www.toyota.com/entune/
or call 1-
800-331-4331.
LISTENING TO INTERNET
RADIO
One of Entune’s features is the ability
to listen to internet radio. In order to
use this service, an Entune compatible
phone and the navigation system
needs to be set. For details, refer to the
“ENTUNE SERVICE” section. (See
page 270.)
INFORMATION
● Other applications can be activated
while listening to internet radio.
● An iPhone cannot be connected via
Bluetooth
® and USB connection at the
same time. However, it is possible to
recharge an iPhone while using Entune
by connecting via USB. The system
uses the connection method that was
used last. Therefore, if connected via
USB after Bluetooth
® connection, it is
necessary to reconnect the iPhone via
Bluetooth
®.
● Services requiring a separate contract
can also be used.*
● Some parts of “Apps” can be adjusted
using the switches on the steering
wheel.
● If internet radio has never been listened
to by activating “Apps” from the “Infor-
mation” screen, the “Apps” tab will be
dimmed.
Page 223 of 328

223
1. AUDIO/VIDEO SYSTEM OPERATION
5
AUDIO/VIDEO SYSTEM
12. AUDIO/VIDEO REMOTE CONTROLS (STEERING SWITCHES)
Volume control switch
Press the “+” side to increase the volume.
The volume continues to increase while
the switch is being pressed.
Press the “-” side to decrease the vol-
ume. The volume continues to decrease
while the switch is being pressed.
“ ” switch
Radio
To select a preset station/channel :
Quickly press and release the “” or “”
switch. Repeat this to select the next pre-
set station/channel.
To seek a station/channel : Press and
hold the “” or “” switch until a beep is
heard. Repeat this to find the next station/
channel. If either switch is pressed during
seek mode, seeking will be canceled.
To seek up or down the frequency, press
and hold the switch until a beep is heard.
When you release the switch, the radio
will begin seeking up or down for a station/
channel. Repeat to find the next station/
channel.
DVD player
Use the “” or “” switch to skip up or
down to a different track, file or chapter in
either direction.
To select a desired track, file or chapter :
Quickly press and release the “” or “”
switch until the desir ed track, file or chap-
ter to play is selected. To return to the be-
ginning of the current track, file or chapter,
press the “” switch once quickly.
To select a desired folder : Press and
hold the “” or “” switch until a beep is
heard to change to the next or the previous
folder. Repeat it until the desired folder is
selected.
Bluetooth
® audio player
Use the “” or “” switch to skip up or
down to a different track or album in either
direction.
To select a desired track : Quickly press
and release the “” or “” switch until the
desired track is selected. To return to the
beginning of the current track, press the
“” switch once quickly.
To select a desired album : Press and
hold the “” or “” switch until a beep is
heard to change to the next or the previous
album. Repeat it until the desired album is
selected.
USB memory/iPod
Use the “” or “” switch to skip up or
down to a different file or track in either
direction.
To select a desired file or track : Press
the “” or “” switch until the desired file
or track is selected. To return to the begin-
ning of the current file or track, press the
“” switch once quickly.
To select a desired folder or album
(USB memory only): Press and hold the
“” or “” switch until a beep is heard to
change to the next or the previous folder or
album. Repeat it until the desired folder or
album is selected.
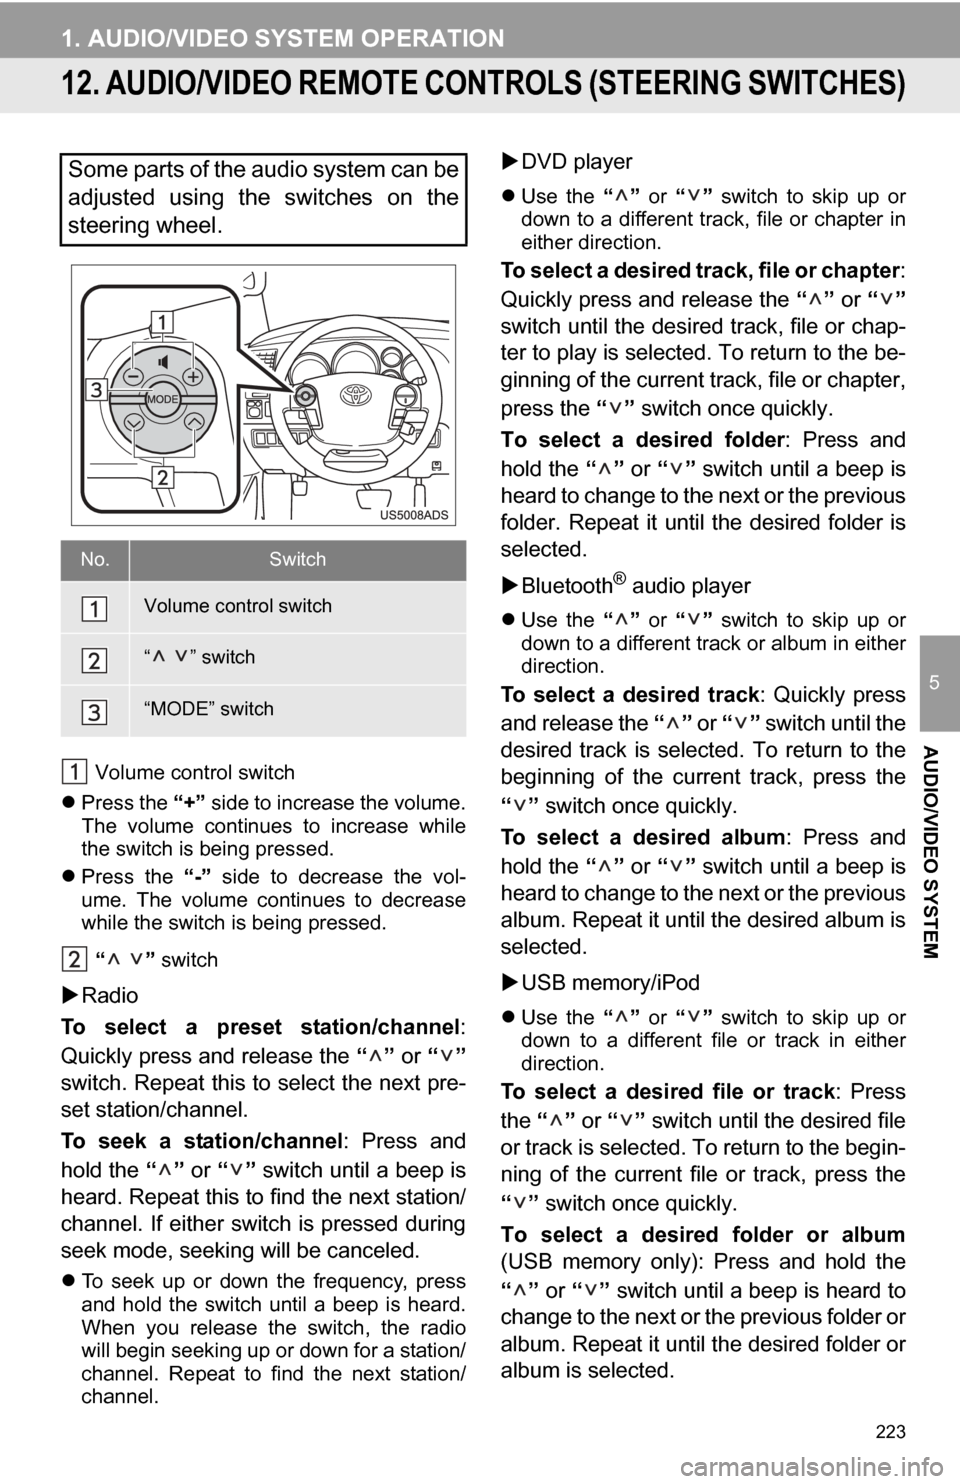
Some parts of the audio system can be
adjusted using the switches on the
steering wheel.
No.Switch
Volume control switch
“ ” switch
“MODE” switch