Page 437 of 556

5
When trouble arises
437
5-2. Steps to take in an emergency
*: Driver's and front passen
ger's seat belt buzzer:
The driver's and front passenger's seat belt buzzer sounds to alert the driver
and front passenger that his or her seat belt is not fastened. Once the engine
switch is turned to the “ON” or “START” position (vehicles without a smart
key system) or the “POWER” switch is turned to ON mode (vehicles with a
smart key system), the buzzer sounds for 6 seconds. If the vehicle reaches a
speed of 12 mph (20 km/h), the buzzer sounds once. If the seat belt is still
unfastened after 30 seconds, the buzzer will sound intermittently for 10 sec-
onds. Then, if the seat belt is still unfastened, the buzzer will sound in a dif-
ferent tone for 20 more seconds.
■ SRS warning light
This warning light system monitors the airbag sensor assembly, front impact
sensors, side impact sensors, driver's seat belt buckle switch, front passen-
ger occupant classification system (ECU and sensors), “AIR BAG ON” indi-
cator light, “AIR BAG OFF” indicator light, front passenger's seat belt buckle
switch, seat belt pretensioner assemblies, airbags, interconnecting wiring
and power sources. ( P. 434)
■ Front passenger detection sensor, passenger seat belt reminder and
warning buzzer
● If luggage is placed on the front passenger seat, the front passenger
detection sensor may cause the warning light to flash and the warning
buzzer to sound even if a passenger is not sitting in the seat.
● If a cushion is placed on the seat, the sensor may not detect a passen-
ger, and the warning light may not operate properly.
■ Electric power steering system wa rning light (warning buzzer)
When the 12-volt battery charge becomes insufficient or the voltage tempo-
rarily drops, the electric power st eering system warning light may come on
and the warning buzzer may sound.
Page 438 of 556

438 5-2. Steps to take in an emergency
■If the malfunction indicator lamp comes on while driving
The malfunction indicator lamp will come on if the fuel tank cap becomes
loose. If the fuel tank cap is loose, tighten it securely. The malfunction indica-
tor lamp will go off after several trips.
If the malfunction indicator lamp does not go off even after several trips, con-
tact your Toyota dealer as soon as possible.
■
When the tire pressure warning light comes on
Check the tire inflation pressure and adjust to the appropriate level.
Pushing the tire pressure warning reset switch will not turn off the tire
pressure warning light.
■The tire pressure warning light may come on due to natural causes
The tire pressure warning light may come on due to natural causes such
as natural air leaks and tire inflat ion pressure changes caused by tem-
perature. In this case, adjusting the tire inflation pressure will turn off the
warning light (after a few minutes).
■When a tire is replaced with a spare tire
The compact spare tire is not equipped with a tire pressure warning
valve and transmitter. If a tire goes flat, the tire pressure warning light will
not turn off even though the flat tire has been replaced with the spare
tire. Replace the spare tire with the re paired tire and adjust the tire infla-
tion pressure. The tire pressure wa rning light will go off after a few min-
utes.
Page 456 of 556
456 5-2. Steps to take in an emergency
Once(Flashes)• The electronic
key could not be
detected when
the “POWER”
switch was
pressed after
the doors were
unlocked with
the mechanical
key.
• The electronic key could not be
detected two
consecutive
times when the
“POWER”
switch was
pressed. Touch the elec-
tronic key to the
“POWER”
switch while
depressing the
brake pedal.
Once
(Flashes)An attempt was
made to start
the hybrid sys-
tem with the
shift lever in a
position other
than P.
Shift the shift
lever to P and
start the hybrid
system.
Power was
turned off due to
the automatic
power off func-
tion.Next time when
starting the
hybrid system,
increase the
engine speed
slightly and
maintain that
level for approx-
imately 5 min-
utes to recharge
the 12-volt-bat-
tery.
Interior
buzzerExterior buzzerWarning messageDetailsCorrection procedure
Page 461 of 556
5
When trouble arises
461
5-2. Steps to take in an emergency
Taking out the compact spare tire
Remove the luggage floor cover
by lifting up the points indicated
by the arrows.
Remove the spare wheel cush-
ions, then loosen the center fas-
tener that secures the spare tire.
STEP1
STEP2
Page 468 of 556

468 5-2. Steps to take in an emergency
CAUTION
■Using the tire jack
Improper use of the tire jack may cause the vehicle to suddenly fall off
the jack, leading to death or serious injury.
●Do not use the tire jack for any purpose other than replacing tires or
installing and removing tire chains.
●Only use the tire jack that comes with this vehicle for replacing a flat
tire.
Do not use it on other vehicles, and do not use other tire jacks for
replacing tires on this vehicle.
●Always check that the tire jack is securely set to the jack point.
●Do not put any part of your body under the vehicle while it is supported
by the jack.
●Do not start or run the hybrid system while your vehicle is supported by
the jack.
●Do not raise the vehicle while someone is inside.
●When raising the vehicle, do not put an object on or under the jack.
●Do not raise the vehicle to a hei ght greater than that required to
replace the tire.
●Use a jack stand if it is necessary to get under the vehicle.
Take particular care when lowering the vehicle to ensure that no one
working on or near the vehicle may be injured.
Page 517 of 556

517
6-1. Specifications
6
Vehicle specifications
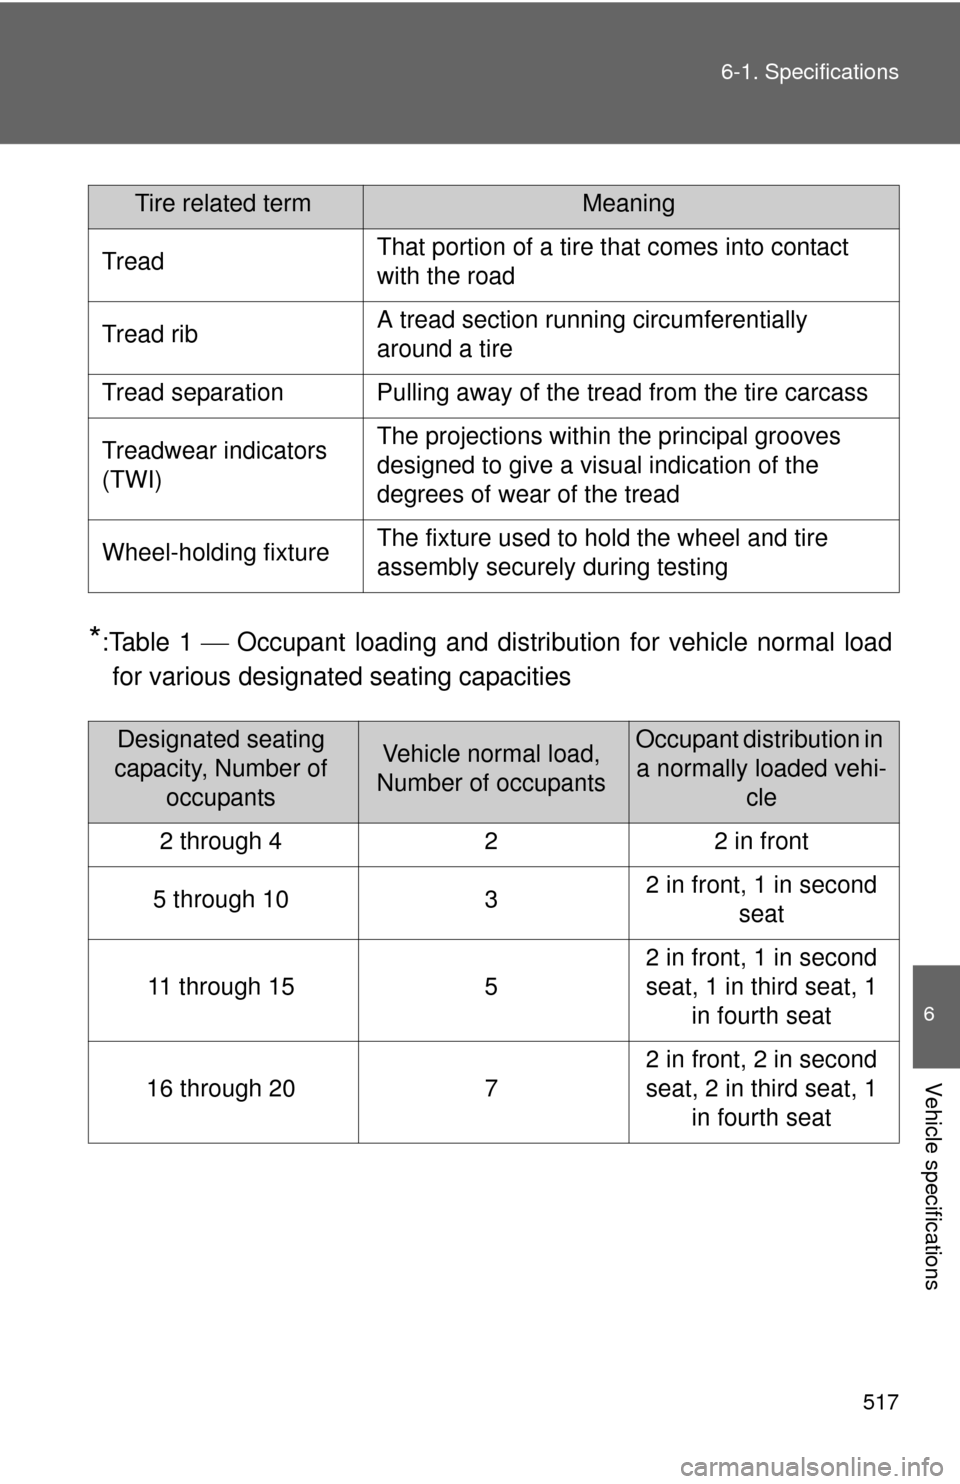
*:Table 1
Occupant loading and distri bution for vehicle normal load
for various designated seating capacities
Tread That portion of a tire that comes into contact
with the road
Tread rib A tread section running circumferentially
around a tire
Tread separation Pulling away of the tread from the tire carcass
Treadwear indicators
(TWI) The projections within the principal grooves
designed to give a visual indication of the
degrees of wear of the tread
Wheel-holding fixture The fixture used to hold the wheel and tire
assembly securely
during testing
Designated seating
capacity, Number of occupantsVehicle normal load,
Number of occupantsOccupant distribution in a normally loaded vehi- cle
2 through 4 2 2 in front
5 through 10 3 2 in front, 1 in second
seat
11 through 15 5 2 in front, 1 in second
seat, 1 in third seat, 1
in fourth seat
16 through 20 7 2 in front, 2 in second
seat, 2 in third seat, 1
in fourth seat
Tire related termMeaning
Page 527 of 556
527
7
For owners
Seat belt instructions for Canadian owners (in French)
The following is a French explanation of seat belt instructions
extracted from the seat belt section in this manual.
See the seat belt section for more detailed seat belt instructions in
English.
Utilisation correcte des ceintures de sécurité
●Déroulez la sangle diagonale
de telle sorte qu'elle passe
bien sur l'épaule, sans pour
autant être en contact avec le
cou ou glisser de l'épaule.
● Placez la sangle abdominale
le plus bas possible sur les
hanches.
● Réglez la position du dossier
de siège. Asseyez-vous le dos
le plus droit possible et calez-
vous bien dans le siège.
● Ne vrillez pas la ceinture de
sécurité.
Page 528 of 556

528
AT T E N T I O N
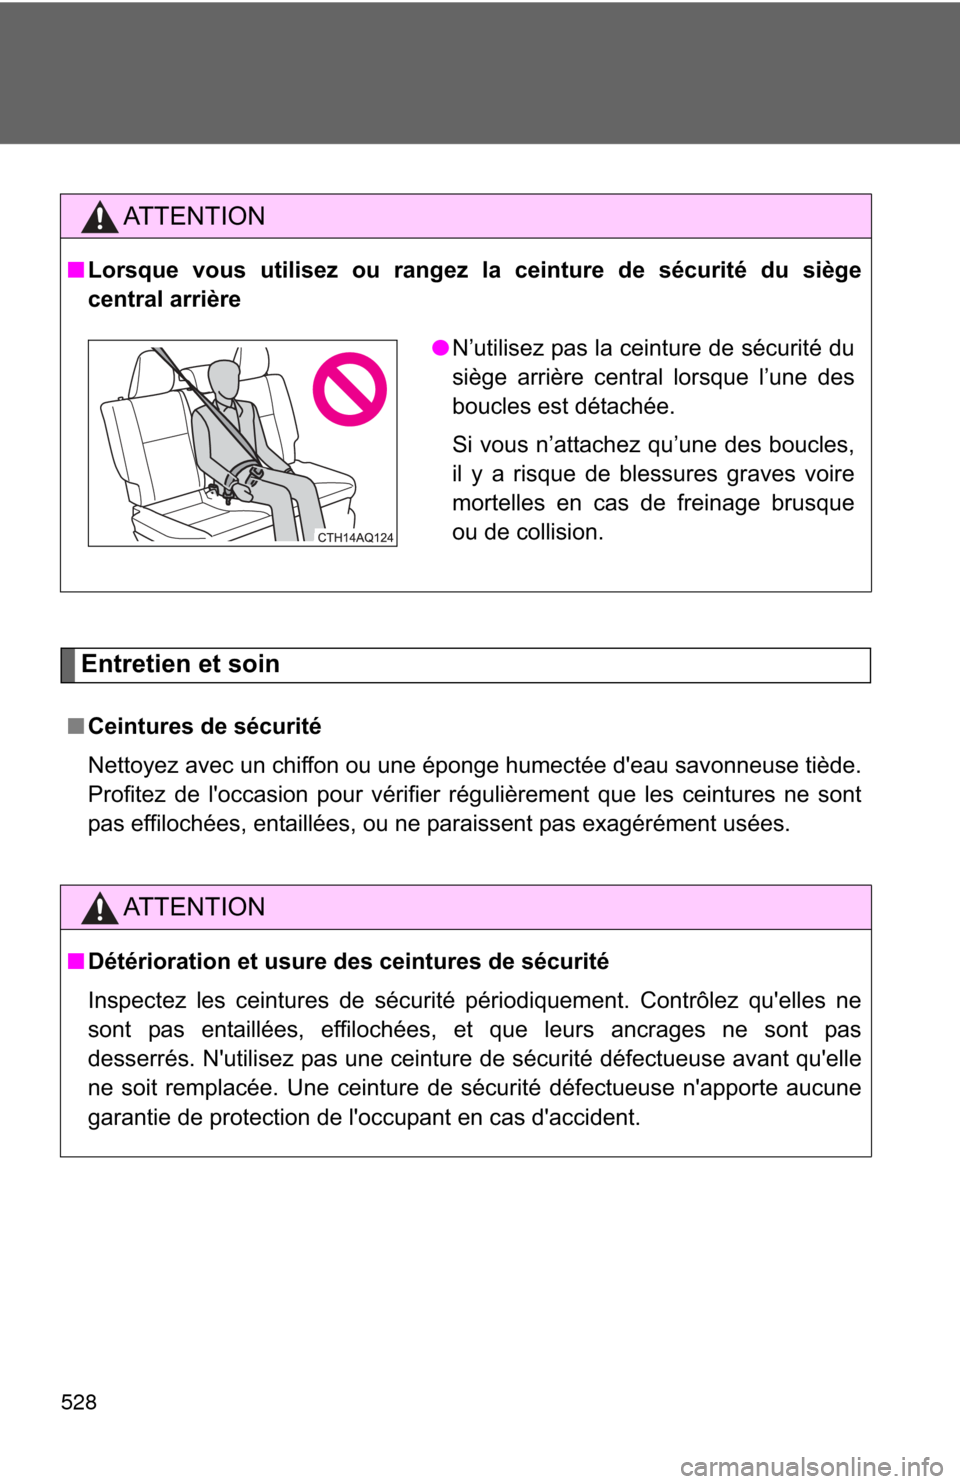
■Lorsque vous utilisez ou rangez la ceinture de sécurité du siège
central arrière
●N’utilisez pas la ceinture de sécurité du
siège arrière central lorsque l’une des
boucles est détachée.
Si vous n’attachez qu’une des boucles,
il y a risque de blessures graves voire
mortelles en cas de freinage brusque
ou de collision.
Entretien et soin
■Ceintures de sécurité
Nettoyez avec un chiffon ou une éponge humectée d'eau savonneuse tiède.
Profitez de l'occasion pour vérifier régulièrement que les ceintures ne sont
pas effilochées, entaillées, ou ne paraissent pas exagérément usées.
AT T E N T I O N
■Détérioration et usure des ceintures de sécurité
Inspectez les ceintures de sécurité périodiquement. Contrôlez qu'elles ne
sont pas entaillées, effilochées, et que leurs ancrages ne sont pas
desserrés. N'utilisez pas une ceinture de sécurité défectueuse avant qu'elle
ne soit remplacée. Une ceinture de sécurité défectueuse n'apporte aucune
garantie de protection de l'occupant en cas d'accident.