Page 144 of 556
144 1-8. Safety information
Removing a child restraint installed with a seat beltPush the buckle release button
and fully retract the seat belt.
Child restraint systems with a top tether strapRemove the luggage cover (if equipped). ( P. 341)
Remove the head restraint ( P. 81)
Secure the child restraint system using the LATCH anchors or
a seat belt.
Open the anchor bracket cover,
latch the hook onto the anchor
bracket and tighten the top tether
strap.
Make sure the top tether strap is
securely latched.
Reinstall the luggage cover (if equipped) and the head
restraint.
STEP1
STEP2
STEP3
STEP4
■Laws and regulations pertaining to anchorages
The LATCH system conforms to FMVSS225 or CMVSS210.2.
Child restraint systems conforming to FMVSS213 or CMVSS213 specifica-
tions can be used.
This vehicle is designed to conform to SAE J1819.
STEP5
Page 146 of 556

146 1-8. Safety information
CAUTION
■When installing a child restraint system
●Shake the child restraint system left and right, and forward and backward
to ensure that it has been securely installed.
● After securing a child restraint system, never adjust the seat.
● Follow all installation instructions provided by the child restraint system
manufacturer.
● When a child restraint system with a top tether strap is installed, do not
install the head restraint. The head restraint may interfere with the top
tether strap preventing secure installation of the child restraint system.
● Make sure to properly store the removed head restraint in a secure place
when you use the child restraint system on the rear seat.
■ Do not use a seat belt extender
If a seat belt extender is used when installing a child restraint system, the
seat belt will not securely hold the child restraint system, which could cause
death or serious injury to the child or other passengers in the event of sud-
den braking, sudden swerving or an accident.
■ To correctly attach a child r estraint system to the anchors
When using the LATCH anchors, be sure that there are no foreign objects
around the anchors and that the seat belt is not caught behind the child
restraint. Make sure the child restraint system is securely attached, or it may
cause death or serious injury to the child or other passengers in the event of
sudden braking, sudden swerving or an accident.
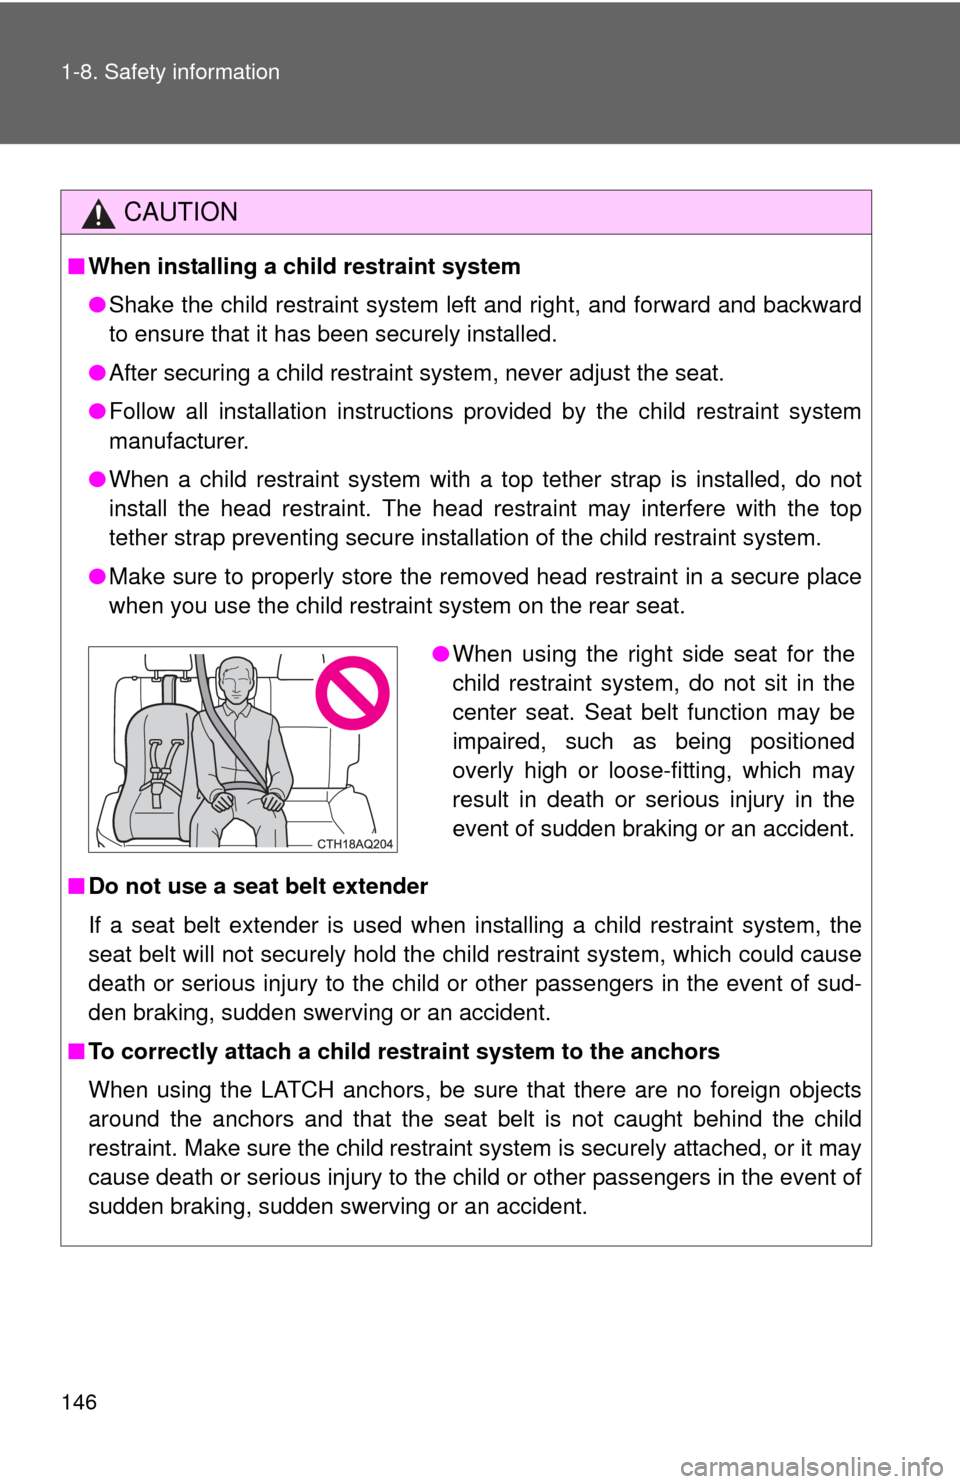
● When using the right side seat for the
child restraint system, do not sit in the
center seat. Seat belt function may be
impaired, such as being positioned
overly high or loose-fitting, which may
result in death or serious injury in the
event of sudden braking or an accident.
Page 147 of 556

When driving2
147
2-1. Driving proceduresDriving the vehicle............ 148
Engine (ignition) switch .... 158
Power (ignition) switch ..... 162
EV drive mode ................. 170
Hybrid transmission ......... 173
Turn signal lever .............. 176
Parking brake ................... 177
Horn ................................. 178
2-2. Instrument cluster Gauges and meters ......... 179
Indicators and warning lights .............................. 182
Multi-information display............................ 185
2-3. Operating the lights and wipers
Headlight switch ............... 202
Fog light switch ................ 206
Windshield wipers and washer ........................... 208
Rear window wiper and washer ........................... 212 2-4. Using other driving
systems
Cruise control ................... 215
Driving assist systems ..... 219
Hill-start assist control ...... 222
2-5. Driving information Cargo and luggage .......... 224
Vehicle load limits ............ 228
Winter driving tips ............ 229
Trailer towing ................... 233
Dinghy towing .................. 234
Page 152 of 556

152 2-1. Driving procedures
CAUTION
●Do not shift the shift lever to R while the vehicle is moving forward.
Doing so can damage the transmission and may result in a loss of vehicle\
control.
● Do not shift the shift lever to D while the vehicle is moving backward.
Doing so can damage the transmission and may result in a loss of vehicle\
control.
● Moving the shift lever to N while the vehicle is moving will disengage the
hybrid system. Engine braking is not available with the hybrid system dis-
engaged.
● During normal driving, do not turn off the hybrid system. Turning the hybrid
system off while driving will not cause loss of steering or braking control,
but the power assist to these systems will be lost. This will make it more
difficult to steer and brake, so you should pull over and stop the vehicle as
soon as it is safe to do so.
However, in the event of an emergency, such as if it becomes impossible
to stop the vehicle in the normal way: P. 488
● Use engine braking (shift position B) to maintain a safe speed when driv-
ing down a steep hill.
Using the brakes continuously may cause the brakes to overheat and lose
effectiveness. ( P. 174)
● Do not adjust the positions of the steering wheel, the seat, or the inside or
outside rear view mirrors while driving.
Doing so may result in a loss of vehicle control that can cause accidents,
resulting in death or serious injury.
● Always check that all passengers' arms, heads or other parts of their body
are not outside the vehicle, as this may result in death or serious injury.
● Do not drive in excess of the speed limit. Even if the legal speed limit per-
mits it, do not drive over 85 mph (140 km/h) unless your vehicle has high-
speed capability tires. Driving over 85 mph (140 km/h) may result in tire
failure, loss of control and possible injury. Be sure to consult a tire dealer
to determine whether the tires on your vehicle are high-speed capability
tires or not before driving at such speeds.
Page 156 of 556

156 2-1. Driving procedures
CAUTION
■When taking a nap in the vehicle
Always turn the hybrid system off. Otherwise, if you accidentally move the
shift lever or depress the accelerator pedal, this could cause an accident or
fire due to hybrid system overheating. Additionally, if the vehicle is parked in
a poorly ventilated area, exhaust gases may collect and enter the vehicle,
leading to death or a serious health hazard.
■ When braking
●When the brakes are wet, drive more cautiously.
Braking distance increases when the brakes are wet, and this may cause
one side of the vehicle to brake differently than the other side. Also, the
parking brake may not securely hold the vehicle.
● If the brake system warning light (yellow indicator) comes on, maintain a
larger than usual distance between you and the vehicle ahead, and avoid
hills or sharp turns that require braking.
In this case, braking is still possible, but the brake pedal should be
depressed more firmly than usual. Also, the braking distance will increase.
● If the brake system warning light (red indicator) comes on, there may be a
malfunction with the brake’s hydraulic system. Immediately stop the vehi-
cle in a safe place and contact your Toyota dealer.
In this case, the brake pedal should be depressed more firmly than usual
and the braking distance will increase. Do not continue to drive the vehicle
in this condition.
NOTICE
■When driving the vehicle
●Do not depress the accelerator and brake pedals at the same time during
driving, as this may restrain driving torque.
● Do not use the accelerator pedal or depress the accelerator and brake
pedals at the same time to hold the vehicle on a hill.
■ When parking the vehicle
Always shift the shift lever to P. Failure to do so may cause the vehicle to
move or the vehicle may accelerate suddenly if the accelerator pedal is acci-
dentally depressed.
Page 183 of 556

183
2-2. Instrument cluster
2
When driving
■
Indicators
The indicators inform the driver of the operating state of the
vehicle’s various systems.
*1: These lights turn on when the engine switch is turned to the “ON”
position (vehicles without a smart key system) or the “POWER”
switch is turned to ON mode (vehicles with a smart key system) to
indicate that a system check is being performed. They will turn off
after the hybrid system is on, or after a few seconds. There may be
a malfunction in a system if a light does not come on, or if the lights
do not turn off. Have the vehicle inspected by your Toyota dealer.
*2: The light flashes to indicate that the system is operating.
Turn signal indicator
(P. 176)Driving ready indicator
( P. 158, 162)
Headlight high beam
indicator ( P. 203)EV drive mode indica-
tor (P. 170)
(U.S.A.)
Headlight indicator
(P. 202)Shift position indicator
( P. 174)
(Canada)
Tail light indicator
(P. 202)“ECO MODE” indicator
( P. 174)
(if equipped)
Front fog light indicator
(P. 206)EV drive indicator lamp
( P. 192)
(if equipped)
Immobilizer system indi-
cator ( P. 110)
(if equipped)
Cruise control indicator
(P. 215)
(if equipped)
Cruise control set indi-
cator (P. 215)
*1,2
Slip indicator ( P. 220)
SRS airbag
on-off indica-
tor (P. 128)*1
Page 202 of 556
202
2-3. Operating the lights and wipers
Headlight switch
The headlights can be operated manually.
Turning the end of the lever turns on the lights as follows:
Ty p e AThe daytime running
lights turn on.
The side marker,
parking, tail, license
plate, daytime run-
ning lights and instru-
ment panel lights turn
on.
The headlights and
all lights listed above
(except daytime run-
ning lights) turn on.
The daytime running
lights turn off.
Page 203 of 556
203
2-3. Operating the lights and wipers
2
When driving
Turning on the high beam headlights
With the headlights on, push
the lever away from you to
turn on the high beams.
Pull the lever toward you to the
center position to turn the high
beams off.
Pull the lever toward you and
release it to flash the high
beams once.
You can flash the high beams
with the headlights on or off.
Ty p e B The daytime running
lights turn on.
The side marker,
parking, tail, license
plate, daytime run-
ning lights and instru-
ment panel lights turn
on.
The headlights and
all lights listed above
(except daytime run-
ning lights) turn on.