Page 261 of 556
261
3-2. Using the audio system
3
Interior features
Random playback
Pressing (RDM) changes modes in the following order:
Folder random Disc random Off
Repeat play
Pressing (RPT) changes modes in the following order:
File repeat Folder repeat* Off
*: Available except when RDM (random playback) is selected
Switching the display
Press .
Track title, Artist name and Album title (MP3 only) are shown on the dis-
play.
To return to the previous display, press or (BACK).
Page 263 of 556

263
3-2. Using the audio system
3
Interior features
■
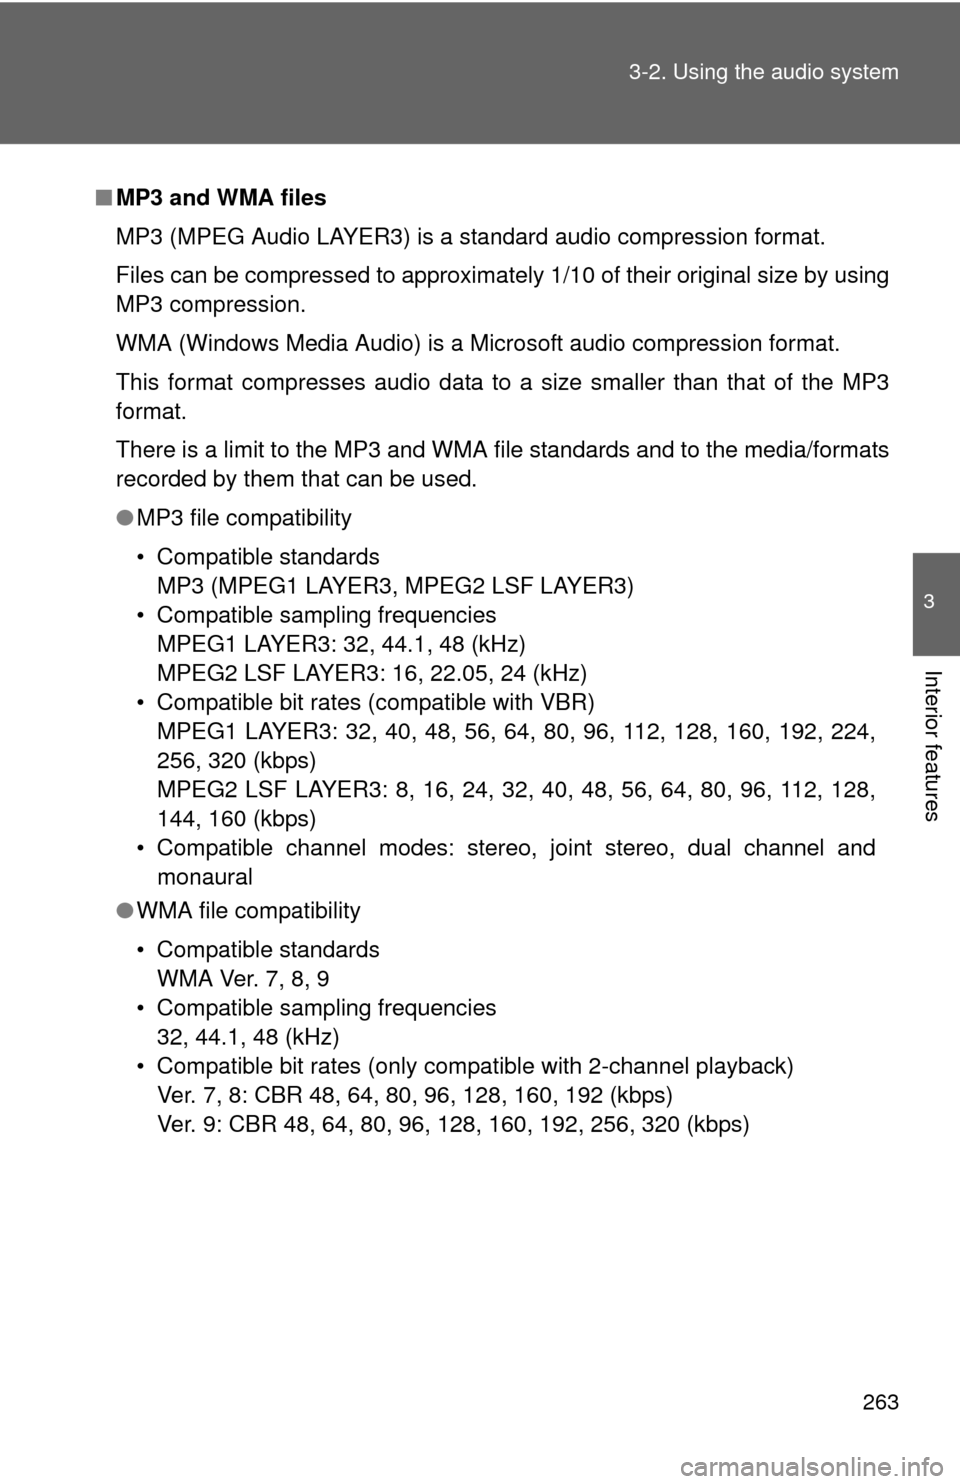
MP3 and WMA files
MP3 (MPEG Audio LAYER3) is a standard audio compression format.
Files can be compressed to approximately 1/10 of their original size by using
MP3 compression.
WMA (Windows Media Audio) is a Microsoft audio compression format.
This format compresses audio data to a size smaller than that of the MP3
format.
There is a limit to the MP3 and WMA file standards and to the media/formats
recorded by them that can be used.
●MP3 file compatibility
• Compatible standards
MP3 (MPEG1 LAYER3, MPEG2 LSF LAYER3)
• Compatible sampling frequencies MPEG1 LAYER3: 32, 44.1, 48 (kHz)
MPEG2 LSF LAYER3: 16, 22.05, 24 (kHz)
• Compatible bit rates (compatible with VBR) MPEG1 LAYER3: 32, 40, 48, 56, 64, 80, 96, 112, 128, 160, 192, 224,
256, 320 (kbps)
MPEG2 LSF LAYER3: 8, 16, 24, 32, 40, 48, 56, 64, 80, 96, 112, 128,
144, 160 (kbps)
• Compatible channel modes: stereo, joint stereo, dual channel and monaural
● WMA file compatibility
• Compatible standards
WMA Ver. 7, 8, 9
• Compatible sampling frequencies 32, 44.1, 48 (kHz)
• Compatible bit rates (only compatible with 2-channel playback) Ver. 7, 8: CBR 48, 64, 80, 96, 128, 160, 192 (kbps)
Ver. 9: CBR 48, 64, 80, 96, 128, 160, 192, 256, 320 (kbps)
Page 265 of 556

265
3-2. Using the audio system
3
Interior features
●
MP3 and WMA playback
When a disc containing MP3 or WMA files is inserted, all files on the disc
are first checked. Once the file check is finished, the first MP3 or WMA\
file
is played. To make the file check finish more quickly, we recommend you
do not write in any files other than MP3 or WMA files or create any unnec-
essary folders.
If the discs contain a mixture of music data and MP3 or WMA format data,
only music data can be played.
● Extensions
If the file extensions .mp3 and .wma are used for files other than MP3 and
WMA files, they will be mistakenly recognized and played as MP3 and
WMA files. This may result in large amounts of interference and damage
to the speakers.
● Playback
• To play MP3 files with steady sound quality, we recommend a fixed bit
rate of 128 kbps and a sampling frequency of 44.1 kHz.
• CD-R or CD-RW playback may not be possible in some instances, depending on the characteristics of the disc.
• There is a wide variety of freeware and other encoding software for MP3 and WMA files on the market, and depending on the status of the
encoding and the file format, poor sound quality or noise at the start of
playback may result. In some cases, playback may not be possible at
all.
• When files other than MP3 or WMA files are recorded on a disc, it may take more time to recognize the disc and in some cases, playback may
not be possible at all.
• Microsoft, Windows, and Windows Media are the registered trade- marks of Microsoft Corporation in the U.S. and other countries.
NOTICE
■ CDs and adapters that cannot be used ( P. 257)
■ CD player precautions ( P. 258)
■ If a CD is left inside the CD pl ayer or in the ejected position for
extended periods ( P. 258)
■ Lens cleaners ( P. 258)
Page 267 of 556
267
3-2. Using the audio system
3
Interior features
Selecting a play mode
Press (BROWSE) to select iPod menu mode.
Turning clockwise changes the play mode in the fol-
lowing order:
“Playlists” “Artists” “Albums” “Songs” “Podcasts” “Genres”
“Composers” “Audiobooks”
Press to select the desired play mode.
■ Play mode list
Play modeFirst
selectionSecond
selectionThird
selectionFourth
selection
“Playlists”Playlists
select Songs
select
--
“Artists” Artists select Albums
selectSongs
select
-
“Albums” Albums
selectSongs
select
--
“Songs” Songs
select ---
“Podcasts” Podcasts
selectEpisodes
select
--
“Genres” Genre select Artists select Albums
selectSongs
select
“Composers”Composers
selectAlbums
selectSongs
select
-
“Audiobooks”Audiobooks
selectChapters
select
--
STEP1
STEP2
STEP3
Page 269 of 556
269
3-2. Using the audio system
3
Interior features
Fast-forwarding and reversing songs
To fast-forward or reverse, press and hold ( ) or
().
Shuffle playbackPressing (RDM) changes modes in the following order:
Track shuffle Album shuffle Off
Repeat play
Press
(RPT).
To cancel, press (RPT) again.
Switching the display
Press .
Track title, Artist name and Album title are shown on the display.
To return to the previous display, press or (BACK).
Adjusting sound quality and volume balance Press to enter iPod menu mode.
Press to change sound modes. ( P. 282)
STEP1
STEP2
Page 271 of 556

271
3-2. Using the audio system
3
Interior features
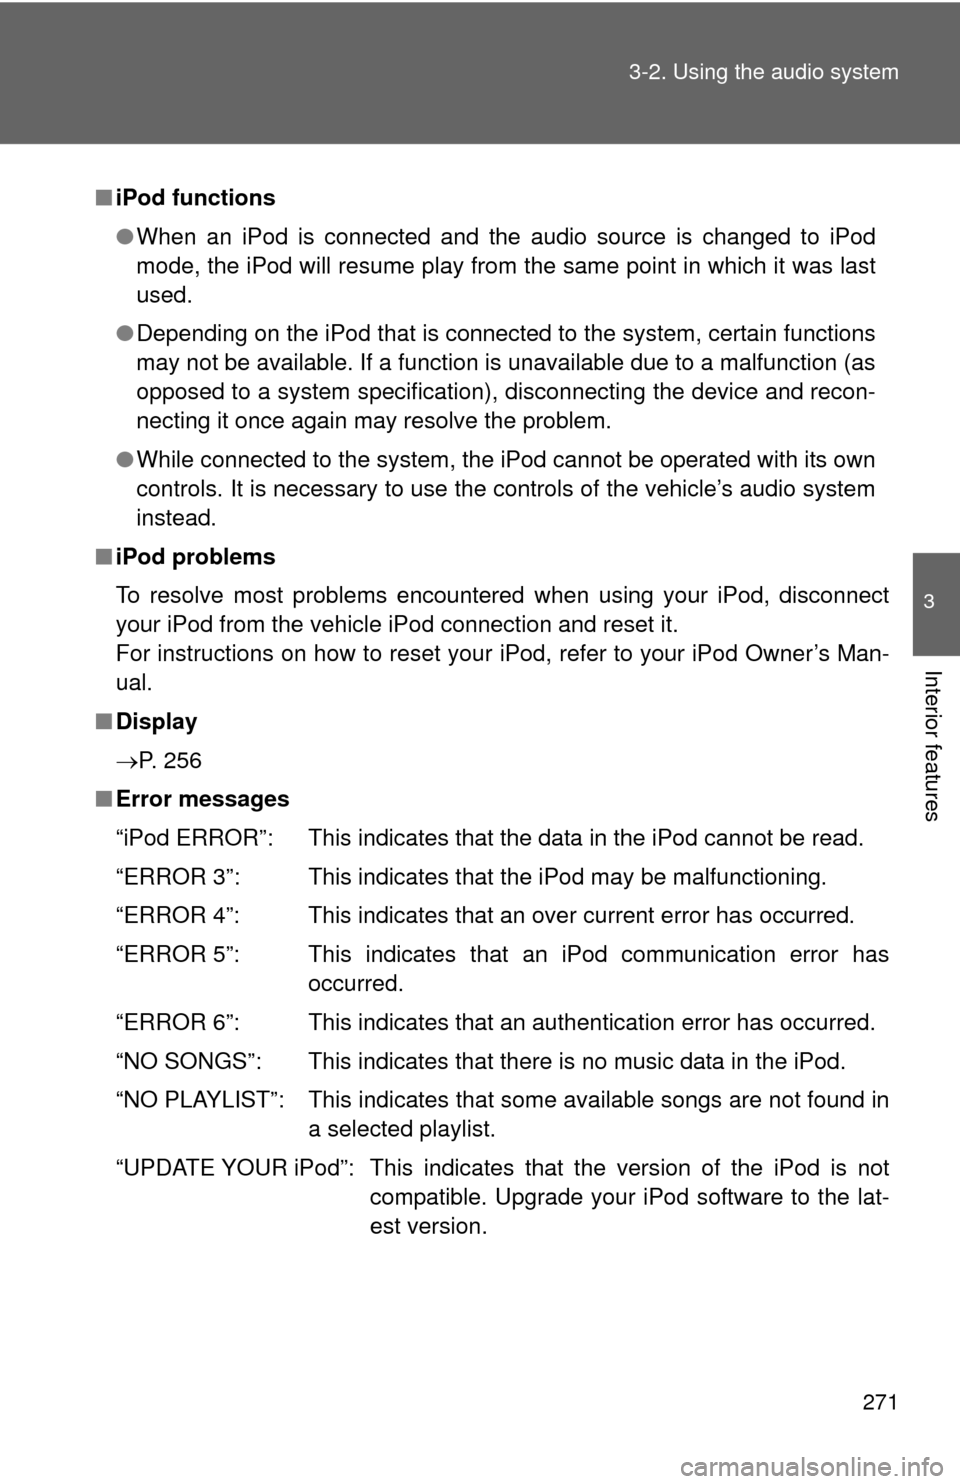
■
iPod functions
●When an iPod is connected and the audio source is changed to iPod
mode, the iPod will resume play from the same point in which it was last
used.
● Depending on the iPod that is connected to the system, certain functions
may not be available. If a function is unavailable due to a malfunction (as
opposed to a system specification), disconnecting the device and recon-
necting it once again may resolve the problem.
● While connected to the system, the iPod cannot be operated with its own
controls. It is necessary to use the controls of the vehicle’s audio system
instead.
■ iPod problems
To resolve most problems encountered when using your iPod, disconnect
your iPod from the vehicle iPod connection and reset it.
For instructions on how to reset your iPod, refer to your iPod Owner’s Man-
ual.
■ Display
P. 256
■ Error messages
“iPod ERROR”: This indicates that the data in the iPod cannot be read.
“ERROR 3”: This indicates that the iPod may be malfunctioning.
“ERROR 4”: This indicates that an over current error has occurred.
“ERROR 5”: This indicates that an iPod communication error has
occurred.
“ERROR 6”: This indicates that an authentication error has occurred.
“NO SONGS”: This indicates that there is no music data in the iPod.
“NO PLAYLIST”: This indicates that some available songs are not found in a selected playlist.
“UPDATE YOUR iPod”: This indicates that the version of the iPod is not compatible. Upgrade your iPod software to the lat-
est version.
Page 273 of 556
273
3-2. Using the audio system
3
Interior features
NOTICE
■
Cord hook
Do not secure items other than cords on the cord hook. Doing so may dam-
age the cord hook.
■ To prevent damage to iPod
●Do not leave iPod in the vehicle. The temperature inside the vehicle may
become high, resulting in damage to the iPod.
● Do not push down on or apply unnecessary pressure to the iPod while it is
connected as this may damage the iPod or its terminal.
● Do not insert foreign objects into the port as this may damage the iPod or
its terminal.
Page 275 of 556
275
3-2. Using the audio system
3
Interior features
Selecting a folder
■ Selecting folders one at a time
To select the desired folder, press ( ) or ( ).
■ Selecting a folder and file from a folder list
Press .
The folder list will be displayed.
Turn and press to select a folder and a file.
To return to the previous display, press (BACK).
■Returning to the first folder
Press and hold ( ) until you hear a beep.
Scanning a folder
Press and hold until you hear a beep.
The first 10 seconds of the first file in the each folder will be played.
When the desired folder is reached, press again.
Selecting files
Turn , or press “ ” or “ ” on to select the desired file.
STEP1
STEP2
STEP1
STEP2