Page 473 of 644

473 4-1. Maintenance and care
4
Maintenance and care
HILUX_OM_OM0K134E_(EE)
Caring for leather areas
Toyota recommends cleaning the interior of the vehicle at least twice a year
to maintain the quality of the vehicle’s interior.
Shampooing the carpets
There are several commercial foaming-type cleaners available. Use a
sponge or brush to apply the foam. Rub in overlapping circles. Do not use
water. Wipe dirty surfaces and let them dry. Excellent results are obtained by
keeping the carpet as dry as possible.
Seat belts
Clean with mild soap and lukewarm water using a cloth or sponge. Also
check the belts periodically for excessive wear, fraying or cuts.
CAUTION
Water in the vehicle
Do not splash or spill liquid in the vehicle.
Doing so may cause electrical components etc. to malfunction or catch
fire.
Do not get any of the SRS components or wiring in the vehicle interior wet.
(P. 110)
An electrical malfunction may cause the airbags to deploy or not function
properly, resulting in death or serious injury.
Cleaning the interior (especially instrument panel)
Do not use polish wax or polish cleaner. The instrument panel may reflect off
the windshield, obstructing the driver’s view and leading to an accident,
resulting in death or serious injury.
Page 474 of 644

474 4-1. Maintenance and care
HILUX_OM_OM0K134E_(EE)
NOTICE
Cleaning detergents
Do not use the following types of detergent, as they may discolor the vehi-
cle interior or cause streaks or damage to painted surfaces:
• Non-seat portions: Organic substances such as benzene or gasoline,
alkaline or acidic solutions, dye, and bleach
• Seats: Alkaline or acidic solutions, such as thinner, benzene, and alcohol
Do not use polish wax or polish cleaner. The instrument panel’s or other
interior part’s painted surface may be damaged.
Preventing damage to leather surfaces
Observe the following precautions to avoid damage to and deterioration of
leather surfaces:
Remove any dust or dirt from leather surfaces immediately.
Do not expose the vehicle to direct sunlight for extended periods of time.
Park the vehicle in the shade, especially during summer.
Do not place items made of vinyl, plastic, or containing wax on the uphol-
stery, as they may stick to the leather surface if the vehicle interior heats
up significantly.
Water on the floor
Do not wash the vehicle floor with water.
Vehicle systems such as the audio system may be damaged if water comes
into contact with electrical components such as the audio system above or
under the floor of the vehicle. Water may also cause the body to rust.
Page 516 of 644
516
4-3. Do-it-yourself maintenance
HILUX_OM_OM0K134E_(EE)
Checking and replacing fuses
If any of the electrical components do not operate, a fuse may have
blown. If this happens, check and replace the fuses as necessary.
Turn the engine switch off.
Open the fuse box cover.
Engine compartment
Push the tab in and lift the lid
off.
Driver’s side instrument panel for left-hand drive vehicles
(front and rear sides)
Remove the lower instrument
panel.
Rear side: Inspection and
replacement of the fuses, con-
tact any authorized Toyota
dealer or repairer, or another
duly qualified and equipped
professional.
STEP1
STEP2
Page 517 of 644
517 4-3. Do-it-yourself maintenance
4
Maintenance and care
HILUX_OM_OM0K134E_(EE)
Driver’s side instrument panel for right-hand drive vehicles
(front and rear sides)
Remove the lower instrument
panel.
Rear side: Inspection and
replacement of the fuses, con-
tact any authorized Toyota
dealer or repairer, or another
duly qualified and equipped
professional.
Page 518 of 644
518 4-3. Do-it-yourself maintenance
HILUX_OM_OM0K134E_(EE)
Passenger’s side instrument panel for left-hand drive vehicles
Open the glove box. Push in
each side of the glove box to
disconnect the claws.
Page 519 of 644
519 4-3. Do-it-yourself maintenance
4
Maintenance and care
HILUX_OM_OM0K134E_(EE)
Passenger’s side instrument panel for right-hand drive vehi-
cles
Open the glove box. Push in
each side of the glove box to
disconnect the claws.
After a system failure, see “Fuse layout and amperage rat-
ings” (P. 523) for details about which fuse to check.
Remove the fuse.
Type A and B fuses can be
removed using the pullout
tool.
STEP3
STEP4
Page 526 of 644
526 4-3. Do-it-yourself maintenance
HILUX_OM_OM0K134E_(EE)Driver’s side instrument panel (front side)
FuseAmpereCircuit
1PWR OUT15 APower outlet
2TA I L10 A
Instrument panel light, front fog
lights, headlight beam level control
system, front position lights, tail
lights, license plate lights, multiport
fuel injection system/sequential
multiport fuel injection system,
multi-information display, daytime
running light system and automatic
headlight system
3STOP10 A
Stop lights, high mounted stoplight,
multiport fuel injection system/
sequential multiport fuel injection
system, ABS, TRC, VSC and shift
lock control system
Page 529 of 644
529 4-3. Do-it-yourself maintenance
4
Maintenance and care
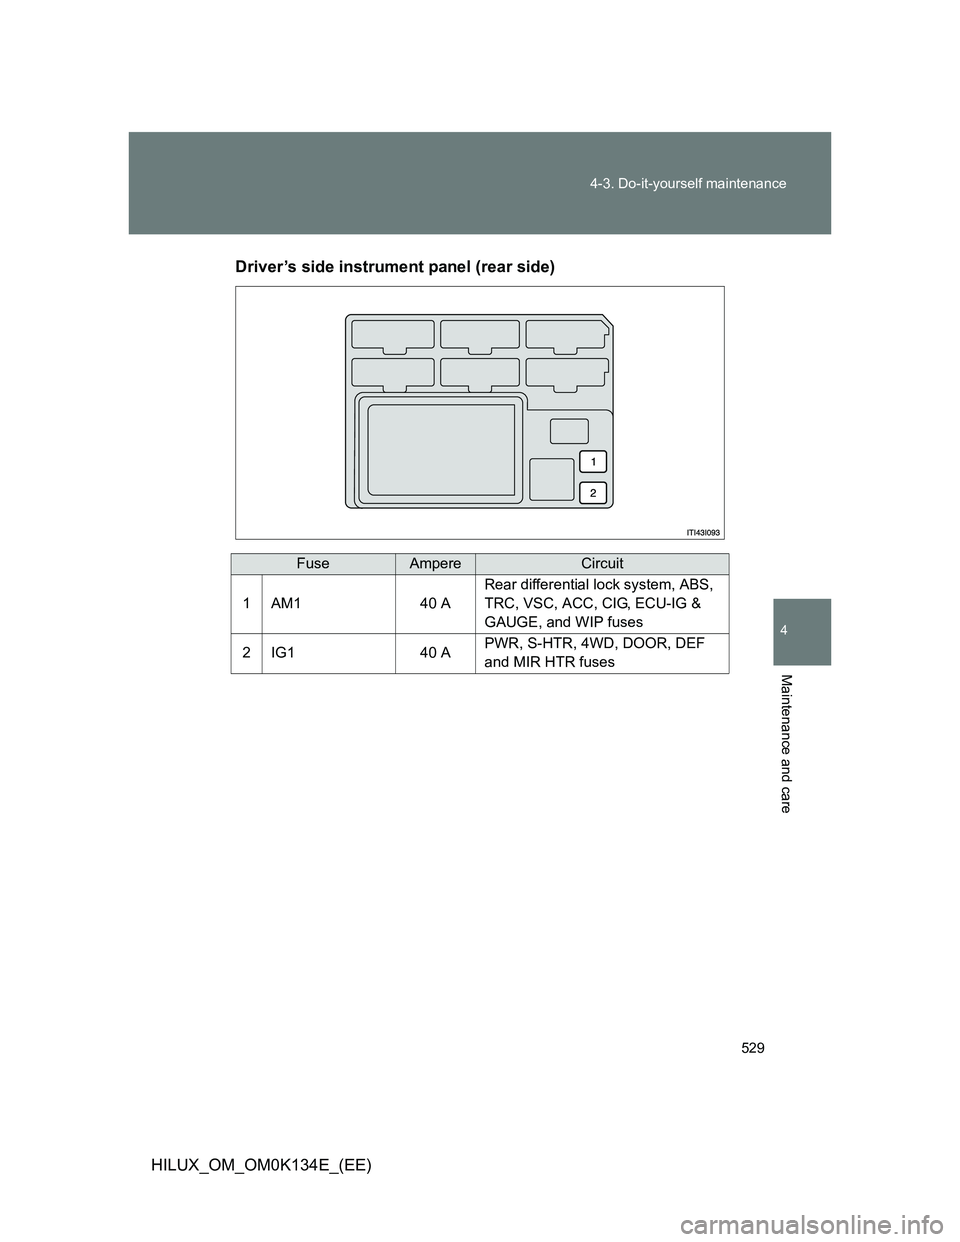
HILUX_OM_OM0K134E_(EE)Driver’s side instrument panel (rear side)
FuseAmpereCircuit
1AM140 A
Rear differential lock system, ABS,
TRC, VSC, ACC, CIG, ECU-IG &
GAUGE, and WIP fuses
2IG140 APWR, S-HTR, 4WD, DOOR, DEF
and MIR HTR fuses