2013 SUBARU TRIBECA tire type
[x] Cancel search: tire typePage 11 of 420
8
&Car phone/cell phone and driving
CAUTION
Do not use a car phone/cell phone
while driving; it may distract your
attention from driving and can lead
to an accident. If you use a car
phone/cell phone, pull off the road
and park in a safe place before
using your phone. In some States/
Provinces, only hands-free phones
may legally be used while driving.
& Modification of your vehicle
CAUTION
Your vehicle should not be modified
other than with genuine SUBARU
parts and accessories. Other types
of modifications could affect its
performance, safety or durability,
and may even violate governmental
regulations. In addition, damage or
performance problems resulting
from modification may not be cov-
ered under warranties. &
Driving a vehicle equipped
with a navigation system
WARNING
Do not allow the monitor to distract
your attention from driving. Also, do
not operate the controls of the
navigation system while driving.
The loss of attention to driving
could lead to an accident. If you
wish to operate the controls of the
navigation system, first take the
vehicle off the road and stop it in a
safe place.
& Driving with pets
Unrestrained pets can interfere with your
driving and distract your attention from
driving. In a collision or sudden stop,
unrestrained pets or cages can be thrown
around inside the vehicle and hurt you or
your passengers. Besides, the pets can
be hurt under these situations. It is also for
their own safety that pets should be
properly restrained in your vehicle. Re-
strain a pet with a special traveling
harness which can be secured to the rear
seat with a seatbelt or use a pet carrier
which can be secured to the rear seat by
routing a seatbelt through the carrier ’s handle. Never restrain pets or pet carriers
in the front passenger
’s seat. For further
information, consult your veterinarian,
local animal protection society or petshop. & Tire pressures
WARNING
Driving at high speeds with exces-
sively low tire pressures can cause
the tires to deform severely and to
rapidly become hot. A sharp in-
crease in temperature could cause
tread separation, and destruction of
the tires. The resulting loss of
vehicle control could lead to anaccident.
Check and, if necessary, adjust the
pressure of each tire (including the spare)
at least once a month and before any long
journey.
Check the tire pressure when the tires are
cold. Use a pressure gauge to adjust the
tire pressures to the values shown on the
tire placard. For detailed information, referto “Tires and wheels ”F 11-21.
Page 46 of 420
Seatbelts &Seatbelt safety tips
WARNING
. All persons in the vehicle should
fasten their seatbelts BEFORE
the vehicle starts to move. Other-
wise, the possibility of serious
injury becomes greater in the
event of a sudden stop or acci-dent.
. All belts should fit snugly in order
to provide full restraint. Loose
fitting belts are not as effective in
preventing or reducing injury.
. Each seatbelt is designed to
support only one person. Never
use a single belt for two or morepersons –even children. Other-
wise, in an accident, serious
injury or death could result.
. Replace all seatbelt assemblies
including retractors and attach-
ing hardware worn by occupants
of a vehicle that has been in a
serious accident. The entire as-
sembly should be replaced even
if damage is not obvious.
. Put children aged 12 and under in a rear seat properly restrained at
all times. The SRS airbag de-
ploys with considerable speed
and force and can injure or even
kill children, especially if they are
12 years of age and under and
are not restrained or improperly
restrained. Because children are
lighter and weaker than adults,
their risk of being injured from
deployment is greater. Conse-
quently, we strongly recommend
that ALL children (including
those in child seats and those
that have outgrown child re-
straint devices) sit in a REAR
seat properly restrained at all
times in a child restraint device
or in a seatbelt, whichever is
appropriate for the child
’s height
and weight.
Always secure ALL types of child
restraint devices (including for-
ward facing child seats) in one of
the rear seating positions recom-
mended in this Owner ’s Manual.
NEVER INSTALL A REARWARD
FACING CHILD SEAT IN THE
FRONT SEAT. DOING SO RISKS
SERIOUS INJURY OR DEATH TO
THE CHILD BY PLACING THECHILD ’S HEAD TOO CLOSE TO THE SRS AIRBAG.
According to accident statistics,
children are safer when properly
restrained in the rear seating
positions than in the front seat-
ing positions. For instructions
and precautions concerning the
child restraint system, refer to“
Child restraint systems ”F 1-29.
Your vehicle is equipped with a crash
sensing and diagnostic module, which will
record the use of the seatbelt(s) by the
driver and front passenger when any of
the SRS frontal, side and curtain airbags
deploy. ! Infants or small children
Use a child restraint system that is
suitable for your vehicle. Refer to “Child
restraint systems ”F 1-29.
! Children
If a child is too big for a child restraint
system, the child should sit in the rear seat
and be restrained using the seatbelts.
According to accident statistics, children
are safer when properly restrained in the
rear seating positions than in the front
seating positions. Never allow a child to
stand up or kneel on the seat.
If the shoulder portion of the belt crosses
Seat, seatbelt and SRS airbags/Seatbelts1-17
– CONTINUED –
Page 95 of 420
1-66Seat, seatbelt and SRS airbags/*SRS airbag (Supplemental Restraint System airbag)
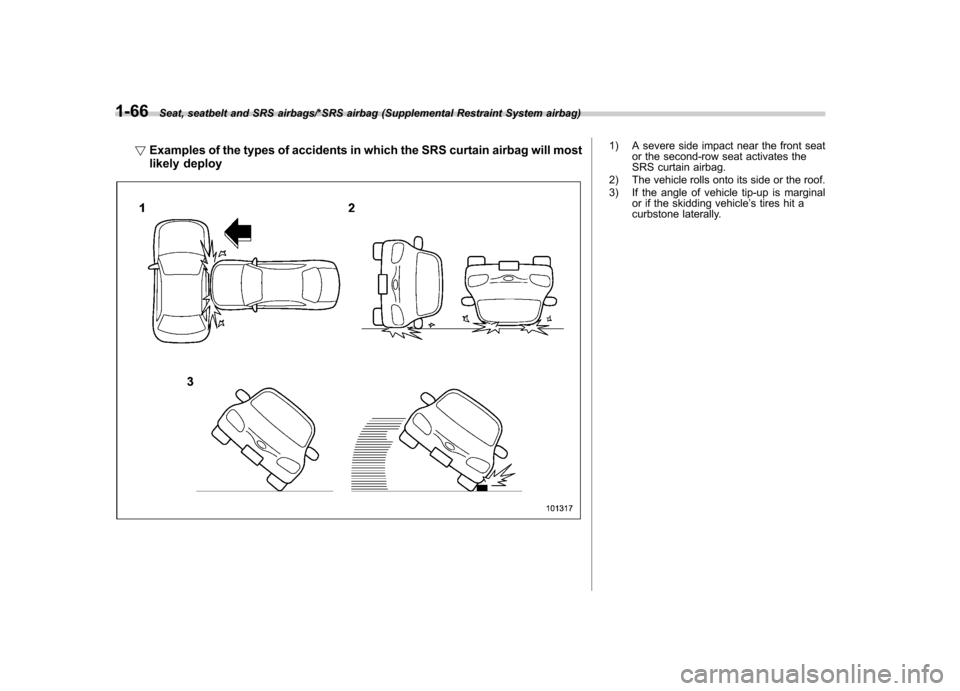
!Examples of the types of accidents in which the SRS curtain airbag will most
likely deploy1) A severe side impact near the front seat
or the second-row seat activates the
SRS curtain airbag.
2) The vehicle rolls onto its side or the roof.
3) If the angle of vehicle tip-up is marginal or if the skidding vehicle ’s tires hit a
curbstone laterally.
Page 196 of 420

NOTE
While you are holding down either side
of the“TUNE TRACK ”button, the
tuning frequency will not stop chan-
ging even if the frequency of a recei-
vable station is reached.
!Seek tuning
If you press the “
”or “”side of the
“ SEEK FLDR ”button (7), the radio will
automatically search for a receivable
station and stop at the first one it finds.
This function may not be available, how-
ever, when radio signals are weak. In such
a situation, perform manual tuning to
select the desired station.
!Automatic tuning (SCAN)
Press the “SCAN ”button (8) to change the
radio to the SCAN mode. In this mode, the
radio scans through the radio band until a
station is found. The radio will stop at the
station for 5 seconds while displaying the
frequency, after which scanning will con-
tinue until the entire band has been
scanned from the low end to the high
end. Press the “SCAN ”button again to
cancel the SCAN mode and to stop on any
displayed frequency.
Press the “
”or “”side of the “SEEK
FLDR ”button (7) again to cancel the scan
mode and to stop on any displayed frequency.
When the
“SCAN ”button is pressed for
automatic tuning, stations are scanned in
the direction of low frequencies to high
frequencies only.
Automatic tuning may not function prop-
erly if the station reception is weakened by
distance from the station or proximity to
tall buildings and hills.
!Selecting preset stations
Presetting a station with a preset button
(10) allows you to select that station in a
single operation. Up to six, AM, FM1 and
FM2 stations each may be preset.
!How to preset stations
1. Press the “FM AM ”button (2) to select
FM1, FM2, or AM reception.
2. Press the “SCAN ”button (8) or tune
the radio manually until the desired station
frequency is displayed.
3. Press and hold one of the preset
buttons (10) to store the frequency. If the
button is pressed briefly, the preceding
selection will remain in memory.
NOTE . If the connection between the radio
and battery is broken for any reason
such as vehicle maintenance or radio
removal, all stations stored in the preset buttons are cleared. If this
occurs, it is necessary to reset the
preset buttons..
If a cell phone is placed near the
radio, it may cause the radio to emit
noise when it receives calls. This noise
does not indicate a radio malfunction. ! Satellite radio mode (if equipped)
To receive satellite radio, it is necessary to
install the SUBARU genuine satellite
receiver (optional part) and to enter into
a contract with a satellite radio network
service such as “Sirius XM
TMsatellite
radio ”(for U.S.A. only) or “Sirius satellite
radio ”(for Canada only). For details,
please contact your SUBARU dealer.
!Sirius satellite radio (for Canadaonly)
Sirius satellite radio is a recent innovation
that allows the listener to experience
digital sound quality and to have a greater
variety of channels.
Use of satellite radio (Sirius) requires a
tuner, antenna and a service contract. For
details, please contact your SUBARU
dealer or visit Sirius Satellite Radio at
www.sirius.ca or call 1-888-539-7474 for
more information. Sirius, the Sirius dog
logo, channel names and logos are trade-
marks of SIRIUS Satellite Radio Inc.
Audio/Type A audio set5-7
– CONTINUED –
Page 197 of 420
5-8Audio/Type A audio set
!Sirius XMTMSatellite Radio Acti-
vation (for U.S.A. only)
Models with Sirius XM
TMare eligible for a
3-month complimentary subscription to
the Sirius XM
TMSatellite Radio service.
Activation process:
You can activate the XM Satellite Radio
from the website of the XM Satellite Radio.
For details, visit the website.
!Satellite radio reception
Satellite radio signals are best received in
areas with a clear view of the open sky. In
areas where there are tall buildings, trees,
tunnels or other structures that may
obstruct the signal of the satellites, there
may be signal interruptions. Other circum-
stances that may result in signal loss
include driving near a wall, steep cliff or
hill, or driving on the lower level of a multi-
tiered road or inside a parking garage.
To help reduce this condition, satellite
radio providers have installed ground-
based repeaters in heavily populated
areas. However, you may still experience
reception problems in some areas.
!Displaying satellite radio ID oftuner
When you activate satellite radio, you
should have your satellite radio tuner ID ready because each tuner is identified by
its unique satellite radio tuner ID.
The satellite radio ID will be needed when
you activate satellite radio and receive
satellite radio customer support.
The satellite radio ID can be found on the
audio display by tuning the channel to
“0 ”.
Turn the “TUNE TRACK ”button (4) to
select the satellite radio channel.
!Band selection button
Push the “SAT ”button (1) when the radio
is off to turn on the radio.
Push the “SAT ”button when the radio is
on to select SAT1, SAT2 or SAT3 recep- tion.
!Channel selection
Press “
”of the “TUNE TRACK ”button
(4) to select the next channel and press “
” of the button to select the previous
channel.
Keep pressing “
”of the button to
change to the next channel continuously
and keep pressing “
”of the button to
change to the previous channel continu-
ously.
!Category selection
Press “
”or “”of the “SEEK FLDR ”
button (7) to display the current category. Press “
”again to select the next category, and press
“
”again to select
the previous category.
!Channel scan
Press the “SCAN ”button (8) to change the
radio to the SCAN mode. In this mode, the
radio scans through the channels until a
station is found. The radio will stop at the
station for 5 seconds while displaying the
channel number, after which scanning will
continue until the entire channel has been
scanned from the low end to the high end.
Also during the category selection, chan-
nel scan can be performed in that cate-
gory.
Press the “SCAN ”button again to cancel
the SCAN mode and to stop on any
displayed channel.
!Selecting preset channels
Presetting a channel with a preset button
(10) allows you to select that channel in a
single operation. Up to six, SAT1, SAT2
and SAT3 channels each may be preset.
!How to preset channels
1. Press the “SAT ”button (1) to select
SAT1, SAT2 and SAT3 reception.
2. Press the “SCAN ”button (8) or the
“ TUNE TRACK ”button (4) to select the
channel.
3. Press and hold one of the preset
Page 207 of 420
5-18Audio/Type B audio set
NOTE
While you are holding down either side
of the TUNE/TRACK button, the tuning
frequency will not stop changing even
if the frequency of a receivable station
is reached.!Seek tuning (SEEK)
If you press the “
”or “”side of the
“ SEEK FLDR ”button (7), the radio will
automatically search for a receivable
station and stop at the first one it finds.
This function may not be available, how-
ever, when radio signals are weak. In such
a situation, perform manual tuning to
select the desired station.
!Scan tuning (SCAN)
Press the “SCAN ”button (8) to change the
radio to the SCAN mode. In this mode, the
radio scans through the radio band until a
station is found. The radio will stop at the
station for 5 seconds while displaying the
frequency, after which scanning will con-
tinue until the entire band has been
scanned from the low end to the high
end. Press the “SCAN ”button again to
cancel the SCAN mode and to stop on any
displayed frequency.
Press the “
”or “”side of the “SEEK
FLDR ”button (7) again to cancel the scan
mode and to stop on any displayed frequency.
When the
“SCAN ”button is pressed for
automatic tuning, stations are scanned in
the direction of low frequencies to high
frequencies only.
Automatic tuning may not function prop-
erly if the station reception is weakened by
distance from the station or proximity to
tall buildings and hills.
!Selecting preset stations
Presetting a station with a preset button
allows you to select that station in a single
operation. Up to six AM, FM1 and FM2
stations each may be preset.
!How to preset stations
1. Press the “FM AM ”button (2) to select
FM1, FM2 or AM reception.
2. Press the “SCAN ”button (8) or tune
the radio manually until the desired station
frequency is displayed.
3. Press and hold one of the preset
buttons to store the frequency. If the
button is pressed briefly, the preceding
selection will remain in memory.
NOTE . If the connection between the radio
and battery is broken for any reason
such as vehicle maintenance or radio
removal, all stations stored in the preset buttons are cleared. If this
occurs, it is necessary to reset the
preset buttons..
If a cell phone is placed near the
radio, it may cause the radio to emit
noise when it receives calls. This noise
does not indicate a radio malfunction. ! Satellite radio mode (if equipped)
To receive satellite radio, it is necessary to
install the SUBARU genuine satellite
receiver (optional part) and to enter into
a contract with a satellite radio network
service such as “Sirius XM
TMsatellite
radio ”(for U.S.A. only) or “Sirius satellite
radio ”(for Canada only). For details,
please contact your SUBARU dealer.
!Sirius satellite radio (for Canadaonly)
Refer to “Sirius satellite radio (for Canada
only) ”F 5-7.
! Sirius XM
TMSatellite Radio Acti-
vation (for U.S.A. only)
Refer to “Sirius XM
TMSatellite Radio
Activation (for U.S.A. only) ”F 5-8.
! Satellite radio reception
Refer to “Satellite radio reception ”F 5-8.
Page 208 of 420

!Displaying satellite radio ID of tuner
When you activate satellite radio, you
should have your satellite radio tuner ID
ready because each tuner is identified by
its unique satellite radio tuner ID.
The satellite radio ID will be needed when
you activate satellite radio and receive
satellite radio customer support.
The satellite radio ID can be found on the
audio display by tuning the channel to “0 ”.
Turn the “TUNE/TRACK ”button (4) to
select the satellite radio channel.
!Band selection button
Push the “SAT ”button (1) when the radio
is off to turn on the radio.
Push the “SAT ”button when the radio is
on to select SAT1, SAT2 or SAT3 recep- tion.
!Channel selection
Press “
”of the “TUNE TRACK ”button
(4) to select the next channel and press “
” of the button to select the previous
channel.
Keep pressing “
”of the button to
change to the next channel continuously
and keep pressing “
”of the button to
change to the previous channel continu-
ously. !
Category selection
Press “
”or “”of the “SEEK FLDR ”
button (7) to display the current category. Press “
”again to select the next
category, and press “”again to select
the previous category.
!Channel scan
Press the “SCAN ”button (8) to change the
radio to the SCAN mode. In this mode, the
radio scans through the channels until a
station is found. The radio will stop at the
station for 5 seconds while displaying the
channel number, after which scanning will
continue until the entire channel has been
scanned from the low end to the high end.
Also during the category selection, chan-
nel scan can be performed in that cate-
gory.
Press the “SCAN ”button again to cancel
the SCAN mode and to stop on any
displayed channel.
!Selecting preset channels
Presetting a channel with a preset button
(10) allows you to select that channel in a
single operation. Up to six, SAT1, SAT2
and SAT3 channels each may be preset.
!How to preset channels
1. Press the “SAT ”button (1) to select
SAT1, SAT2 and SAT3 reception. 2. Press the
“SCAN ”button (8) or the
“ TUNE TRACK ”button (4) to select the
channel.
3. Press and hold one of the preset
buttons (10) to store the channel. If the
button is pressed briefly, the preceding
selection will remain in memory.
NOTE
If the connection between the radio and
battery is broken for any reason such
as vehicle maintenance or radio re-
moval, all channels stored in the preset
buttons are cleared. If this occurs, it is
necessary to reset the preset buttons. !Display selection
Press the “AUDIO ”button (5) while receiv-
ing satellite radio to change the display asfollows.
! Rear seat entertainment
If your vehicle is equipped with a Rear
Seat Entertainment System, you can
enjoy audio outputs from the system
through the vehicle ’s speakers by press-
ing the “RSE AUX ”button (3). Press the
button again to return to the audio set
Audio/Type B audio set5-19
– CONTINUED –
Page 269 of 420
7-24Starting and operating/Vehicle Dynamics Control system
namics Control is no guarantee
that full vehicle control will be
maintained at all times and under
all conditions, its activation
should be seen as a sign that
the speed of the vehicle should
be reduced considerably.
. Whenever suspension compo-
nents, steering components, or
an axle are removed from a
vehicle equipped with Vehicle
Dynamics Control system, have
an inspection of that system
performedbyanauthorized
SUBARU dealer.
. The following precautions should
be observed in order to ensure
that the Vehicle Dynamics Con-
trol system is operating properly. – All four wheels should be
fitted with tires of the same
size, type, and brand. Further-
more, the amount of wear
should be the same for all
four tires.
– Keep the tire pressure at the
proper level as shown on the
vehicle placard attached to
the driver ’s side door pillar.
In the event of wheelspin and/or skidding on a slippery road surface and/or during
cornering and/or an evasive maneuver,
the Vehicle Dynamics Control system
adjusts the engine
’s output and the
wheels ’respective braking forces to help
maintain traction and directional control. . Traction Control Function
The traction control function is designed to
prevent spinning of the driving wheels on
slippery road surfaces, thereby helping to
maintain traction and directional control.
Activation of this function is shown by
flashing the Vehicle Dynamics Control
operation indicator light. . Skid Suppression Function
The skid suppression function is designed
to help maintain directional stability by
suppressing the wheels ’tendency to slide
sideways during steering operations. Acti-
vation of this function is shown by flashing
the Vehicle Dynamics Control operation
indicator light.
NOTE . Slight twitching of the brake pedal
may be felt when the Vehicle Dynamics
Control system operates; a small de-
gree of vehicle or steering wheel shak-
ing may also be noticed in this situa-
tion. These are normal characteristics
of Vehicle Dynamics Control operation
and are no cause for alarm. .
When driving off immediately after
starting the engine, a short operation
noise may be noticed coming from the
engine compartment. This noise is
generated as a result of a check being
performed on the Vehicle Dynamics
Control system and is normal.. Depending on the timing of activa-
tion of the brakes, the brake pedal may
seem to jolt when you drive off after
starting the engine. This is a conse-
quence of the Vehicle Dynamics Con-
trol operational check and is normal.. In the circumstances shown in the
following list, the vehicle may be less
stable than it feels to the driver. The
Vehicle Dynamics Control System may
therefore operate. Such operation does
not indicate a system malfunction.
–on gravel-covered or rutted
roads – on unfinished roads
– when the vehicle is towing a
trailer– when the vehicle is fitted with
snow tires or winter tires
. Activation of the Vehicle Dynamics
Control system will cause operation of
the steering wheel to feel slightly
different compared to that for normalconditions. . Even if the vehicle is equipped with