2013 SUBARU TRIBECA center console
[x] Cancel search: center consolePage 17 of 420

14 &Interior
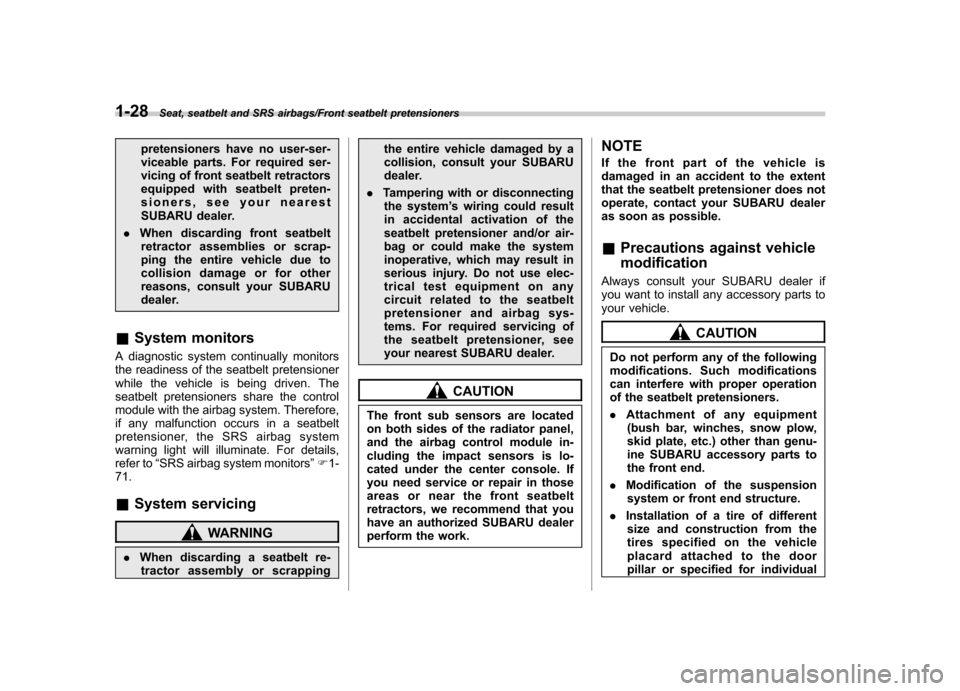
! Passenger compartment area
1) Seatbelt (page 1-17)
2) Lower anchorages for child restraint
system (page 1-37)
3) Center console (page 6-6)
4) Front seat (page 1-2)
5) Second-row seat (page 1-8)
6) Third-row seat (page 1-13)
Page 57 of 420

1-28Seat, seatbelt and SRS airbags/Front seatbelt pretensioners
pretensioners have no user-ser-
viceable parts. For required ser-
vicing of front seatbelt retractors
equipped with seatbelt preten-
sioners, see your nearest
SUBARU dealer.
. When discarding front seatbelt
retractor assemblies or scrap-
ping the entire vehicle due to
collision damage or for other
reasons, consult your SUBARU
dealer.
& System monitors
A diagnostic system continually monitors
the readiness of the seatbelt pretensioner
while the vehicle is being driven. The
seatbelt pretensioners share the control
module with the airbag system. Therefore,
if any malfunction occurs in a seatbelt
pretensioner, the SRS airbag system
warning light will illuminate. For details,
refer to “SRS airbag system monitors ”F 1-
71.
& System servicing
WARNING
. When discarding a seatbelt re-
tractor assembly or scrapping the entire vehicle damaged by a
collision, consult your SUBARU
dealer.
. Tampering with or disconnecting
the system ’s wiring could result
in accidental activation of the
seatbelt pretensioner and/or air-
bag or could make the system
inoperative, which may result in
serious injury. Do not use elec-
trical test equipment on any
circuit related to the seatbelt
pretensioner and airbag sys-
tems. For required servicing of
the seatbelt pretensioner, see
your nearest SUBARU dealer.
CAUTION
The front sub sensors are located
on both sides of the radiator panel,
and the airbag control module in-
cluding the impact sensors is lo-
cated under the center console. If
you need service or repair in those
areas or near the front seatbelt
retractors, we recommend that you
have an authorized SUBARU dealer
perform the work. NOTE
If the front part of the vehicle is
damaged in an accident to the extent
that the seatbelt pretensioner does not
operate, contact your SUBARU dealer
as soon as possible. &
Precautions against vehicle modification
Always consult your SUBARU dealer if
you want to install any accessory parts to
your vehicle.
CAUTION
Do not perform any of the following
modifications. Such modifications
can interfere with proper operation
of the seatbelt pretensioners. . Attachment of any equipment
(bush bar, winches, snow plow,
skid plate, etc.) other than genu-
ine SUBARU accessory parts to
the front end.
. Modification of the suspension
system or front end structure.
. Installation of a tire of different
size and construction from the
tires specified on the vehicle
placard attached to the door
pillar or specified for individual
Page 83 of 420

1-54Seat, seatbelt and SRS airbags/*SRS airbag (Supplemental Restraint System airbag)
the child restraint system. Turn the ignition
switch to the“ON ”position and make sure
that the front passenger ’s frontal airbag
ON indicator turns off and the OFF
indicator illuminates.
If the ON indicator still remains illuminated
while the OFF indicator turns off, take the
following actions. . Ensure that no article is placed on the
seat other than the child restraint system
and the child occupant. . Ensure that there is no article left in the
seatback pocket.
If the ON indicator still remains illuminated
while the OFF indicator turns off after
taking relevant corre ctive actions de-
scribed above, relocate the child restraint
system to one of the rear seating positions
recommended in this Owner ’s Manual and
immediately contact your SUBARU dealer
for an inspection. NOTE
When a child who has outgrown a child
restraint system or a small adult is
seated in the front passenger ’s seat,
the SUBARU advanced frontal airbag
system may or may not activate the
front passenger ’s SRS frontal airbag
depending on the occupant ’s seating
posture. If the front passenger ’s SRS frontal airbag is activated (the ON
indicator remains illuminated while
the OFF indicator turns off), take the
following actions. .
Ensure that no article is placed on
the seat other than the occupant. . Ensure that there is no article left in
the seatback pocket.
If the ON indicator still remains illumi-
nated while the OFF indicator turns off
despite the fact that the actions noted
above have been taken, seat the child/
small adult in the rear seat and im-
mediately contact your SUBARU dealer
for an inspection. Even if the system
has passed the dealer inspection, it is
recommended that on subsequent trips
the child/small adult always take the
rear seat.
Children who have outgrown a child
restraint system should always wear the
seatbelt irrespective of whether the airbag
is deactivated or activated. ! Conditions in which front passen- ger’s SRS frontal airbag is activated
The front passenger ’s SRS frontal airbag
will be activated for deployment upon
impact when any of the following condi-
tions is met regarding the front passen-ger ’s seat.
. When the seat is occupied by an adult. .
When a heavy article is placed on the
seat.
When the front passenger ’s seat is occu-
pied by an adult, observe the following
precautions. Failure to do so may lessen
the load on the front passenger ’s seat,
deactivating the front passenger ’s SRS
frontal airbag despite the fact that the seat
is occupied by an adult. . Do not allow the second-row seat
occupant to lift the front passenger ’s seat
cushion using his/her feet.. Do not place any article under the front
passenger ’s seat, or squeeze any article
from behind and under the seat. This may
lift the seat cushion. . Do not squeeze any article between
the front passenger ’s seat and side trim/
pillar, door or center console box. This
may lift the seat cushion.
!If the passenger ’s frontal airbag
OFF indicator illuminates and
the ON indicator turns off even
when the front passenger ’s seat
is occupied by an adult
This can be caused by the adult incor-
rectly sitting in the front passenger ’s seat.
Turn the ignition switch to the “LOCK ”
position. Ask the front passenger to set
the seatback to the upright position, sit up
Page 101 of 420

1-72Seat, seatbelt and SRS airbags/*SRS airbag (Supplemental Restraint System airbag)
&SRS airbag system servicing
WARNING
. When discarding an airbag mod-
ule or scrapping the entire vehi-
cle damaged by a collision, con-
sult your SUBARU dealer.
. The SRS airbag has no user-
serviceable parts. Do not use
electrical test equipment on any
circuit related to the SRS airbag
system. For required servicing of
the SRS airbag, consult your
nearest SUBARU dealer. Tamper-
ing with or disconnecting the system ’s wiring could result in
accidental inflation of the SRS
airbag or could make the system
inoperative, which may result in
serious injury.
CAUTION
If you need service or repair in areas
indicated in the following list, have
the work performed by an author-
ized SUBARU dealer. The SRS air-
bag control module, impact sensors
and airbag modules are stored in
these areas. .
Under the center console
. Inside each front fender
. Steering wheel and column and
nearby areas
. Top of the dashboard on front
passenger ’s side and nearby
areas
. Each front seat and nearby area
. Inside each center pillar
. In each roof side (from the front
pillar to a point over the second-
row seat)
. Between the second-row seat
cushion and rear wheel house
on each side
. Under the second-row center
seat
In the event that the SRS airbag is
deployed, replacement of the system
should be performed only by an author-
ized SUBARU dealer. When the compo-
nents of the SRS airbag system are
replaced, use only genuine SUBARUparts. NOTE
In the following cases, contact your
SUBARU dealer as soon as possible. . The front part of the vehicle was involved in an accident in which only
the driver
’s SRS frontal airbag or both
driver ’s and front passenger ’sSRS
frontal airbags did not deploy.. The pad of the steering wheel, the
cover over the front passenger ’s SRS
frontal airbag, or either roof side (from
the front pillar to a point over the
second-row seat) is scratched,
cracked, or otherwise damaged.. Center pillar, rear wheel house or
rear floor pan, or an area near these
parts, was involved in an accident in
which the SRS side airbag and SRS
curtain airbag did not deploy.. The fabric or leather of either front
seatback is cut, frayed, or otherwisedamaged.. The rear part of the vehicle was
involved in an accident in which no
SRS airbag was deployed.
& Precautions against vehicle modification
WARNING
To avoid accidental activation of the
system or rendering the system
inoperative, which may result in
serious injury, no modifications
should be made to any components
Page 184 of 420

to the OFF position as soon as the
outside dusty condition clears.
NOTE
When driving on a dusty road or behind
a vehicle that emits unpleasant exhaust
gases, set the air inlet selection button
to the ON position.
From time to time, return the air inlet
selection button to the OFF position to
draw outside air into the passengercompartment. &
Rear air conditioner
The rear air conditioner blows cool air out
of the rear ventilators while the “A/C ”
button on the control panel is in the “ON ”
position. The fan speed of the rear air
conditioner can be adjusted using the rear
air conditioner dial behind the center
console. The fan speed can be adjusted
in four steps by turning the dial. Turn the
dial to the “OFF ”position to stop the fan.
NOTE . When the “A/C ”button is in the
“ OFF ”position and when the “A/C ”
indicator is not illuminated during
AUTO mode operation, the air condi-
tioner compressor does not operate,
meaning that the system merely blows
uncooled air out of the ventilators. .
The outlet air temperature of the rear
air conditioner cannot be adjusted.. The rear air conditioner cannot be
used as a heater. & Temperature sensors
1) Interior air temperature sensor
2) Solar sensor
The automatic climate control system
employs several sensors. These sensors
are delicate. If they are treated incorrectly
and become damaged, the system may
not be able to control the interior tempera-
ture correctly. To avoid damaging the
sensors, observe the following precau-tions. – Do not subject the sensors to impact.
– Keep water away from the sensors.
Climate control/Automatic climate control system4-9
– CONTINUED –
Page 217 of 420

5-28Audio/Auxiliary input jack
Auxiliary input jack
You can connect an external audio device
to the vehicle’s audio system and play
back audio via the vehicle ’s speakers.
An auxiliary (AUX) input jack is equipped
in the lower compartment of the center
console. A stereo mini pin plug (3.5ø) can
be inserted in this jack. The connection
cable is available at electrical appliance or
similar stores.
To use the AUX input jack :
1. Connect a portable audio player to the
AUX input jack.
2. Press the “RSE AUX ”button on the
audio control panel to turn on the auxiliary
audio input.
3. Play back the portable audio player. Refer to the Owner
’s Manual for the
portable audio player.
NOTE . The output sound of the portable
audio player is not loud, and the sound
via the vehicle ’s speakers that are
connected to the vehicle audio set
may be very low. If you turn up the
volume of the audio set, the volume
becomes louder. However, when you
change from one portable audio player
to another one, the volume levels via
the vehicle ’s speakers may be signifi-
cantly louder compared to the prior
device. To avoid a large volume differ-
ence, turn down the volume when you
change between portable audioplayers.. In some cases, when the sound
volume of the portable audio player is
low, the sound becomes bad when you
turn up the volume of the vehicle audio
system. In this case, adjust the sound
volume of the portable audio player.. In some cases, noise occurs be-
cause of a bad connection between the
portable player and the vehicle audio
system. Try cleaning the stereo jack
and audio plug.. If noise is not reduced, check for
disconnection of the cord or malfunc- tions of the portable player.
Page 220 of 420

Interior light......................................................... 6-2
Dome light .......................................................... 6-2
Cargo area light .................................................. 6-3
Rear gate light .................................................... 6-3
Map light ............................................................. 6-3
Automatic ambient light for center console area (if equipped) ...................................................... 6-4
Sun visors ........................................................... 6-4
Sun visor extension plate .................................... 6-5
Vanity mirror with light ........................................ 6-5
Storage compartment ......................................... 6-6
Glove box ........................................................... 6-6
Center console box ............................................. 6-6
Rear console ....................................................... 6-7
Overhead console ............................................... 6-8
Cup holder ........................................................... 6-8
Front passenger ’s cup holder .............................. 6-8
Second-row seat cup holders .............................. 6-9
Third-row seat cup holders .................................. 6-9
Bottle holders ...................................................... 6-9
Accessory power outlets ................................... 6-10
Coat hook ........................................................... 6-12
Shopping bag hook ............................................ 6-13 Floor mat
............................................................ 6-13
Cargo area cover (if equipped) ......................... 6-14
Using the cover ................................................. 6-14
To remove the cover .......................................... 6-15
To install the cover housing ............................... 6-15
Convenient tie-down hooks .............................. 6-16
Under-floor storage compartment .................... 6-16
HomeLink
®Wireless Control System (if
equipped) ........................................................ 6-17
Garage door opener programming in the U.S.A. .............................................................. 6-18
Programming rolling-code-protected garage door openers in the U.S.A. ....................................... 6-19
Programming for entrance gates and garage door openers in Canada ........................................... 6-20
Programming other devices ............................... 6-21
Operating the HomeLink
®Wireless Control
System ............................................................ 6-21
Erasing HomeLink
®button memory .................... 6-21
In case a problem occurs ................................... 6-21
Rear view camera (if equipped) ........................ 6-21
How to use the rear view camera ....................... 6-22
Viewing range on the screen .............................. 6-23
Help line ............................................................ 6-24 Interior equipment
6
Page 223 of 420

6-4Interior equipment/Sun visors
(automatic illumination - ON).
. The doors are unlocked using the
remote keyless entry transmitter. . The ignition switch is turned from the
“ Acc ”position to the “LOCK ”position.
The automatically illuminated map lights
remain illuminated for several seconds
and then gradually turn off after all doors
are closed.
While the lights are illuminated, if any of
the following operations are performed,
the map lights turn off immediately. . The ignition switch is turned from the
“ LOCK ”position to the “Acc ”or “ON ”
position.. All doors and the rear gate are locked
using the remote keyless entry transmitter.
The setting of the period for which the light
remains illuminated (OFF delay timer) can
be changed by a SUBARU dealer. Con-
tact your SUBARU dealer for details.
NOTE
If any of the doors or the rear gate is
not completely closed, the map lights
will remain illuminated as a result.
However, the map lights are automati-
cally turned off by the battery drainage
prevention functi on to prevent the
battery from discharging. For details, refer to
“Battery drainage prevention
function ”F 2-6.
& Automatic ambient light for
center console area (if equipped)
The automatic ambient light illuminates
when the ignition switch is in the “ON ”
position and the light control switch is inthe “
”position or “”position. The
light dimly illuminates the area around the
center console. The light turns off when
the light control switch is in the “OFF ”
position. Also, the brightness of the light is
adjusted by the illumination brightness
control dial. Sun visors
To block out glare, swing down the visors.
To use the sun visor at a side window,
swing it down and move it sideways.