Page 10 of 36
7
Getting
Started Instrument
Panel Gauges
Personalize Controls
While
Operating Safety / In Case
of Emergency Additional
Information
7
Getting Started
Instrument Panel
Gauges
Personalize
Controls
While Operating
Safety / In Case of Emergency
Additional Information
Gauges
Trip meter and odometerSpeedometer
Fuel gauge
Informational
Multi-function display
switching knob
Vehicle Dynamics
Control/Vehicle Dynamics
Control operation
Vehicle Dynamics Control OFF
CHECK ENGINE /
Malfunction indicator
Tire pressure warning light
Front passenger frontal
airbag ON
Front passenger frontal
airbag OFF
Low windshield
washer fluid Hill Holder
Turn signals
Front fog light indicator
light (if equipped)
Headlight indicator light
Page 12 of 36
9
Getting
Started Instrument
Panel Gauges
Personalize Controls
While
Operating Safety / In Case
of Emergency Additional
Information
9
Getting Started
Instrument Panel
Gauges
Personalize
Controls
While Operating
Safety / In Case of Emergency
Additional Information
Gauges
Speedometer
Fuel gauge
Informational
Multi-function display
switching knob
All-Wheel Drive (Automatic
Transmission)
Vehicle Dynamics
Control/Vehicle Dynamics
Control operation
Vehicle Dynamics Control OFF
CHECK ENGINE /
Malfunction indicator
Tire pressure warning light
Front passenger frontal
airbag ON
Front passenger frontal
airbag OFF Low windshield
washer fluid
Hill Holder
Turn signals
Front fog light indicator
light (if equipped)
Headlight indicator light
Page 19 of 36
16
Controls
1
2
3
5
Automatic Climate Control
(if equipped)
1. Automatic On and Off This system automatically controls
outlet air temperature, fan speed, air
flow distribution, air inlet control, and air
conditioner compressor operation. Press
“AUTO” to activate. Press “OFF” to turn
off the system.
2. Temperature Control Buttons Press the blue down arrow (cool) or
the red up arrow (warm) to select and
maintain a comfortable climate within
the driver and passenger compartment. Temperature is displayed digitally on the
screen. Separate temperature settings
can be adjusted for the driver’s side and
passenger’s side.
Operation in Manual Mode
3. Recirculated / Outside Air Button
Press the air inlet selection button to
prevent outside air from being drawn
into the passenger compartment. Press
the button again to allow outside air
into the compartment. TO PREVENT
WINDSHIELD FOGGING, DO NOT
REMAIN IN THE RECIRCULATED MODE
FOR AN EXTENDED PERIOD OF TIME.
6
Page 20 of 36

17
Getting
Started Instrument
Panel Gauges
Personalize Controls
While
Operating Safety / In Case
of Emergency Additional
Information
17
Getting Started
Instrument Panel
Gauges
Personalize
Controls
While Operating
Safety / In Case of Emergency
Additional Information
Controls
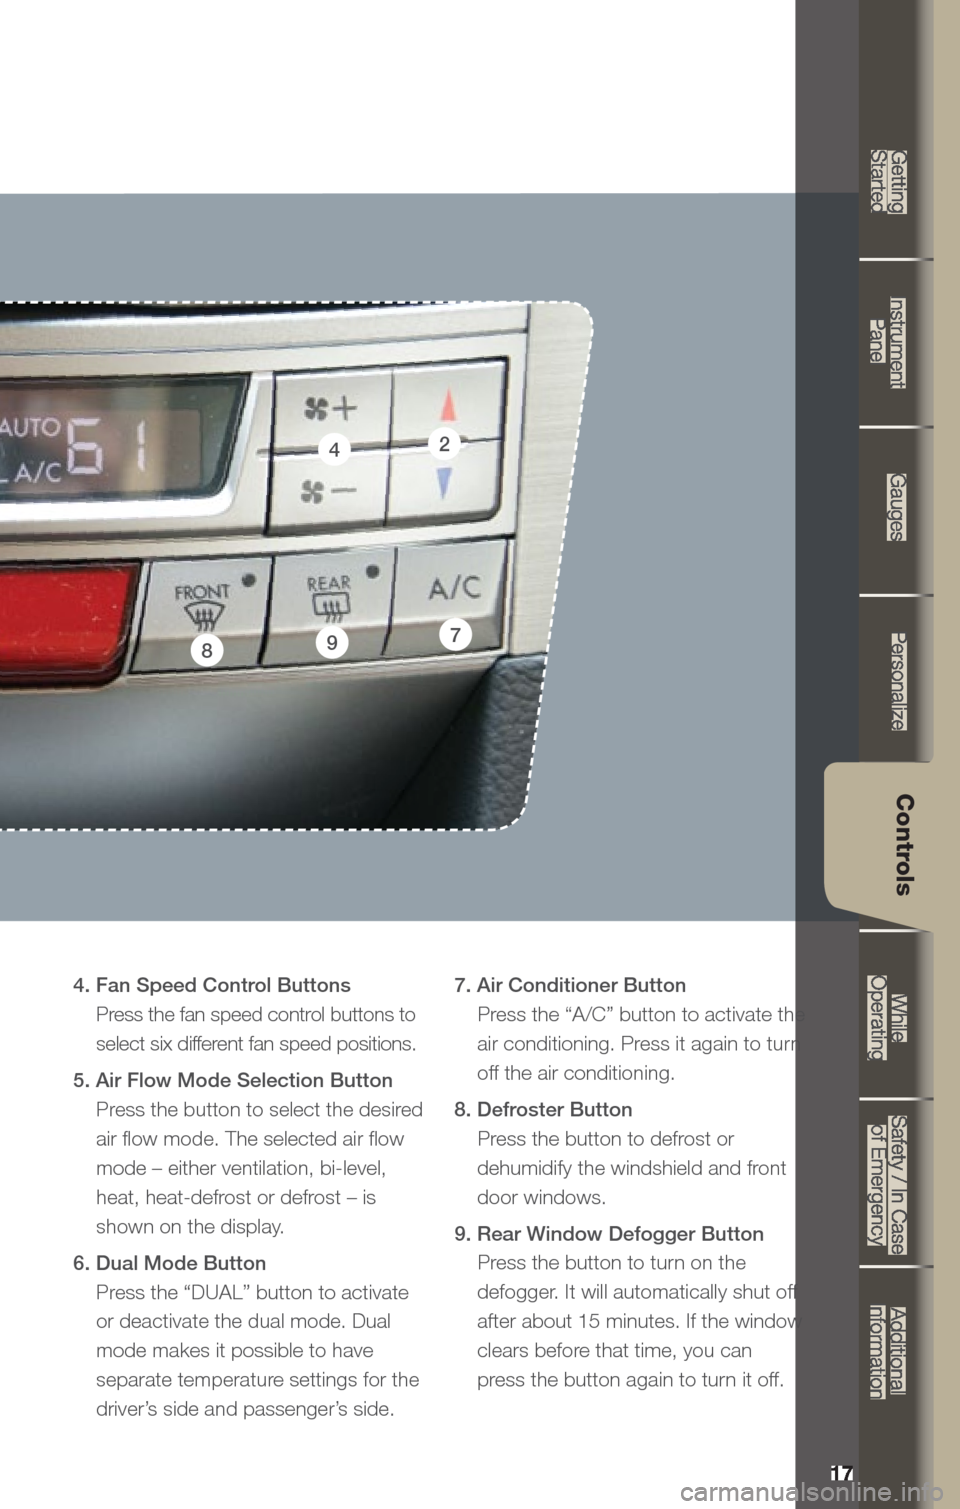
4
78
4. Fan Speed Control Buttons Press the fan speed control buttons to
select six different fan speed positions.
5. Air Flow Mode Selection Button Press the button to select the desired
air flow mode. The selected air flow
mode – either ventilation, bi-level,
heat, heat-defrost or defrost – is
shown on the display.
6. Dual Mode Button Press the “DUAL” button to activate
or deactivate the dual mode. Dual
mode makes it possible to have
separate temperature settings for the
driver’s side and passenger’s side. 7. Air Conditioner Button
Press the “A/C” button to activate the air conditioning. Press it again to turn
off the air conditioning.
8. Defroster Button Press the button to defrost or
dehumidify the windshield and front
door windows.
9. Rear Window Defogger Button Press the button to turn on the
defogger. It will automatically shut off
after about 15 minutes. If the window
clears before that time, you can
press the button again to turn it off.9
2
Page 22 of 36

19
Getting
Started Instrument
Panel Gauges
Personalize Controls
While
Operating Safety / In Case
of Emergency Additional
Information
19
Getting Started
Instrument Panel
Gauges
Personalize
Controls
While Operating
Safety / In Case of Emergency
Additional Information
Controls
CD Player functions
8. Load
Insert a disc into the slot. The CD
will automatically be drawn in and
will begin play at the first track.
9. Play CD
Press the “CD/AUX” button
and playback will begin.
10. Repeat / Random
Press the “RPT/RDM” button
once to repeat the current
track; press twice to repeat the
current folder.
Press and hold the “RPT/RDM”
button to randomize tracks on
a CD.
11. Eject
Press the button to eject the disc.
12. Forward / Reverse
Rotate the “TUNE/TRACK/CH”
knob clockwise to skip to the
beginning of the next track; rotate
the knob counter-clockwise to
skip to the beginning of the
current track. Rotate the knob
counter-clockwise again to go to
the previous selection.
13. Fast Forward / Fast Reverse
Press and hold the right arrow
of the “SEEK” button for more
than one second to fast forward.
Release the button to stop. To fast
reverse, press and hold the left
arrow for more than one second
and release the button to stop. 14.
Scan
Press the “SCAN” button to begin
previewing the first 10 seconds
of each track on the disc. Normal
playback will resume after all
tracks have been scanned. Press
the “SCAN” button again to stop
scanning and listen to the track
being previewed.
MP3/WMA Formatted CD
Player Functions
15. Folder Selection
Press the up arrow of the
“FOLDER” button to select the
next folder. Press the down
arrow to go back to the first
music file. Quickly press the
down arrow again to go back
to the previous folder.
16. Page Scroll
Press the “TEXT” button to select
title display. Press and hold again
to scroll through the title, 8
characters at a time. Up to a
maximum of 64 characters.
17. Display
Press and hold the “TEXT” button
during playback to change the
display to show the play time,
disc title, artist name and track
title. If the disc is formatted with
MP3/WMAs, press the “TEXT”
button to change the display to
show play time, folder name
and file name.
Page 32 of 36

29
Getting
Started Instrument
Panel Gauges
Personalize Controls
While
Operating Safety / In Case
of Emergency Additional
Information
29
Getting Started
Instrument Panel
Gauges
Personalize
Controls
While Operating
Safety / In Case of Emergency
Additional InformationAdditional
Information
Fuel
Use regular unleaded gasoline with an octane rating of 87 AKI
or higher.
Fuel Capacity
• 18.5 US gal (70 liters, 15.4 Imp gal)
• When the low fuel indicator light is displayed on the
instrument panel, approximately 2.6 U.S. gallons of fuel remain.
• If you have recently fueled your vehicle, the check
engine light on the instrument panel may stay on due
to a missing or loose fuel filler cap (the cap should be
tightened until a click is heard).
- 2.5 liter 4-cyl. DOHC models use 0W-20 synthetic.
- 3.6 liter 6-cyl. models use 5W-30.
Engine Oil
Use only the following oils:
• API classification SM or SN with the words “ENERGY
CONSERVING” or “RESOURCE CONSERVING”.
• Or ILSAC GF-4 or GF-5, which can be identified with the ILSAC
certification mark (Starburst mark).
Engine Oil Capacity
• 2.5 liter 4-cyl. models: 5.1 US qt (4.8 liters, 4.2 lmp qt)
• 3.6 liter 6-cyl. models: 6.9 US qt (6.5 liters, 5.7 Imp qt)