2013 SUBARU FORESTER mirror
[x] Cancel search: mirrorPage 247 of 436
6-18Interior equipment
not to apply the wax to the camera. If it
comes in contact with the camera,
moisten a clean cloth with a diluted
neutral detergent to remove the wax..The camera lens has hard coating to
help prevent scratches. However, when
washing the vehicle or cleaning the
camera lens, be careful not to scratch
the camera lens. Do not use a washing
brush directly on the camera lens. The
image quality of the rear view camera
may deteriorate.. Strong light shined on the camera
lens may develop vertical lines around
the light source. This is not a malfunc-tion. . Under fluorescent light, the display
may flicker. However, this is not a malfunction.. The image of the rear view camera
may be slightly different from the
actual color of the objects. & How to use the rear view camera
When the shift lever or select lever is set to “R ”, the rear view camera automatically
displays the rear view image from the
vehicle. When the lever is set to other
positions, the image before setting to “R ”
is displayed.
1. Set the ignition switch to “ON ”. 2. Set the shift lever or select lever to
“R ”.
NOTE . For models with the genuine
SUBARU navigation system, the image
of the rear view camera has priority
over other screen displays. Therefore,
while the rear view camera is in opera-
tion, the operations of other screens
are disabled. To operate other screens,
set the shift lever or select lever to a
position other than “R ”.
. The image of the rear view camera is
horizontally reversed as is the case
with the vehicle rearview mirror or the
side view mirror.. It may be difficult to see the image of
the rearview camera in the following
cases. This is not a malfunction of thecamera.
–The vehicle is in a dark place (at
night, in a tunnel, etc.). – The vehicle is in an extremely hot
or cold place.– An object (such as raindrops,
snow, dirt, etc.) that disturbs the
view of the rear view camera sticks
to the lens of the camera. – Strong light shined directly on
the camera lens (occasionally, there
are vertical lines on the screen). &
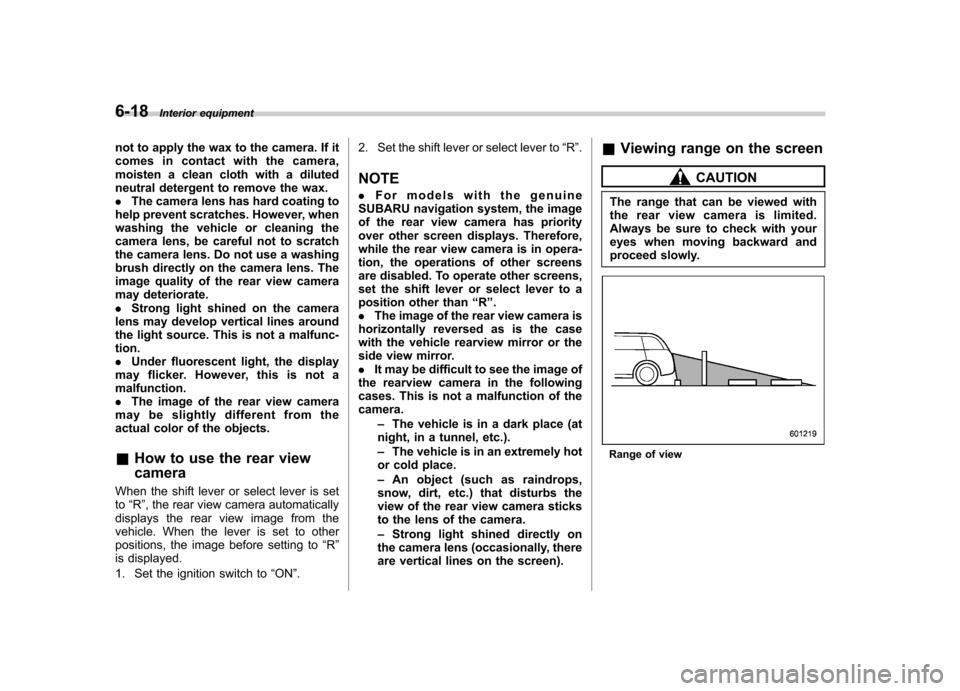
Viewing range on the screen
CAUTION
The range that can be viewed with
the rear view camera is limited.
Always be sure to check with your
eyes when moving backward and
proceed slowly.
Range of view
Page 258 of 436
The U.S. Environmental Protection
Agency (EPA) and states using two-wheel
dynamometers in their emission testing
program have EXEMPTED SUBARU
AWD vehicles from the portion of the
testing program that involves a two-wheel
dynamometer. There are some states that
use four-wheel dynamometers in their
testing program. When properly used, this
equipment should not damage a SUBARU
AWD vehicle.
Under no circumstances should the rear
wheels be jacked off the ground, nor
should the driveshaft be disconnected for
state emission testing.Preparing to drive
You should perform the following checks
and adjustments every day before you
start driving.
1. Check that all windows, mirrors, and
lights are clean and unobstructed.
2. Check the appearance and condition
of the tires. Also check tires for properinflation.
3. Look under the vehicle for any sign of leaks.
4. Check that the hood and rear gate are
fully closed.
5. Check the adjustment of the seat.
6. Check the adjustment of the inside
and outside mirrors.
7. Fasten your seatbelt. Check that your
passengers have fastened their seatbelts.
8. Check the operation of the warning
and indicator lights when the ignition
switch is turned to the
“ON ”position.
9. Check the gauges, indicator and warn-
ing lights after starting the engine.
NOTE
Engine oil, engine coolant, brake fluid,
washer fluid and other fluid levels
should be checked daily, weekly or at
fuel stops. Starting the engine
CAUTION
Do not operate the starter motor
continuously for more than 10 sec-
onds. If the engine fails to start after
operating the starter for 5 to 10
seconds, wait for 10 seconds or
more before trying again.
NOTE
It may be difficult to start the engine
when the battery has been discon-
nected and reconnected (for mainte-
nance or other purposes). This diffi-
culty is caused by the electronically
controlled throttle ’s self-diagnosis
function. To overcome it, keep the
ignition switch in the “ON ”position
for approximately 10 seconds before
starting the engine. & MT models
1. Apply the parking brake.
2. Turn off unnecessary lights and ac- cessories.
3. Depress the clutch pedal to the floor
and shift the shift lever into neutral. Hold
the clutch pedal to the floor while starting Starting and operating
7-7
– CONTINUED –
Page 310 of 436
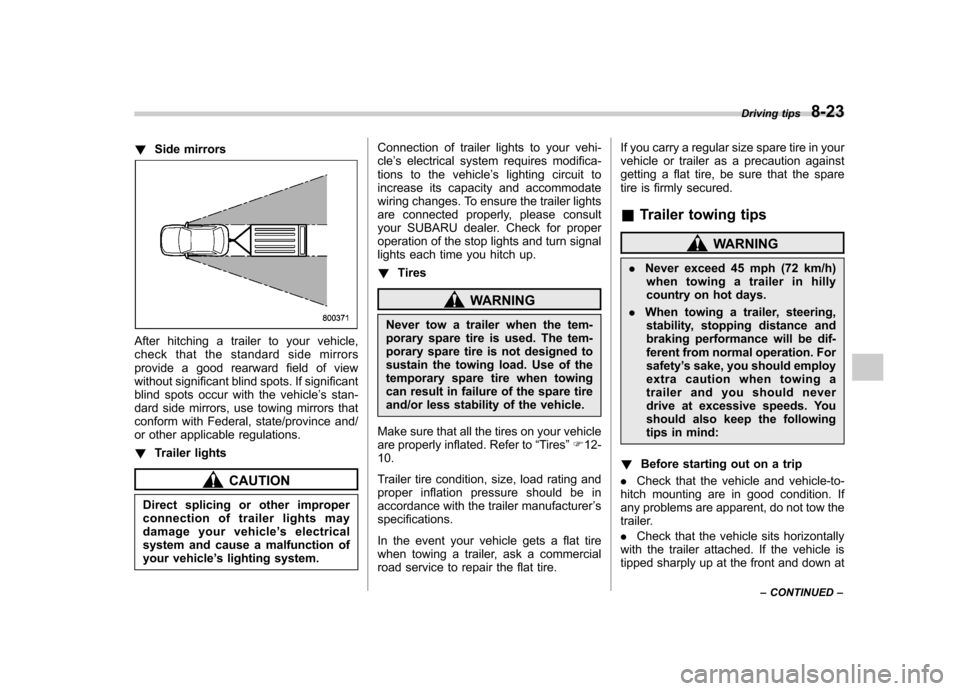
!Side mirrors
After hitching a trailer to your vehicle,
check that the standard side mirrors
provide a good rearward field of view
without significant blind spots. If significant
blind spots occur with the vehicle ’s stan-
dard side mirrors, use towing mirrors that
conform with Federal, state/province and/
or other applicable regulations. ! Trailer lights
CAUTION
Direct splicing or other improper
connection of trailer lights may
damage your vehicle ’s electrical
system and cause a malfunction of
your vehicle ’s lighting system. Connection of trailer lights to your vehi-cle
’s electrical system requires modifica-
tions to the vehicle ’s lighting circuit to
increase its capacity and accommodate
wiring changes. To ensure the trailer lights
are connected properly, please consult
your SUBARU dealer. Check for proper
operation of the stop lights and turn signal
lights each time you hitch up. ! Tires
WARNING
Never tow a trailer when the tem-
porary spare tire is used. The tem-
porary spare tire is not designed to
sustain the towing load. Use of the
temporary spare tire when towing
can result in failure of the spare tire
and/or less stability of the vehicle.
Make sure that all the tires on your vehicle
are properly inflated. Refer to “Tires ”F 12-
10.
Trailer tire condition, size, load rating and
proper inflation pressure should be in
accordance with the trailer manufacturer ’s
specifications.
In the event your vehicle gets a flat tire
when towing a trailer, ask a commercial
road service to repair the flat tire. If you carry a regular size spare tire in your
vehicle or trailer as a precaution against
getting a flat tire, be sure that the spare
tire is firmly secured. &
Trailer towing tips
WARNING
. Never exceed 45 mph (72 km/h)
when towing a trailer in hilly
country on hot days.
. When towing a trailer, steering,
stability, stopping distance and
braking performance will be dif-
ferent from normal operation. Forsafety ’s sake, you should employ
extra caution when towing a
trailer and you should never
drive at excessive speeds. You
should also keep the following
tips in mind:
! Before starting out on a trip
. Check that the vehicle and vehicle-to-
hitch mounting are in good condition. If
any problems are apparent, do not tow the
trailer. . Check that the vehicle sits horizontally
with the trailer attached. If the vehicle is
tipped sharply up at the front and down at Driving tips
8-23
– CONTINUED –
Page 311 of 436
8-24Driving tips
the rear, check the total trailer weight,
GVW, GAWs and tongue load again, then
confirm that the load and its distribution
are acceptable. . Check that the tire pressures are
correct.. Check that the vehicle and trailer are
connected properly. Confirm that:
–The trailer tongue is connected
properly to the hitch ball. – The trailer lights connector is con-
nected properly and trailer ’s stop lights
illuminate when the vehicle ’s brake
pedal is pressed, and that the trailer ’s
turn signal lights flash when the vehicle ’s turn signal lever is operated.
– The safety chains are connected
properly. – All cargo in the trailer is secured
safely in position.– The side mirrors provide a good
rearward field of view without a sig-
nificant blind spot.
. Sufficient time should be taken to learn
the “feel ”of the vehicle/trailer combination
before starting out on a trip. In an area free
of traffic, practice turning, stopping and
backing up. !
Driving with a trailer
. You should allow for considerably more
stopping distance when towing a trailer.
Avoid sudden braking because it may
result in skidding or jackknifing and loss ofcontrol. . Avoid abrupt starts and sudden accel-
erations. If your vehicle has a manual
transmission, always start out in first gear
and release the clutch at moderate enginerevolution. . Avoid uneven steering, sharp turns and
rapid lane changes.. Slow down before turning. Make a
longer than normal turning radius because
the trailer wheels will be closer than the
vehicle wheels to the inside of the turn. In
a tight turn, the trailer could hit yourvehicle. . Crosswinds will adversely affect the
handling of your vehicle and trailer, caus-
ing sway. Crosswinds can be due to
weather conditions or the passing of large
trucks or buses. If swaying occurs, firmly
grip the steering wheel and slow down
immediately but gradually. . When passing other vehicles, consid-
erable distance is required because of the
added weight and length caused by
attaching the trailer to your vehicle.
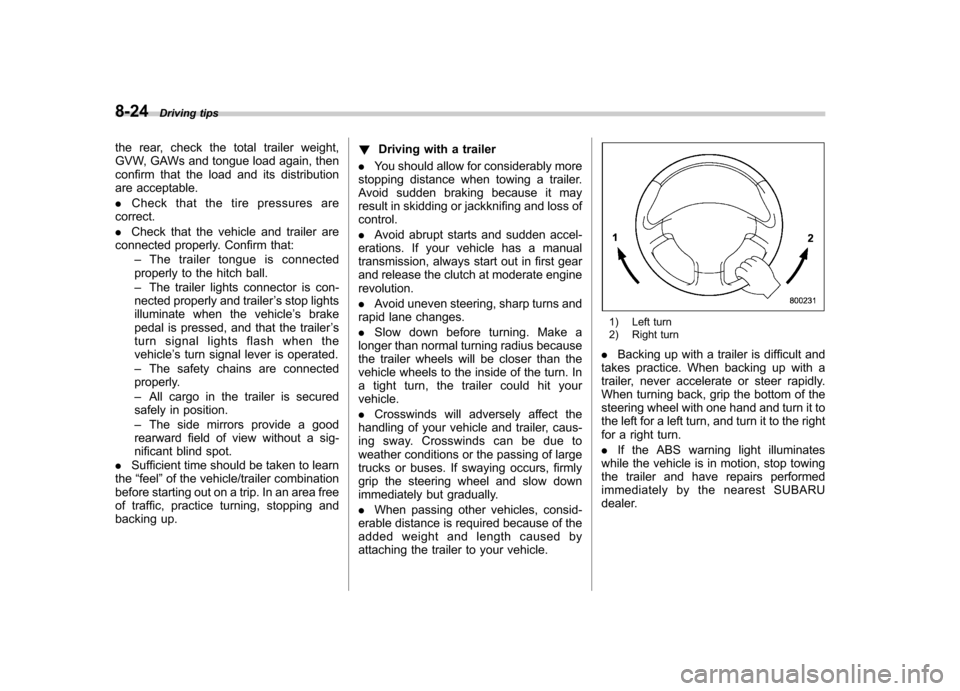
1) Left turn
2) Right turn
. Backing up with a trailer is difficult and
takes practice. When backing up with a
trailer, never accelerate or steer rapidly.
When turning back, grip the bottom of the
steering wheel with one hand and turn it to
the left for a left turn, and turn it to the right
for a right turn. . If the ABS warning light illuminates
while the vehicle is in motion, stop towing
the trailer and have repairs performed
immediately by the nearest SUBARU
dealer.
Page 400 of 436
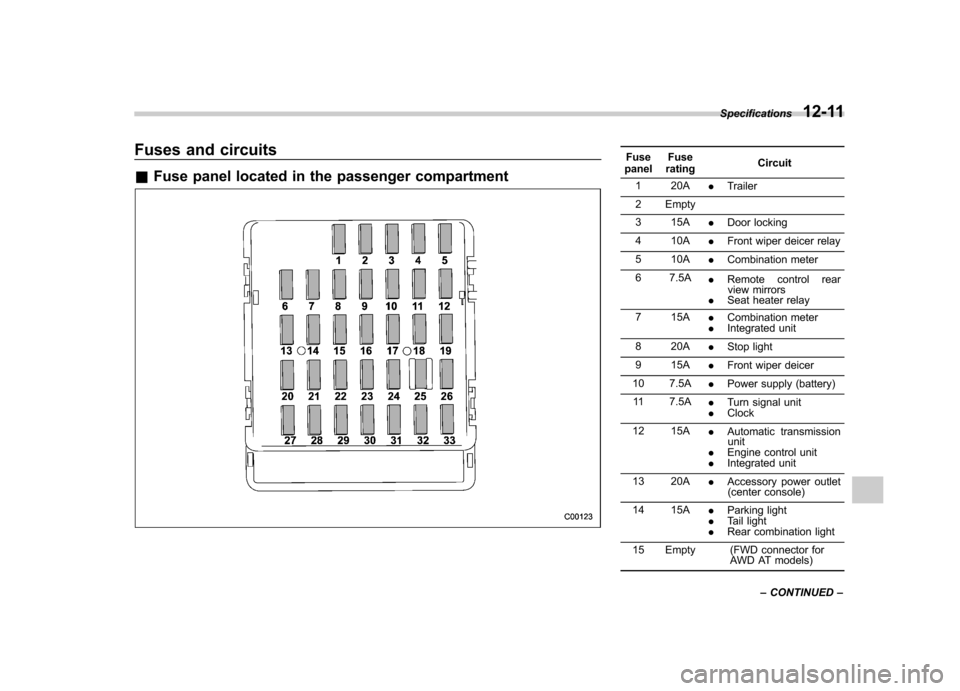
Fuses and circuits &Fuse panel located in the passenger compartmentFuse
panel Fuse
rating Circuit
1 20A .Trailer
2 Empty
3 15A .Door locking
4 10A .Front wiper deicer relay
5 10A .Combination meter
6 7.5A .Remote control rear
view mirrors
. Seat heater relay
7 15A .Combination meter
. Integrated unit
8 20A .Stop light
9 15A .Front wiper deicer
10 7.5A .Power supply (battery)
11 7.5A .Turn signal unit
. Clock
12 15A .Automatic transmission
unit
. Engine control unit
. Integrated unit
13 20A .Accessory power outlet
(center console)
14 15A .Parking light
. Tail light
. Rear combination light
15 Empty (FWD connector for AWD AT models)
Specifications
12-11
– CONTINUED –
Page 402 of 436
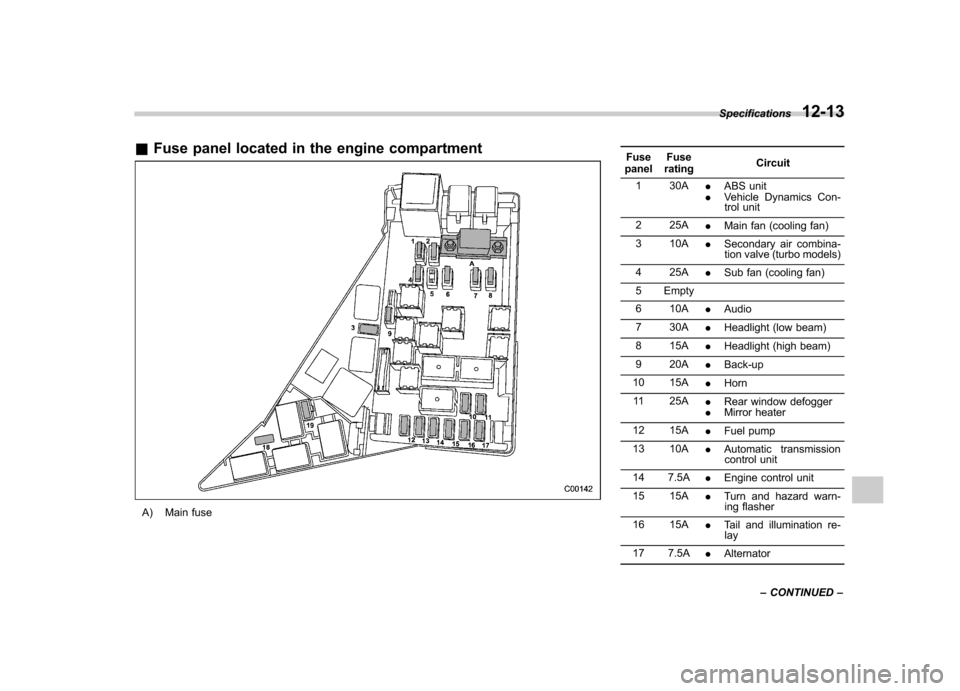
&Fuse panel located in the engine compartment
A) Main fuse Fuse
panel Fuse
rating Circuit
1 30A .ABS unit
. Vehicle Dynamics Con-
trol unit
2 25A .Main fan (cooling fan)
3 10A .Secondary air combina-
tion valve (turbo models)
4 25A .Sub fan (cooling fan)
5 Empty
6 10A .Audio
7 30A .Headlight (low beam)
8 15A .Headlight (high beam)
9 20A .Back-up
10 15A .Horn
11 25A .Rear window defogger
. Mirror heater
12 15A .Fuel pump
13 10A .Automatic transmission
control unit
14 7.5A .Engine control unit
15 15A .Turn and hazard warn-
ing flasher
16 15A .Tail and illumination re-
lay
17 7.5A .Alternator
Specifications
12-13
– CONTINUED –
Page 425 of 436

14-2Index
A Abbreviation ................................................................... 3
ABS (Anti-lock Brake System) ..................................... 7-23
Warning light ......................................................... 3-19
Accessories ....................................................... 5-4, 11-45
Accessory power outlet ................................................. 6-9
Active head restraint ..................................................... 1-6
Air cleaner element ................................................... 11-15
Air conditioner
Manual climate control system ................................... 4-8
Air filtration system ..................................................... 4-11
Airflow selection Automatic climate control system ............................... 4-6
Manual climate control system ................................... 4-8
Alarm system ............................................................ 2-14
All-Wheel Drive warning light ....................................... 3-21
Aluminum wheel ....................................................... 11-37
Cleaning ............................................................... 10-3
Antenna system ........................................................... 5-3
Anti-lock Brake System (ABS) ..................................... 7-23
Arming the system ..................................................... 2-15
Armrest ....................................................................... 1-8
Ashtray ..................................................................... 6-11
AT OIL TEMP warning light ......................................... 3-17
Audio Antenna system ....................................................... 5-3
Auxiliary input jack ................................................. 5-29
Bluetooth
®audio .................................................... 5-40
CD player operation ............................................... 5-22
Control button ........................................................ 5-37
FM/AM radio operation ........................................... 5-13 iPod
®operations
.................................................... 5-32
Power and audio controls ......................................... 5-9
Satellite radio operations ......................................... 5-18
Set ........................................................................ 5-4
USB storage device operations ................................ 5-32
Auto-dimming mirror/compass .............................. 3-36, 3-38
Automatic climate control system ................................... 4-6
Automatic headlight beam leveler ................................. 3-31
Warning light .......................................................... 3-21
Automatic transmission ............................................... 7-15
Fluid ........................................................... 11-20, 12-9
MANUAL mode ...................................................... 7-19
Oil temperature warning light (AT OIL TEMP) ............. 3-17
Select lever ........................................................... 7-16
Shift lock function ................................................... 7-17
SPORT mode ........................................................ 7-20
Automatic/Emergency Locking Retractor (A/ELR) ........... 1-13
Auxiliary input jack ...................................................... 5-29
BBattery .................................................................... 11-43
Drainage prevention function ..................................... 2-5
Jump starting ......................................................... 9-10
Replacement (remote engine start transmitter) ........... 7-12
Replacement (remote keyless entry system) .............. 2-10
Bluetooth
®audio ........................................................ 5-40
Booster seat .............................................................. 1-28
Bottle holder ............................................................... 6-9
Brake Assist .................................................................... 7-22
Booster ....................................................... 7-22, 11-25
Page 428 of 436

EngineCompartment overview ........................................... 11-7
Coolant ........................................................ 11-14, 12-9
Exhaust gas (carbon monoxide) ............................. 6, 8-2
Hood .................................................................... 11-5
Oil................................................................ 11-9, 12-5 Overheating .......................................................... 9-13
Starting ................................................................... 7-7
Stopping ................................................................. 7-9
Exterior care .............................................................. 10-2
F
Flat tires ..................................................................... 9-6
Floor mat .................................................................. 6-12
Fluid level Automatic transmission .......................................... 11-20
Brake .................................................................. 11-23
Clutch .................................................................. 11-24
Power steering ..................................................... 11-22
Fog light Bulb ................................................................... 12-15
Indicator light ......................................................... 3-25
Switch .................................................................. 3-32
Folding mirror switch .................................................. 3-44
Front Differential gear oil ........................................ 11-21, 12-8
Fog light ..................................................... 3-32, 12-15
Fog light indicator light ............................................ 3-25
Seatbelt pretensioners ............................................ 1-20
Turn signal light .................................................... 11-48
Front seats .................................................................. 1-2 Forward and backward adjustment
............................ 1-3
Head restraint adjustment ......................................... 1-5
Power seat ............................................................. 1-4
Reclining ................................................................ 1-3
Seat height adjustment (driver ’s seat) ........................ 1-4
Fuel ........................................................................... 7-2
Consumption indicator ............................................. 3-26
Economy hints ........................................................ 8-2
Filler lid and cap ...................................................... 7-3
Gauge ................................................................... 3-10
Requirements ................................................. 7-2, 12-4
Fuses ..................................................................... 11-44
Fuses and circuits .................................................... 12-11
G
GAWR (Gross Axle Weight Rating) .. ............................. 8-13
Glove box ................................................................... 6-5
GVWR (Gross Vehicle Weight Rating) ........................... 8-13
H
Hands-free system. ..................................................... 5-42
Hazard warning flasher .......................................... 3-5, 9-2
Head restraint adjustment Front seat ............................................................... 1-5
Rear seat ............................................................... 1-8
Headlight
Beam leveler. ......................................................... 3-31
Bulb replacing ...................................................... 11-45
Bulb wattage ........................................................ 12-15
Control switch ........................................................ 3-29
Flasher .................................................................. 3-30 Index
14-5