2013 SUBARU FORESTER transmission fluid
[x] Cancel search: transmission fluidPage 312 of 436

!Driving on grades
. Before going down a steep hill, slow
down and shift into lower gear (if neces-
sary, use 1st gear) in order to utilize the
engine braking effect and prevent over-
heating of your vehicle ’s brakes. Do not
make sudden downshifts. . When driving uphill in hot weather, the
air conditioner may turn off automatically
to protect the engine from overheating. . When driving uphill in hot weather, pay
attention to the following indicators be-
cause the engine and transmission are
relatively prone to overheating.
–Temperature gauge (if equipped)
– Coolant temperature high warning
light (if equipped) – AT OIL TEMP warning light (AT
models)
. If any of the following conditions occur,
immediately turn off the air conditioner and
stop the vehicle in the nearest safe
location. Refer to “If you park your vehicle
in case of an emergency ”F9-2 and
“ Engine overheating ”F 9-13.
– Temperature gauge needle ap-
proaches the OVERHEAT zone (if
equipped). Refer to “Temperature
gauge (models with type A combina-
tion meter) ”F 3-11.
– Coolant temperature high warning light illuminates (if equipped). Refer to“
Coolant temperature low indicator
light/Coolant temperature high warn-
ing light ”F 3-16.
– AT OIL TEMP warning light illumi-
nates (AT models). Refer to “AT OIL
TEMP warning light (AT models) ”F 3-
17.
. If your vehicle has an automatic trans-
mission, avoid using the accelerator pedal
to stay stationary on an uphill slope
instead of using the parking brake or foot
brake. That may cause the transmission
fluid to overheat. . If your vehicle has an automatic trans-
mission, place the select lever as follows.
Uphill slopes: “D ”position
Downhill slopes: A low-speed gear posi-
tion to use engine braking ! Parking on a grade
Always block the wheels under both
vehicle and trailer when parking. Apply
the parking brake firmly. You should not
park on a hill or slope. But if parking on a
hill or slope cannot be avoided, you
should take the following steps.
1. Press and hold the brake pedal.
2. Have someone place chocks under
both the vehicle and trailer wheels.
3. When the chocks are in place, release
the brake pedal slowly until the chocks absorb the load.
4. Press the brake pedal fully and then
apply the parking brake; slowly release
the brake pedal.
5. Shift into 1st or reverse gear (manual
transmission models) or the
“P ” position
(automatic transmission models) and shut
off the engine. Driving tips
8-25
Page 338 of 436

Maintenance schedule....................................... 11-3
Maintenance precautions ................................... 11-3
Before checking or servicing in the engine compartment .................................................... 11-4
When checking or servicing in the engine compartment (non-turbo models) ...................... 11-4
When checking or servicing in the engine compartment while the engine is running .......... 11-5
Engine hood ....................................................... 11-5
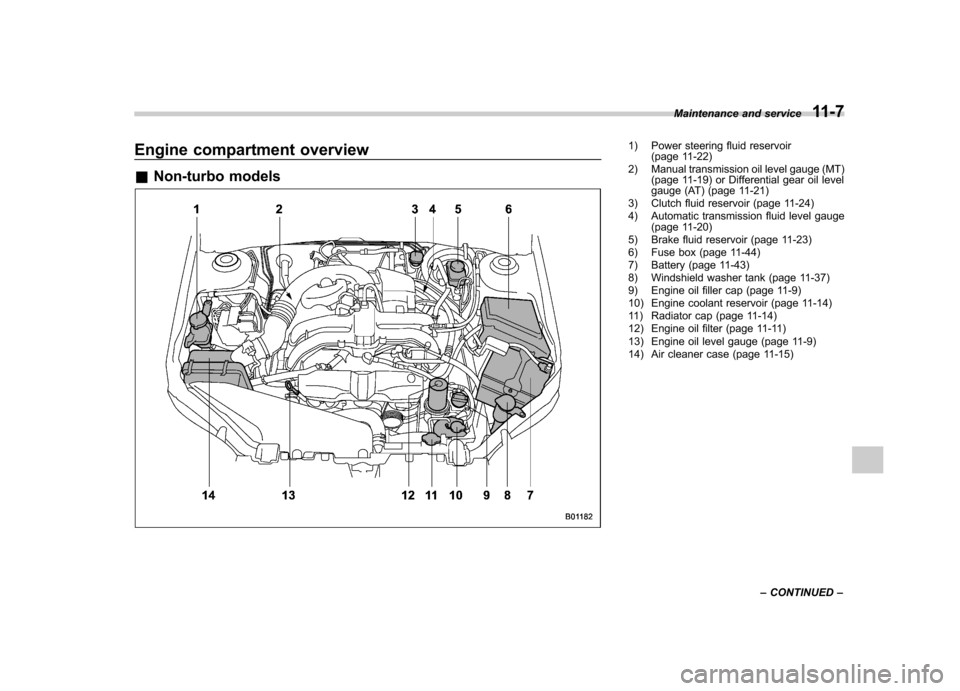
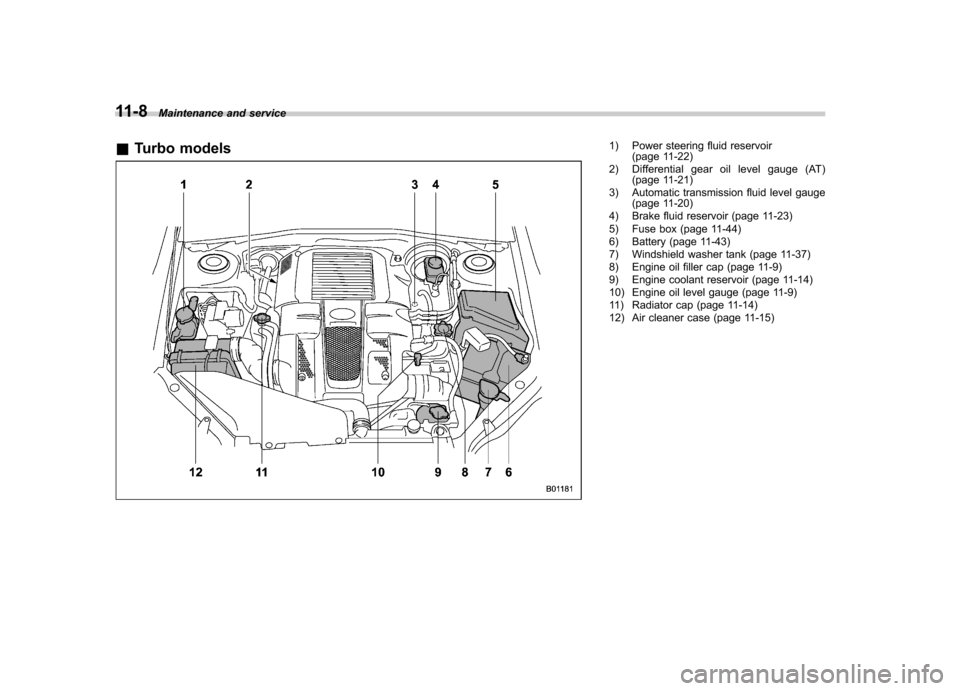
Engine compartment overview .......................... 11-7
Non-turbo models .............................................. 11-7
Turbo models ..................................................... 11-8
Engine oil ............................................................ 11-9
Checking the oil level ......................................... 11-9
Changing the oil and oil filter ............................ 11-11
Recommended grade and viscosity .................. 11-13
Synthetic oil ..................................................... 11-13
Cooling system ................................................ 11-13
Cooling fan, hose and connections ................... 11-14
Engine coolant ................................................. 11-14
Air cleaner element .......................................... 11-15
Replacing the air cleaner element ..................... 11-15
Spark plugs ...................................................... 11-17
Drive belts ........................................................ 11-18
Turbo models ................................................... 11-18
Non-turbo models ............................................ 11-18
Manual transmission oil .................................. 11-19
Checking the oil level ....................................... 11-19
Recommended grade and viscosity .................. 11-19Automatic transmission fluid
.......................... 11-20
Checking the fluid level .................................... 11-20
Recommended fluid ......................................... 11-21
Front differential gear oil (AT models) ........... 11-21
Checking the oil level ...................................... 11-21
Recommended grade and viscosity .................. 11-22
Rear differential gear oil .................................. 11-22
Recommended grade and viscosity .................. 11-22
Power steering fluid ........................................ 11-22
Checking the fluid level .................................... 11-22
Recommended fluid ......................................... 11-23
Brake fluid ........................................................ 11-23
Checking the fluid level .................................... 11-23
Recommended brake fluid ............................... 11-24
Clutch fluid (MT models) ................................. 11-24
Checking the fluid level .................................... 11-24
Recommended clutch fluid ............................... 11-25
Brake booster .................................................. 11-25
Brake pedal ...................................................... 11-26
Checking the brake pedal free play .................. 11-26
Checking the brake pedal reserve distance....... 11-26
Clutch pedal (MT models) ............................... 11-27
Checking the clutch function ............................ 11-27
Checking the clutch pedal free play .................. 11-27
Hill start assist system (MT models) .............. 11-27
Replacement of brake pad and lining ............ 11-28
Breaking-in of new brake pads and linings ....... 11-28
Parking brake stroke ....................................... 11-29
Maintenance and service
11
Page 344 of 436

Engine compartment overview &Non-turbo models1) Power steering fluid reservoir
(page 11-22)
2) Manual transmission oil level gauge (MT) (page 11-19) or Differential gear oil level
gauge (AT) (page 11-21)
3) Clutch fluid reservoir (page 11-24)
4) Automatic transmission fluid level gauge (page 11-20)
5) Brake fluid reservoir (page 11-23)
6) Fuse box (page 11-44)
7) Battery (page 11-43)
8) Windshield washer tank (page 11-37)
9) Engine oil filler cap (page 11-9)
10) Engine coolant reservoir (page 11-14)
11) Radiator cap (page 11-14)
12) Engine oil filter (page 11-11)
13) Engine oil level gauge (page 11-9)
14) Air cleaner case (page 11-15) Maintenance and service
11-7
– CONTINUED –
Page 345 of 436

11-8Maintenance and service
& Turbo models
1) Power steering fluid reservoir
(page 11-22)
2) Differential gear oil level gauge (AT) (page 11-21)
3) Automatic transmission fluid level gauge (page 11-20)
4) Brake fluid reservoir (page 11-23)
5) Fuse box (page 11-44)
6) Battery (page 11-43)
7) Windshield washer tank (page 11-37)
8) Engine oil filler cap (page 11-9)
9) Engine coolant reservoir (page 11-14)
10) Engine oil level gauge (page 11-9)
11) Radiator cap (page 11-14)
12) Air cleaner case (page 11-15)
Page 357 of 436

11-20Maintenance and service
Automatic transmission fluid &Checking the fluid level
The automatic transmission fluid expands
largely as its temperature rises; the fluid
level differs according to fluid temperature.
Therefore, there are two different scales
for checking the level of hot fluid and cold
fluid on the level gauge.
Though the fluid level can be checked
without warming up the fluid on the“ COLD ”range, it is recommended to
check the fluid level when the fluid is at
operating temperature. ! Checking the fluid level when the
fluid is hot
1. Drive the vehicle several miles to raise
the temperature of the transmission fluid
up to normal operating temperature; 158
to 176 8F (70 to 80 8C) is normal.
2. Park the vehicle on a level surface and
set the parking brake.
3. First shift the select lever in each
position. Then shift it in the “P ” position,
and run the engine at idling speed.
1) Yellow handle
1) HOT range
2) COLD range
3) Full level
4) Low level
4. Pull out the level gauge and check the fluid level on the gauge. If it is below the
low level on the
“HOT ”range, add the
recommended automatic transmission
fluid up to the full level.
NOTE
Do not fill the automatic transmission
fluid over the full level. ! Checking the fluid level when the
fluid is cold
When the fluid level has to be checked
without time to warm up the automatic
transmission, check that the fluid level is
between the low level and full level on the“ COLD ”range. If it is below that range,
add fluid up to the full level. Be careful not
to overfill.
CAUTION
Be careful not to spill automatic
transmission fluid when adding it.
If automatic transmission fluid
touches the exhaust pipe, it may
cause a bad smell, smoke, and/or a
fire. If automatic transmission fluid
gets on the exhaust pipe, be sure to
wipe it off.
Page 358 of 436

&Recommended fluid
Refer to “Fluids ”F 12-9.
NOTE
Using any non-specified type of auto-
matic transmission fluid could result in
damage inside the transmission. When
replacing the automatic transmission
fluid, be sure to use the specified type. Front differential gear oil (AT models) &
Checking the oil level
1) Yellow handle
1. Park the vehicle on a level surface and
stop the engine.
2. Pull out the level gauge, wipe it clean,
and insert it again.
1) Full level
2) Low level
3. Pull out the level gauge again and
check the oil level on it. If it is below the
low level, add oil to bring the level up to
the full level.
CAUTION
Be careful not to spill front differ-
ential gear oil when adding it. If oil
touches the exhaust pipe, it may
cause a bad smell, smoke, and/or a
fire. If oil gets on the exhaust pipe,
be sure to wipe it off. Maintenance and service
11-21
– CONTINUED –
Page 359 of 436

11-22Maintenance and service
&Recommended grade and viscosity
Each oil manufacturer has its own base
oils and additives. Never use different
brands together. For details, refer to“ Manual transmission, front differential
and rear differential gear oil ”F 12-8. Rear differential gear oil
There is no rear differential gear oil level
gauge. To check the rear differential gear
oil level, consult your SUBARU dealer forinspection. &
Recommended grade and viscosity
Each oil manufacturer has its own base
oils and additives. Never use different
brands together. For details, refer to“ Manual transmission, front differential
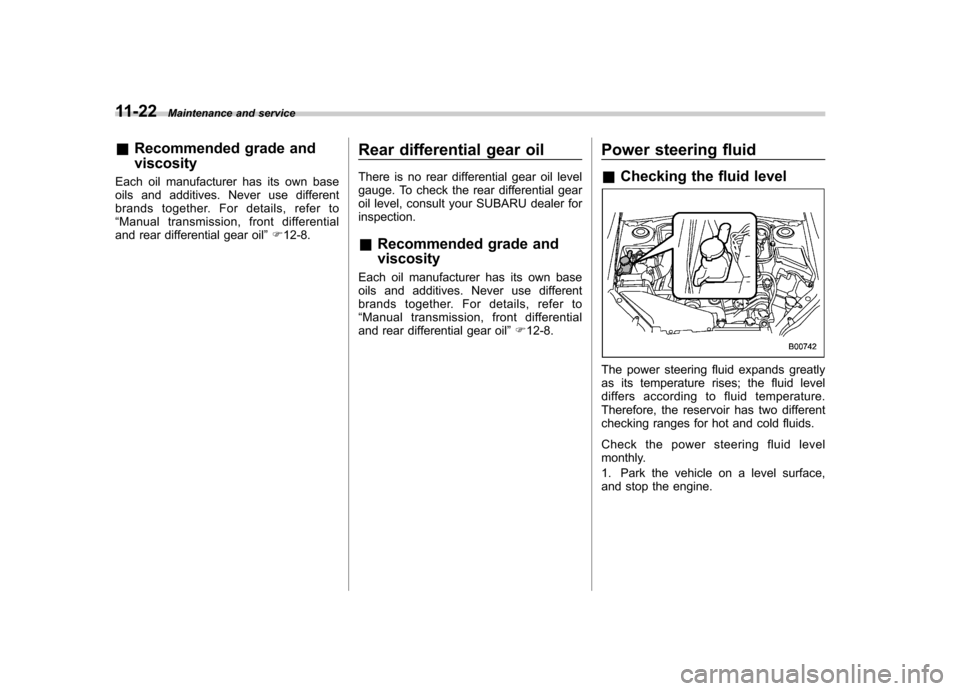
and rear differential gear oil ”F 12-8. Power steering fluid &
Checking the fluid level
The power steering fluid expands greatly
as its temperature rises; the fluid level
differs according to fluid temperature.
Therefore, the reservoir has two different
checking ranges for hot and cold fluids.
Check the power steering fluid level
monthly.
1. Park the vehicle on a level surface,
and stop the engine.
Page 390 of 436

Specifications..................................................... 12-2
Dimensions ........................................................ 12-2
Engine ............................................................... 12-3
Electrical system ................................................ 12-3
Fuel ................................................................... 12-4
Engine oil .......................................................... 12-5
Manual transmission, front differential and rear differential gear oil ........................................... 12-8
Fluids ................................................................ 12-9
Engine coolant ................................................... 12-9 Tires
................................................................ 12-10
Fuses and circuits ........................................... 12-11
Fuse panel located in the passenger compartment ................................................. 12-11
Fuse panel located in the engine compartment ................................................. 12-13
Bulb chart ......................................................... 12-15
Vehicle identification ....................................... 12-18Specifications
12