Page 136 of 796
01-210000-00
9. TIGHTENING TORQUE OF STANDARD BOLTS
Tightening Torque By Bolt Specification ▶
Metric bolt strength is embossed on the head
of each bolt. The strength of bolt can be
classified as 4T, 7T, 8.8T, 10.9T, 11T and
12.9T in general.
Observe standard tightening torque during
bolt tightening works and can adjust torque
to be proper within 15 % if necessary. Try not
to over max. allowable tightening torque if not
required to do so. 1.
2.Determine extra proper tightening torque if
tightens with washer or packing.
If tightens bolts on the below materials, be
sure to determine the proper torque. 3.
4.
Aluminum alloy: Tighten to 80 % of
above torque table.
Plastics: Tighten to 20 % of above
torque table. ·
·
Page 150 of 796
01-6
3. ENGINE COMPARTMENT LAYOUT
Do not work on the engine compartment while the engine, radiator, exhaust manifold, muffler or
catalytic converter is hot. Always turn the engine off and allow it to cool before starting the
maintenance.
Regularly check the engine oil level and add Ssangyong genuine engine oil if necessary.
Clean the dipstick with clean cloth so that any foreign materials cannot get into the engine. -
-
-
Power steering fluid
reservoirBrake fluid reservoir
Engine oil dipstick
gauge
Washer fluid
reservoir cap Engine oil filler cap
Air cleaner
Operating vehicle with insuffi cient amount of oil can damage the engine. Make sure the engine
oil level is correct and add oil if necessary.
Coolant reservoirFuse & relay
Page 155 of 796
01-110000-00
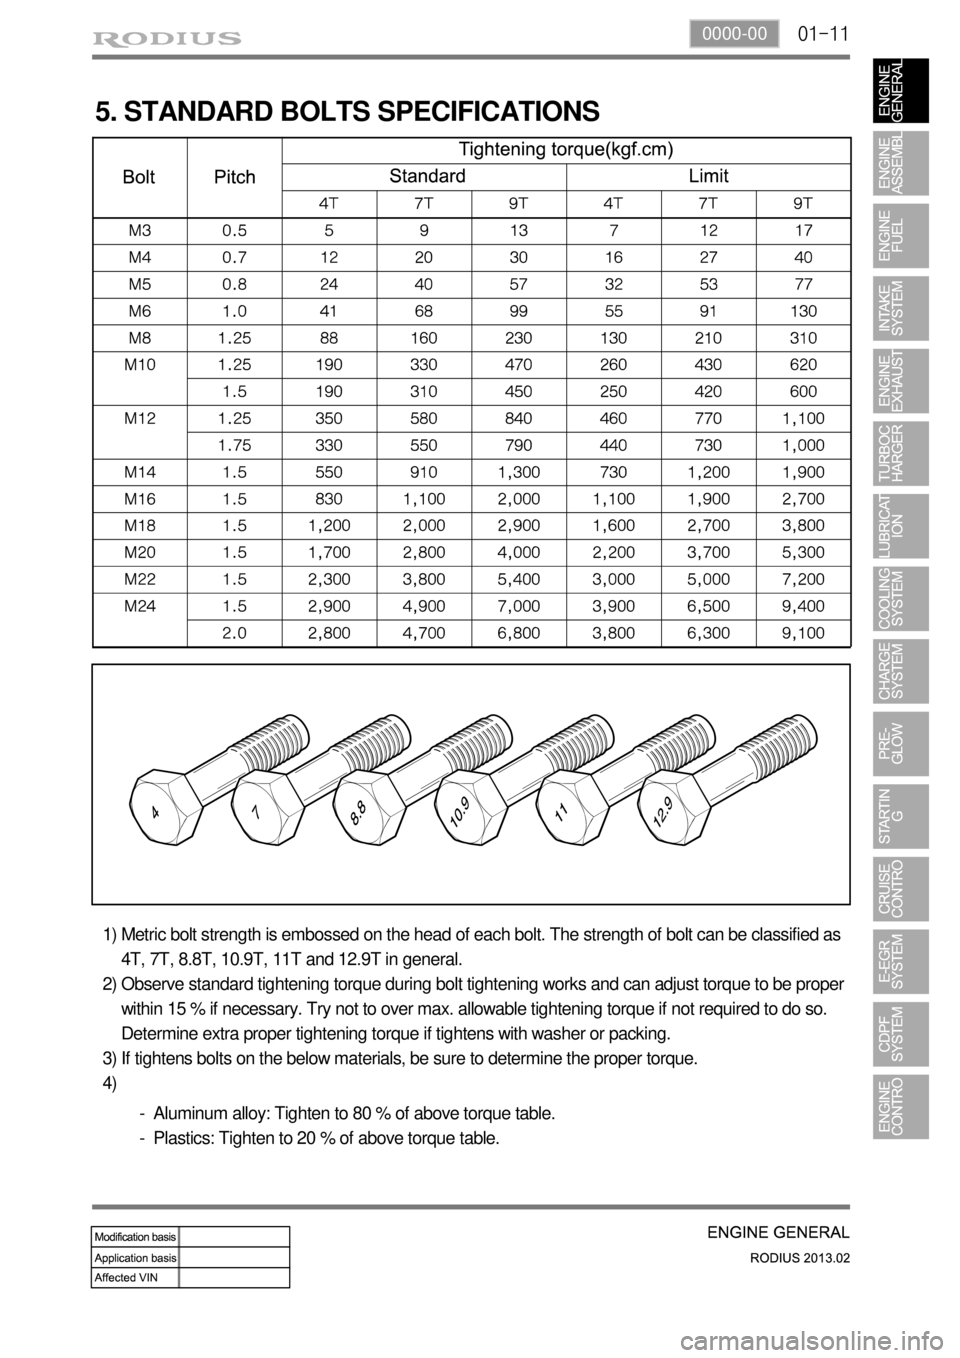
5. STANDARD BOLTS SPECIFICATIONS
Metric bolt strength is embossed on the head of each bolt. The strength of bolt can be classified as
4T, 7T, 8.8T, 10.9T, 11T and 12.9T in general.
Observe standard tightening torque during bolt tightening works and can adjust torque to be proper
within 15 % if necessary. Try not to over max. allowable tightening torque if not required to do so.
Determine extra proper tightening torque if tightens with washer or packing.
If tightens bolts on the below materials, be sure to determine the proper torque. 1)
2)
3)
4)
Aluminum alloy: Tighten to 80 % of above torque table.
Plastics: Tighten to 20 % of above torque table. -
-
Page 212 of 796
03-52210-01
Plug the removed components with clean and undamaged sealing caps and store it into the box to
keep the conditions when it was installed. 6.
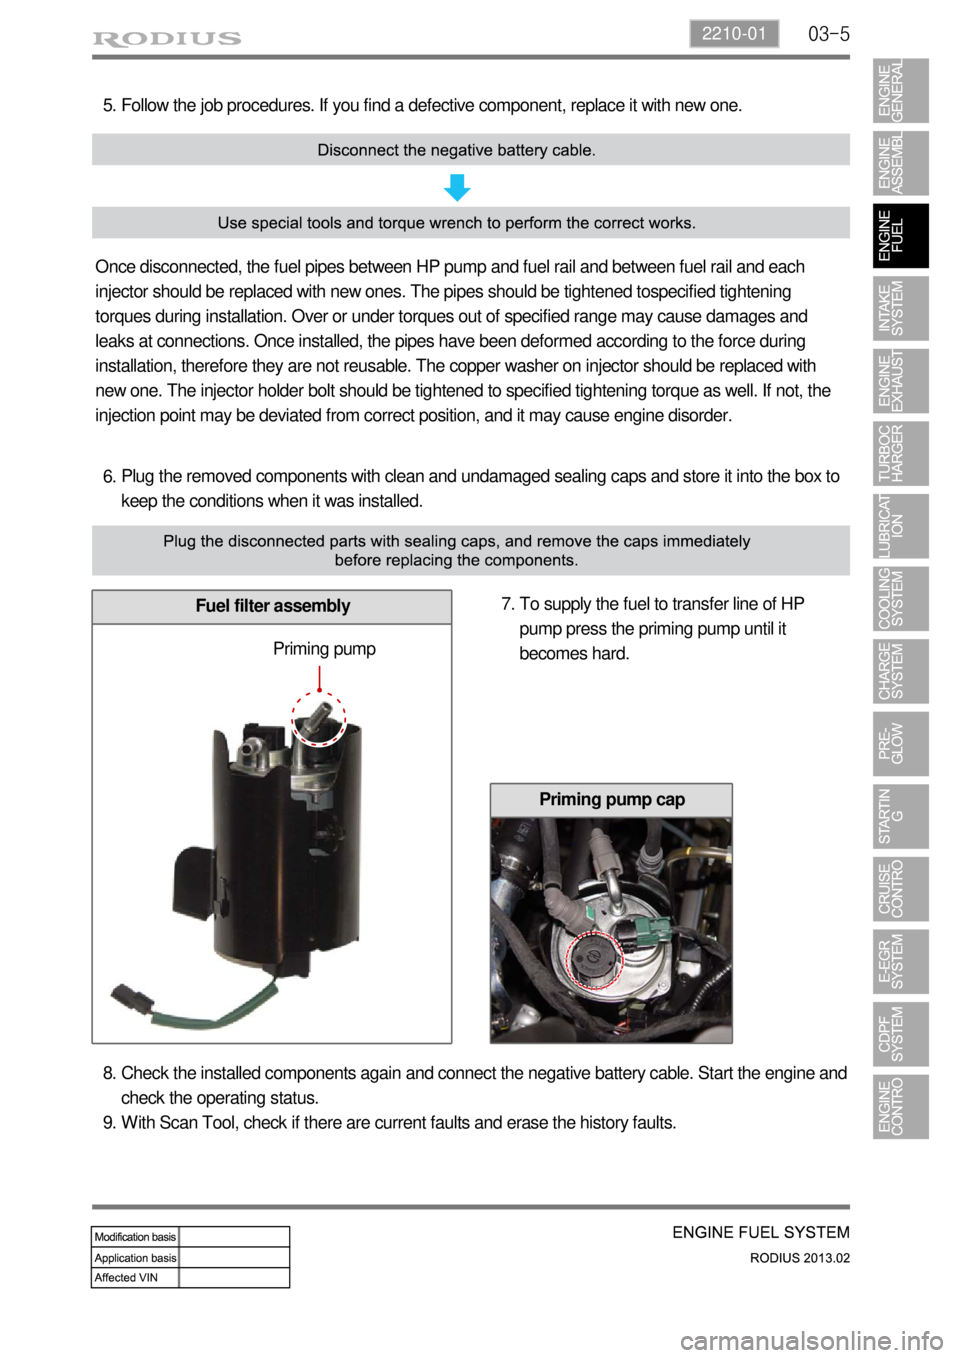
Fuel filter assembly
Follow the job procedures. If you find a defective component, replace it with new one. 5.
Once disconnected, the fuel pipes between HP pump and fuel rail and between fuel rail and each
injector should be replaced with new ones. The pipes should be tightened tospecified tightening
torques during installation. Over or under torques out of specified range may cause damages and
leaks at connections. Once installed, the pipes have been deformed according to the force during
installation, therefore they are not reusable. The copper washer on injector should be replaced with
new one. The injector holder bolt should be tightened to specified tightening torque as well. If not, the
injection point may be deviated from correct position, and it may cause engine disorder.
To supply the fuel to transfer line of HP
pump press the priming pump until it
becomes hard. 7.
Priming pump
Check the installed components again and connect the negative battery cable. Start the engine and
check the operating status.
With Scan Tool, check if there are current faults and erase the history faults. 8.
9.
Priming pump cap
Page 437 of 796
02-6
2. FUNCTIONS OF RK STICS
1) Wiper Control
(1) Wiper MIST and Washer Coupled Wiper
The wiper relay is turned on 0.3 seconds (T1) after turning “ON” the washer switch for 0.2 ~
0.59 seconds (T2) with the ignition key “ON”, and it is turned off when the parking terminal
is turned off. 1.
The wiper relay is turned on 0.3 seconds (T1) after turning “ON” the washer switch over 0.6
seconds (T2) with the ignition key “ON”, and it is turned on three times immediately after
turning off the washer switch. 2.
Page 438 of 796
02-78710-01
If the washer operating signal is inputted while the wipers are operating in intermittent or AUTO
mode, the system stores the previous intermittent interval and operates the washer coupled wiper.
After then, the wiper operation returns back to intermittent or AUTO mode with the stored operating
interval. 3.
Page 446 of 796
02-158710-01
The wiper relay continues to output when the parking terminal is fixed at the ground or IGN
while the wiper relay is “ON” (INT switch = ON or Washer switch = ON) (The output
stops immediately after turning off the switch) - (1) Wiper MIST and washer coupled wiper
When turning on the washer switch while the wiper relay is operating.
1)
If the wiper relay “ON” request time is shorter than the remained “ON” time, it is
disregarded. -
(2) Speed sensitive INT (intermittent) wiper
The wiper relay continues to output for remaining “ON” time even when the INT switch is
turned off.
IGN 2 switch “ON”, INT switch “OFF”: resume the intermittent time when turning “ON
IGN 2 switch “OFF”, INT switch “ON”: resume the intermittent time when turning “ON 1)
2)
3)
(3) Controls when the wiper motor parking is defective
Page 503 of 796
06-38510-00
1. SPECIFICATIONS
1) Center Fascia Switch
Item Specifications
Center fascia switch &
bezel assemblyHazard warning flasher switch DC 12 V 10 A(lamp load)
Windshield heated glass switch
DC 12 V 1 A(inductive load) Rear heated glass switch
ESP OFF switch
Driver/front passenger seat warmer
switch
Fog lamp switch
2) 4WD Switch & HLLD Switch & Rear Wiper Operation Switch
Item Specifications
4WD switch &
HLLD switch &
rear wiper operation
switch assemblyWasher switch DC 12 V 3.8 A(lamp load)
Wiper switch DC 12 V 3.0 A (max. 10 A)
4WD switch DC 12 V 300 mA
HLLD switch DC 12 V 1 A (inductive load)
3) Steering Wheel Switch
Item Specifications
Steering wheel switch Rated voltage DC 5 V 0.1 A(rated load)
Operation temperature-30℃~+80℃