2013 SMART FORTWO COUPE ELECTRIC DRIVE window
[x] Cancel search: windowPage 34 of 218
temporary breathing difficulty for people
with asthma or other breathing trouble. To
avoid this, you may wish to get out of the
vehicle as soon as it is safe to do so. If you
have any breathing difficulty but cannot
get out of the vehicle after the air bag
inflates, then get fresh air by opening a
window or door. G
WARNING
To reduce the risk of injury when the front
air bags inflate, it is very important for
the driver and passenger to always be in a
properly seated position and to wear their
respective seat belt.
For maximum protection in the event of a
collision always be in normal seated
position with your back against the
backrest. Fasten your seat belt and ensure
it is properly positioned on your body.
Since the air bag inflates with
considerable speed and force, a proper
seating and hands on steering wheel
position will help to keep you at a safe
distance from the air bag.
Occupants who are unbelted, out of position
or too close to the air bag can be seriously
injured or killed by an air bag as it
inflates extremely quickly and with great
force:
R Sit properly belted in a position that is
as upright as possible with your back
against the seat backrest.
R Adjust the driver’s seat as far as possible
rearward, still permitting proper
operation of vehicle controls. The
distance from the center of the driver’s
breastbone to the center of the air bag
cover on the steering wheel must be at
least 10 inches (25 cm) or more. You should
be able to accomplish this by
adjustments to the seat. If you have any
problems, please contact an authorized
electric drive smart center.
R Do not lean your head or chest close to the
steering wheel or dashboard. R
Keep hand son the outside of the steering
wheel rim. Placing hands and arms inside
the rim can increase the risk and
potential severity of hand/arm injury
when the driver’s front air bag inflates.
R Adjust the passenger seat as far as
possible rearward from the dashboard
when the seat is occupied.
R Occupants, especially children, should
never place their bodies or lean their
heads in the area of the door where the
head-thorax air bag (cabriolet) or
thorax-pelvis side air bag (coupé)
inflates. This could result in serious
injuries or death should the head-thorax
air bag (cabriolet) or thorax-pelvis side
air bag (coupé) be deployed. Always sit
as upright as possible, wear the seat belt
properly and use an appropriately sized
infant restraint, toddler restraint, or
booster seat recommended for the size
and weight of the child.
Failure to follow these instructions can
result in severe injuries to you or other
occupants.
If you sell your vehicle, it is important that
you make the buyer aware of this safety
information. Be sure to give the buyer this
Operator’s Manual.
i Air bags are designed to deploy only in
certain frontal impacts (front air bags
and knee bags), or side impacts (head-
thorax air bags, window curtain air bags
and thorax-pelvis air bags) which
exceed preset thresholds. Only during
these events will they provide their
supplemental protection.
The driver and passenger should always
wear their seat belts .Otherwise it is not
possible for air bags to provide their
supplemental protection.
In case of other types of impacts and
impacts below air bag deployment
thresholds, air bags will not deploy. The
driver and passenger will then be
protected to the extent possible by a 32
Occupant safety>> Safety.
Page 38 of 218
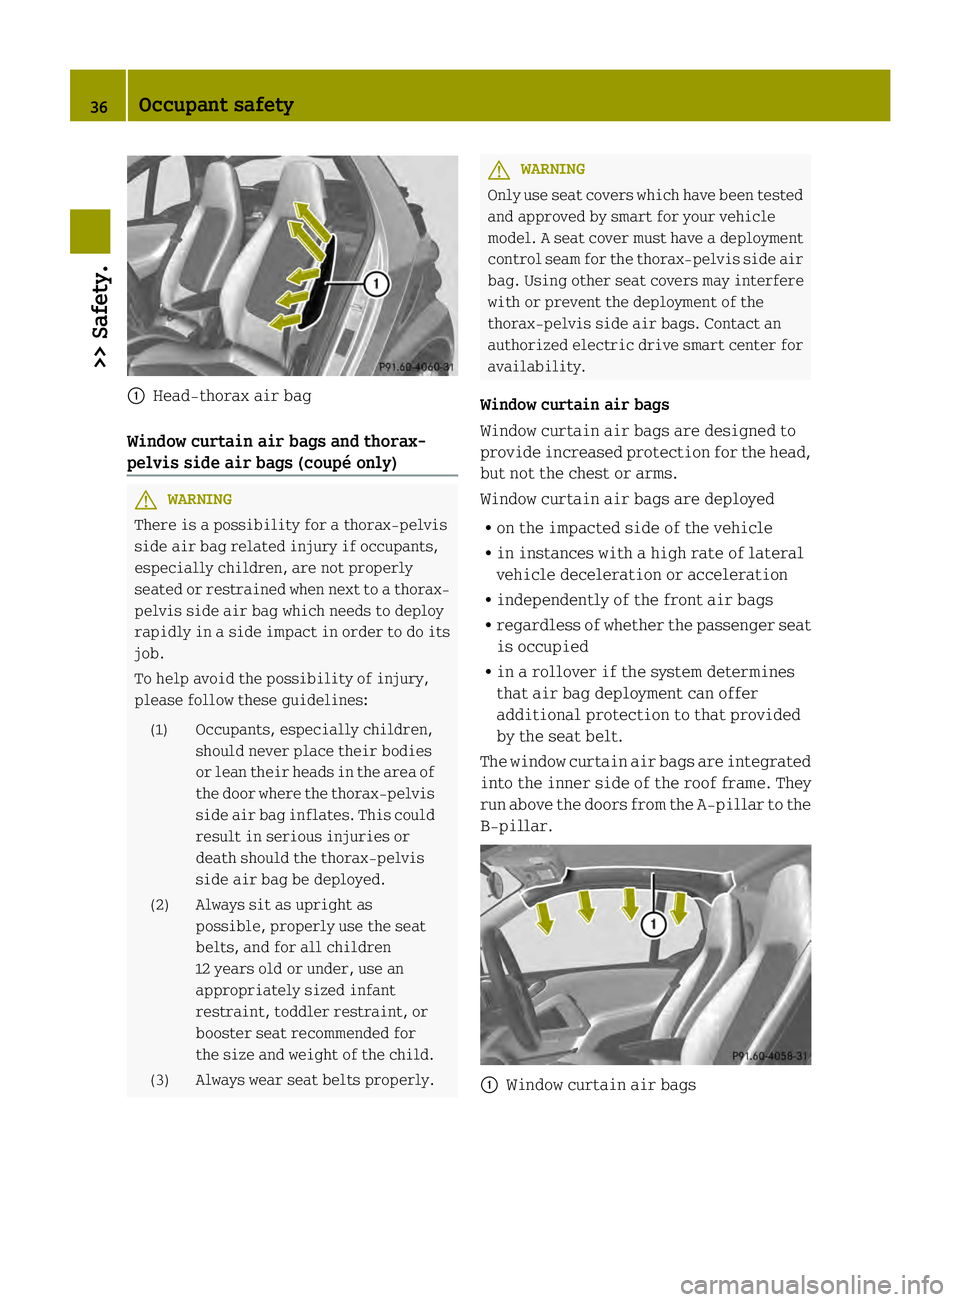
0002
Head-thorax air bag
Window curtain air bags and thorax-
pelvis side air bags (coupé only) G
WARNING
There is a possibility for a thorax-pelvis
side air bag related injury if occupants,
especially children, are not properly
seated or restraine dwhen next to a thorax-
pelvis side air bag which needs to deploy
rapidly in a side impact in order to do its
job.
To help avoid the possibility of injury,
please follow these guidelines:
(1) Occupants, especially children, should never place their bodies
or lean their heads in the area of
the door where the thorax-pelvis
side air bag inflates .This could
result in serious injuries or
death should the thorax-pelvis
side air bag be deployed.
(2) Always sit as upright as possible, properly use the seat
belts, and for all children
12 years old or under, use an
appropriately sized infant
restraint, toddler restraint, or
booster seat recommended for
the size and weight of the child.
(3) Always wear seat belts properly. G
WARNING
Only use seat covers which have been tested
and approved by smart for your vehicle
model. A seat cover must have adeployment
control seam for the thorax-pelvis side air
bag. Using other seat covers may interfere
with or prevent the deployment of the
thorax-pelvis side air bags. Contact an
authorized electric drive smart center for
availability.
Window curtain air bags
Window curtain air bags are designed to
provide increased protectio nfor the head,
but not the chest or arms.
Window curtain air bags are deployed
R on the impacted side of the vehicle
R in instances with a high rate of lateral
vehicle deceleration or acceleration
R independently of the front air bags
R regardless of whether the passenger seat
is occupied
R in a rollover if the system determines
that air bag deployment can offer
additional protection to that provided
by the seat belt.
The window curtain air bags are integrated
into the inner side of the roof frame. They
run above the doors from the A-pillar to the
B-pillar. 0002
Window curtain air bags 36
Occupant safety>> Safety.
Page 39 of 218

Thorax-pelvis side air bags
Thorax-pelvis side air bags are designed
to provide increased protection for the
thorax and pelvis, but not the arms.
Thorax-pelvis side air bags are deployed
R on the impacted side of the vehicle
R in instances with a high rate of lateral
vehicle deceleration or acceleration
R independently of the front air bags
R regardless of whether the seat belt on the
impacted side of the vehicle is in use
R independently of the ETDs.
Thorax-pelvis side air bags will generally
not deploy in a rollover.
The thorax-pelvis side air bags will
deploy, however, if the system detects
R a high rate of lateral vehicle
deceleration or acceleration, and
R that air bag deployment can offer
additional protection to that provided
by the seat belt.
The thorax-pelvis side air bags are
integrated into the driver and passenger
seat backrests. 0002
Thorax-pelvis side air bags Occupant Classification System
The Occupant Classification System (OCS)
automatically turns the passenger front air
bag on or off based on the classified
occupant weight category determined by weight sensor readings from the passenger
seat.
i
Based on the classified occupant
weight category determined by weight
sensor readings from the passenger seat,
the system does also deactivate
R head-thorax air bag (cabriolet)
R the window curtain air bag (coupé)
R the thorax-pelvis side air bag (coupé)
R the seat Emergency Tensioning
Devices
R the seat belt force limiter.
Occupants must sit properly belted in a
position that is as upright as possible with
their back against the seat backrest and
feet on the floor to be correctly classified.
If the occupant’s weight is transferred to
another object in the vehicle (e.g. by
leaning on armrests), the OCS may not be
able to properly approximate the
occupant’s weight category.
i If the seat, including the trim cover and
cushion, needs to be serviced in any way,
take the vehicle to an authorized
electric drive smart center. Only seat
accessories approved by smart may be
used.
Both driver and the passenger should
always use the 00090007indicator
lamp as an indication of whether or not
the passenger is properly positioned
(Y page 39). G
WARNING
If the 00090007indicator lamp
illuminates when an adult or someone
larger than a small individual is in the
passenger seat, have the passenger re-
position himself or herself in the seat
until the 00090007indicator lamp
goes out.
In the event of a collision, the air bag
control unit will not allow passenger front
air bag deployment when the OCS has
classified the passenger seat occupant as Occupant safety
37>> Safety.
Z
Page 43 of 218
Do not carry heavy or hard objects in the
passenger compartment unless they are
firmly secured in place.
For more information, please refer to the
“Loading and storing section”.
Unsecured or improperly positioned cargo
increases a child’s risk of injury in the
even tof
R strong braking maneuvers
R sudden changes of direction
R an accident
Infant and child restraint system We recommend all infants and children be
properly restrained at all times while the
vehicle is in operation.
The passenger lap-shoulder belt has a
special seat belt retractor for secure
fastening of child restraints.
To fasten a child restraint, follow all
mounting instructions provided by the
child restraint manufacturer. Then pull the
shoulder seat belt out completely and let it
retract. During seat belt retraction, a
ratcheting sound can be heard to indicate
that the special seat belt retractor is
activated .The seat belt is now locked. Push
down on child restraint to take up any
slack.
To deactivate, release seat belt buckle and
let seat belt retract completely. To
deactivate the special seat belt retractor
for the passenger seat, the passenger seat
must be in the most backwar dposition. The
seat belt can again be used in the usual
manner. G
WARNING
Never release the seat belt buckle while the
vehicle is in motion, since the special seat
belt retractor will be deactivated.
The use of infant or child restraints is
required by law in all 50 states, the
District of Columbia, the U.S. territories, and all Canadian provinces and
territories.
Infants and small children should be seated
in an appropriate infant or child restraint
system properly secured in accordance
with the manufacturer’s instructions for
the child restraint, that complies with U.S.
Federal Motor Vehicle Safety Standards 213
and 225 and Canadian Motor Vehicle Safety
Standards 213, 213.1 and 213.2.
A statement by the child restraint
manufacturer of compliance with these
standards can be found on the instruction
label on the restraint and in the
instruction manual provided with the
restraint.
When using any infant restraint, toddler
restraint, or booster seat be sure to
carefully read and follow all
manufacturer’s instructions for
installation and use.
Please read and observe warning labels
affixed to the inside of the vehicle and to
infant or child restraints. G
WARNING
Children 12 years old and under must be
seated and properly secured in an
appropriately sized infant restraint,
toddler restraint, or booster seat
recommended for the size and weight of the
child.
The infant or child restraint must be
properly secured with the vehicle’s seat
belt fully in accordance with the child seat
manufacturer’s instructions.
Occupants, especially children, should
never place their bodies or lean their
heads in the area of the door where the
head-thorax air bags (cabriolet), window
curtain air bags (coupé) and thorax-pelvis
air bags (coupé) inflates. This could result
in serious injuries or death should the
head-thorax air bags (cabriolet), window
curtain air bags (coupé) and thorax-pelvis
air bags (coupé) be triggered. Always sit as
upright as possible, properly use the seat Occupant safety
41>> Safety.
Z
Page 49 of 218

Anti-theft warning system*
Once the anti-theft warning system has
been armed, a visual and audible alarm is
triggered when
R someone opens a door or the tailgate
R someone enters the vehicle’s interior
R there is motion inside the vehicle
R someone attempts to raise the vehicle
The alarm will also be triggered when
unlocking and opening the driver’s door
with the key.
i The alarm will stay on, even if the
driver’s door is immediately closed. For
canceling the alarm, see (Y page 47).
Close the windows and the tailgate before
arming the alarm system. Make sure there
are no moving objects inside the vehicle. X
Arming: Lock the vehicle using the
remote control.
Warning system indicator lamp 0002
flashes rapidly. The anti-theft warning
system arms after about 25 seconds. When
the anti-theft warning system is armed,
warning system indicator lamp 0002
flashes about every three seconds.
i You can also arm the anti-theft warning
system by locking the vehicle without
using the remote control (Y page 170).
X Disarming: Unlock the vehicle using the
remote control.
The anti-theft warning system is
disarmed. Warning system indicator
lamp 0002stops flashing. Canceling the alarm X
Insert the key in the starter switch.
X Turn the key to starter switch position 1.
or
X Press button 0006or0004 on the key. Tow-away alarm* and interior motion
sensor*
Once the anti-theft warning system has
been armed, a visual and audible alarm is
triggered when someone attempts to raise
the vehicle or if motion is detected inside
the vehicle.
X Arming: Lock the vehicle using the
remote control.
The tow-away protectiona nd the interior
motion sensor are armed after about
25 seconds.
X Disarming: Unlock the vehicle using the
remote control.
The tow-away protectio nand the interior
motion sensor are disarmed.
Canceling the alarm X
Insert the key in the starter switch.
X Turn the key to starter switch position 1.
or
X Press button 0006or0004 on the key.
Switching off tow-away protection and
interior motion sensor Switch off the tow-away protectio
nand the
interior motion sensor when locking the
vehicle and
R transporting the vehicle,
R board, e.g. a ferry or auto train,
R there are people or animals in the
vehicle,
R the side windows remain open.
This prevents any false alarm. Anti-theft systems
47>> Safety.
* optional Z
Page 51 of 218
>> Controls.Openin
gand closing .......................... 50
Starter switch positions .....................55
Seats .............................................. 56
Mirrors ........................................... 58
Seat belts ........................................ 60
Lighting ......................................... 62
Windshield wipers ............................. 67
Soft top system (cabriolet only) ...........68
Side windows .................................... 73
Driving and parking .......................... 74
Transmission ................................... 77
Instrument cluster ............................. 79
Control system .................................. 81
Audio system* ................................... 91
Driving systems ................................ 93
Air conditioning with climate control ..95
Loading and storing ......................... 100
Useful feature s................................ 105
Page 61 of 218
good view of the road and traffic
conditions.
Exterior rear view mirrors
G
WARNING
Exercise care when using the passenger-
side exterior rear view mirror. The mirror
surface is convex (outwardly curved surface
for a wider field of view). Objects in mirror
are closer than they appear. Check your
interior rear view mirror and glance over
your shoulder to determine whether any
vehicles are in the ’blind spot’ of your field
of vision, before changing lanes.
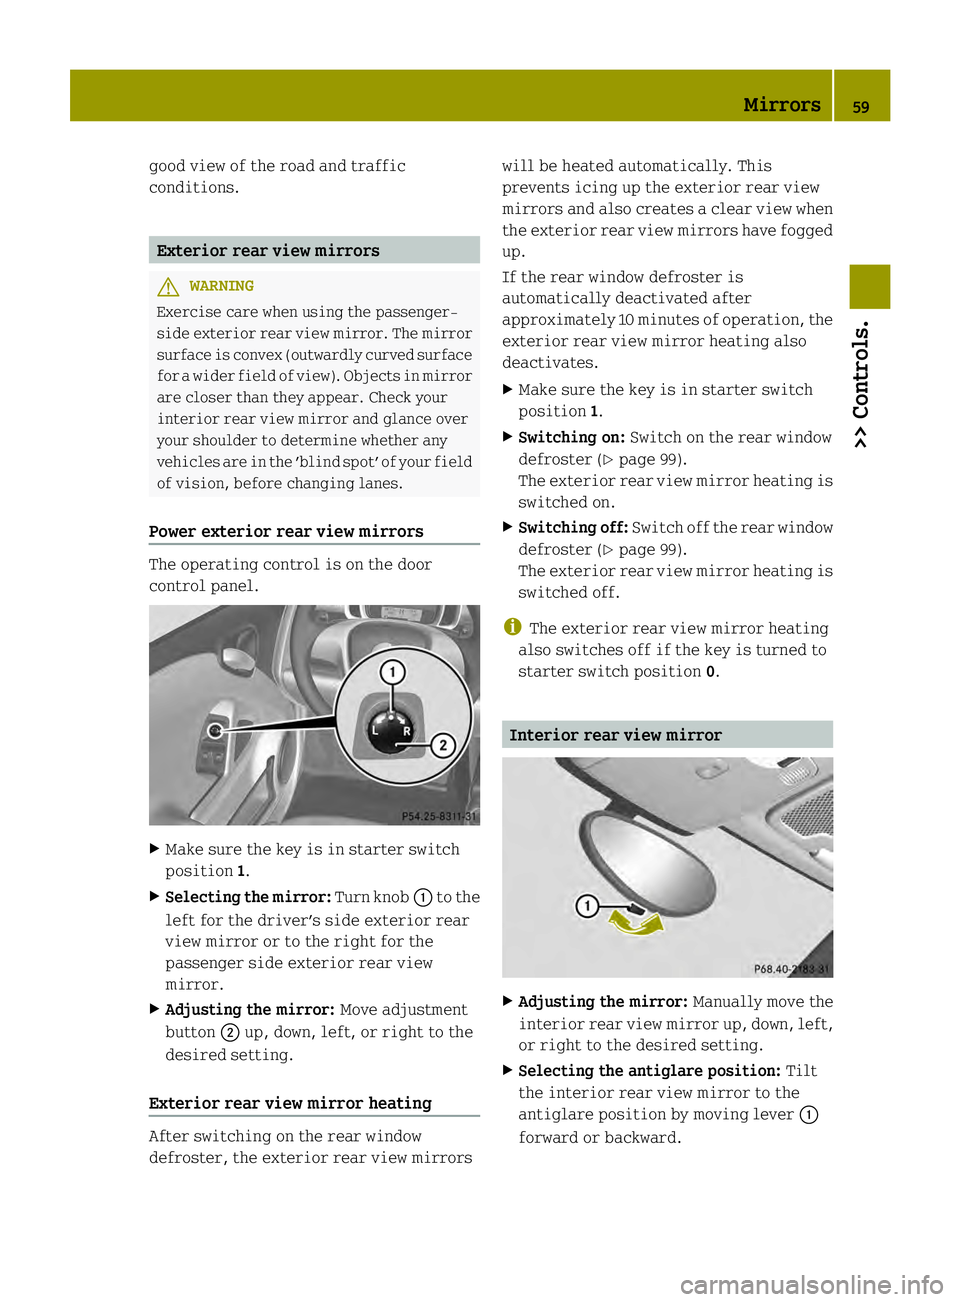
Power exterior rear view mirrors The operating control is on the door
control panel.
X
Make sure the key is in starter switch
position 1.
X Selecting the mirror: Turn knob0002to the
left for the driver’s side exterior rear
view mirror or to the right for the
passenger side exterior rear view
mirror.
X Adjusting the mirror: Move adjustment
button 0003up, down, left, or right to the
desired setting.
Exterior rear view mirror heating After switching on the rear window
defroster, the exterior rear view mirrors will be heated automatically. This
prevents icing up the exterior rear view
mirrors and also creates a clear view when
the exterior rear view mirrors have fogged
up.
If the rear window defroster is
automatically deactivated after
approximately 10 minutes of operation, the
exterior rear view mirror heating also
deactivates.
X
Make sure the key is in starter switch
position 1.
X Switching on: Switch on the rear window
defroster (Y page 99).
The exterior rear view mirror heating is
switched on.
X Switching off: Switch off the rear window
defroster (Y page 99).
The exterior rear view mirror heating is
switched off.
i The exterior rear view mirror heating
also switches off if the key is turned to
starter switch position 0. Interior rear view mirror
X
Adjusting the mirror: Manually move the
interior rear view mirror up, down, left,
or right to the desired setting.
X Selecting the antiglare position: Tilt
the interior rear view mirror to the
antiglare position by moving lever 0002
forward or backward. Mirrors
59>> Controls. Z
Page 70 of 218
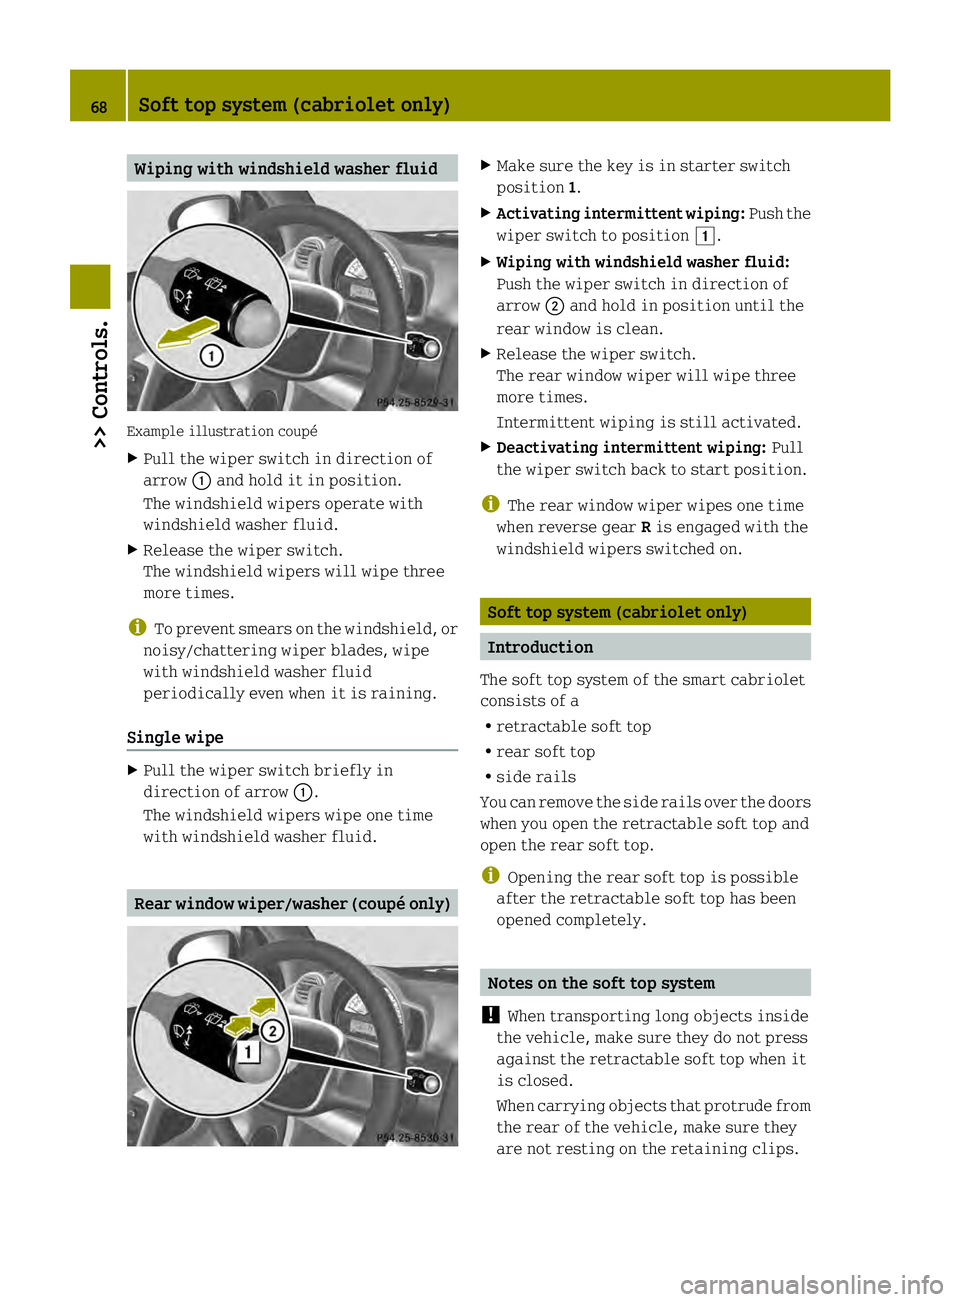
Wiping with windshield washer fluid
Example illustration coupé
X
Pull the wiper switch in direction of
arrow 0002and hold it in position.
The windshield wipers operate with
windshield washer fluid.
X Release the wiper switch.
The windshield wipers will wipe three
more times.
i To prevent smears on the windshield, or
noisy/chattering wiper blades, wipe
with windshield washer fluid
periodically even when it is raining.
Single wipe X
Pull the wiper switch briefly in
direction of arrow 0002.
The windshield wipers wipe one time
with windshield washer fluid. Rear window wiper/washer (coup
éonly) X
Make sure the key is in starter switch
position 1.
X Activating intermittent wiping: Pushthe
wiper switch to position 0004.
X Wiping with windshield washer fluid:
Push the wiper switch in direction of
arrow 0003and hold in position until the
rear window is clean.
X Release the wiper switch.
The rear window wiper will wipe three
more times.
Intermittent wiping is still activated.
X Deactivating intermittent wiping: Pull
the wiper switch back to start position.
i The rear window wiper wipes one time
when reverse gear Ris engaged with the
windshield wipers switched on. Soft top system (cabriolet only)
Introduction
The soft top system of the smart cabriolet
consists of a
R retractable soft top
R rear soft top
R side rails
You can remove the side rails over the doors
when you open the retractable soft top and
open the rear soft top.
i Opening the rear soft top is possible
after the retractable soft top has been
opened completely. Notes on the soft top system
! When transporting long objects inside
the vehicle, make sure they do not press
against the retractable soft top when it
is closed.
When carrying objects that protrude from
the rear of the vehicle, make sure they
are not resting on the retaining clips. 68
Soft top system (cabriolet only)>> Controls.