2013 SMART FORTWO COUPE ELECTRIC DRIVE air condition
[x] Cancel search: air conditionPage 98 of 218
the vehicle's cooling fan are switched on
automatically. This cools the high‑voltage
battery but not the vehicle's interior .When
the high‑voltage battery reaches the
nominal temperature again, the air
conditioner switches off automatically.
i The range of the vehicle is decreased
when the air conditioner is switched on.
i In warmer weather, ventilate the
passenger compartment for a short
period of time before utilizing the air
conditioning.
Further information on the "Air
conditioning before start" function can be
found on (Y page 86).96
Air conditioning with climate control>> Controls.
Page 99 of 218
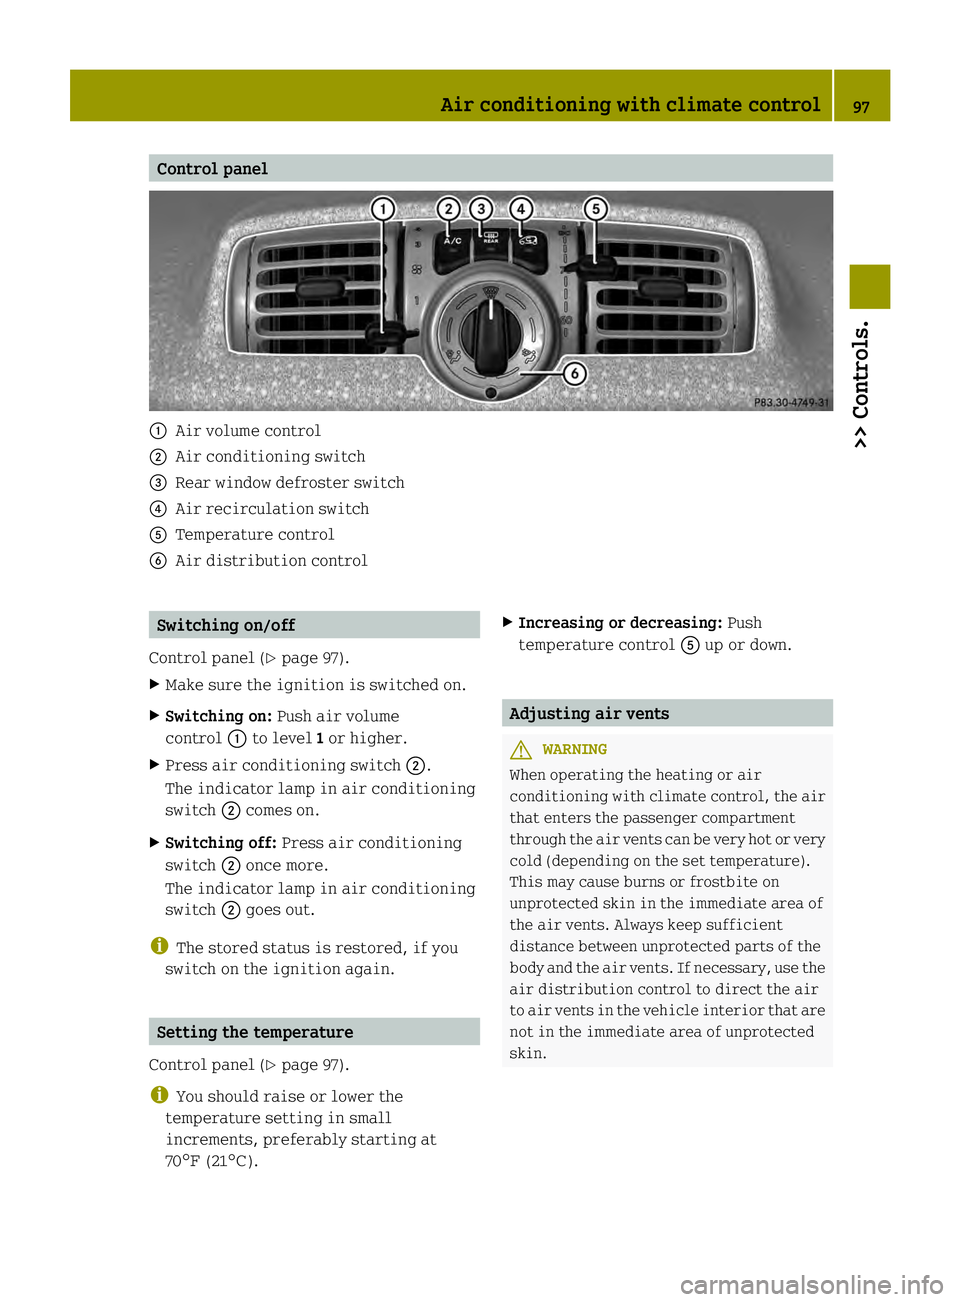
Control panel
0002
Air volume control
0003 Air conditioning switch
002B Rear window defroster switch
002A Air recirculation switch
0028 Temperature control
0029 Air distribution control Switching on/off
Control panel (Y page 97).
X Make sure the ignition is switched on.
X Switching on: Push air volume
control 0002to level 1or higher.
X Press air conditioning switch 0003.
The indicator lamp in air conditioning
switch 0003comes on.
X Switching off: Press air conditioning
switch 0003once more.
The indicator lamp in air conditioning
switch 0003goes out.
i The stored status is restored, if you
switch on the ignition again. Setting the temperature
Control panel (Y page 97).
i You should raise or lower the
temperature setting in small
increments, preferably starting at
70¦ (21¥). X
Increasing or decreasing: Push
temperature control 0028up or down. Adjusting air vents
G
WARNING
When operating the heating or air
conditioning with climat econtrol, the air
that enters the passenger compartment
through the air vents can be very hot or very
cold (depending on the set temperature).
This may cause burns or frostbite on
unprotected skin in the immediate area of
the air vents. Always keep sufficient
distance between unprotected parts of the
body and the air vents. If necessary, use the
air distribution control to direct the air
to air vents in the vehicle interior that are
not in the immediate area of unprotected
skin. Air conditioning with climate control
97>> Controls. Z
Page 100 of 218
To make sure the heating or air
conditioning with climate control works
properly, please observe the following:
R Keep the air intake grill free from
deposits, e.g. ice or snow, to ensure that
fresh air can flow freely into the vehicle
interior.
R Do not obstruct air vents or ventilation
grilles in the vehicle interior.
i For draft-free ventilation, move the
sliders for the center air vents and side
air vents to the middle position.
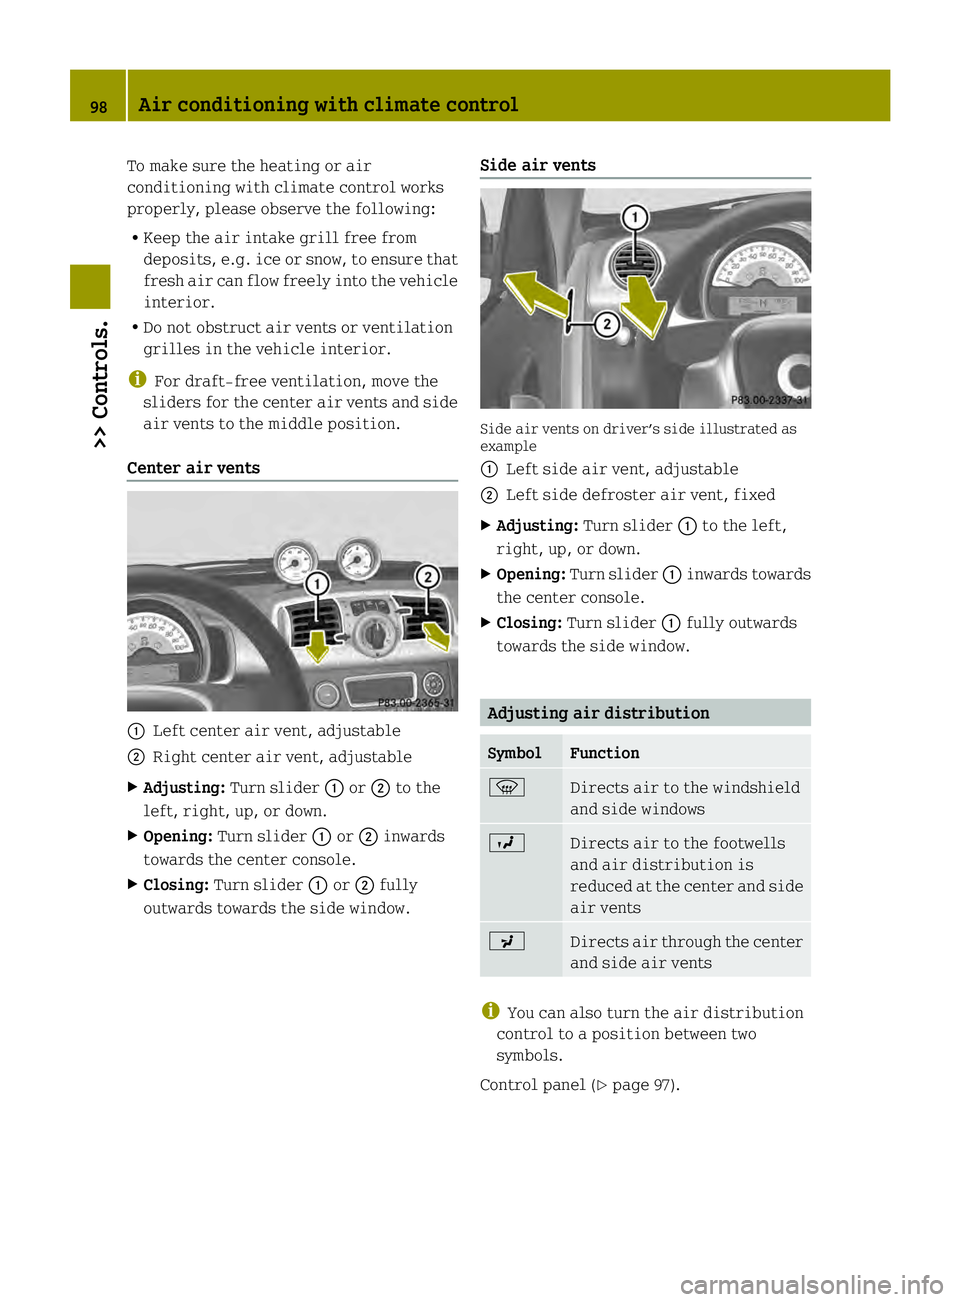
Center air vents 0002
Left center air vent, adjustable
0003 Right center air vent, adjustable
X Adjusting: Turn slider 0002or0003 to the
left, right, up, or down.
X Opening: Turn slider 0002or0003 inwards
towards the center console.
X Closing: Turn slider 0002or0003 fully
outwards towards the side window. Side air vents Side air vents on driver’s side illustrated as
example
0002
Left side air vent, adjustable
0003 Left side defroster air vent, fixed
X Adjusting: Turn slider 0002to the left,
right, up, or down.
X Opening: Turn slider 0002inwards towards
the center console.
X Closing: Turn slider 0002fully outwards
towards the side window. Adjusting air distribution
Symbol Function
0006
Directs air to the windshield
and side windows
0007
Directs air to the footwells
and air distribution is
reduced at the center and side
air vents
0008
Directs air through the center
and side air vents
i
You can also turn the air distribution
control to a position between two
symbols.
Control panel (Y page 97).98
Air conditioning with climate control>> Controls.
Page 101 of 218
X
Turn air distribution control 0029to the
desired symbol.
The air distribution is controlled
depending on the position of the air
distribution control. Adjusting air volume
The air volume is controlled depending on
the blower speed selected. Five blower
speeds are available. 0
Off
1
Slow
2
Medium
3
High/defrosting
4
Maximum
X
Increasing or decreasing: Push air
volume control 0002up or down. Defrosting
G
WARNING
Never drive with iced up or fogged
windows. Visibility will be significantly
impaired. Impaired visibility could
endanger yourself and others. This may
prevent you from observing the traffic
conditions, thereby causing an accident.
The best defrosting of windows is achieved
if the ice is completely removed from the
windows manually with an ice scraper
before driving off.
Also use the "Air conditioning before
start" function (Y page 86).
Control panel (Y page 97). X
Switching on: Push air volume
control 0002to level 3.
X Turn air distribution control 0029to
position 0006.
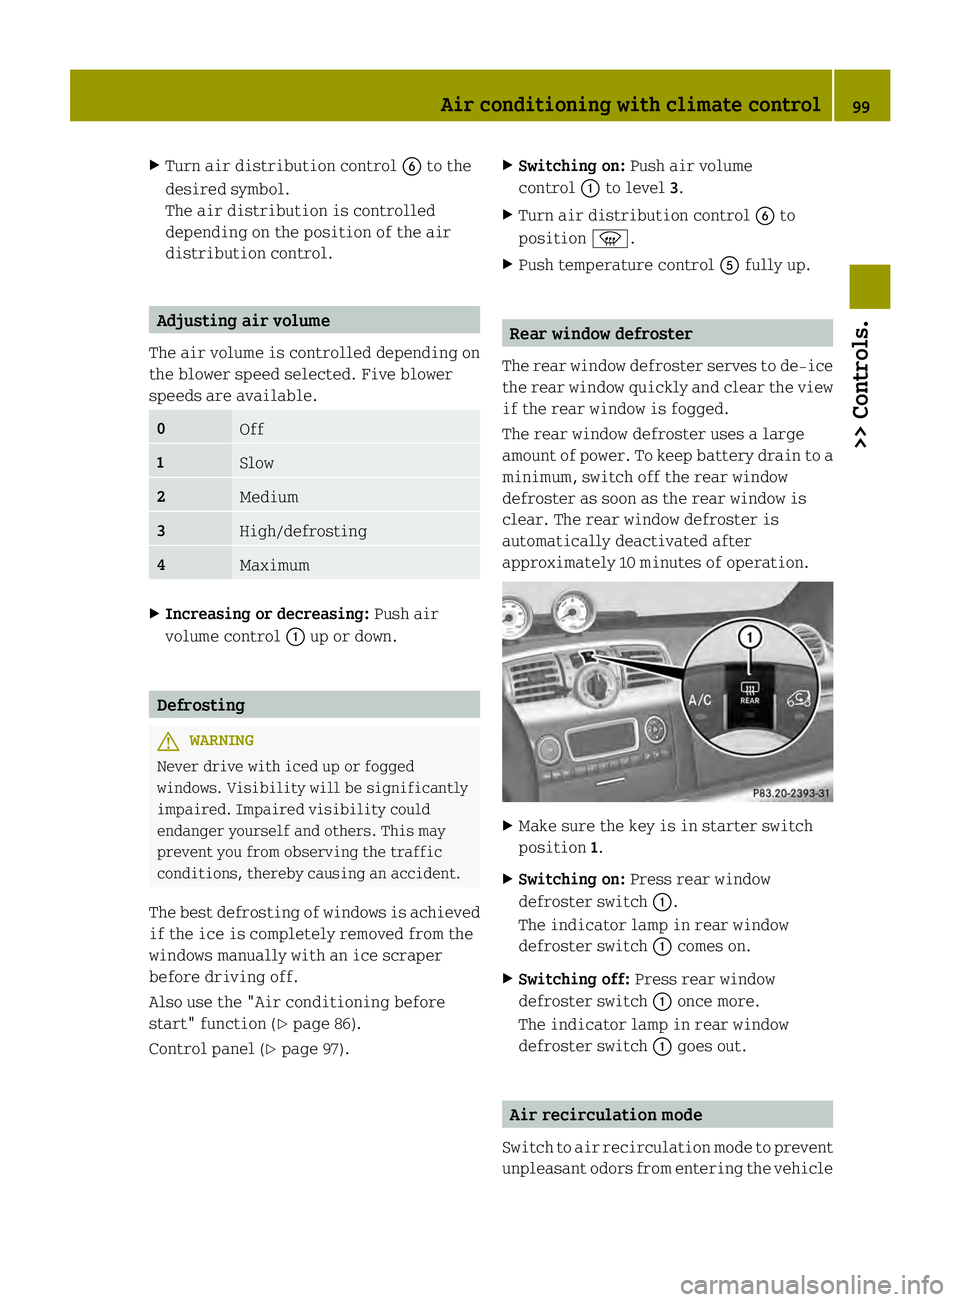
X Push temperature control 0028fully up. Rear window defroster
The rear window defroster serves to de-ice
the rear window quickly and clear the view
if the rear window is fogged.
The rear window defroster uses a large
amount of power. To keep battery drain to a
minimum, switch off the rear window
defroster as soon as the rear window is
clear. The rear window defroster is
automatically deactivated after
approximately 10 minutes of operation. X
Make sure the key is in starter switch
position 1.
X Switching on: Press rear window
defroster switch 0002.
The indicator lamp in rear window
defroster switch 0002comes on.
X Switching off: Press rear window
defroster switch 0002once more.
The indicator lamp in rear window
defroster switch 0002goes out. Air recirculation mode
Switch to air recirculation mode to prevent
unpleasant odors from entering the vehicle Air conditioning with climate control
99>> Controls. Z
Page 102 of 218
from the outside (e.g. before driving
through a tunnel). This setting cuts off the
intake of outside air and recirculates the
air in the passenger compartment.
G
WARNING
When the air recirculation mode is
switched on, windows can fog on the inside
immediately. Fogged windows impair
visibility, endangering you and others. If
the windows begin to fog on the inside,
switching off the air recirculation mode
immediately should clear interior window
fogging. If interior window fogging
persists,m ake sure the air conditionin gis
switched on, turn air distribution control
0029 to position 0006and increase the air
volume using air volume control 0002.
Control panel (Y page 97).
X Switching on: Press air recirculation
switch 002A.
The indicator lamp in air recirculation
switch 002Acomes on.
X Switching off: Press air recirculation
switch 002Aonce more.
The indicator lamp in air recirculation
switch 002Agoes out. Loading and storing
Cargo compartment cover blind with
parcel net bag
G
WARNING
The cargo compartment cover blind is not
intended to secure heavy objects in the
event of an accident. For this reason, heavy
objects must be tied down.
Vehicle occupants could be injured by
objects being thrown around in the vehicle
in the event of
R hard braking
R a change of direction
R an accident G
WARNING
Do not place any objects on the mounted
cargo compartment cover blind.
Vehicle occupants could be injured by
objects being thrown around in the vehicle
in the event of
R hard braking
R a change of direction
R an accident G
WARNING
Only place light loads in the parcel net
bag. Do not transport heavy ,sharp-edged or
fragile objects in the parcel net bag. The
parcel net bag cannot sufficiently secure
loads in an accident.
Vehicle occupants could be injured by
objects being thrown around in the vehicle
in the event of
R hard braking
R a change of direction
R an accident
Observe the loading guidelines.
The cargo compartment cover blind
R serves to protect objects that are stored
in the vehicle’s cargo compartment from
prying eyes
R prevents smaller objects from
penetrating into the passenger
compartment from the cargo
compartment; however, it is not intended
to act as a load restraining device
The parcel net bag
R is for storing small, lightweight objects
R prevents small objects from sliding
around inside the passenger
compartment
! If objects are placed on the cargo
compartment cover blind when mounted,
the cover may be damaged. 100
Loading and storing>> Controls.
Page 113 of 218
"Vehicle Homepage". For this reason, make
sure than no unauthorized persons have
access to your personal area.
After selling the vehicle, you are required
to delete the vehicle from your personal
area on the "Vehicle Homepage". You must
also destroy the vehicle verification code
(VVC) documents.
If you have bought a pre-owned vehicle, it
may be possible that the previous owner
still has access to the "Vehicle Homepage".
For this reason, have a new vehicle
verification code (VVC) reissued to you at
an authorized electric drive smart center
after purchase. With this new code you can
set up the access to your vehicle as
described in the "Personal area setup"
section. Here you can also deactivate the
previous owner's access ,should it still be
active.
Calling up the functions of the "Vehicle
Homepage" If the vehicle is registered in your
personal area of the "Vehicle Homepage",
you can, for example, access the following
functions:
R call up the current charge level
R program the departure time
R activate the "Air conditioning before
start" function
When the vehicle is being charged, you can
call up the estimated charging time and the
attainable range. Both results are
estimated values because, for example,
they are influenced by the following
factors:
R outside temperature
R active electrical consumers, e.g. air
conditioning, lights
R personal driving style
R traffic conditions
Plan for a sufficient reserve accordingly. Connecting the vehicle to the Internet
via powerline If you wish to use the "Vehicle Homepage"
at home, your vehicle must be able to access
the Internet
.This is possible via your DSL
router, for example. This connection is
established by means of the inserted
charging cable using powerline
technology.
The vehicle supports powerline
communicatio naccording to the "HomePlug
AV" standard. Data is transmitted via phase
L1 and the neutral conductor of the power
line.
In order for the vehicle to access the
Internet, you require a commercially
available adapter of the "HomePlug AV"
standard. This adapter must also have an
encryption button so that it can be
configured to communicate with the
vehicle. Connect the adapter to the power
supply as well as your Internet connection.
If the adapter is connected to different
phase than L1, a phase coupler must be
additionally installed. Only in this way
can stable communication be guaranteed.
For questions, consult a qualified
electrician.
i If you already have a powerline network
installed, the vehicle can be integrated
into it.
To establish a connection between the
vehicle and a powerline adapter, carry out
the following:
X Connect the vehicle to a power socket or
a wallbox.
The right 0004indicator lamp on the
vehicle socket must flash green.
X Insert the powerline adapter into a
neighboring power socket. Observe that
the vehicle and the adapter are
connected via phase L1.
X Switch on the ignition.
X Call up the Charge current menu on the
control system (Y page 88). High-voltage battery
111>> Operation. Z
Page 125 of 218
Do not underinflate tires. Underinflated
tires wear excessively and/or unevenly,
adversely affec thandling and energy
consumption of the vehicle, and are more
likely to fail from being overheated.
Do not overinflate tires. Overinflated
tires can adversely affect handling and
ride comfort, wear unevenly, increase
stopping distance, and result in sudden
deflation (blowout) because they are more
likely to become punctured or damaged by
road debris, potholes etc.
Do not overload the tires by exceeding the
specified load limit as indicated on the
Tire and Loading Information placard on
the driver’s door B‑pillar. Overloading the
tires can overheat them, possibly causing
a blowout. Overloading the tires can also
result in handlin gor steering problems, or
brake failure.
Your vehicle is equipped with the Tire and
Loading Information placard located on
the driver’s door B‑pillar (Y page 128).
The tire inflation pressure should be
checked regularly. Only adjust the tire
inflation pressure on cold tires. The tires
can be considered cold if the vehicle has
been parked for at least 3 hours or driven
less than 1 mile (1.6 km). Depending on the
ambient temperature, the driving speed
and the tire load, the tire temperature
changes. When the tire temperature
changes by 18¦ (10¥), the tire inflation
pressure will change by approximately
10 kpa (0.1 bar, 1.5 psi). Keep this in mind
when checking tire inflation pressure on
warm tires and adjust the tire pressure
only if the tire inflation pressure is too
low for the current operating conditions.
If you check the tire inflation pressure
when the tires are warm, the reading will
be higher than the cold reading. This is
normal. Do not let air out to match the
specified cold tire inflation pressure.
Otherwise, the tire will be underinflated. Follow recommended cold tire inflation
pressures listed on Tire and Loading
Information placard on the driver’s door
B‑pillar.
Keeping the tires properly inflated
provides the best handling, tread life and
riding comfort.
In addition to the Tire and Loading
Information placard on the driver’s door
B‑pillar, also consult the tire inflation
pressure label (if available) on the inside
of the filler flap for any additional
information pertaining to special driving
situations. For more information, see
“Important notes on tire inflation
pressure” (Y
page 124).
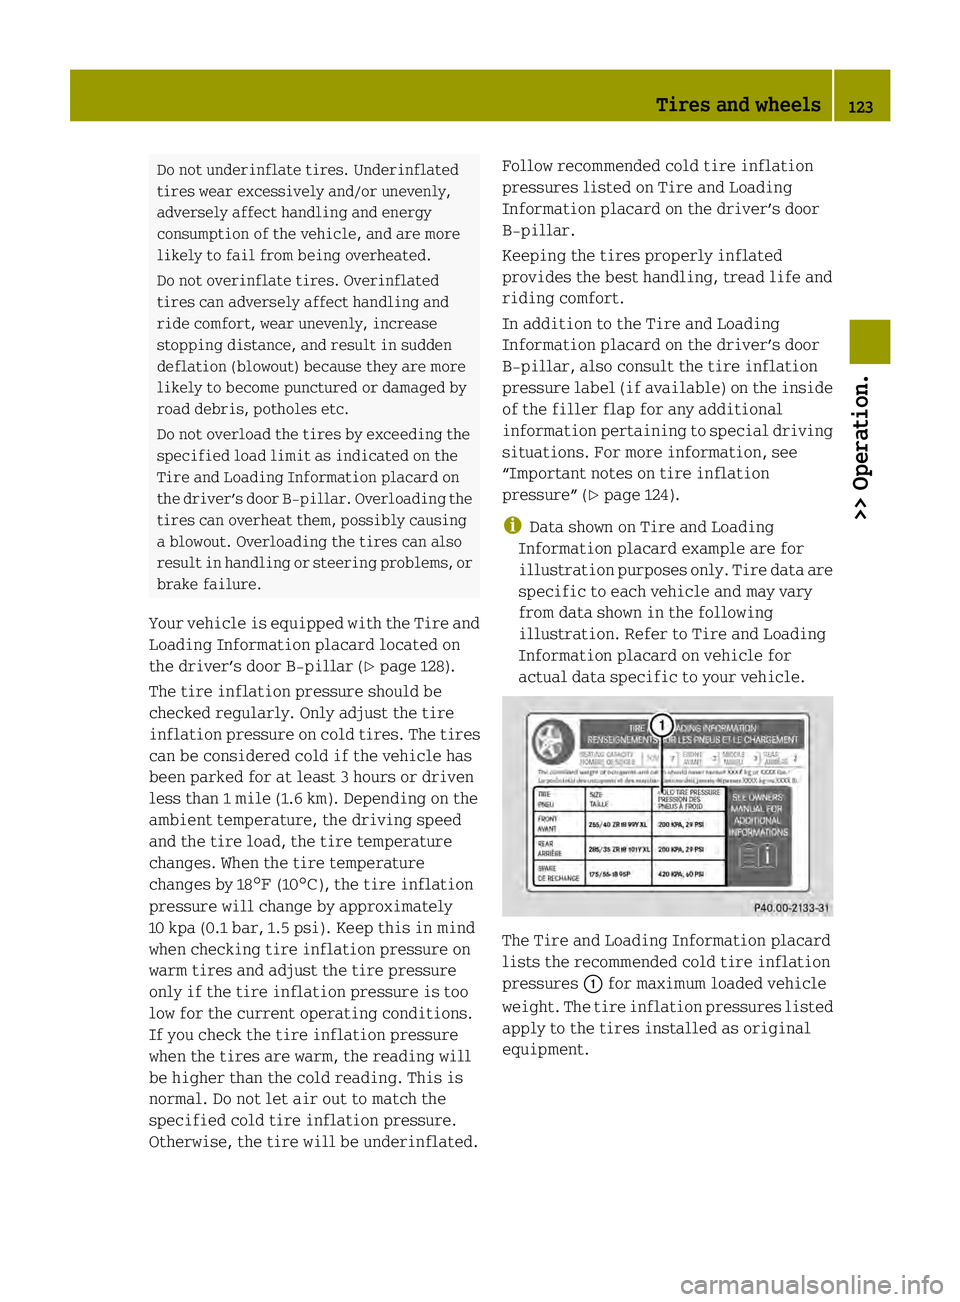
i Data shown on Tire and Loading
Information placard example are for
illustration purposes only. Tire data are
specific to each vehicle and may vary
from data shown in the following
illustration. Refer to Tire and Loading
Information placard on vehicle for
actual data specific to your vehicle. The Tire and Loading Information placard
lists the recommended cold tire inflation
pressures
0002for maximum loaded vehicle
weight. The tire inflation pressures listed
apply to the tires installed as original
equipment. Tires and wheels
123>> Operation. Z
Page 127 of 218

Checking tire inflation pressure
manually
Follow the steps below to achieve correct
tire inflation pressure:
X Remove the cap from the valve on one tire.
X Firmly press a tire gauge onto the valve.
X Read the tire inflation pressure on tire
gauge and check against the
recommended tire inflation pressure on
the Tire and Loading Information
placard on the driver’s door B‑pillar
(Y page 128). If necessary, add air to
achieve the recommended tire inflation
pressure.
X If you have overfilled the tire, release
tire inflation pressure by pushing the
metal stem of the valve with e.g. a tip of
a pen. Then recheck the tire inflation
pressure with the tire gauge.
X Install the valve cap.
X Repeat this procedure for each tire.
Tire Pressure Monitoring System
(TPMS)* Your vehicle may be equipped with a
Tire
Pressure Monitoring System (TPMS).
It monitors the tire inflation pressure in
all four tires .Awarning is issued to alert
you to a decrease in pressure in one or more
of the tires.
The Tire Pressure Monitoring System
(TPMS) is equipped with a combination low
tire pressure/TPMS malfunction telltale in
the instrument cluster. Depending on how
the telltale illuminates, it indicates a low
tire pressure condition or a malfunction in
the TPMS system itself:
R If the telltale illuminates continuously,
one or more of your tires is significantly
underinflated. There is no malfunction
in the TPMS.
R If the telltale flashes for 60 seconds and
then stays illuminated, the TPMS system
itself is not operating properly. The TPMS only functions on wheels that are
equipped with the proper electronic
sensors. G
WARNING
The TPMS does not indicate a warning for
wrongly selected inflation pressures.
Always adjust tire inflation pressure
according to the Tire and Loading
Information placard on the driver’s door
B‑pillar.
The TPMS is not able to issue a warning due
to a sudden dramatic loss of pressure (e.g.
tire blowout caused by a foreign object). In
this case bring the vehicle to a halt by
carefully applying the brakes and avoiding
abrupt steering maneuvers. G
WARNING
Each tire should be checked monthly when
cold and inflated to the inflation pressure
recommended by the vehicle manufacturer
on the Tire and Loading Information
placard. If your vehicle has tires of a
different size than the size indicated on
the Tire and Loading Information placard,
you should determine the proper tire
inflation pressure for those tires.
As an added safety feature, your vehicle has
been equipped with a tire pressure
monitoring system (TPMS) that illuminates
a low tire pressure telltale when one or
more of your tires is significantly
underinflated.
Accordingly, when the low tire pressure
telltale illuminates, you should stop and
check your tires as soon as possible, and
inflate them to the proper pressure.
Driving on a significantly underinflated
tire causes the tire to overheat and can lead
to tire failure.
Underinflation also increases energy
consumption, reduces tire tread life, and
may affect the vehicle’s handling and
stopping ability. Please note that the TPMS
is not a substitute for proper tire
maintenance, and it is the driver’s Tires and wheels
125>> Operation.
* optional Z